I will show you a few ways to Format, Backup (Clone) and Restore a SD card for the Reaspberry Pi.
Format Raspberry Pi SD card
Simplest way to format your card is in Windows 7, open “Computer”, right click your SD card, and click “Format”. Note that In Windows if it only shows 56MB (even after using SD formatter), you can try this official tool from the SD card organisation which should format any SD card.
Backup SD card (Raspberry Pi OS on it)
There are a few software in Windows you can use to do this.
- Win32Diskimager (most common)
- DiskImage_1_6
Here is how you can use Win32Diskimager.
Table of Contents
Step 1:
Insert your SD card into the card reader and wait until Windows finds it. It appears as E: Drive in my example.
Startup “Win32DiskImager”. Notice you will need to select which drive is your SD card, then click the NAVIGATE icon just next to the E: pulldown box, this will open a file-explorer window.
Step 2:
Now select a folder on your hard-drive where you want to save the image file of your SD card. In my example, i have a folder named “rpi_backups”. Also type in a filename of the image you’re about to create, and click Save to proceed.
Note: It’s useful to include the size of the SD card in the filename, which is handy later on when you have odd sized SD cards that may require partition-resizing after being restored.
Step 3:
Confirm the file path is correct, and click Read button to start copying your SD card into the image file.
Step 4:
Here’s my image file being written, which is take a while.
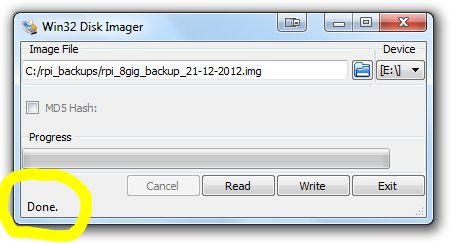
Step 5:
And done!
Sometimes Win32Diskimager would intermittently see the card, probably because Win32DiskImager cannot handle non-windows (i.e. Linux) partitions, and doesn’t try to remove these before trying to put an image onto the SD-card. Which may lead to problems with the program, or an invalid card image. You can try using a Live linux CD with GPparted (partition editor) to remove any and all partitions on the card before running Win32DiskImager. (Information from here)
Clone and Restore Raspberry Pi SD card (Copy existing Raspberry Pi OS on another SD card)
Note that you can only take your cloned image (backed up image) and put it on the same sized OR BIGGER card. I haven’t come across a solution to the opposite yet.
I know there are two options, use dd on Unix/Linux, or Win32DiskImager on Windows. These tools can backup and restore RPi SD card.
Just connect your SD card to your Windows PC, fire up Win32DiskImager, select your SD card device, specify a file name (eg. “MyImage.img”) and click on Read – the file you create will be your “image”.
The image will be an exact copy of whatever is on your SD card, so assuming you already have a working Pi setup exactly as you want it, this method will allow you to create a clone of your working system by reading “MyImage.img” and writing it to a new SD card. But do beware the .img file will be the same size as your SD card – so if its a 16Gb card, you’ll end up with a 16Gb .img file – takes a long time and takes up a lot of space. This is a good reason for NOT using oversized SD cards to be honest.
Or you can try the methods described on this thread, where you can clone SD card right on your Pi.


6 comments
I have just followed your instructions on updating an SD card for the PI 2. The new card works perfectly on my old PI B. It will not load at all beyond the start screen on the PI 2. I understand that I require to add the following lines
sudo nano /boot/config.txt
add
boot_delay = 1
sudo nano /boot/cmline. txt
add
cgroup_enable = memory (before elevator = deadline)
In order to over come this problem and remove load error on the PI set up relating to cgroups.
However I have been unable to archive this.
Please can you advise me further as to how best to archive this and over come my orginal problem.
Many thanks
sorry i don’t have the pi2 so cannot replicate your problem, hope you find a solution soon.
I can’t download the tool you used, please help
Hello,
Wishes for the day.
I have used * GB sd card ofr Raspberry Pi os and it suclly installed.
But now am unable to format it.
Even i have used SD formatter.
But when i formatted it showing only 1.30 GB out of 8GB.
Please suggest how to format my sd card commpletely.
Regards
i have a similar problem, try to google “expand raspberry Pi SD card”, you can expand the size to full capacity.
Win32 diskmanager won`t work, have tried XP, Win7 and vista.
I am about to try DiskImage_1_6, if I try to copy the image from my SD card to a folder on my hard drive Diskimage says ( all data will be destroyed on drive Yes or No), will this actually wipe my harddrive if i press YES.
Thanks.