
An FPV camera is a key component in FPV drone systems, capturing real-time video that’s transmitted to the pilot’s goggles or monitor. These small and lightweight cameras boast ultra-low latency, wide dynamic range, and provide vital visual information for FPV drone pilots to navigate and perform maneuvers. With advancing technology, some of the latest FPV cameras now offer onboard recording with image quality rivalling that of action cameras, such as the DJI O3. In this guide, we’ll discuss the key factors to consider when selecting the best FPV camera for FPV drones.


Table of Contents
Analog vs Digital FPV Systems

FPV systems fall into two categories: analog and digital.
Analog FPV cameras aren’t compatible with digital FPV systems, and vice versa. Currently, there are three digital FPV systems: DJI, Walksnail, and HDZero. Cameras designed for a specific digital FPV system aren’t compatible with other digital FPV systems.
If you’re unsure which FPV system to choose, take a look at the pros and cons of each system in my review: https://oscarliang.com/fpv-system/
FPV Camera Recommendations
Below are my top FPV camera recommendations for each FPV system.
DJI
DJI O4 Pro Air Unit
Best Camera for DJI

The latest DJI O4 is arguably the best camera for the DJI FPV system. It’s better than its predecessor, the DJI O3, in every aspect: image quality, clarity, low-light performance, and dynamic range.
You can learn more about the O4 Pro in my review: https://oscarliang.com/dji-o4-air-unit-pro/
Get your DJI O4 Air Unit from these vendors:
AliExpress: https://s.click.aliexpress.com/e/_ooZCvq5
GetFPV: https://oscarliang.com/product-6ugi
RDQ: https://oscarliang.com/product-22l1
Amazon: https://amzn.to/3Cb5xjh
FPV24 (EU): https://oscarliang.com/product-zklr
DJI O4 Air Unit (Lite)
Smallest DJI Camera
The DJI O4 (Lite) is exceptionally small and lightweight. While its image quality and field of view don’t quite match the O4 Pro—or even the O3—it’s ideal for micro FPV drones.
You can learn more about this camera in my review: https://oscarliang.com/dji-o4-air-unit-lite/
Get your DJI O4 Air Unit from these vendors:
AliExpress: https://s.click.aliexpress.com/e/_ooZCvq5
GetFPV: https://oscarliang.com/product-gc8l
RDQ: https://oscarliang.com/product-kjl2
Amazon: https://amzn.to/4gQc2HE
FPV24 (EU): https://oscarliang.com/product-pqry
DJI O3 Air Unit
Retiring, but Reliable Option
The DJI O3 Air Unit is now overshadowed by the new DJI O4 Pro, which offers superior performance across the board. At the same price, it no longer makes sense to buy a brand-new O3 when the O4 Pro delivers a better overall experience. However, the O3 has proven itself as solid and reliable camera over the years and will continue to serve well it in your fleet.
You can learn more about this camera in my review: https://oscarliang.com/dji-o3-air-unit-fpv-goggles-2/#A-Closer-Look-at-the-DJI-O3-Air-Unit
Get your DJI O3 Air Unit from these vendors:
RDQ: https://oscarliang.com/product-sadl
GetFPV: https://oscarliang.com/product-4blv
AliExpress: https://s.click.aliexpress.com/e/_DdQYArv
Amazon: https://amzn.to/3RtWfm1
Walksnail
Walksnail offers a few different camera options for different applications.
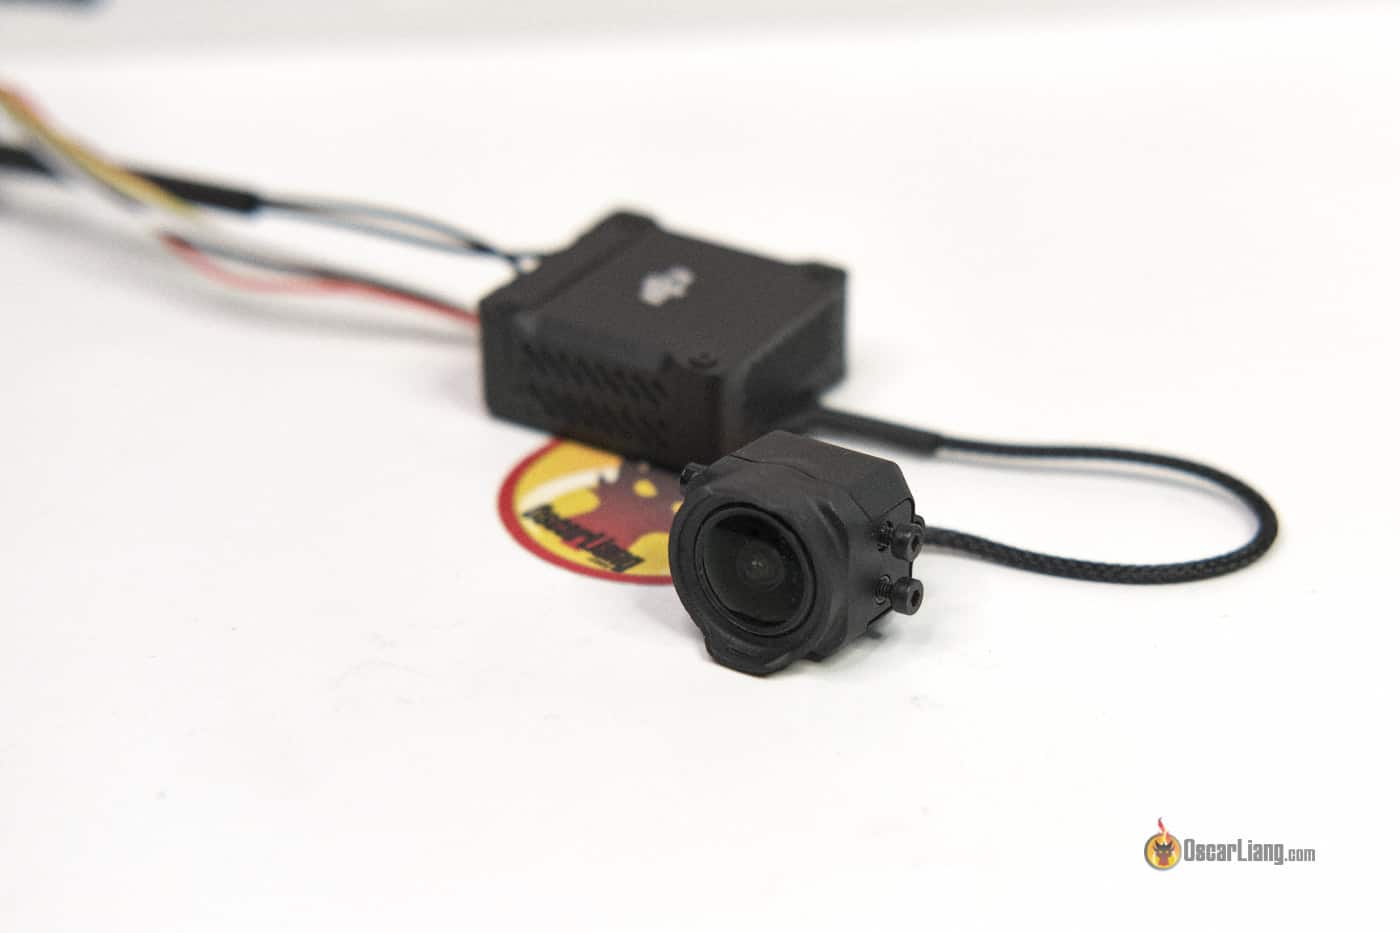
Walksnail Avatar V2
Best Image Camera
![]()
The standard version of the Avatar V2 VTX camera is quite similar to the original V1 camera, similar image quality and latency, but the V2 uses a native 4:3 image sensor instead of 16:9. It offers excellent image quality in daylight.
When comparing the Avatar V2 cameras to the DJI cameras, it’s evident that the new Avatar V2 cameras provide superior image quality to the DJI OG camera, though they don’t quite reach the level of the DJI O3.
You can find the Avatar V2 camera/kit here:
GetFPV: https://oscarliang.com/product-a40o
RDQ: https://oscarliang.com/product-im46
AE: https://s.click.aliexpress.com/e/_DlDWGKt
Amazon: https://amzn.to/3JRXY1Z
Caddx: https://oscarliang.com/product-qe4v
Walksnail Avatar Pro
Best Lowlight Camera
![]()
The Avatar Pro camera is equipped with a 1/1.8-inch Sony Starvis sensor and features native 4:3 image sensors. While the Pro version excels in low light conditions, the standard camera offers slightly better image quality in daylight.
The Avatar Pro camera truly stands out in low light situations, outperforming all other cameras in the Avatar lineup. The Pro camera exhibits a marginally higher latency (less than 5ms) than the V2 camera.
You can find the Avatar Pro camera/kit here:
Caddx: https://oscarliang.com/product-xpso
RDQ: https://oscarliang.com/product-tfta
GetFPV: https://oscarliang.com/product-bmj8
AE: https://s.click.aliexpress.com/e/_DdGReBT
Amazon: https://amzn.to/3JvbW8H
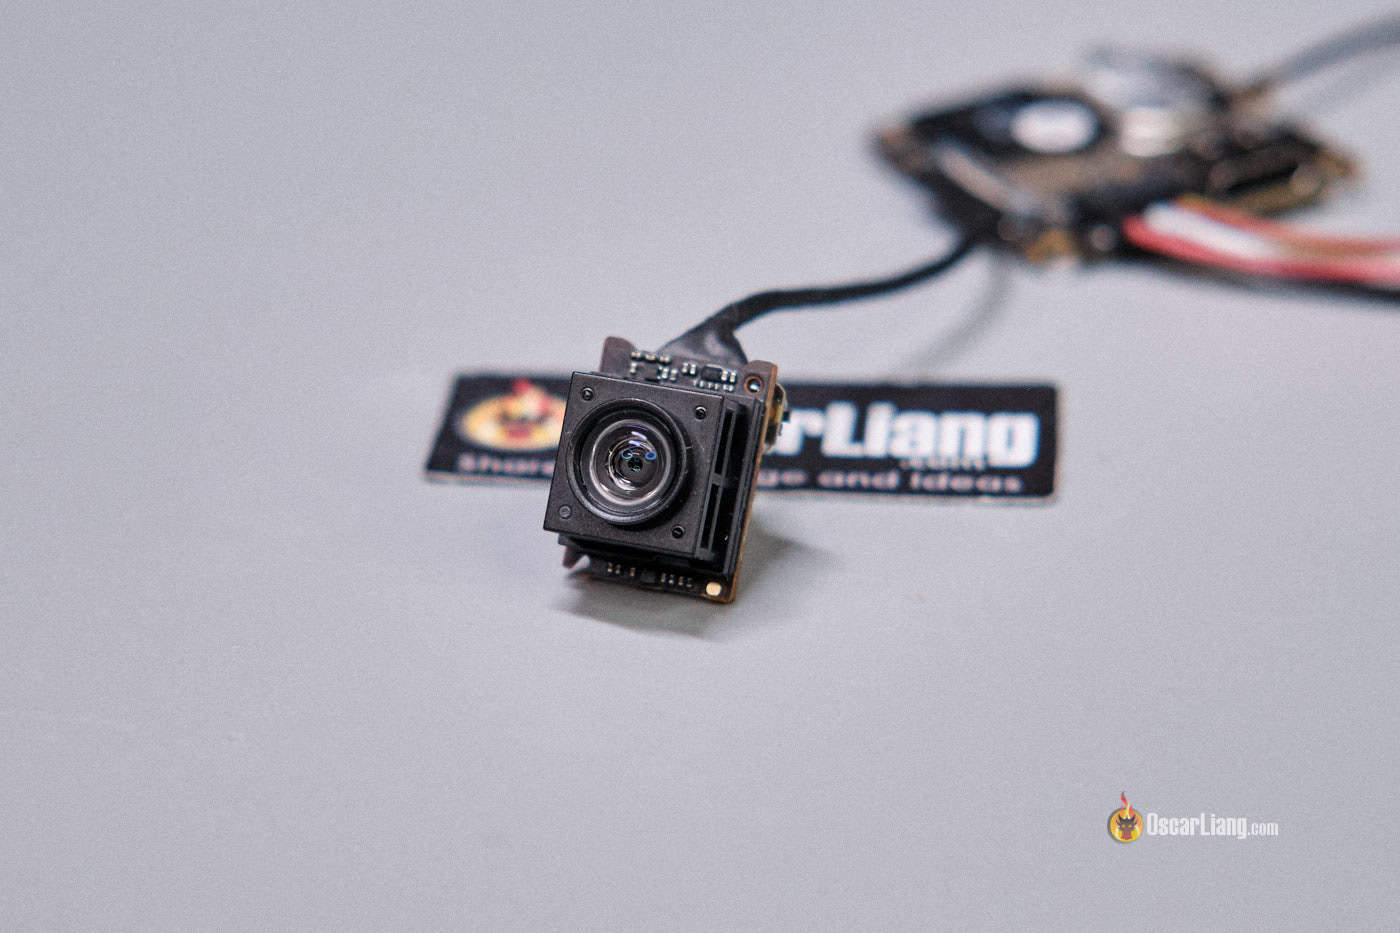
Walksnail Avatar 1S Mini Lite
Smallest Camera
![]()
Weighing less than 2 grams, the 1S Mini Lite camera is the most compact camera in the Avatar system. It’s a nano-sized (14x14mm) camera, but it lacks mounting holes and requires custom-made mounts.
Compared to the image quality of the standard V2 camera, the Lite Camera has a marginally smaller FOV, slightly softer image, and slower exposure changes to lighting conditions. However, the weight savings may outweigh the downsides for micro drones.
Get the Walksnail Lite Camera from:
Caddx: https://oscarliang.com/product-d75h
AliExpress: https://s.click.aliexpress.com/e/_DdCMC0z
GetFPV: https://oscarliang.com/product-27gi
RDQ: https://oscarliang.com/product-3uda
Amazon: https://amzn.to/3FASTZv
HDZero
HDZero offers a few camera options for different applications.
Runcam HDZero Nano90 Camera
Best Camera

The Runcam HDZero Nano90 Camera offers race-winning performance for the HDZero system in 540p 90fps mode, providing the lowest latency of any video link available today. It also supports 720p 60fps for higher resolution and boasts impressive low light performance.
Note that only the HDZero Goggles support the 540p 90fps mode; for the HDZero VRX, you can only use 720p 60fps. Nonetheless, the image quality is on par with the previous Runcam Micro V2.
Buy the Runcam HDZero Nano 90 camera here:
GetFPV: https://oscarliang.com/product-cwhq
Amazon: https://amzn.to/3yIjakU
AE: https://s.click.aliexpress.com/e/_DnS4LtL
If you don’t use 90fps mode, and want a micro size camera, check out the Runcam Micro V2:
GetFPV: https://oscarliang.com/product-5rbr
RDQ: https://oscarliang.com/product-fbtl
AE: https://s.click.aliexpress.com/e/_DkxYuxD
HDZero Whoop Lite
Smallest Camera

The HDZero Nano Lite Camera is designed for ultra-light micro FPV drones, weighing a mere 1.5g. Combined with the new Whoop Lite VTX at 4.5g and a 0.4g dipole antenna, this combo represents the world’s lightest digital FPV solution, weighing in at under 7g in total.
Utilizing the same sensor as the Runcam Micro V2, this camera offers switchable 4:3 / 16:9 modes, customizable image settings, and exceptional low light performance.
Find the HDZero Whoop Lite Camera here:
AE: https://s.click.aliexpress.com/e/_DDtI5wD
GetFPV: https://oscarliang.com/product-dl3i
Analog
Foxeer T-Rex
Top of the Line

The Foxeer T-Rex is among the best cameras in terms of image detail and sharpness. Regardless of whether the advertised 1500TVL is accurate, the T-Rex undoubtedly delivers outstanding image quality. While analog FPV doesn’t quite match the level of HD video in terms of image detail, the T-Rex still provides noticeably enhanced visuals compared to other analog cameras.
Find the Foxeer T-Rex from these vendors:
AE: https://s.click.aliexpress.com/e/_De7jGA5
GetFPV: https://oscarliang.com/product-yhi6
RDQ: https://oscarliang.com/product-ywoj
Amazon: https://amzn.to/3pAXsLt
Caddx Ratel 2
Best Value

The Caddx Ratel 2 has been on the market for years and has garnered a considerable number of positive reviews. It’s a relatively affordable camera, given the performance it offers. The Ratel 2 boasts a good balance of wide dynamic range and contrast, without any digital artifacts and with natural color reproduction.
Find the Caddx Ratel 2 from these vendors:
AE: https://s.click.aliexpress.com/e/_DdtVZtD
GetFPV: https://oscarliang.com/product-c4hh
RDQ: https://oscarliang.com/product-8y8i
Amazon: https://amzn.to/3CfhFvg
NBD: https://oscarliang.com/product-27zm
Need a smaller version? Check out the Caddx Baby Ratel 2 Nano (14x14mm):
AE: https://s.click.aliexpress.com/e/_DELJQ2H
GetFPV: https://oscarliang.com/product-a5rx
RDQ: https://oscarliang.com/product-dz2k
NBD: https://oscarliang.com/product-zzia
Foxeer Razer Micro
Cheapest Worth Having

Priced at just $18, the Foxeer Razer Micro is likely the most affordable analog camera that still provides a decent image. Stick to the Foxeer Razer Micro/Nano and avoid the other Razer models for the best value.
Get the Foxeer Razer Micro here:
GetFPV: https://oscarliang.com/product-82uc
AE: https://s.click.aliexpress.com/e/_DB4GQBv
RDQ: https://oscarliang.com/product-pzsy
Caddx Ant Lite Nano
Smallest Camera

The Caddx Ant Lite Nano is considered to be the best of the lightweight analog cameras and is widely used in many BNF models. It’s available with and without mounting holes depending on what canopy you’re mounting it in.
You can find the Ant Lite Nano here:
AE: https://s.click.aliexpress.com/e/_DFQU3gJ
GetFPV: https://oscarliang.com/product-usnu
RDQ: https://oscarliang.com/product-7bmh
Amazon: https://amzn.to/3V6yqnK
Foxeer Predator Micro
Popular for Racing

The Foxeer Predator Micro is a highly popular FPV camera choice among racing pilots. Its ultra-low latency, high image contrast make obstacles stand out clearly. Additionally, it offers a wide field of view, which is desirable in racing, and it’s reasonably priced. however the ultra vibrate color might not be appealing to everyone
Find the Predator Micro here:
AliExpress: https://s.click.aliexpress.com/
GetFPV: https://oscarliang.com/product-te58
Amazon: https://amzn.to/3IPsqXC
NBD: https://oscarliang.com/product-xt1f
Here’s the nano version (14x14mm):
AE: https://s.click.aliexpress.com/e/_DlGfQmN
GetFPV: https://oscarliang.com/product-owbk
NBD: https://oscarliang.com/product-dkdv
Runcam Night Eagle 3
Best for Low Light

The Runcam Night Eagle 3 excels in low light FPV due to its high light sensitivity. However, it only displays black and white image, therefore it might not be the best choice for daytime flying. But for night flying it’s absolutely one of the best, see my comparison here: https://oscarliang.com/flying-fpv-at-night/
Get the Runcam Eagle 3 here:
AliExpress: https://s.click.aliexpress.com/e/_DcftoLj
GetFPV: https://oscarliang.com/product-iz6x
Speedybee: https://oscarliang.com/product-ok0b
For a good camera that works decently for both day and night, check out the Caddx Ratel Pro:
Caddx: https://oscarliang.com/product-b0o5
AliExpress: https://s.click.aliexpress.com/e/_DDa4vCt
Banggood: https://oscarliang.com/product-rmaq
RDQ: https://oscarliang.com/product-v7m3
Size and Weight
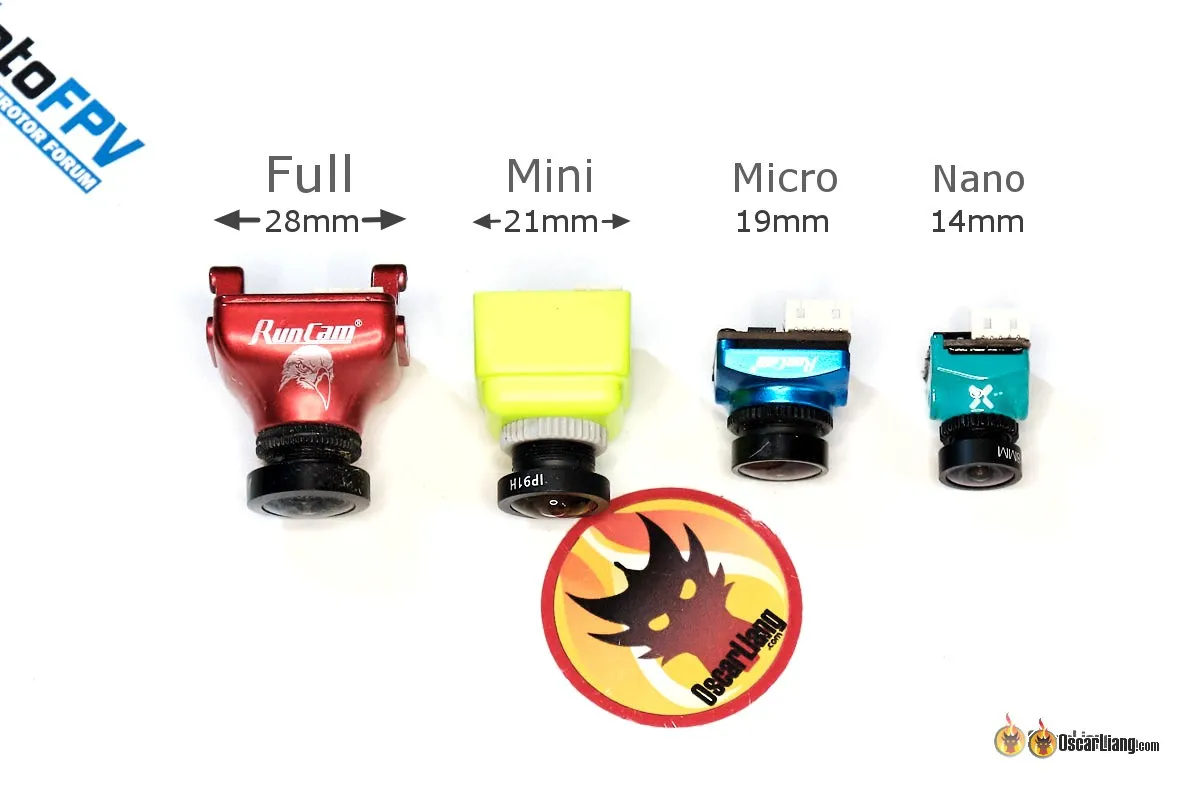
FPV camera sizes are determined by the width, which is the distance between the mounting holes on both sides. Your choice of camera size depends on your FPV drone frame and how you plan to mount it. The common sizes include:
- Standard, aka “full size” (28mm)
- Mini (21mm)
- Micro (19mm)
- Nano (14mm)
Micro size is the most popular these days, as it typically works well with modern 3-inch, 4-inch, and 5-inch frames (and larger). Drones that are smaller generally use the Nano size. Be sure to double-check the specs of your frame to confirm compatibility and avoid surprises.
Aspect Ratio

There are two aspect ratios to choose from in FPV cameras: 4:3 and 16:9.
4:3 is preferred for FPV flying because it provides more vertical FOV (field of view), which is useful when your drone tilts forward or backward while speeding up or slowing down. This allows you to see what’s in front of you more clearly. In contrast, 16:9 offers a wider view on the sides, but that information is less useful for pilots.
Additionally, if you plan to stabilize your footage using software like Gyroflow, 4:3 has an edge over 16:9 because it crops less of the image when rendering into a 16:9 video for uploading to platforms like YouTube.
Ideally, your FPV goggles should support the aspect ratio of your FPV camera. Mismatched aspect ratios can result in distorted images in the goggles. For instance, if you have a 4:3 camera and 16:9 goggles, the image will appear stretched.
Some FPV cameras allow you to switch between 4:3 and 16:9 aspect ratios. However, when switching to a non-native aspect ratio, you will experience a reduced FOV due to cropping. It’s best to use the native aspect ratio of the camera for optimal performance.
Field of View
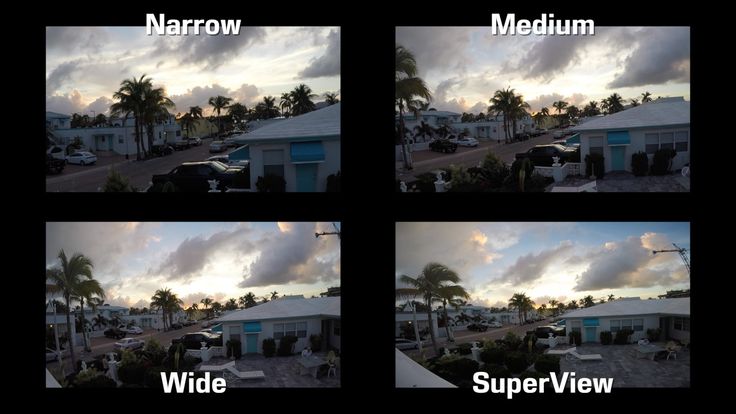
The field of view (FOV) of an FPV camera determines the angle of the captured image. A smaller FOV results in a more zoomed-in image, allowing you to see obstacles like branches more clearly. A wider FOV lets you see more of the environment, which might be preferred for proximity flying and racing.
However, when the FOV is too large, the image appears distorted, resulting in so called “fish-eye” effect. Objects in the center would appear smaller and further away than they are in reality, while the edges of the image appear curved and distorted.
There is no “best” FOV, as it ultimately depends on personal preference and the type of environment in which you fly.
FOV is affected by the lens’s focal length and the image sensor size. A shorter focal length and a larger sensor size result in a wider FOV. Here’s a rough estimation of FOV for a camera with a 1/3″ sensor size in 4:3 aspect ratio:
| Lens Focal Length | Approx. FOV |
| 1.8mm | 160° – 170° |
| 2.1mm | 150° – 160° |
| 2.3mm | 140° – 150° |
| 2.5mm | 130° – 140° |
| 2.8mm | 120° – 130° |
| 3.0mm | 110° – 120° |
As mentioned previously, aspect ratio can also affect FOV if the camera supports both 16:9 and 4:3. In this case, selecting a non-native ratio will simply crop the sides or the top and bottom, resulting in a smaller FOV.
Wide Dynamic Range

The Wide Dynamic Range (WDR) of an FPV camera determines the image quality in extreme lighting conditions where both bright and dark areas are present in the same frame. A good camera should ideally allow the pilot to see as much detail in the shadows as possible while preventing the sky from being overly overexposed. Choosing an FPV camera with decent WDR capability is crucial, as it helps you see better while flying, ultimately helping you avoid obstacles and crashes.
Low Light Performance

If you plan to fly in low light conditions, such as indoors or during sunset/night, it’s essential to choose a camera with good low light capabilities.
Apart from checking reviews, you can gauge a camera’s low light performance by its LUX number in the specifications. The lower the LUX value, the better the camera’s low light performance. Furthermore, cameras with larger imaging sensors generally perform better in low light conditions, as more light enters the sensor.
Latency
Latency refers to the time it takes for the FPV camera to capture, process, and transmit the image to the video transmitter. For drone racing enthusiasts or those engaging in high-speed flying, latency can be a crucial factor in selecting an FPV camera. Lower latency allows pilots to react more quickly, enabling better control and avoiding potential obstacles or crashes.
Analog FPV Camera Considerations
CCD and CMOS

In analog FPV cameras, there are two common types of image sensors used: CCD and CMOS, each with unique characteristics and advantages.
CCD is an older technology and used to be the go-to image sensor for FPV cameras since it performed better than CMOS at the time. However, CMOS technology has improved rapidly, and it’s now just as good as CCD, if not better. Modern analog FPV cameras almost exclusively use CMOS sensors, which are continually getting better and more affordable.
For more details, check out this article about the differences between CCD and CMOS: https://oscarliang.com/cmos-ccd-fpv-camera-multicopter/. Here is a summary of the pros and cons of both types of sensor:
CCD:
- Less jello effect in footage due to global shutter
- Less image processing and digital artifacts, however resolution and image detail usually appear lower than the best CMOS cameras
- Above average performance in low light, dynamic range and light/dark transition
- Better image contrast than CMOS
- CCD cameras perform similarly across the board, unlike CMOS cameras with varying performance
CMOS:
- More susceptible to jello due to rolling shutter
- Varying performance and price: the most expensive cameras are usually CMOS, and ironically, the cheapest cameras are also CMOS, while CCD is typically in the mid-price range
- Generally lower in latency
- Higher resolution and sharper image, with the trade-off of potentially over-sharpening and digital artifacts
- Low light/night FPV cameras tend to use large CMOS sensors
- Usually more flexible/dynamic with camera settings
Image Sensor Size

In addition to CCD and CMOS types, image sensors also come in different sizes. The two popular sensor sizes for analog cameras are 1/1.8″ and 1/3″, with the former being larger and the latter being smaller.
Sensor size influences low light performance and dynamic range. Generally, a camera with a larger sensor can have better low light performance under the same settings. Additionally, a larger sensor provides a wider field of view (FOV) when using the same focal length lens.
Camera Lens

You can replace the lens on an analog FPV camera to achieve a different FOV or image quality. FPV camera lenses primarily differ in two aspects: focal length and thread size. For more in-depth information, you can refer to our article specifically about FPV camera lenses.
Full-size cameras typically use larger and heavier lenses with 12mm diameter thread that can be screwed into the housing, known as M12 lenses. Smaller 8mm lenses, or M8 lenses, are utilized to make cameras more compact and lightweight. M12 lenses allow more light in, resulting in marginally better image quality compared to M8 lenses. M8 lenses are highly compact and are mostly used in Micro and Nano cameras.
NTSC and PAL

What are PAL and NTSC?
PAL and NTSC are video standards used in different parts of the world back in the days.
They differ mainly in frame rate and resolution. PAL has a resolution of 720×576 at 25fps (frames per second), while NTSC has 720×480 at 30 fps.
Which One Should You Use?
While choosing between PAL and NTSC used to be crucial for compatibility reasons, modern FPV equipment generally supports both formats, making the choice more about personal preference and specific use cases.
- Resolution vs. Frame Rate: PAL offers slightly higher resolution, giving pilots slightly clearer image, while NTSC provides a higher frame rate, which can result in slightly smoother video playback.
- OSD Display: Thanks to the higher resolution, PAL offers more vertical space to place OSD elements, and making OSD text slightly sharper.
Selecting the Correct Video Format in Betaflight
Regardless of whether you choose PAL or NTSC, it’s essential to select the appropriate video format in the Betaflight OSD to ensure the OSD displays correctly. For example, if you chose PAL in Betaflight but have a NTSC camera, you might find the bottom part of the OSD missing in your Goggles. This step is crucial for maintaining the readability and accuracy of your on-screen information.
TVL
TVL, or “TV lines,” is the term used by manufacturers to measure the resolution of analog FPV cameras.
TVL is measured by connecting the camera to a display and having it capture an image of a card with alternating black and white lines. The maximum number of distinct black and white lines that the camera can detect is its TVL value, which represents the image detail the camera is capable of producing.
However, TVL has become less meaningful in recent years, as manufacturers often inflate these numbers as a marketing tool. Instead of relying on TVL, choose your camera based on the image quality demonstrated in reviews.
How to Connect an Analog FPV Camera to a VTX?

Wiring an analog FPV camera in your drone varies depending on the application and components involved. At its most basic, an FPV camera has three wires to connect: video signal, power, and ground.
To connect the FPV camera directly to a VTX, connect the signal wires, and ensure you have a working video receiver on the same channel in your FPV goggles to get an image. Also, connect the ground wires of both the FPV camera and VTX if they are powered from different sources.
Modern FPV cameras support a wide range of input voltage (e.g., 5V to 36V), allowing you to power them from a regulated 5V BEC or directly from a LiPo battery (2S-8S).
Consider these good practices when connecting your FPV setup for cleaner video: https://oscarliang.com/connect-vtx-fpv-camera/
Using the flight controller (FC) with a built-in OSD chip is the most common way to connect an FPV camera. Connect the camera signal to the video input on the FC, and connect the video output on the FC to the VTX.

Some optional connections may be available depending on the camera’s features, such as:
- TX and RX (UART) for connecting to the FC, allowing camera settings to be changed using your radio
- OSD or Menu pins for connecting a joystick for changing camera settings
- VBAT or VSEN for monitoring battery voltage
Recording Flight Footage
There are several ways to record flight footage from your FPV camera:
- FPV Goggles with DVR: Most FPV goggles have a built-in DVR (digital video recorder) that records whatever is displayed on the screen, even including the signal break-ups.
- VTX with Onboard Recording: Some video transmitters (VTX) feature onboard recording capabilities, which deliver higher quality footage compared to DVR recordings in goggles. They don’t include signal break-ups experienced during flight. Examples of such VTXs include the DJI O3 Air Unit and the Walksnail Avatar VTX.
- External DVR for Analog: For analog setups, you can use an external DVR connected directly to the FPV camera inside the drone. This method records footage without any interference and generally offers better image quality since there’s no quality loss from the 5.8GHz wireless link.
For the best possible image quality, consider mounting an action camera, such as a GoPro, on your drone. This option captures high-quality footage that can be used for various purposes, including sharing online or analyzing flight performance.
Can I use HD cameras as FPV cameras?
While it’s true that many stunning HD FPV videos on YouTube are captured using HD action cameras such as GoPro or Runcam 3, these cameras are generally not suitable for real-time FPV flying.
Some HD cameras offer “video out” capabilities, allowing them to be connected to an video transmitter for FPV. However, the latency in these cameras is typically too high for FPV flying (often over 100ms), making it challenging to react in time to prevent crashes. As a result, it’s recommended to use a dedicated FPV camera for real-time flying and.
How to Setup OSD

OSD (on-screen display) is a feature that overlays useful flight information onto your FPV goggles during flight. Depending on your specific FPV system, the process for setting up OSD may vary. Below are tutorials for various systems:
- Analog: https://oscarliang.com/betaflight-osd/
- HDZero: https://oscarliang.com/setup-hdzero/#Betaflight-OSD-Setup
- Walksnail: https://oscarliang.com/setup-avatar-fpv-system/#Betaflight-Configurations
- DJI: https://oscarliang.com/dji-o3-air-unit-fpv-goggles-2/#OSD
These tutorials will guide you through the necessary steps to configure OSD for each system and help ensure that you have access to valuable flight information during your FPV flying experience.
You made it!
Congratulations on reaching the end of this comprehensive FPV camera guide! I sincerely hope that the information provided has been helpful in your quest to find the perfect FPV camera for your needs. If you have any questions or comments, please don’t hesitate to reach out. Happy flying!
Edit History
- 2014 – Article created
- 2016 – Updated info about CMOS vs. CCD, Added info about OSD and camera size
- 2018 – Added info about camera control and low light capability
- 2019 – Added a little history about camera development, Updated info regarding FOV, lens sizes, sensor sizes, CCD/CMOS, Built-in Mic, DVR, and connection
- 2023 – Added FPV camera recommendations for all available FPV systems, DJI, HDZero, Walksnail and analog. Revisited the guide, shortened URL.
- May 2024 – Updated products
- Mar 2025 – Updated DJI options
62 comments
Great insights. Thank you.
Is there an analog camera that can record 4K video on an sd card?
So you do not need to mount a GoPro?
The Hawekeye thumb camera has AV output you can hook up to a VTX. But it has considerable amount of latency which might not be ideal for FPV response time: https://oscarliang.com/hawkeye-thumb-4k-camera/
You have articles on just about everything I’m needing to learn. I’m grateful. The one thing that’s getting me right now, is that it seems like everyone is out of stock on certain models. So it goes! I’ll be learning here regardless and eventually get myself into it.
Hi
I’ve a usb c thermal camera
Do you have any info on attaching it to a drone so that images can be transmitted to a display in real time?
Thnx
Btw, good article
I’m wondering why the Runcam Split 4 doesn’t get more love? Best picture out of all my cameras. I also have a Trex. And others, but the Runcam Split 4 is 4k @30fps and I’m just fine with that. Analog 4k, yup.
It was quite challenging installing the Split in many frames due to its size, not to mention it’s quite pricey.
Hey Oscar, in the FOV section, are you talking about the FOV-H or FOV-D?
FOV-D – When manufacturers talk about FOV it’s normally FOV-D, unless specified otherwise.
Hi Oscar.
I was leaving a comment 2 day ago regarding to a RunCam Wasp Nano and the problem wich I was facing it was that on the top side of the screen I had a bulcky image and white noise on the bottom.
I was finding out that I have to update my goggles v2 to fw 01.00.0608 but after rooting them the Assistance doesn’t give me the possibility to update to 608 it shows only the 607 and I can’t get my wasp + Vista kit working. Could you please be so kind and try to figure out how could I use the Wasp Nano instead of the nebula nano..
Advanced thank you for your time.
I documented the issue with the Wasp camera in my review: https://oscarliang.com/runcam-wasp/#Latest-DJI-Firmware-Required
To update firmware on the Vista after rooting you need to do this: https://oscarliang.com/fpv-wtf-root-hack-dji/#How-To-Update-DJI-Firmware-After-Rooting
You can also roll back on firmware if you want: https://oscarliang.com/fpv-wtf-root-hack-dji/#Rollback-to-older-Firmware-with-Butter
thanks for this impressive article ! does anyone know about a list or standard which non hdzero cameras could be used with HDzero VTZX boards ?
Bonjour,
Franchement bravo pour cet article concis et qui répond à bon nombre de questions que je me posais sur le sujet. Là, c’est un concentré pertinent. Merci à toi !
Very good article. Thanks
What do you use to receive and view the video?
Can we use DJI Osmo Action Camera as FPV, (connect audio video transmitter to camera)? so that I can take 4K videos for aerial shooting as well as I use it as FPV.
I am ok with latency, when I use DJI Osmo Action camera as FPV.
I want to connect my “TS832 48Ch 5.8G 600mW Wireless Audio/Video Transmitter for FPV RC” to DJI Osmo Action Camera.
Please help!.
How about FX900TW and the FX805 with OSD?
I found them there. It would be nice to add them as well to review for nano size!
youtube.com/watch?v=3xp9m9yl20s
Oscarm,, thanks for the write up…. there are so many options I am dizzy….
Just check my recommended camera list :) (search for best fpv camera oscar)
Thanks for taking the time to provide the information.
I have just installed the AIO by the looks of the picture in a rc digger. Chosen because of size.
Works ok but I would be interested in a lens that deals with short distance with clarity, ie it’s fitted in the cab and the focus is on the bucket.
Would you have any suggestions?
Thanks in advance
Hello Oscar,
Good articles, thanks.
But I’m looking for a VERY SLIM camera with best digital, res., clarity, not for a drone,
that has the lowest (air) aerodynamic drag,
for an RC airplane, to be mounted on it’s fuselage side,
or the most forward top / bottom portion of it’s wing.
But, also (camera) mounted on a servo controlled vertical gimble,
for (as close to) a zero degree up and to 180 degrees down (view) travel,
the aircraft will do the 360 degrees plus horizontal (yaw) view.
This is for personal fun only.
I’m a senior RC pilot, life AMA member with safety in mind.
I’ve done basic searches for the above items with no results.
Thank you for any comments.
Sincerely – JW
Thank you for not assuming everyone knows what all these acronyms mean :)
Very helpful article.
I need a first person view camera for my drone which is three feet long with a three feet wingspan. The plane weighs less than 15 pounds.
Is there any development to a high FPS live feed? Competitive gamers such as myself do indeed benefit greatly from 144hz monitors, so I think it will benefit the FPV community as well. Current FPV cameras are only a max of 30 FPS, which is quite slow if you ask me.
Great information!
I do actually have a questions, so I got myself a 1000TVL camera
The image is just great but not sure if that could be considered HD. It is actually 1000 Lines right?
The goggles I have do not support HD, they are actually 600×400 so as you mention on the article, I am loosing some quality there but just got it in case someday I want to upgrade the goggles.
Also the camera has a screw there so though I could remove the lens but have not been able to do so.. any idea on how to do it?
TVL is not pixels.
Excellent info thanks, as this is not a recent article do you have a more up to date one? Keen to see if there are any better newer options, I am looking to upgrade my Wizard X220S with 800TVL to something with a better picture, I like the sound of the Predator in this article.
Thanks again for your helpful info,
The considerations for FPV camera haven’t changed much, so the info in this post is still very relevant.
We recently updated our recommendation for FPV cameras: https://oscarliang.com/top-5-best-fpv-camera-mini-quad/
Sir for On Screen Display can we connect the smart phone to video reciever?
If so how can we connect it?
Oscar,
Thanks for the tutorial. We are looking for a relatively simple system with long dwell time for monitoring our hunting preserves to preclude poaching. We need real live time feedback and some sort of system that will monitor a wide field of view (largest ground area with reasonable resolution). Any suggestions?
Thanks
Otis
Thanks Oscar…..for everything!
A current or near future technical question from a serious amateur still photographer: Are there quadcopter cameras with large image sensors (e.g. “full size” Nikon D5 is 35.9 mm X 23.9 mm)? Are there interchangeable lens or mechanical zoom, not digital zoom? Explanation of the question: The perspective of the quadcopter offers a practical perspective for “art” still shots that otherwise only could be achieved by shooting from full sized helicopter. By being able to more narrowly control the depth of field…I.e. make it more shallow…and be able to capture large image files…i.e. raw files in the 24 mb range, large artistic images would be possible. For example, a shot of a ship at sea needs a deep depth of field but a shot from about 50 ft of a raptor feeding its young in the nest needs only about 2-3 ft in focus. Too great a depth of field in that setting distracts the eye from the subject. You want only an out of focus background that supports but not distracts from the story you are trying to tell with the image.
Thank you for this, I have been struggling with questions towards fpv and it’s setup for months now, finally building my second 250quad after losing my first in the woods (still). And now it’s on to finally, ohhh finally, fpv. This blog was really, very well articulated and touched on every topic I had questioned about. You’re the man.
In conclusion, I’ve decided on 600tv , probably that Foxeer HS1177 you mentioned, I have it on paste lol my only other question would be… for the transmitter, is 600mw the obvious choice, over 200mw? Also.. is 1.??ghz better then 5.8ghz?
Hi Oscar, have recently dragged out the old fossils stuff frame and rebuilt it, I’m using a runcam 2 for both recording and video (1080P @ 60fps) I’m not getting noticeable lag for my flying style (cruising about and mostly shaking alot whilst flying!)
It maybe worth mentioning that this is an option now with runcam 2.1 firmware. I’ve connected the video lead to a Vtx, and am running the camera directly off the lipo with the battery out. There’s also a genius mod here;
youtube.com/watch?v=WrjGromqfoE where they guy has used the empty battery space to fit a vtx in the runcam……If you’re not racing, this is adequate and saves space and weight.
Hello. Under the section on FOV I think you have a mistake – lenses that come with IR filters make for better daytime visibility, but drastically reduce nighttime visibility. Most cameras have an IR filter. If the camera does not have an IR Filter, you can sometimes see really well at dusk, etc, but risk having “whiteout” during the day.
Oscar:
Your information is always very clear and objective.
There are two issues I would like to see you discuss:
1) Can you discussion the intracacies of FPV latency?
2) If a camera has a particular actual resolution in pixels (WxH), can we expect this resolution to be accurately conveyed to the 5.8ghz receivers and DVRs? If not, how do we tell what we are actually getting?
Jim
I bought this Boscam All In One 7″ Inch FPV Monitor w/ 5.8ghz Receiver and Built-In Battery and Boscam TS832 32Ch 5.8Ghz 600mw Wireless Audio/Video Transmitter for FPV RC CN143 for my Fuav seraphi copter with the Firefly camera came with the copter but i not be able to connect one to another. I change every combination of dip switch seem not work…any one out there can help me ion this. i bought this two from ebay but have tuff time to reach them for help can not return neither
There is no info of how to find correct aspect ratio camera and googles.
I have spent a lot of time to find real camera with 16:9 aspect ratio which corresponds to my FPV googles.
I don’t understand why most of the cameras are 4:3 aspect ratio when most of the TV, Monitors, googles are 16:9.
Even GoPro outputs 4:3 live video and adds black bars up and down which makes impossible to use with any of 16:9 TV.
Hi Ivan. The main reason you can’t get 16.9 is because analogue video is 4.3 -eg 720×576 (pal) You can “fake” 16.9 by using a camera with anamorphic pixel aspect ratio. so the end result will look great on a 16.9 screen. i would love to use one of these but haven’t seen any around. I only know about anamorphic because i do video production and thats how we got wide screen before HD came along. eg by using a mini-dv camera with the anamorphic setting – when we used this feature the picture would be squeezed/narrow (stretched in a vertical fashion) when viewing through a 4.3 screen on our cameras. we’d fix it during editing wr the image would be stretched back to normal, resulting in a widescreen image. hope this makes sense! (ps: i think buzzhobbies had a camera that did widescreen)
Hi Oscar
Thank you very much for this post It really helped thanks.
Hi Oscar
I have viewed the Inspires digital view through Headplay. It was awesome.
I want to have that super digital clarity for my 250 racer.
So I need a lightweight video transmitter (200 meters is minimum but more is better ) & receiver with no lag and a small high res. digital camera.
I understand GoPro has lag which I do not wish to tolerate.
Can I have your advice please .
Please respond to my email address with a copy of your response when you have time.
the reason we fly analogue is because it is tolerant of interference. hd signal is either all or nothing. when signal is weak, you get no image. i don’t know about you, but when signal is weak (ie. due to lots of trees and interference) i’d rather get a really garbled image (and still be able to just barely make out enough to fly out of the woods) than see no image at all (and most definitely crash due to that same interference).
Hey thank you for the information. I just wanted to make a quick note. When you said “Some lenses can even improve the camera light sensitivity, and some come with infrared filter which enhance the ability at night.” I think you meant to say that some come “without” the filter which enhance night visibility.
Hi Oscar
Thanks for the post, it’s very helpful.
I have a questions regarding FPV cameras and transmitters.
You say FPV cameras has at least 3 wires (positive voltage, ground and video). So, is it possible to connect any kind of FPV camera (CCD/CMOS) to any transmitter?
I have a TX5803 transmitter and a DEVO F7 with RX corresponding video receiver (working with an iLook camera), and I want to re-use this kit (TX/RX) for a 250 racing drone by connecting a dedicated FPV camera.
Regards.
Hi Prog4j
It is possible. Any kind of camera can be connected to any kind of transmitter.
Were the pictures at Hollywood beach taken with a quadcopter?
Nice place to take pics with one.
that was most definitely hollywood beach. My grandmother has a house about 3/4 of a mile from there… i go down every winter to get away from the NJ weather
Hey , just a minor point about TVL , it’s actually vertical lines displayed which is equivalent to “horizontal” resolution. The vertical resolution is fixed in the PAL / NTSC analog standard and can’t be changed. TVL is not connected in any way to 576p and 1080i or whatever which is also vertical resolution ( also called lines).
That means if you have 600 TVL you might have higher horizontal resolution but the same vertical resolution.
wikipedia has an (small) article on “tv lines”
…”most are made into a square shape of length 25mm”…
Sorry, but i can find only 32×32 or 38×38, can you help me?
Thanks, Luca
Hi Luca, sorry i meant 32 and 38, not 25. I have updated the post now.
but you can find smaller camera, try searching for Sony 600TVL Mini.
thanks
Oscar
What about this one?
securitycamera2000.com/products/RunCam-600TVL-DC-5%252d17V-Wide-Voltage-Mini-FPV-Camera.html
Thanks for your reply :)
yes, looks good!
Great …thanks for this article!
Nice article, very helpful. There is so much more to this hobby than “grab & go fly” and you lay it out in an easy to read and understand form. It seems every article I read leads me to 2 or 3 more I am going to need to read, I like how you refer to the more detailed stuff but break it down to beginner/advanced.
Thanks for the kind words my friend :)
Hi Oscar ,Have you tested the camera yet? love to know results
sorry what camera?
Was about to buy a new Sony 800TVL camera but luckily I found a video on Youtube where they found out about the excessive lag compared to the Sony 600TVL PZ0420. Anyone know of a new generation camera with low lag or comparable to the Sony 600TVL PZ0420.
There are mix review on this one. quite a few people say there is no noticeable delay. I am getting one of this camera so will test it out myself :)
After this post , if anyone ask “what is FPV ?” , you can show him the exit door :)
ha, i will show him google :D
Hi Oscar ..this is a very fine article on selection of a camera..i need a suggestion from you .i am designing a vision added inertial nevigation for quadcopter ..so which cmos camera would you prefer me for this application.