In this tutorial I will show you how to setup HDZero in a Betaflight FPV drone from scratch, including connection to the flight controller, Betaflight OSD configuration, SmartAudio setup, firmware update and explaining the options in the menu.


Not sure what HDZero is? Check out this introductory article first.
Table of Contents
Where to Buy HDZero?
I listed all the HDZero hardware currently available in this post.
How to Update HDZero Firmware
I recommend updating your VTX and VRX to the latest firmware for bug fixes and new features. Cameras don’t need to be updated at the moment. It’s best to update your VTX before mounting it in your frame, as it’s easier to access the update port.
Download firmware: https://www.hd-zero.com/document
Get the latest update, the zip file includes firmware for all the existing HDZero compatible VRX, VTX’s and FPV goggles.
The process takes around 10 mins, so make sure the battery you use to power the VRX is charged to avoid running flat during the update.
Flashing the wrong firmware could brick/damage your device. If you flashed the wrong firmware, there’s a recovery process in the manual you could try to fix it.
How to Flash HDZero VRX
Unzip and copy the firmware files “HDZeroVRX_4SMA_Rev.zip” onto the SD card’s root directory, then insert the SD card in the module.

Power on the VRX, the update will begin automatically, just wait until it shows a message “Firmware update successfully repower VRX now”.
That’s it!

The firmware files (HDZero_RX.bin, HDZero_VA.bin and HDZero.bin) will be deleted from SD card after updating. If these files are gone, it’s a good indication that the firmware update has completed. But for whatever reason you want to keep the firmware files after update, for example you have multiple VRX to update, then simply create an empty text file on the same directory and name it “DONOTREMOVE.txt”.
SD Card not recognised? Try to format it inside the goggles. If you format it on your computer, choose FAT32 format and set Allocation Unit size to 4096 bytes.
If you power off the VRX during firmware flashing, you could brick the VRX, and it won’t boot up anymore. See FAQ section for solution.
How to Flash HDZero VTX
Connect the VTX to the VRX’s firmware update port using the provided 6-pin cable. You don’t need to power the VTX as it will get power from the VRX.

The process is the same as updating the VRX, you will need to copy the firmware file to the SD card and insert it in the VRX.
There are quite a few different firmware for different VTX’s, be VERY CAREFUL choosing the correct one.
How to Flash HDZero FPV Goggles
Firmware updates is easy with the HDZero FPV goggles: simply place the firmware file in the SD card inside the goggles, and use the menu to complete the update process.
There’s also a firmware update port on the goggles just like the VRX module, for updating VTX.
Device Firmware Name Table
After 2023
| VTX | Firmware Name |
| HDZero Goggles | HDZEROGOGGLE-Revddmmyyyy.zip |
| HDZero VRX | HDZeroVRX_4SMA_Revddmmyyyy.zip |
| HDZero Freestyle VTX | FreestyleVTX.Revddmmyyyy.zip |
| HDZero Whoop VTX | WhoopVTX_Revddmmyyyy.zip |
| HDZero Whoop Lite VTX | WhoopLiteVTX_Revddmmyyyy.zip |
| HDZero Race V1 VTX | RaceV1VTX_Revddmmyyyy.zip |
| HDZero Race V2 VTX | RaceV2VTX_Revddmmyyyy.zip |
| Shark Byte TX5S.1 | WhoopVTX_Revddmmyyyy.zip |
| Shark Byte TX5M.1 | * Firmware not available |
| Shark Byte TX5R.1 | WhoopLiteVTX_Revddmmyyyy.zip |
| Shark Byte VRX.1 | SharkByteVRX_2SMA_Revddmmyyyy.zip |
| Shark Byte ScoutHD (Fatshark) | ScoutHD_Revddmmyyyy.zip |
Before 2023
| VTX | Firmware Name |
| HDZero VRX | HDZeroVRX_4SMA_Revddmmyyyy.zip |
| HDZero Freestyle VTX | FreestyleVTX.Revddmmyyyy.zip |
| HDZero Whoop VTX | Whoop_TX5S.1 Revddmmyyyy.zip |
| HDZero Whoop Lite VTX | WhoopLite_Race.Revddmmyyyy.zip |
| HDZero Race V1 VTX | WhoopLite_Race.Revddmmyyyy.zip |
| HDZero Race V2 VTX | WhoopLite_Race.Revddmmyyyy.zip |
| Shark Byte TX5S.1 | Whoop_TX5S.1 Revddmmyyyy.zip |
| Shark Byte TX5M.1 | TX5M.1.Revddmmyyyy.zip |
| Shark Byte TX5R.1 | WhoopLite_Race.Revddmmyyyy.zip |
| Shark Byte RX.1 | SharkByteVRX_2SMA_Revddmmyyyy.zip |
| Shark Byte ScoutHD | ScoutHD.Revddmmyyyy.zip |
Power on VRX, and firmware updating will begin automatically. It should only take around a minute or two.
The VTX firmware file “HDZero_TX.bin” will disappear from the SD card after a successful update. Again, if you wish to keep it, create a text file on the root directory and name it “DONOTREMOVE.txt”.
Attaching VRX to FPV Goggles
To learn more about the HDZero VRX check out my review.

An mini HDMI to mini HDMI cable is provided for connecting the HDZero VRX to your FPV goggles. This cable should work out fo the box for the latest Fat Shark and Skyzone FPV goggles.
For the Orqa FPV.ONE (V1 and V2) however, you will need an adapter like this (affiliate link) as it has micro HDMI connector (instead of mini).
To attach the VRX module on the FPV Goggles, use the provided fan cover which has a holder. Again, this fan cover is designed for the Fatshark and Skyzone FPV Goggles, it might not be ideal on other goggles and require custom made holder. For example for the Orqa Pilot Goggles, I had to print my own holder that can be found on thingiverse: https://www.thingiverse.com/thing:5196944/files

I have also seen people using velcro, which makes it easier to attach and remove the HDZero module whenever you want.
Powering VRX
It comes with an XT60 power cable with two outputs, it allows you to power both your goggles and the VRX from the same battery. However, make sure your goggles can support the same voltage you are using to power the VRX, because the power cable has no voltage regulator built-in, both outputs are the same voltage as the input. Some older goggles only support up to 3S, if you feed them 6S you will fry them.
The VRX supports 2S to 6S, so it’s pretty flexible.
VRX Antenna Choices
Antennas are not included. Not sure what to buy? Here are my 5.8GHz antenna recommendations.
You should mount antennas on all 4 SMA connectors to maximize its potential. Choose antenna according to your flying environment and application.
Use 5.8GHz antennas. You can use either right-hand circular polarized (RHCP), or left-hand circular polarized (LHCP) as long as they match the one you are using on the drone.
According to HDZero manual, for best results, you should use matching antennas for the two top SMA connectors, and matching antennas for the two on the sides.

Connecting Camera to VTX
Note that the MIPI cable that connects the camera to the VTX needs to be purchased separately, it’s not included when you buy the camera or VTX.
Product Page:
- NBD: https://oscarliang.com/product-jp2h
- RDQ: https://oscarliang.com/product-ds0e
- GetFPV: https://oscarliang.com/product-mrtf
It comes in different lengths so make sure you measure how long is needed before purchasing. Lengths available are: 4cm 8cm, 12cm, 25cm. Note that the DJI MIPI cable doesn’t work with HDZero because aparently DJI’s are not standard size MIPI connectors.
Get the longer cable than you need! It’s better be too long than not long enough! 12cm should be ok for most 5″ frames, but for some with long body it might not if you are mounting the VTX at the very back. Double check.
The MIPI connector can only fit one way, press very gently and do not force it. You can secure it with the provided zip tie or metal plate.
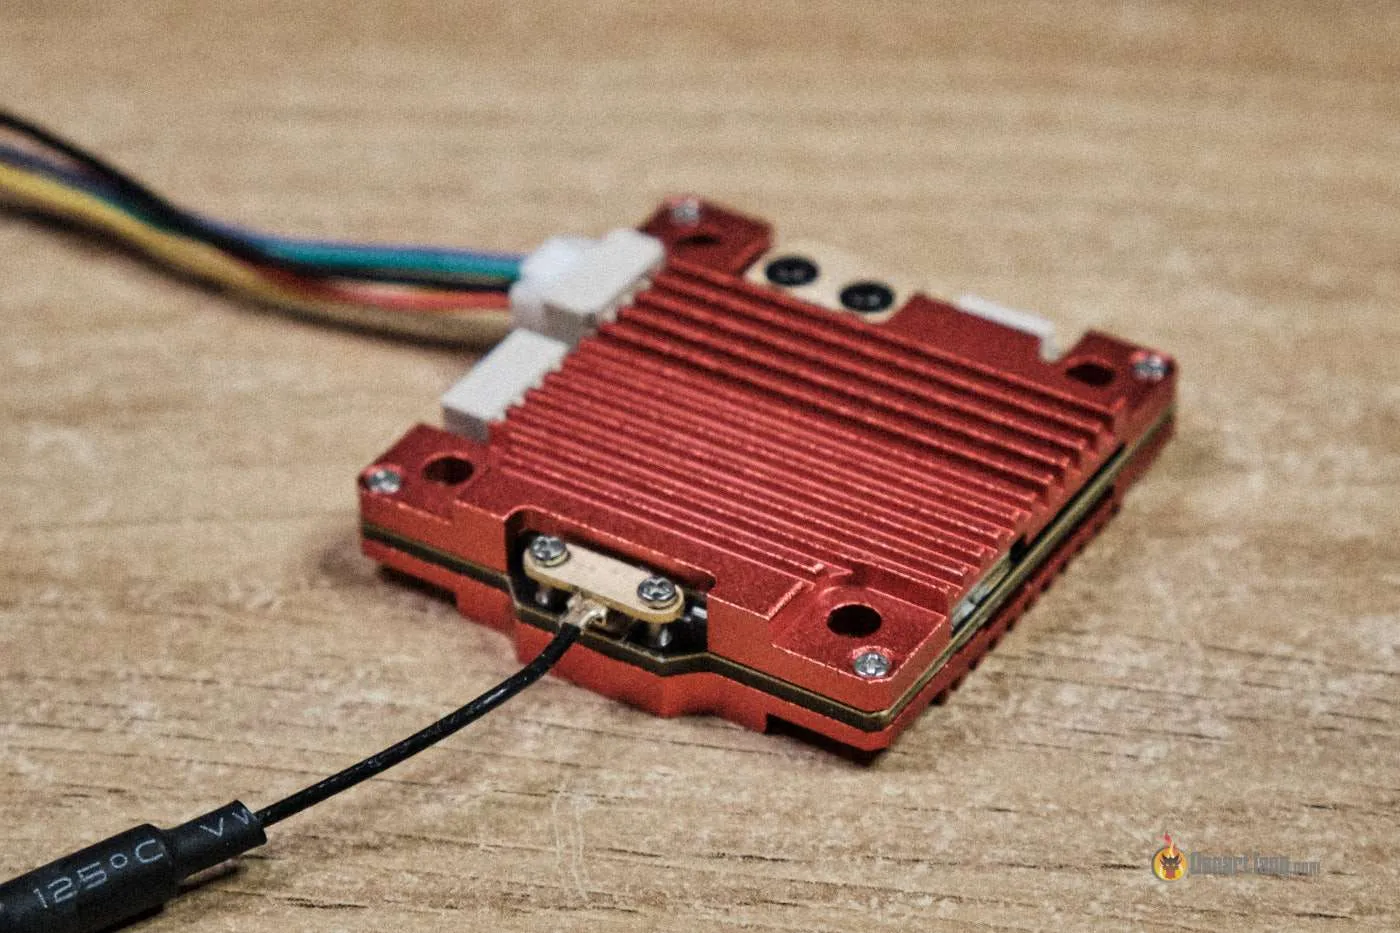
VTX / FC Wiring
There are only 4 wires you need to connect between the FC and VTX: VCC, GND, TX1 and RX1.
VCC is the power, GND is ground, TX1 and RX1 connects to any spare UART on the flight controller.
If you want to setup SmartAudio too, you will need 1 extra wire to connect the SA pad on the VTX to an RX pad of another spare UART. I personally recommend setting up SmartAudio, it’s useful.

Freestyle V1 VTX pinout:

Freestyle V2 Pinout:

Although some of these HDZero VTX supports up to 6S input voltage, I strongly recommend powering it via a BEC (built-in voltage regulator on your FC), for example 8V-12V, and not directly from the LiPo. Crashing or the motors getting obstructed can cause a massive voltage spike in the power system and can burn out the VTX. Powering the VTX via a BEC can reduce the risk of that.
If you still want to power the VTX directly from LiPo, it would help by adding a low ESR capacitor to the power to reduce those voltage spikes.
Mounting VTX in the Drone
It’s important that you check if your frame can fit the HDZero VTX. For example the Race V2 VTX, although it has 20x20mm mounting holes, it’s almost as large as a 30x30mm board so it might not fit in some frames designed for the DJI Vista which also uses 20x20mm mounting.
Before powering on the VTX, make sure to attach the antenna or it could overheat very quickly and get damaged.
The U.FL connector is probably one of the weakest points of any HDZero VTX, it can be ripped off when the antenna pulls on that pad. Therefore you should use zip tie or the provided metal plate to secure the U.FL connector in place.

Binding VTX and VRX
There’s no binding required, HDZero works just like analogue, simply select the same channel on the VTX and VRX and you have a working video link. This is how to spectate/watch other people fly too, just go to their channel on your VRX.
As a matter of fact, as soon as you power on the VRX mdoule, it will begin by scanning all the channels and show you which ones are active.
Betaflight OSD Setup
Betaflight 4.4
Requirements:
- Update your VRX/VTX to the latest firmware
- Connect TX and RX pads on VTX to a spare UART on the FC
- Enable MSP for that UART in the Ports tab in Betaflight
- In the Configuration tab, enable OSD and Telemetry features
In the Ports tab, under “Peripherals” for that UART you have connected the VTX to, select VTX (MSP + Displayport) it will also enable MSP automatically.

Here is how to set up SmartAudio:
- Connect the SA pad on the VTX to a TX pin of a spare UART on the FC
- In the Ports tab in Betaflight, select SmartAudio for that UART
- Apply HDZero VTX preset

In the OSD tab, make sure to select “HD” in video format in order to use the whole 16:9 screen and appropriately sized font.

My OSD elements:
set osd_vbat_pos = 2499 set osd_link_quality_pos = 2237 set osd_rssi_dbm_pos = 2229 set osd_tim_2_pos = 2563 set osd_flymode_pos = 3596 set osd_throttle_pos = 3532 set osd_current_pos = 3563 set osd_mah_drawn_pos = 2531 set osd_craft_name_pos = 2083 set osd_pilot_name_pos = 2115 set osd_warnings_pos = 14677 set osd_avg_cell_voltage_pos = 2520 save
Betaflight 4.3 / 4.28
Requirements:
- Update your VRX/VTX to the latest firmware
- Connect TX and RX pads on VTX to a spare UART on the FC
- Enable MSP for that UART in the Ports tab in Betaflight
- In the Configuration tab, enable OSD and Telemetry features
In CLI, enable MSP Display Port by entering:
set osd_displayport_device = MSP set displayport_msp_serial = YOUR_UART_PORT_NUMBER - 1 save
For example, if you are using UART2, displayport_msp_serial should be 1.
The OSD layout looks exactly the same as analogue, and you can move the elements around the same way too in Betaflight. Unlike DJI, all the elements are supported in HDZero.

Here is how to set up SmartAudio:
- Connect the SA pad on the VTX to a TX pin of a spare UART on the FC
- In the Ports tab in Betaflight, select SmartAudio for that UART
- Enter this VTX table in the CLI command:
vtxtable bands 2 vtxtable channels 8 vtxtable band 1 RACEBAND R FACTORY 5658 5695 5732 5769 5806 5843 5880 5917 vtxtable band 2 FATSHARK F FACTORY 0 5760 0 5800 0 0 0 0 vtxtable powerlevels 3 vtxtable powervalues 1 2 3 vtxtable powerlabels 25 200 0 save
Stick Commands
By setting up Betaflight OSD you can activate certain HDZero menus too. Here are the stick movement diagrams for HDZero: https://oscarliang.com/stick-commands/#HDZero-Stick-Commands
Changing VTX Settings
There are 3 ways to change VTX settings: keypad joystick, VTX menu and SmartAudio. You can use whatever method you prefer, personally I use SmartAudio most of the times. However for VTX that don’t support SmartAudio, you can use VTX Menu.
Keypad Joystick

I think VTX Menu or SmartAudio are better ways to change VTX settings, but the keypad that comes with the VRX module is handy to have when you can’t look at the screen or can’t operate the menu with your radio, or you just want to quickly change channel or power level.
You can change settings for VTX and certain camera with the keypad. Here’s the flowchart how the command works.

Only Runcam Nano HD (orange) and Foxeer Digisight V1/V2 are supported by the keypad joystick. All other HDZero branded cameras (HDZero Nano lite, HDZero Micro V2, and HDZero Nano camera) support stick commands for camera settings. HDZero Micro V1 and Foxeer Digisight V3 camera does not have user changeable camera settings.
The Whoop Lite VTX does not support this keypad, but all other VTXes do.
VTX Menu

To bring up the VTX Menu, use stick commands as shown here.
The VTX menu is useful when you are not using a flight controller with HDZero, or you didn’t setup SmartAudio (or if the VTX doesn’t support Smartaudio like the Whoop VTX). Here are what the options mean.
LP_Mode: low power mode, when set to ON, before the quad arms, the video transmitter will be in low power mode (25mW). It’s useful when you crash and the quad is sitting on the ground, the VTX transmits on lower power to avoid overheating. But if you are far away from the quad, you will most likely lose video signal, but if this doesn’t matter to you you should set it to ON.
PIT_Mode: options are OFF / 1mW / 0mW. 0mW means the VTX will power down until you arm.
OFFSET_25mW: In some racing events, you are required to be on 25mW or lower. This options allows you to lower your power output by a certain number of mW to meet the power requirement.
SmartAudio

You can change HDZero VTX power level and channel through Betaflight OSD menu just like an analogue VTX by setting up SmartAudio.
You can also setup switches on the radio to quickly control your channel and power, and enabling pit mode without looking at the OSD, which is useful for race events.
Note that HDZero VTX outputs 0.1mW when SmartAudio PIT mode is ON, it allows you to still see Betaflight OSD menu with the quad up close to your FPV goggles, and yet it won’t cause issues to other pilots who might be in the air.
However, when SmartAudio is enabled, the usual HDZero VTX menu will be disabled. SmartAudio also takes up an UART on the FC (it only requires the TX pin).
SmartAudio is supported in the following HDZero VTX: HDZero Race, HDZero Freestyle and HDZero Whoop Lite VTX, it doesn’t work in the older HDZero Whoop VTX. It’s using TBS SmartAudio V2.1.
Changing VRX Settings
There are two modes, Video mode and Setup mode. In video mode, HDMI outputs live video, while setup mode outputs the system menu with lots of settings.
To switch between Video mode and Setup mode, push the wheel to the left and hold for around 3 seconds, then release.
In Setup mode, use the wheel button to navigate and push down the button for confirmation, push the wheel to the left and hold to return to the previous menu.

How to Record Video (DVR)
By default, the DVR automatically starts recording if there is video signal from the quad. It can be set to manual start recording in the menu.
An 8GB-32GB SD card is recommended by HDZero. I’m using a SanDisk Ultra 32GB and it works well so far.
First of all, format your SD card inside the module to avoid any potential format issues (the format option is in the system menu). If you must format the SD card on your computer, choose FAT32 and Allocation Unit size to 4096 bytes (in windows).
- DVR video files resolution: 1280x720p 60FPS
- Bitrate: 18Mbps with TS format, 12Mbps with MOV format, format is optional in system menu
One minute of recording in TS format is around 130MB, so a 32GB card can store around 240 minutes of video (rough estimation). MOV video format takes around 30% less space but also lower in bitrate.
TS format is tolerant of being cut off. In other words, if the video file is suddenly cut off (say, by pulling power before stopping recording), it wont be corrupted, and will still play. It’s not about quality at all, really. It’s about making sure you don’t lose footage. The MOV option is the same encoding, but the start of the file contains an index to make seeking easier. When you stop recording, the DVR writing the file goes back and updates the index. If you pull power, the index isn’t written, so the file needs to be repaired, which may or may not work.
I think for most people, the MOV format is better because many popular video editors don’t support TS format and you need to convert it to MP4 or MOV first. MOV is just easier to work with.
When SD card is full, recording will stop but it won’t affect the live video. Switching to setup mode in the module will stop the recording also, and switching back to video mode will start the recording again but in a new video file.
The HDZero Goggles support better DVR (h.265 at 25mbps) and they allow you to pick either TS or MP4, both are the same quality, but MP4 is better in compatibility with many video editors.
FAQ
Here’s a troubleshooting guide and frequently asked questions.
VRX Not Booting Up After Update
It probably needs to be re-flashed in bootloader mode. Here’s how:
Power off VRX, get the correct firmware on an SD card and insert it in the VRX module.
Move the switch to Bottom position.

Power on VRX module, the red LED will light up, wait for it to turn off, on, and then off again (it could take over 10 min to complete).
Power off, and move the switch to TOP position.
That should fix it.
No Video
First thing to check is if you connected the VRX to the goggles correctly, can you see the VRX menu? If you can then the problem is probably on the VTX side.
Check if the camera is connected to the VTX properly and any sign of damage on the MIPI cable/connectors.
Try updating the VTX and VRX to the latest firmware.
Check if the VTX is getting enough power, maybe the BEC you are using doesn’t supply enough voltage or current. Check with a multimeter, and test the VTX by powering it directly from a LiPo battery. The red LED might give you a hint, it should be bright red when powered, if it’s dim and flickering that could be a sign of not getting enough power.
If the Blue LED flashing about once every second, chances are it’s not detecting the camera, or it has the wrong firmware. Try flashing the correct firmware again. If that doesn’t fix it, try a different camera, or put that camera on a different VTX.
Also make sure you have the HDMI output setting correctly, the options are 720p and 1080p. On certain goggles such as the Skyzone you need 1080p otherwise color might not look right. But on Orqa only 720p works.
Unsupported HDMI Input
The issue could be wrong resolution option (HDMI output in menu). Toggle between 720p/1080p and see which one works for your goggles. If you can’t do it in the goggles, connect the module to your computer monitor with HDMI input, most monitors should support both 720p and 1080p.
OSD Not Working
Make sure firmware are updated on both VRX and VTX.
Check if you are using the right UART in the ports tab and that’s indeed connected to your VTX, remember the port number you enter in CLI has to be the UART number subtracted by 1, for example UART5 is 4, UART2 is 1, etc.
The TX pin should go to RX pin, and RX to TX. Do not use softserial. Make sure you have configured MSP display port correctly.
Official HDZero Manual
https://www.hd-zero.com/document
Edit History
- Jul 2022 – tutorial created
- Feb 2023 – updated for Betaflight 4.4
29 comments
Hello,
Thanks for that great article Oscar, as usual, you saved my time so many times :)
I just received an Eco bundle VTX + cam but I don’t understand how I’m supposed to plug or solder it. Your tutorial is perfect so I’m clear about where I should solder on the FC, but what do I do with the vtx chip ? There are 2 plugs available but there isn’t any compatible plug in the box :/ Shall I solder directly on board but if yes, where ? There are four clean and accessible pads named V, G, T and R, but what about the fifth for smart audio, and who is who (V = voltage,G = ground, T = TX, R = RX ?). Sorry for the noob questions but I’m really surprised how this product is not documented at all, it’s not in the manuals on the hdzero site :(
Sorry I am currently not using any HDZero gear and not keeping up with their new products. I’d suggest reaching out to HDZero support.
Hi Oscar, I tried to reply just after my post but I couldn’t because first post needed to be approved. If somebody ends here with the same question, I finally found how I should solder it by consulting mobula6 eco manual as it uses the same vtx. Here’s a link to the manual, there’s a photo with the wiring between vtx and fc :) fr.manuals.plus/happymodel/mobula6-eco-2024-65mm-brushless-whoop-drone-manual
Hi Oscar,
thanks for this tutorial, but the below linked screenshot from the OSD section makes it look like you should toggle serial_rx for the vtx uart. i was pulling my hair out for a while trying to get it working.
https://oscarliang.com/wp-content/uploads/2022/10/betaflight-4.4-configurator-ports-peripherials-vtx-msp-displayport-smartaudio-tramp-serial-rx.jpg
How to set up HDZero Freestyle system with iNAV 6.0?
Do you have a recommendation on how to wire and set up the HDZero Freestyle on INAV? All the instructions are for Betaflight
If you’re using betaflight 4.4 there’s no need to use smart audio anymore, just use MSP, this makes it a lot easier to use the existing HD DJI port that seems to be on all flight controllers currently.
Hello Oscar, if I only connect GND and VCC to power source (and leave the TX/RX un-connect). Will the camera still working and transmit video to VRX/Goggles? I dont fly a drone, I have rc truck so I dont use Flight Controller
Yes, it will still transmit with only power connected.
Oscar, please take a look at the thread in the link, as your wiring diagram seems to be the opposite of what is being said there. Now I can’t seem to get a signal out of my VTX.
Mistakes are only human, but this one just may have cost me a VTX which I’m obviously NOT happy about. facebook.com/groups/hdzero/permalink/579399427421356/
I am deeply sorry about that, there was indeed a mistake in the wiring diagram (order was reversed), although I did use the same color coding as the original harness. I have updated it now.
Very good information, thank you. I have a question though, I have the older Shark byte system and I just got it. What firmware name is it for this older system?
See table under this section: https://oscarliang.com/setup-hdzero/#How-to-Flash-HDZero-VTX
Oh ok, I thought there was just VTX software in this list. So for the older system (Shark byte VRX with the 2 SMA’s on top) it would be “Shark Byte RX.1 SharkByteVRX_2SMA_Revddmmyyyy.zip” Correct? Just want to be sure. Also does it matter if it’s before or after 2023? What does that refer to “Before or after 2023”? Thanks again.
Correct. Before/after 2023 refers to the date of the firmware releases, they changed the naming of the firmware files.
Hi Oscar thanks for such a clear tutorial. I am trying to set up hd zero for small manual fixed wing so no FC . Is this possible? I can see it would power up etc will the Vtx bind directly to vrx and then I can use the goggle menu to control? Or will I still have to set up in betaflight first? Thank you!
You can use HDZero without a flight controller, you can set VTX channel etc using the keypad joystick. You won’t be able to use radio sticks to change settings unless the VTX is connected to an FC tho.
Thanks Oscar – except I have the Whoop 1S Nano version and there is no keypad. Does that mean no choice except to connect to FC?
correct
So we could also use cheap VR box + phone + hdmi to usb video capture + HDZero VRX right?
Hallo,
Hab jetzt zwei mal das hdmi board in der hdo2 gegrillt.
Hat jemand ne idee wie man es beheben kann,es scheint ja bei vielen leuten zu passieren…warum????
Hello, is there a way for mounting the HDzero VRX to Skyzone SKY04X V2? The supplied bracket appears to be firing Fat Shark rather than the Skyzone SKY04X V2. ORQA made a bracket for the ORQA.One Pilot; however, Skyzone does not. Or, HDzero could supply some mounting brackets or allow the buyers to select one. There are some 3D print STL files available on the Internet; but, not all fliers have 3D printers.
Thank you for your review.
Fatshark mount is absolutely (not beautiful though) compatible with skyzone fan
Thx for covering HDZ! I’m using it on everything now from Whoops on up. DJI looks better on the bench, but I find the way HDZ handles break-up and latency to create a much more immersive experience when flying.
As always great article. This is what is missing in the HDZero manuals but hopefully we have You Oscar:-)
Do you think the VTX could work with Fat Shark Scout HD goggles?
Yea they should be compatible :)
Hi Oscar, great tutorial! One note for the original whoop vtx and Smart audio…
I was stumped with how to get osd element “vtx channel” to work since hdzero canvas firmware 09042021. Was just getting the dreaded triple question marks “?:?:?” Instead of actual band:channel:power displayed. The hdzero discord group directed me to use SA (smart audio) which on face value makes no sense because you are not actually connecting a physical wire from a uart to a pad on the tx5s1. Nor is SA use mentioned in any official Fatshark sharkbyte user manual. The tx5s1 itself does not support SA. But SA function needs to be enabled in BF on an open free uart so that the vtxtable can be created. What a pain. But nonetheless it works with firmware 23072021 and higher so now when I change channel or power, the osd now reflects the change. No more triple question marks.
Note just to make sure I had a free and clear uart for SA (again, even though it is not physically connected)
Hey, thanks so much for the info! I would’ve saved myself some trouble if I’d come here before ordering things.
On a side note, the wiring diagram is probably wrong. It’s showing UART connections going TX>TX and RX>RX. Those should be flip flopped if I’m not mistaken.
Please do a new walkthrough on HDZERO goggles etc.