DJI has just unveiled its latest game-changers, the Goggles 2 and DJI O3 Air Unit. These next-generation devices boast remarkable enhancements in image quality, features, and resolution, which now reaches a stunning 1080p at up to 100fps. But, is it worth it for everyone, especially those who already own the original DJI FPV system, to upgrade to the new Air Unit O3 and Goggles 2? Let’s delve into the details and find out.


If you’re still unsure about which FPV system is the best fit for you in 2023, check out my comprehensive summary here: https://oscarliang.com/fpv-system/
Table of Contents
Where to Buy?
Update (Apr 2024): DJI released the new Goggles 3 (https://oscarliang.com/dji-goggles-3/) and Avata 2 drone (https://oscarliang.com/dji-avata-2/).
Purchase the DJI Goggles 2 at:
- GetFPV: https://oscarliang.com/product-l6c2
- FPV24: https://oscarliang.com/product-ir06
- AliExpress: https://s.click.aliexpress.com/e/_DeYafE7
- RDQ: https://oscarliang.com/product-ju88
- Amazon: https://amzn.to/3HDvOXr
Secure the DJI O3 Air Unit from:
- RDQ: https://oscarliang.com/product-sadl
- FPV24: https://oscarliang.com/product-lg1c
- GetFPV: https://oscarliang.com/product-4blv
- AliExpress: https://s.click.aliexpress.com/e/_DdQYArv
- Amazon: https://amzn.to/3RtWfm1
The complete Air Unit O3 package, including the camera and antenna, retails at US$229. However, you can purchase individual spare parts separately, an excellent option for those who might need to replace a damaged component without buying an entirely new unit:
- O3 Camera Module (US$109): https://oscarliang.com/product-68q4
- O3 Transmission module (US$169): https://oscarliang.com/product-b5jw
- Dual Antenna (US$19): https://oscarliang.com/product-lhx2
- 3in1 cable (US$9): https://oscarliang.com/product-36t0
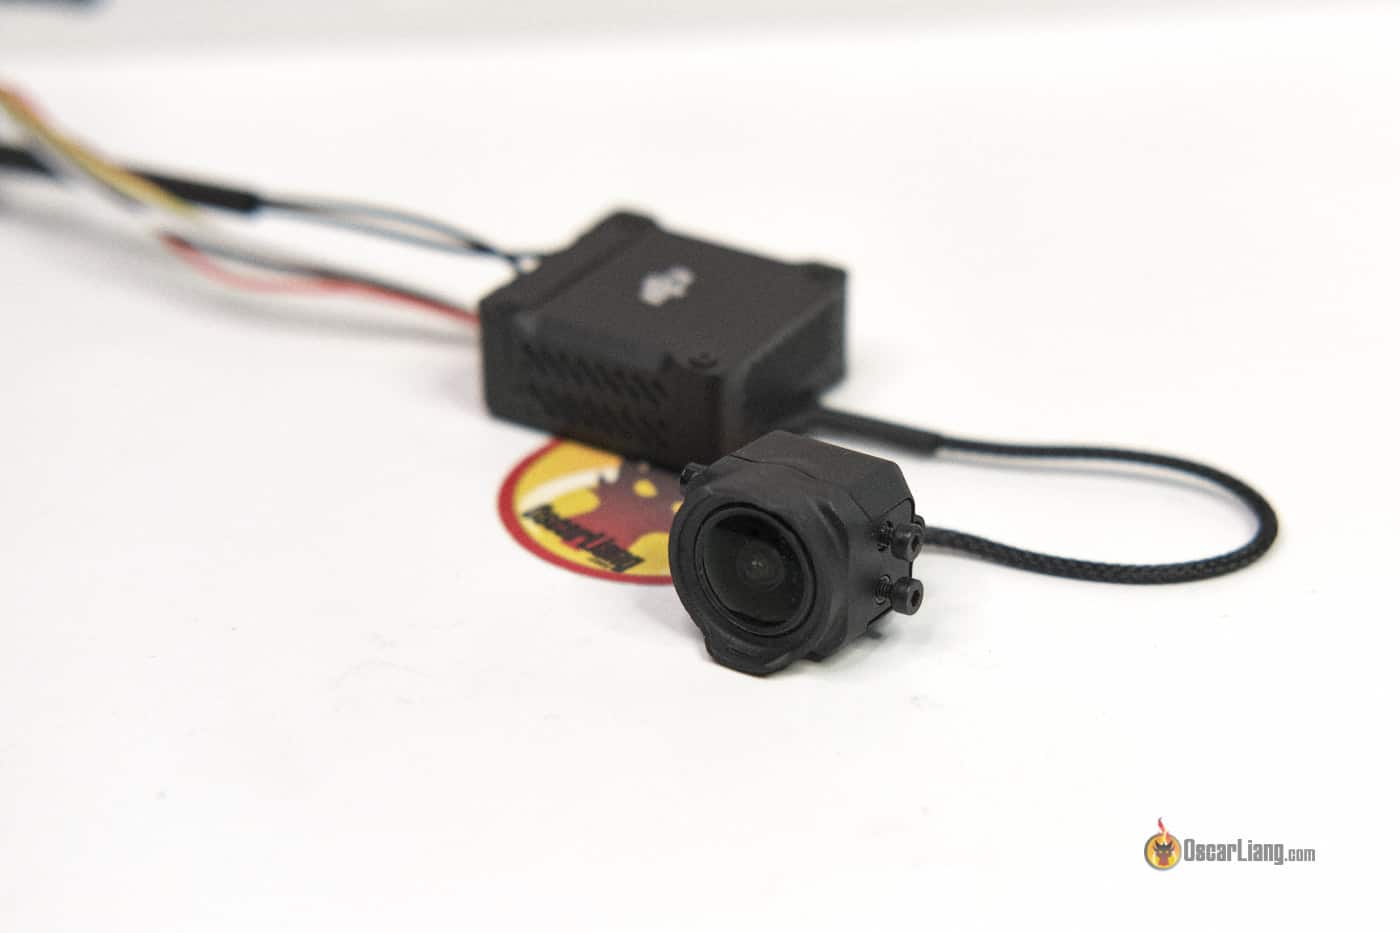
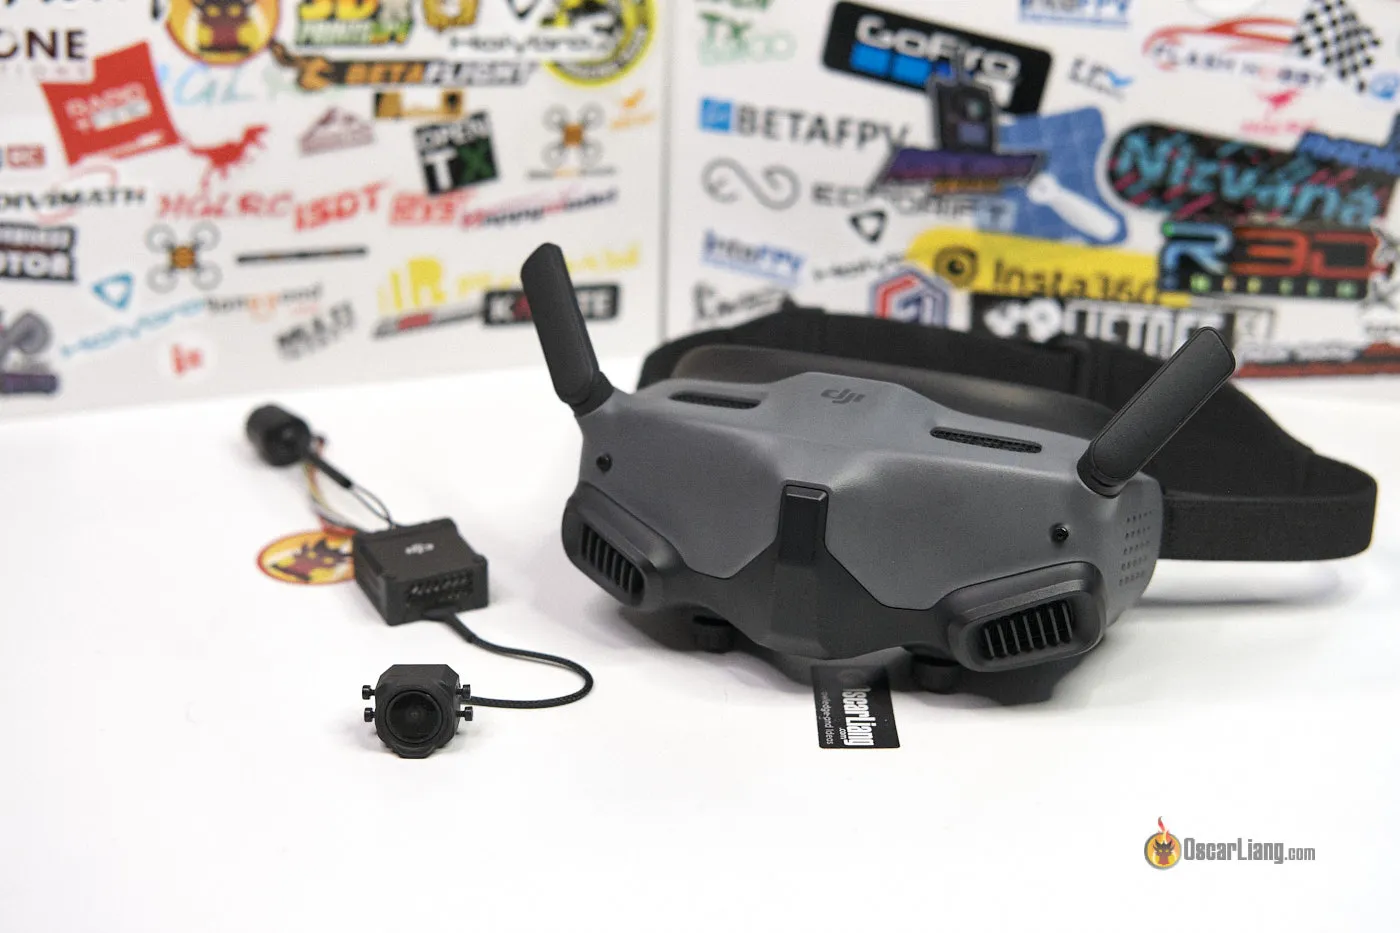
A Closer Look at the DJI O3 Air Unit
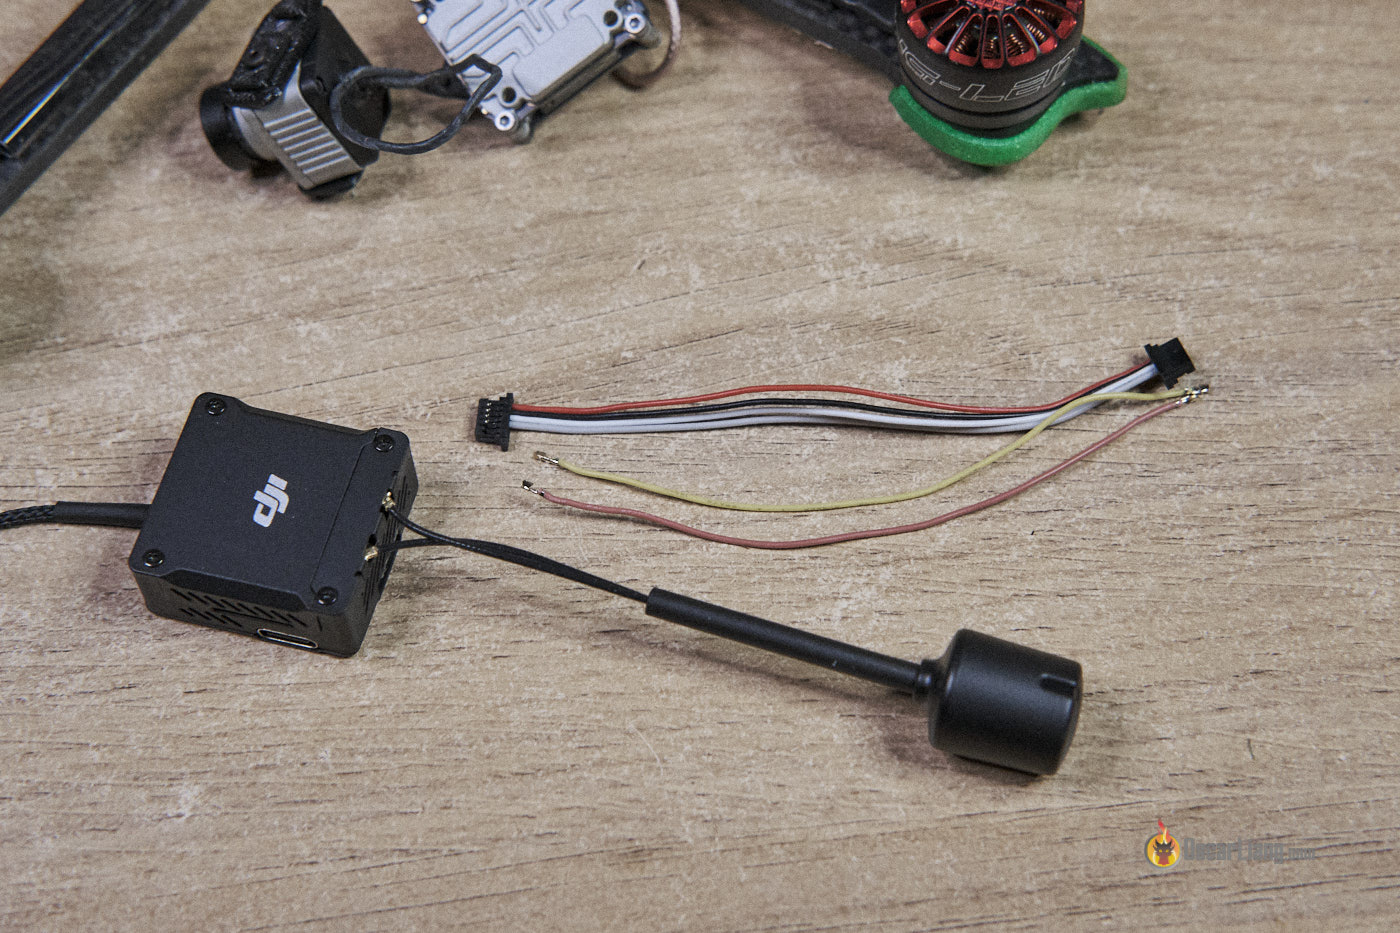
The DJI O3 Air Unit sports a sleek, square design with subtle ventilation on all sides, reminiscent of the Caddx Vista. The unit includes a 6-pin JST connector, USB-C port, micro SD card slot, camera cable, and antenna cable, with the camera connected via a braided cable.
In essence, DJI took the same camera and video transmitter from the recently released DJI Avata drone, repackaged it into a “DIY” bundle, and dubbed it the O3 Air Unit. As a result, it boasts the same image quality as the Avata drone.

The O3 Air Unit is compatible with both the new DJI Goggles 2 and the older DJI FPV Goggles V2 (albeit with reduced performance). However, the DJI FPV Goggles V1 is not compatible, likely due to its lack of dual-band capability.
With Goggles 2
- 1080p 100fps 30ms latency
- 1080p 60fps 40ms latency
With FPV Goggles V2
- 810p 120fps 28ms latency
- 810p 60fps 30ms latency
Interestingly, the older V2 goggles provide lower latency but at a reduced resolution. While the difference between 1080p and 810p may not seem significant, it’s almost double the pixel count and can create a noticeable difference in image quality.
Specifications
- Price: $229
- 1/1.7-inch 4:3 image sensor
- 155° FOV
- 10km range
- O3 Air Unit Dimension 30.5 x 30.5 x 14.5mm
- O3 Air Unit Mounting Hole Pattern 25.5 x 25.5mm (M1.6 screws)
- Camera module dimension: 20mm (width) x 21.2mm (length) including lens
- Camera module mounting: 2 holes on each side 6mm apart (M2)
- Camera ribbon cable length: 115mm
- Antenna wire length 85mm
- Length of silicon wires to FC: 100mm
- Input voltage: 7.4V to 26.4V (2S to 6S)
- Weight: 39.5 grams (whole setup)
Size and Weight
The DJI O3 Air Unit is more compact and lighter than the original DJI FPV Air Unit (39.5g vs 53.4g). However, it’s larger and heavier than the the Runcam Link / Caddx Vista (33g) and the Walksnail Avatar VTX/Cam combo (28g). The O3 Air Unit is similar in height to the Vista but wider and longer, comparable to the Avatar VTX in terms of width and length.

DJI designed the Air Unit with two antennas housed together for easy mounting, making them appear as a single antenna. Two wires emerge from the antenna and connect to separate U.FL connectors on the Air Unit.
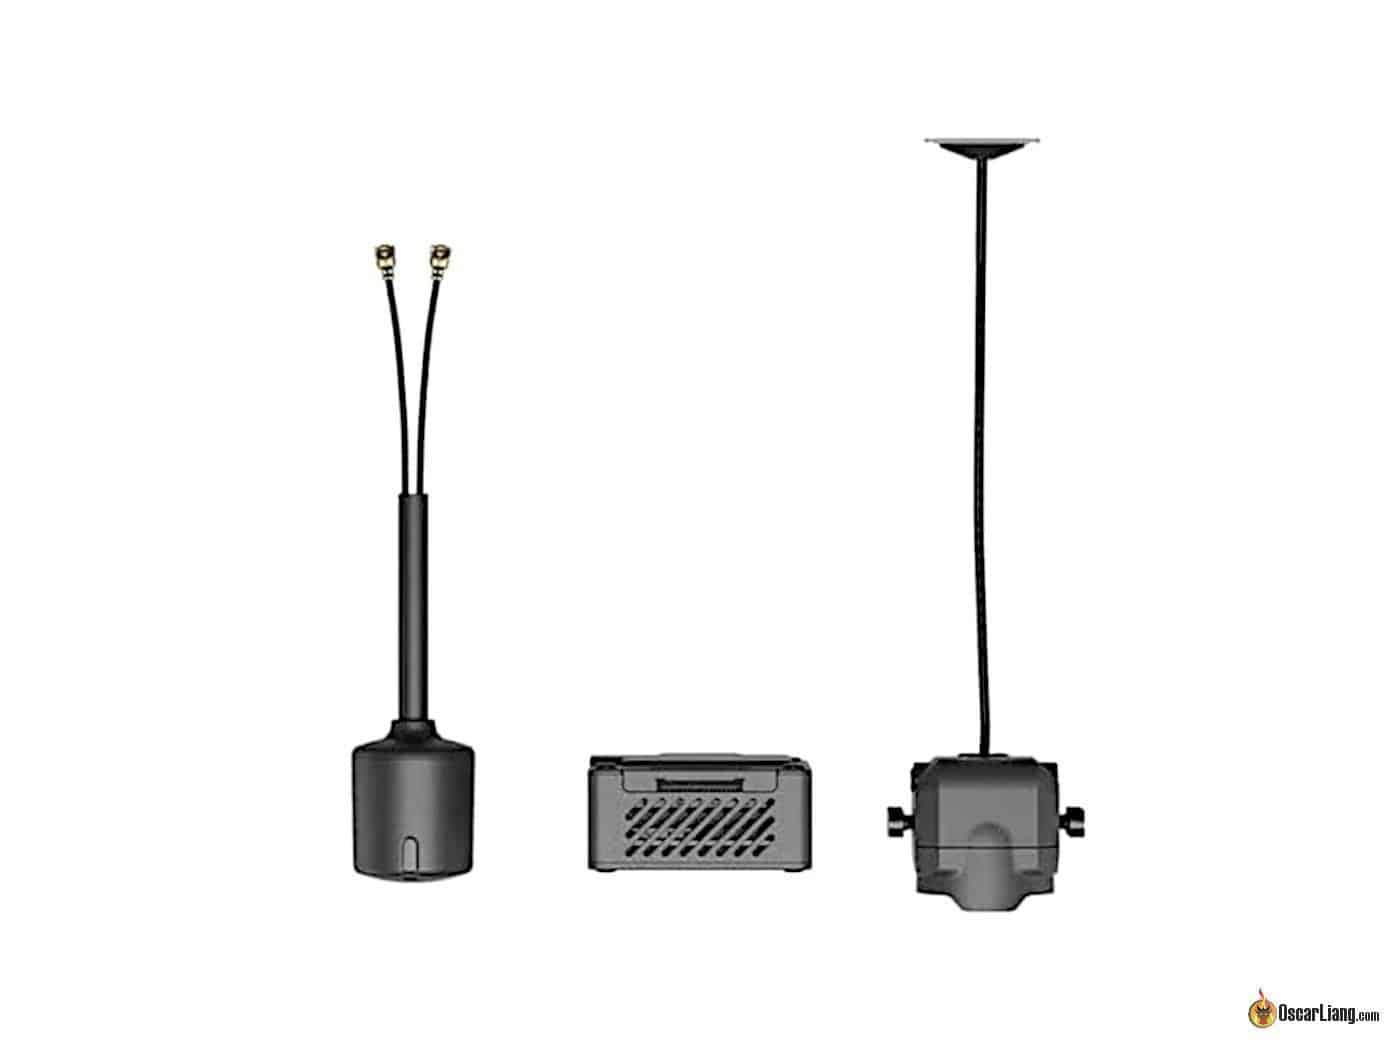
Featuring 25.5×25.5mm mounting with M1.6 screws, the O3 Air Unit is slightly larger than the Vista but should still fit most frames available.

However, the camera module’s large lens and non-standard dimensions pose a challenge for current FPV frames. The bigger camera, which houses a larger sensor, theoretically offers better image quality and low light performance. Installing it may require custom-made 3D printed brackets or a new frame specifically designed for the O3 Air Unit.

None of my existing frames natively fit the camera module; all require 3D printed holders. The camera protrudes from the frame due to its width, offering limited protection during crashes.

On the other hand, the video transmitter is small enough to fit most frames. If your frame doesn’t have 25.5×25.5 mounting, you can either create an adapter or use double-sided tape and a zip tie for securement.

This is the iFlight Nazgul V2 I just installed the DJI O3 inside.

Image Quality and Performance
The O3 Air Unit essentially serves as a 4K action camera.
Compared to the previous DJI FPV Air Unit, the O3 Air Unit’s image quality is markedly improved, boasting greater detail, dynamic range, and more resolution and frame rate options.
Users can adjust exposure, white balance, ISO, and shutter speed through the goggles menu, offering flexibility similar to a GoPro. The field of view can also be modified, but this only affects onboard recording, not what you see in the goggles (which always display a “Wide” FOV). I recommend switching to a 4:3 aspect ratio in the goggles for additional vertical FOV, as the image sensor is 4:3.
Price Comparison
When comparing the video transmitter and camera, the $229 DJI O3 is roughly $70 more expensive than the Walksnail Combo, $90 more than the Runcam Link + Wasp cam combo, and $50 more than the HDZero combo (Freestyle VTX + Micro Cam V2).
The higher price of the DJI O3 System accounts for added features, such as a true 1080p video link, 4K stabilized onboard recording, and built-in radio control link. For some users, these features may be sufficient to replace a heavy HD action camera, resulting in a lighter quadcopter with improved flight performance.
However, in the event of a crash, the first component to suffer damage is likely the camera, and replacing it isn’t cheap. The O3 camera module costs $109, while other digital FPV system cameras average between $40 and $60.
Onboard Recording
The O3 Air Unit serves not only as an FPV camera but also as an HD action camera. It can record up to 4K 60fps in a 16:9 aspect ratio or 2.7K at 120fps. The built-in RockSteady feature provides video stabilization, and when disabled, gyro data is available alongside video files for use with Gyroflow stabilization.
Keep in mind that vibrations can significantly impact Rocksteady’s performance. With the gyro sensor located inside the camera module, the O3 Air Unit requires a clean drone build and effective camera mounting to dampen vibrations for optimal stabilization.
While the image quality of onboard recording may not match the latest GoPro cameras (it is closer to a GoPro Hero 6 in my opinion), it is likely sufficient for most FPV hobbyists. The 20GB built-in memory can hold about 20 minutes of 4K 60fps recording, and a micro SD card can be used for additional storage. However, there is no onboard microphone for sound recording. The O3 Air Unit’s internal storage is a convenient backup for when you forget your SD card and you won’t go home empty handed.
An ND filter can be added to the O3 camera to create more motion blur for cinematic videos, but this also affects the image displayed inside the goggles, making it less flexible than using a separate action camera. An ND filter option for the O3 is available here: https://oscarliang.com/flywoo-nd-filter-o3/

Range
The DJI O3 Air Unit boasts a maximum range of 10km (6.2 miles) in FCC mode and 2km in CE mode. This impressive range often exceeds the battery life of most drones. Tests have shown the O3 can go even further with aftermarket higher gain antennas on the goggles.
Built-in Radio Control Link
The O3 Air Unit includes an SBUS output, similar to the original Air Unit and Vista. It is compatible with the DJI remote controller V2, which comes with the Avata and DJI FPV Drone, allowing you to fly your drone without an external receiver like Crossfire or ExpressLRS.
![]()
While using the DJI remote controller 2 simplifies drone setup, the built-in radio link may not offer the same range and packet rate as high-performance radio links like ExpressLRS. For a more solid radio link and improved performance, consider using a dedicated receiver in your drone. Another disadvantage of the DJI Radio 2 is the lack of functionality and screen, making it less customizable and feature-rich compared to similarly sized radios like the Radiomaster Zorro.
Heat Issue
The O3 Air Unit is known to generate more heat and is more prone to overheating than the Vista and original FPV Air Unit. Ensuring proper cooling is essential for maintaining performance and reliability. Enable low power mode to transmit at the lowest possible power level when the drone is not armed.
Has to be Connected to an FC for Full Power
Keep in mind that even with Low Power mode off, the O3 Air Unit does not output maximum RF Power until it receives the Arming command from the flight controller. This is a concern for those flying fixed wings without a flight controller, as it currently seems that the best range requires connecting the O3 to an FC. I think this might just be a bug and hopefully it will get fixed by DJI in the future(?).
But I think it makes sense to use an FC and GPS capability on a wing if you plan to use the expensive O3 Air Unit on it.
Pros and Cons
Pros:
- Update the O3 Air Unit without powering up your quad, avoiding overheating on the bench
- Access both internal storage and SD card through USB without plugging in LiPo
- Compatible with both DJI Goggles 2 and FPV Goggles V2
- Larger image sensor
- DJI’s Flagship O3+ Video Streaming
- Built-in 20GB memory for high-quality onboard recording, with micro SD card support for memory expansion
- 4K recording can potentially replace GoPro
- Built-in RockSteady Stabilization and Gyroflow support
- Native Betaflight OSD Support (MSP Displayport), eliminating the need for hacking
- Records OSD and the entire menu in Goggles DVR
Cons:
- Incompatible with DJI FPV Goggles V1
- More expensive than other digital FPV systems
- Larger and heavier than the Vista
- Camera module too big for most frames
- Consumes 40% more power than the Vista due to 4K onboard recording, stabilization, and better encoding. This not only increases the risk of overheating but also requires a BEC capable of handling at least 17W-18W (e.g., 2A at 9V) for safety
- Does not output maximum RF power unless used with a flight controller (with MSP UART connected), making it less ideal for wings without an FC
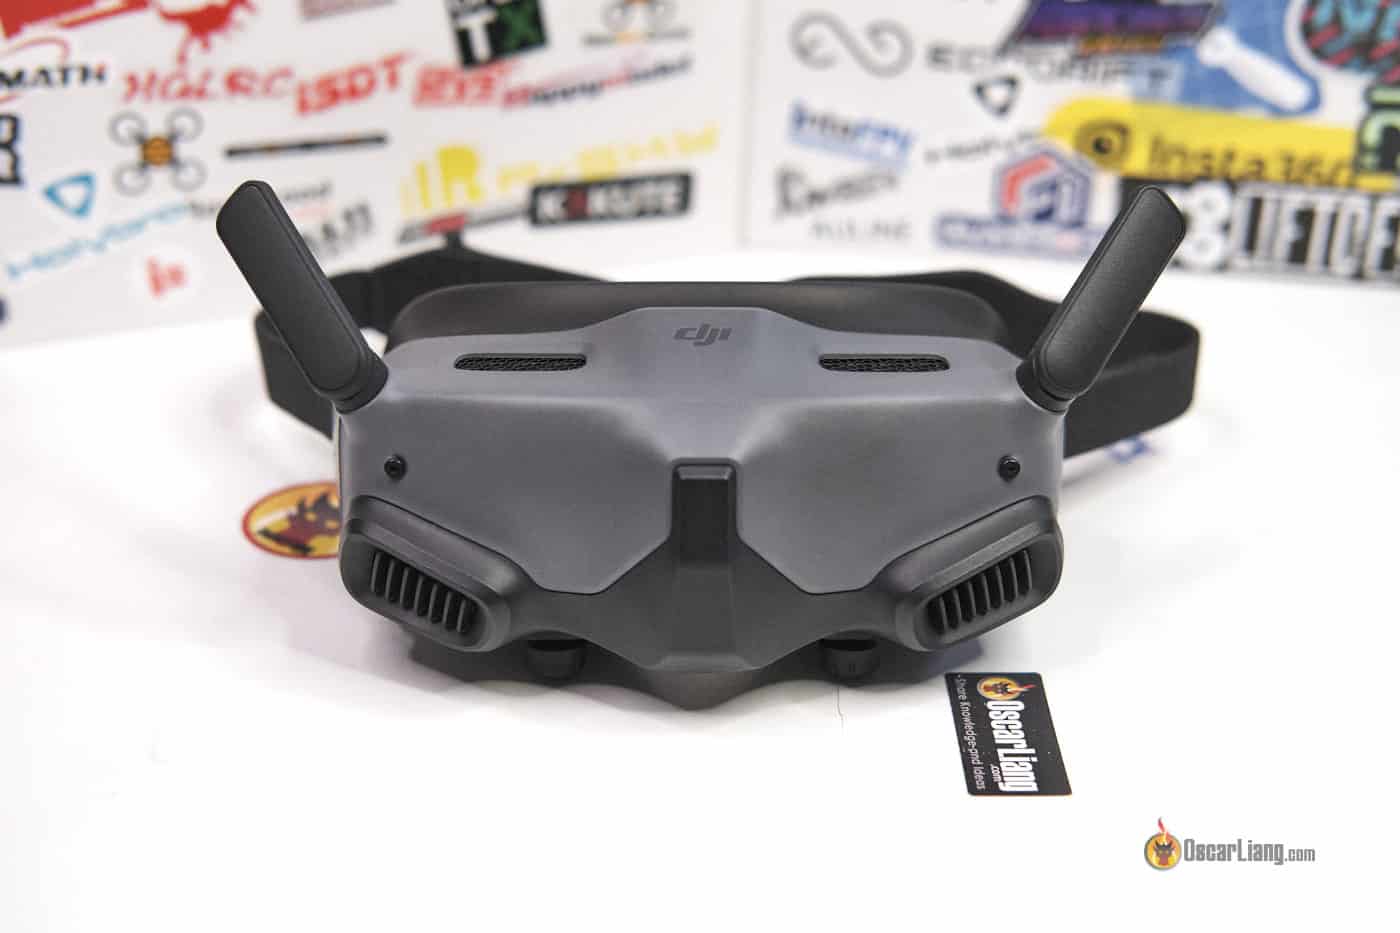
DJI Goggles 2
The new DJI Goggles 2 have been completely redesigned, offering a more compact form factor that is easier to carry around compared to previous versions.
They are roughly the same size as the Orqa FPV.One Pilot.

Left: DJI Goggles 2; Right: Orqa FPV.One Pilot
They are even slightly smaller than the Walksnail Avatar (also known as Fatshark Dominator HD).
Left: DJI Goggles 2; Right: Walksnail Avatar (Fatshark Dominator HD)
The Goggles 2 feature OLED screens, which are a significant improvement over the LCD screens in the V1 and V2. The OLED screens offer better contrast, vibrant colors, and sharper images, which enhance the HD video experience.
Specifications
- Two Micro-OLED Screens, screen size 0.49 inch
- Screen resolution 1920x1080p
- 2 Hour Battery Time with the included battery
- Diopter Adjustment (+2 to -8), but no astigmatism correction support
- IPD: 56-72 mm
- FOV: 51° diagonally in 4:3 aspect ratio
- Max Video Transmission Bitrate: 50Mbps
- Video Transmission Encoding: H.265/H.264
- Supports MP4 and MOV Video and Audio Playback Formats
- Input voltage: 2S
- Supports DLNA Protocol (WiFi streaming)
- WiFi protocol: Wi-Fi 802.11b/a/g/n/ac
- Supports head tracking
- Dual band capability 2.4GHz and 5.8GHz
- Dimension with antenna folded: 167.40×103.90×81.31 mm
- Weight:
290g298g
Differences between FPV Goggles V2 and DJI Goggles 2
DJI’s naming convention can be confusing, so let’s clarify the differences between these two goggles.
The FPV Goggles V2 goggles were released around the same time as the DJI FPV drones in 2020. The new DJI Goggles 2 were released more recently, alongside the DJI Avata drones in Fall 2022.
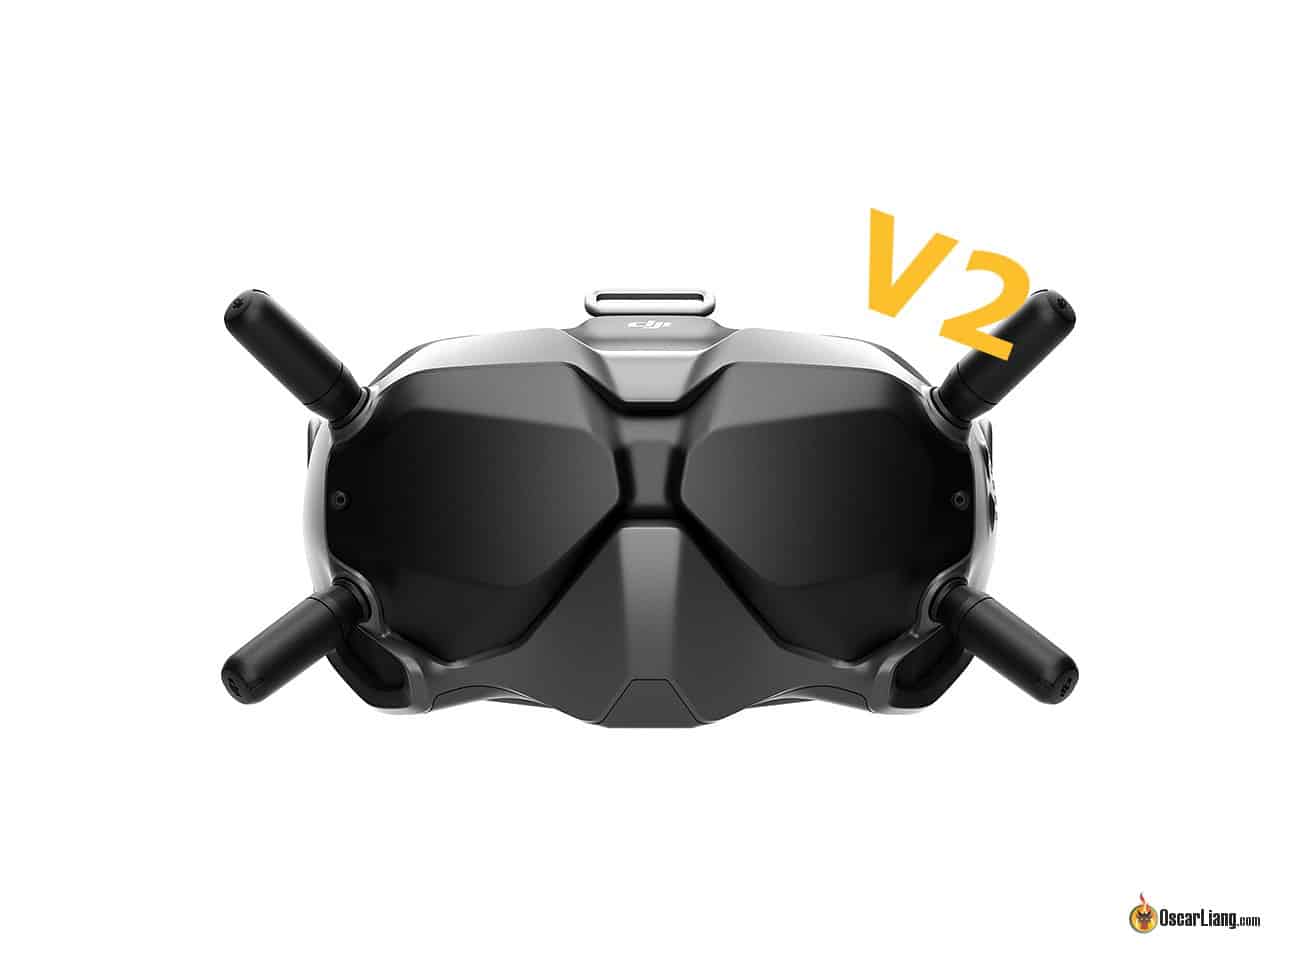
DJI FPV Goggles V2 (Previous generation)
The Goggles 2 are significantly lighter and smaller than the FPV Goggles V2. DJI managed to make them more compact while also incorporating better technology.

Left: New DJI Goggles 2; Right: Old DJI Goggles V2

The new DJI O3 Air Unit is compatible with both the FPV Goggles V2 and Goggles 2 headsets. However, with the V2 Goggles, you won’t get the full performance. On the FPV Goggles V2, the video feed is 810p 120fps with 28ms latency, while on the Goggles 2, it’s 1080p 100fps with 30ms latency.
Note that the new Goggles 2 do not have AV input, so they don’t support analog FPV systems, unlike the previous FPV Goggles V1/V2. They also don’t have HDMI input, so they don’t support other digital FPV systems like HDZero or Avatar.
Can’t decide which goggles to get in 2023? Check out my FPV goggles buyer’s guide: https://oscarliang.com/fpv-goggles/
Antennas
The two foldable antennas on the Goggles 2 are omni-directional linearly polarized antennas, and there are two additional internal antennas, which are also omni-directional linearly polarized. The O3 Air Unit also has linear antenna, so they work well together – two linear antennas in 45-degree to each other inside the same housing.
However the Vista normally comes with LHCP antennas, therefore the Goggles 2 might perform worse with the Vista. There will be some signal loss due to the difference in polarization, but it should be fine for short to mid range flying.

The two external antennas are removable and connected via MCX connectors, allowing for potential aftermarket antenna upgrades in the future. The two internal antennas are harder to access, so it’s unlikely that ordinary pilots would replace them.

The foldable design is convenient, and since antennas are included, you save money compared to many FPV goggles that don’t come with antennas.
Track Pad
The Goggles 2 have no buttons, relying on a trackpad for navigation and menu control. This innovative design is likely cheaper to produce and more durable than mechanical buttons, but it can be less user-friendly. The trackpad may register incorrect gestures, which can be slightly annoying, and it takes some time to get used to. On the bright side, the lack of buttons means you won’t accidentally press them when putting on or taking off the goggles.

Goggles DVR
Here’s a sample footage from the DVR (using O3 Air Unit).
The Goggles 2 DVR can now record the entire screen, including OSD and menu (and you can also choose to record the clean feed without any OSD if you prefer – the option is in the menu). This feature is exclusive to the Goggles 2, as overlaying the OSD/menu on top of the video feed requires additional encoding and processing power only available in the newer goggles. With the FPV Goggles V2 and O3 Air Unit, you will still get a clean feed DVR as before.
DVR videos are in 1080p 60fps, taking up more space than before and requiring a faster SD card. Note that the video in the goggles and goggles DVR are not stabilized. You can choose in the settings whether or not to store the OSD data in an .srt file (subtitles).
IPD and Focus Adjustment
You can’t wear glasses while using the Goggles 2, as you can with the FPV Goggles V2. However, they have a wide focus adjustment range between +2 and -8. Once you’ve set the IPD and focal adjustments, you can lock the knobs to prevent accidental changes.

There’s a sensor between the lenses that can detect whether you’re wearing the goggles or not. When you take the goggles off, it automatically shuts the screens off to save power. When you put them back on, the screens take about half a second to turn on. There are some concerns about long-term reliability, but it’s a sleek feature nonetheless.

Headstrap
The headstrap is attached to the goggles via velcro and is easily removable if you prefer an aftermarket strap. It works well for the most part, but a wider, more flexible, and stretchy strap might be preferable. It’s not designed to hold the battery on the strap, so you may need a 3D-printed holder for that. Currently, many pilots simply put the battery in their pocket while flying.

Battery
The goggles come with a 2S 1800mAh battery pack (weight: 120g), providing about 3 hours of battery life per charge.
I haven’t opened the battery yet, but it’s been reported online that it contains two 18650 Li-ion cells, which some users have replaced with 21700 cells for increased capacity (requires a 3D printed case). This may be a modification worth considering in the future.

Video Output
The DJI Goggles 2 has a USB-C port for video output. You’ll need a USB-C to USB-C cable and the DJI Fly app installed on your smartphone. It’s not available in the Play store; you can download the APK from DJI’s website: https://www.dji.com/nl/downloads/djiapp/dji-fly
This displays the video feed along with Betaflight OSD on your phone, but it doesn’t display the menu. Currently, there’s no way to get a clean video feed from the Goggles 2 (without OSD and logo). It’s also unknown if it’s possible to get an HDMI video output from the Goggles 2. If you want a clean feed and HDMI output when using the O3 Air Unit, the FPV Goggles V2 can do it, but it can’t display the OSD at all.
Compatibility
Here’s a compatibility table made by IntoFPV user “CREASE” (last updated Sep 2023):
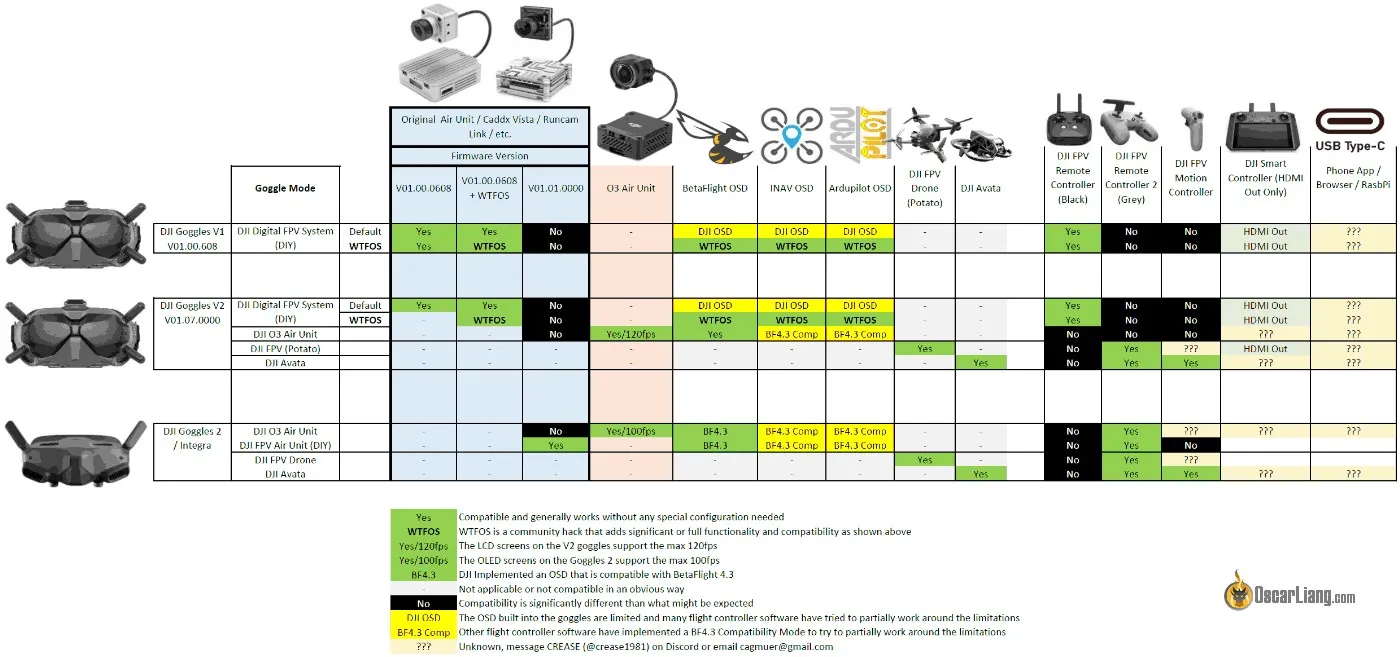
For full size image see this thread: https://intofpv.com/t-help-on-a-dji-fpv-compatibility-chart-to-rule-them-all
How To Setup DJI Goggles 2 and O3 Air Unit
Unboxing
Before powering on the goggles, fully charge the battery. While a charger isn’t included, any USB charger should work. The goggles support PD and QC charging up to 12W. Fully charging the battery from empty takes just under 1 hour.
I read online it’s possible to power the goggles from a PD/QC cable power bank or power adapter, though this hasn’t been tested by me personally as it requires a special USB cable, such as this: https://s.click.aliexpress.com/e/_DkomM0j

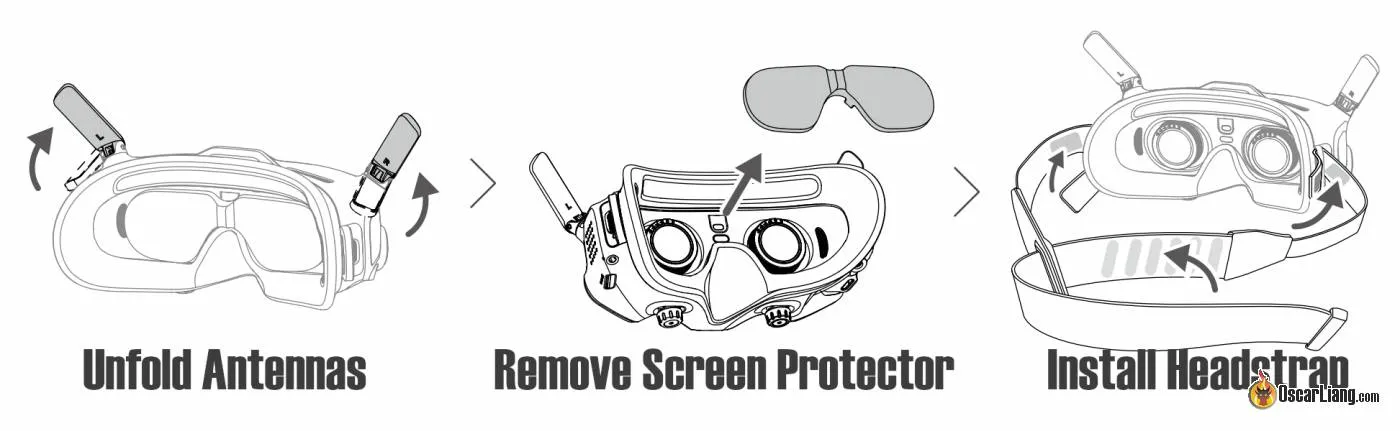
Unfold the two top antennas, remove the screen protector, and install the head strap, which is attached to the goggles with Velcro.
Power On Goggles
To power on the goggles, connect the battery to the goggles. There’s a power button on the battery; press it once to check the battery level, press it again and hold it for two seconds to power it on/off. You’ll hear sound from the goggles when it’s booted up (the goggles have speakers!).
Once you have an image in the goggles, adjust IPD and focus using the dials on the bottom. Adjust one eye at a time with the other eye closed. Push the dial left and right so you can see all four corners relatively well with minimal blurry edges. For some people, it’s impossible to have absolutely clear corners/edges, just get it as good as you can. Then twist the dial to adjust focus until the image is crystal clear. Push the knob up and turn it to the left to lock it in place to prevent accidental changes to IPD and focus.

The focus adjustment allows -8.0D – +2.0D. If you require diopter outside of this range or astigmatism correction, eyeglass frames are provided that can be installed on the goggles, allowing you to use your own lenses.
Unlike most other FPV goggles, the Goggles 2 have no buttons; control is via a touchpad. The first time you power on the goggles, you’ll go through a tutorial explaining how to use the touchpad to access the menu, change settings, and lock/unlock the screen. It’s pretty straightforward.

You should get an SD card for recording DVR, which can record your flying and help you locate your drone after a crash. Because the DVR records 1080p videos, you need a fast card. The Sandisk 16GB Class10 A1 card from the DJI FPV Goggles V2 (which records 720p) gave a slow SD card warning. This card works well: Samsung Evo Plus U3: https://amzn.to/3j8lg9A
Remember to format the SD card inside the goggles.
Activation
After the tutorial, activate your goggles using the DJI Assistant 2 (Consumer Drones Series) software available on Windows and MacOS – NOT the DJI FPV Series. Download: https://www.dji.com/nl/downloads/softwares/dji-assistant-2-consumer-drones-series.

Connect the O3 Air Unit to your computer via the USB-C port. You don’t need to power the O3 Air Unit. The USB-C cable isn’t included, but any USB-C data cable should work fine.
Firmware Update
You can update the O3 Air Unit using the DJI Assistant 2 (Consumer Drones Series) software available on Windows and MacOS – NOT the DJI FPV Series. Download: https://www.dji.com/nl/downloads/softwares/dji-assistant-2-consumer-drones-series.
Connect the O3 Air Unit to your computer via the USB-C port. You don’t need to power the O3 Air Unit. The USB-C cable isn’t included, but any USB-C data cable should work fine.
If you updated your FPV Goggles V2 to support the O3 AU, you’ll have to use the “DJI Assistant 2 (Consumer Drone Series)” too, as well as for the Vista that you updated to support the Goggles 2. DJI will likely move away from the FPV Drone Series in the future.
Connection O3 to FC
The O3 Air Unit has the same pinout as the previous Air Unit and Vista, it’s plug and play with flight controllers with the DJI 6-pin connector. It can be powered by 2S to 6S voltage (7.4-26.4V). The O3 max power consumption is around 16W, drawing 1.6A at 10V, if you are powering it from a BEC, make sure it’s powerful enough.
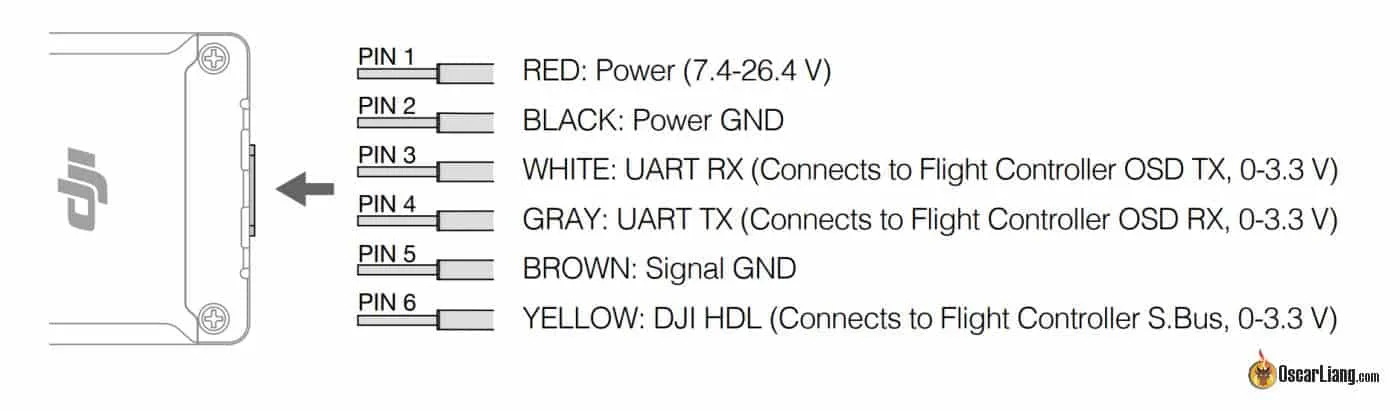
For most FC it’s plug and play, no soldering, but beware of the wiring order, in some rare cases you might need to swap cables around.

If you are using your own radio receiver, make sure to remove the DJI HDL and GND wires from the cable like so.
Now connect the O3 AU to your computer via USB-C (no need to power the quad), open “DJI Assistant 2 (Consumer Drone Series)“, and activate it, and also upgrade firmware to the latest version.
If you want to record videos inside the O3 air unit, you need to get an SD card. I was getting a slow SD card warning using the Sandisk Extreme Pro 64GB U3 A1 card. Switched to a Samsung 256GB Evo A2 fixed that issue, you can get this card here: https://amzn.to/3B8JplQ
It’s best if you format the card inside the Air Unit (option in the goggles’ camera menu).
OSD
The DJI O3 Air Unit fully supports Betaflight OSD. Betaflight OSD menu and all the OSD elements are fully functional.
If you are using Betaflight 4.3, go to the Presets tab, and search for “dji”, the “FPV.WTF MSP-OSD” preset should pop up, in options, select the UART you’ve connected to the O3 AU.

Picking this preset is the same as entering these command lines in CLI, but Preset makes it so much easier!
set osd_displayport_device = MSP
set displayport_msp_serial = x (should be 1 less than the UART number, e.g. if UART1, enter 0 here)
save
Here’s the official manual if you want to learn more.
Pairing DJI Goggles 2 and O3 Air Unit
Power on the Goggles. On your track pad, swipe right to open the System menu, go to Status and switch to “DJI O3 Air Unit”.
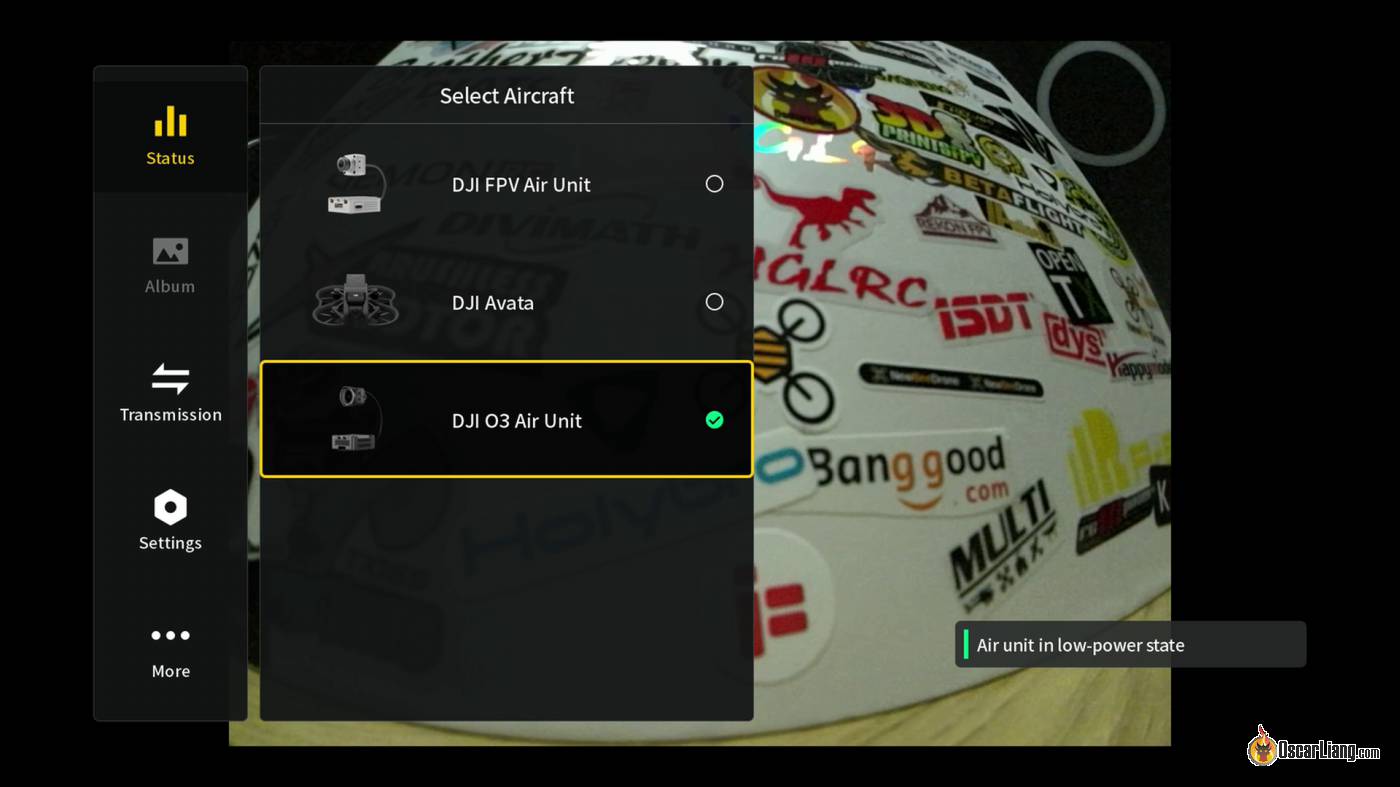
Then press the link button between the lenses.

Power on your O3 Air Unit, wait until the green LED turns off and becomes red. Press the bind button, it will start flashing. When binding is successful, the LED will turn green, and you should have an image from the camera in your Goggles.

To enable HD OSD, you should go to the settings menu in the goggles, Display, under Canvas Mode, select HD OSD. This will allow you to display the OSD in smaller font and you would be drag those OSD elements all the way the edges of the screen. If you select Normal mode, the font would be much bigger.
If the Canvas Mode option is missing in the goggles, maybe you need to update firmware.
And in Betaflight OSD tab, make sure HD is selected under Video Format.
Binding DJI FPV Goggles V2 and O3 Air Unit
In the FPV Goggles V2 menu, go to Settings => Device => Switch to DJI FPV, then power cycle the goggles. This is important; if you are in the wrong mode, the update won’t work properly.
Then connect your V2 goggles to the computer, open up DJI Assistant 2 (DJI FPV Series) app, and update to the latest firmware. If you are interested in rooting your goggles and install WTFOS, you must root them before updating. More info can be found here.
Once updated, go to the menu, Settings => About => Switch Aircraft Model => DJI O3 Air Unit.
Power on the O3 Air Unit and Goggles, then press the bind buttons on both devices, and they should be bound within seconds.
Warning (23 Nov 2022): With the FPV Goggles V2, when you switch mode to use the O3 Air Unit, all your previous binds with the Vista and FPV Air Units will be lost! If you want to use your older air units and vista, you’d have to bind them again. Apparently, if you bind one of the old air units, all the binds come back (not confirmed), but then your binds with any O3 Air Units are gone. It seems to be more like a bug than a feature; hopefully, DJI can fix this in future firmware updates.
Unlock FCC Mode
In FCC mode, there should be 7 available channels in the 20MHz mode, and 3 available channels in the 40MHz mode.
If your Goggles 2 are shipped with CE mode (to comply with European regulations), they will be limited in terms of output power (only 25mW) and channels. There will be only 1 available channel in the 40MHz mode and 3 available channels in the 20MHz mode.
You can perform the “FCC hack” to unlock higher output power (more range and signal penetration) and more channels (allows more pilots in the air at the same time) if that’s legal where you fly. It’s simply a file you place in the goggles. Note that it’s NOT the naco text file we previously used with the Vista but the process is similar.
To switch to FCC mode, the method is exactly the same as for the DJI Avata drone. Simply get the file “ham_cfg_support” and unzip it to the root directory of the SD card and put it in the goggles.
Download here: https://drive.google.com/file/d/1ug2U_i5kdrKQQ2I17NLJBXm2tKQeNj5Q/view?usp=share_link
To check if you are in FCC mode, go to Settings => Transmission => Channel Mode, switch to Manual, under 40MHz bandwidth, you should see 3 channels available in FCC mode. If you are in CE mode, it will only show 1 channel there.
The FCC mode is permanent, however you can go back to CE mode from FCC mode by factory reset the headset (in the menu Settings / About).
Recording Videos
To start recording in the Goggles 2, swipe down from the top to access the Record button in the screen menu. Alternatively, you can set up the goggles and O3 AU to start recording as soon as you arm the quad (Settings=>Camera=>Advanced Camera Settings). This is a more convenient option for many pilots.
To download videos, plug in the USB cable. There’s no need to remove the SD card. For the O3 AU, you’ll see two separate external drives—one for the SD card and one for the internal memory. To download video off the Goggles 2, you should power them on first, otherwise connecting the USB cable does nothing.
You may find the video files get split in the O3 when it gets to about 4GB. This is due to the FAT32 format of the SD card, which has a 4GB file size limit. There is no work around to this unless you record at a lower resolution or frame rate which leads to smaller file size.
However, here’s the silver lining. When these split files are imported into a video editor sequentially, they should play back seamlessly. There shouldn’t be any skips, stutters, or overlaps. It means that while you might have multiple files for a single recording session, your final edited video can still be one smooth, continuous clip.
If you need to stablize these videos in Gyroflow, the program actually allows you to import these clips first before applying stabilization to ensure consistency.
Audience Mode
AKA Spectator Mode, is a mode that allows you to watch other people fly (who also has the Goggles 2/ with O3 Air Unit). It should also work with people with V2 and Integra goggles if they are flying with the O3 Air Unit.
When using V2 goggles with the O3 air unit, the pilot’s goggles rebroadcast the signal, and other goggles tune into that rebroadcast. The audience may experience poorer quality video quality than the pilot. However, audience mode comes with a trade-off, as some of the bandwidth used for communication with the aircraft is now used for communicating with nearby goggles. As a result, the pilot may experience worse link quality.
Replacing Camera and Antenna
To replace the camera, you can follow this detail guide: https://oscarliang.com/replace-calibrate-dji-o3-camera/
To remove the antenna from the O3 AU, take off the metal bar and disconnect the UFL connectors.

Best Settings
Here’s the summary, I will explain what the settings do after the break.
Camera Settings:
- Sharpness -1
- Noise Reduction -2
Recommended settings for best FPV experience:
- 100fps
- Auto Mode
- Aspect Ratio 4:3
- Color Normal
- ISO Max 6400
Recommended settings for the best HD recording (Using ND filter, Gyroflow stabilization, and Color grading):
- 2.7K 60fps
- Manual Mode
- Auto ISO
- Shutter 1/120
- ISO Max 200 – set this as low as possible, it lets the camera to change ISO between 100 and this value depending on the lighting. Increasing it will make your image look grainy and noisy in dark scenes. But if this is too low the image might be too dark to see.
- White Balance set manually to match scene, 4500K (sunny day), 5500K (cloudy day), or 5000K in between
- Aspect Ratio 4:3
- FOV Wide
- Color D-Cinelike
- EIS Off
Recommended settings for decent HD recording (for lazy people, no editing required):
- 2.7K 60fps
- Auto Mode
- Color Normal
- White Balance Auto
- EIS On
- ISO Max as low as possible depends on the lighting condition, if not sure just leave it at 6400, your image might look grainer when flying through dark areas but at least you can see.
O3 Air Unit Camera Settings
Resolution and Frame Rate
The best resolution and frame rate for your O3 Air Unit depends on your intended use. While 4K offers the highest bitrate and resolution, it lacks a 4:3 aspect ratio, which can impact post-processing. In general, 2.7K 100fps is a good option, offering a 4:3 aspect ratio, decent bitrate, and smooth video feed in the goggles. 100fps offers the smoothest flying experience, though your video editor might not support it (since most video editor only support up to 60fps), in this case you might want to use 60fps.
Higher frame rates typically allow for higher bitrates too. However, while resolution doesn’t impact your FPV feed, frame rate does, as the goggles will display the same frame rate you choose for recording.
Here is a list of the resolution/frame rate and the respective bitrate / data per minute.
- 1080p 120 100Mbps (750MB/min)
- 1080p 100 100Mbps (750MB/min)
- 1080p 60 80Mbps (600MB/min)
- 1080p 50 80Mbps (600MB/min)
- 1080p 30 40Mbps (300MB/min)
- 2.7K 120 150Mbps (1.13GB/min)
- 2.7K 100 150Mbps (1.13GB/min)
- 2.7K 60 130Mbps (0.98GB/min)
- 2.7K 50 130Mbps (0.98GB/min)
- 2.7K 30 80Mbps (600MB/min)
- 4K 120 150Mbps (1.13GB/min)
- 4K 100 150Mbps (1.13GB/min)
- 4K 60 150Mbps (1.13GB/min)
- 4K 50 150Mbps (1.13GB/min)
- 4K 30 110Mbps (0.83GB/min)
ISO and Shutter Speed
Setting ISO and Shutter Speed to Auto works well for most FPV lighting conditions. To do this, swipe up, select the first option (Mode), and choose Auto.

When using an ND filter, however, you should use Manual mode. Set the ISO as low as possible and choose a fixed Shutter Speed value according to your frame rate, such as one over twice your frame rate, to maximize the benefits of ND filters. But if you aren’t doing anything serious with the footage from the O3 air unit, then there’s no need to use ND filters in my opinion.
I shared my settings when using ND filters on the O3: https://oscarliang.com/flywoo-nd-filter-o3/
Color
The O3 Air Unit offers two color modes: Normal and D-Cinelike. D-Cinelike provides a flat color profile, capturing a wider color gamut, dynamic range, and tonal range for greater color grading flexibility. However, it also affects what you see in the goggles.
Normal color is recommended for most uses, as it looks better in the goggles. If you plan to color grade your footage, D-Cinelike may be the better choice. To change the color mode, swipe up and find the last option (Color) in the menu.

EV
EV, or exposure value, can be adjusted to your preference.
If you find the default settings too dark, consider increasing the EV to +0.3. To adjust EV, swipe up on the track pad and find the option in the camera settings.
Sharpness
Set the Sharpness to -1 for optimal image quality.
To do this, swipe right, go to Settings=>Camera=>Advanced Camera Settings.

Adjusting the Sharpness can have a noticeable effect on the image, and -1 provides a good balance between softness and over-sharpening.

Noise Reduction
Set Noise Reduction to -2 for the clearest image. This setting can have a more subtle effect, but reducing noise can improve details, especially in darker areas.

EIS
EIS, or Electronic Image Stabilization, is an option to use the built-in Rocksteady technology for stabilizing footage recorded by the O3 Air Unit. Note that this doesn’t affect what you see in the goggles, only the recorded videos.
Turning off EIS means the video isn’t stabilized but will record with gyro data for post-processing stabilization using Gyroflow. This method offers more customization options for stabilization. However, keep in mind that gyro data is only recorded when the Camera FOV is set to Wide or Normal.
For the best results, ensure your quad is relatively vibration-free, which is essential for both Rocksteady and Gyroflow. DJI recommends using 48KHz PWM frequency on your ESC.
For assistance with tuning, refer to this tutorial: https://oscarliang.com/pid-filter-tuning-blackbox/
Goggles 2 Settings
Resolution and Frame rate
For the best flying experience, set the frame rate to 2.7K 100FPS (or 1080p 100FPS).
Here are the latency for each resolution/frame rate setting (figures from the SRT files in the O3 AU):
- 1080p 120 34ms
- 1080p 100 40ms
- 1080p 60 34ms
- 1080p 50 40ms
- 1080p 30 34ms
- 2.7K 120 34ms
- 2.7K 100 40ms
- 2.7K 60 34ms
- 2.7K 50 40ms
- 2.7K 30 34ms
- 4K 120 34ms
- 4K 100 40ms
- 4K 60 34ms
- 4K 50 40ms
- 4K 30 34ms
Latency appears to be affected only by frame rate. Although 100fps has higher latency at 40ms than other frame rates’ 34ms, I found 100FPS offering the smoothest FPV feed.
120fps seems to perform the same as 60fps, you can feel the frame rate in the goggles is lower, but still pretty good. At 50fps, it’s noticeably lower than 100fps and 60fps, but still flyable. But at 30fps, frame rate is so low you can almost “feel the stuttering” and it’s almost unflyable for me.
As mentioned, resolution has no effect on video feed, so you can select whatever resolution you want to use.
To adjust the resolution and frame rate, swipe up on the track pad and find “Video Quality” in the Camera settings.
Note that when you set 4K, you cannot use 4:3, only 16:9 is available. I don’t rely on the O3 for 4K recording, I much prefer to get the best flying experience in the goggles, so I normally go with 2.7K/100 (or just 1080p/100 if you want to save SD card space in the O3 AU).
Enhanced Display
Enable Enhanced Display to improve the viewing experience in various lighting conditions. To enable it, swipe down and select the Enhanced Display icon.

Bandwidth
Set the bandwidth to 40MHz when flying alone, and 20MHz or 10MHz when flying in a group to minimize interference. To adjust the bandwidth, swipe right, go to Transmission, set Channel Mode to Manual, and select your desired bandwidth.
The larger the bandwidth, the better the image quality. So go with 40MHz whenever you can. But when flying with other people it’s better to choose a lower bandwidth which causes less interference and it allows more people to fly together. When using 40MHz, the maximum channel available is reduced from 7 to 3 (in FCC mode).

Focus Mode
There is no noticeable difference between Focus Mode set to off and auto, so you can leave it at auto for now.
Image Scaling
If you experience blurry edges with the Goggles 2, you can scale down the image for better clarity. To do this, swipe right, go to Settings=>Display, and select 90% under Air Unit Display Scaling. This adjustment should help make the OSD around the corners clearer.

Conclusion
Signal
When it comes to signal performance, the O3 Air Unit definitely stands out as a significant upgrade over the Vista and original Air Unit. The image quality is noticeably better, with improved signal penetration and impressive 4K onboard recording with image stabilization. In my opinion, the extra cost is worth it compared to the original Air Unit and Vista. However, it should be noted that installing the O3 in an existing frame can be a bit of a challenge.
On the other hand, while the Goggles 2 have many improvements over their predecessor, they are not entirely an upgrade when it comes to signal performance. While the screens are much better and the overall size is smaller and lighter, the link quality hasn’t improved noticeably compared to the V2 goggles. It’s possible that this is due to the better aftermarket antennas available for the V2. It’s worth noting that there may be third-party antennas available in the future that can boost the range and penetration for the Goggles 2.
Comfort and User Experience
The comfort and user experience of the Goggles 2 are highly praised by many users. They are incredibly lightweight and easy to wear for extended periods of time. The lack of light leak is also a big plus for those who want a fully immersive flying experience.
However, some users have reported that it can take a bit of effort to get a good focus on the screen compared to the V2 goggles. Additionally, some users have reported experiencing blurry edges on the Goggles 2, which can be a bit distracting.
Fortunately, there is a workaround by adjusting the screen scaling in the system settings. It’s also worth noting that having full Betaflight OSD support without any hacking is a nice bonus for those who want to customize their flying experience.
Micro Drone Support, Latency, Low Light
The O3 Air Unit may not be the best option for micro drones due to its size and weight. It’s better suited for larger quads like 5″, and for freestyle or cinematic flying. However, smaller drones can still be used with the O3 if the onboard recording capabilities are more important than weight.
For racing and aggressive flying in confined spaces where reaction time is crucial, other systems with lower and more consistent latency, like HDZero, may be a better choice. Additionally, the O3’s low light performance is not as strong as other options on the market at the moment.
Not a GoPro Replacement
While the O3 Air Unit is capable of recording in 4K and offers image stabilization, it may not be a suitable replacement for a dedicated action camera such as the GoPro. One limitation is that 4K recording is only available in a 16:9 aspect ratio, which can result in more cropping and lower resolution compared to using 4:3. The O3 Air Unit also requires careful handling to avoid issues with vibration and oscillation for stabilization features such as Rocksteady or Gyroflow to work effectively.
Another consideration is that changing camera settings on the O3 Air Unit can impact the user’s FPV experience and make it less flexible compared to using a GoPro. Additionally, it may be challenging to avoid getting props or other parts of the drone in the frame during HD video recording due to how the FPV camera is typically mounted.
While the O3 Air Unit’s image quality is improving and can be comparable to older GoPro models, the latest GoPro cameras still have better image quality overall. Therefore, it may be best to consider the O3 Air Unit as a decent replacement for older GoPro models rather than a complete replacement for a modern GoPro.
Price
Overall, it seems that the DJI O3 Air Unit and Goggles 2 offer some significant upgrades over previous models in terms of image quality, signal penetration, and features such as onboard recording and stabilization. However, there are some drawbacks to consider, such as the O3’s size and weight being better suited for larger drones and its limitations as a replacement for a GoPro. The Goggles 2 are also not a complete upgrade over the V2, but do offer better screens and portability. Ultimately, the decision to invest in these new DJI products may come down to individual preferences and priorities, as well as budget considerations.
Buy the DJI FPV Goggles V2:
- AliExpress: https://s.click.aliexpress.com/e/_De1DIgT
- Amazon: https://amzn.to/3WKNQeO
- GetFPV: https://oscarliang.com/product-awxy
- RDQ: https://oscarliang.com/product-fnzl
Get the DJI Goggles 2 here:
- GetFPV: https://oscarliang.com/product-l6c2
- AliExpress: https://s.click.aliexpress.com/e/_DeYafE7
- RDQ: https://oscarliang.com/product-ju88
- Amazon: https://amzn.to/3HDvOXr
Get the DJI O3 Air Unit here:
- RDQ: https://oscarliang.com/product-sadl
- GetFPV: https://oscarliang.com/product-4blv
- AliExpress: https://s.click.aliexpress.com/e/_DdQYArv
- Amazon: https://amzn.to/3RtWfm1
DJI FPV Goggles V2 Supports O3 Air Unit
To make your V2 goggles compatible with the new O3 Air Unit, you ned to update the goggles firmware first.
Switch the goggles to DJI FPV mode and then update the firmware to V01.04.0000 using DJI Assistant 2 (Consumer Drones Series) software on your computer. According to the fpv.wtf, updating to this firmware won’t affect the the ability to root the goggles as long as you make sure the firmware in DIY Mode (DJI Digital FPV System mode) is v1.00.06.06 or v1.00.06.08. However, if you intent to eventually root your DJI FPV Goggles V2 and want to play safe, you should perform the root hack in advance, once it’s rooted it’s permanent.
DJI Goggles 2 Supports Vista and FPV Air Unit
Update on 8th Dec 2022
As promised by DJI, they have added support to use the new DJI Goggles 2 with Runcam Link (Caddx Vista) and the FPV Ait Units. Also, the remote controller 2 will also support the Vista and FPV Air Unit.
- When using the Goggles 2 with the Vista and FPV Air Units, Canvas mode will work too, meaning full Betaflight OSD is supported, no need to root anymore (but still won’t work with V2 and V1 goggles, for these goggles you still need to root to get full Betaflight OSD support)
- For this support to happen, simply update to the latest firmware on your Vista/FPV Air Unit (V01.01.0000) and Goggles 2 (V01.03.0000) or newer, restart the devices after the update is complete. If you previously rooted and installed WTFOS, you need to uninstall WTFOS first: https://oscarliang.com/fpv-wtf-root-hack-dji/#How-To-Update-DJI-Firmware-After-Rooting. Your Vist is still rooted (it’s permanently) so you can always roll back and isntall WTFOS again if you want. Dont’ worry.
- To setup OSD, the process is the same as the O3 Air Unit
The catch:
- FPV Air Unit (the old one) loses its ability of onboard recording when used with Goggles 2, hopefully it can be fixed in future firmware
- After the update, the Vista and FPV Air Unit won’t work with the V1/V2 goggles and the DJI FPV Remote Controller (V1). You can however downgrade the FPV Air Unit and Vista firmware to v01.00.06.08, if you want to use those older goggles and remote again. Though if you have V01.05.0000 on your V2 goggles, it will work with Vista/FPV Air unit with V01.01.0000 firmware
- Once updated, the Vista/Air Unit will work the same way as the O3 Air Unit, i.e. you cannot set output power anymore, it’s set dynamically by the system. You can still unlock FCC mode but using the same method as the O3 Air Unit (as I described in this post)
This is extremely good news for people who already own the older generation DJI video transmitters and also getting the new Goggles 2. That means you can continue to use your older gear and not have to upgrade all of them to the O3 Air Unit. But if you own both Goggles V2 and Goggles 2, then it will pretty much force you to choose which goggles to use as you cannot use both at the same time. If you bind your Vista to one goggles, you will lose the bind to the other. You can however roll back on the firmware if you wish.
Swipe right to go to the System menu, Status => Switch => DJI FPV Air Unit.
10-bit Color for DJI O3 Air Unit
Updated on 07 Jan 2023
With the latest V01.02.0000 Firmware, 10-bit color is available for the O3 Air Unit in D-Cinelike color mode.
What 10-bit color does to your footage is that it would look more lifelike as a result because it contains more color information and has more color depth, and the transitions between different colors looks more natural.
DJI FPV Drone Support
Updated on 24 July 2023
Goggles 2 and Integra now support the DJI FPV drone with firmware version 0.1.07.0000. This update brings support for the DJI FPV drone.
Accessories and Upgrades
ND filters
Flywoo ND filter for O3 Review: https://oscarliang.com/flywoo-nd-filter-o3/
X-Air MKII Patch Antennas
Review: TrueRC X-Air MKII Antennas Upgrade for DJI Goggles 2
Better Straps
- Amazon: https://amzn.to/3lQjD1d
- AliExpress: https://s.click.aliexpress.com/e/_DedMEez
- GetFPV: https://oscarliang.com/product-u95r
- RDQ: https://oscarliang.com/product-je1z
Shorter Power Cable
- AliExpress: https://s.click.aliexpress.com/e/_DlH2xqZ
- Amazon: https://amzn.to/3I7EnZy
Aftermarket Face Plate Foam Padding
- AliExpress: https://s.click.aliexpress.com/e/_Dn0e0YZ
- Amazon: https://amzn.to/3SdtnyA
- GetFPV: https://oscarliang.com/product-ecsu
- RDQ (option 1): https://oscarliang.com/product-bv19
- RDQ (option 2): https://oscarliang.com/product-96wg
Lens Protector
- AliExpress: https://s.click.aliexpress.com/e/_DkNxvYz
- Amazon: https://amzn.to/3KmAe72
Lumenier Universal Antenna Adapter

You can swap out the original antennas on the DJI Goggles 2 for some higher gain antennas for better range and penetration. The antenna is removable and has a MCX connector which is not a common connector in FPV, therefore it will require special aftermarket antennas made for the Goggles 2. The good news is you can use these MCX to SMA or RP-SMA adapter, which allows you to use any existing SMA antennas on the Goggles 2.
GetFPV: https://oscarliang.com/product-c5f4
Goggles 2 Battery Adapter

If you want to power your Goggles 2 from a 3S, 4S or even 6S LiPo battery, consider getting the Speedybee Goggles BEC: https://oscarliang.com/speedybee-goggles-bec/
Working with Gyroflow
How To Use Gyroflow
Stabilizing footage from a DJI O3 camera in Gyroflow is easy. The gyro data in integrated in the video files, and it also contains the required lens profile, eliminating the need for synchronization and configuration. Once you set up the camera settings, it’s just a “drop and go” process.
Here’s a quick step-by-step setup guide:
- Before you start recording, disable the in-camera stabilization (EIS/Rocksteady) and set your Field of View (FOV) to Wide. This is crucial as these settings ensure your camera records gyro data, which is needed for stabilization in Gyroflow.
- Once you have your footage, simply drag and drop the video file into Gyroflow.
- Click ‘Export’, and Gyroflow will handle the rest.
It’s important to note that the Ultrawide and Normal lens modes are not supported for this process. Stick with the Wide FOV setting for now.
Jello in Raw Footage
Changing Motor PWM Frequency
Adjust ESC PWM frequency to fixed 48 kHz for minimal vibration from motors. Why and How to guide: https://oscarliang.com/best-blheli-32-settings/
Soft Mounting the Camera
Soft-mount the O3 Air Unit camera with TPU holder, or rubber inserts to isolate vibration from the frame, avoiding direct mounting to the drone frame (to rigid material such as metal or carbon fibre parts). Most modern frames designed for the O3 camera come with this feature.
Check Your Lens
Another point to note is that the lens of the camera unit can sometimes become loose. If you encounter persistent issues, this might be something worth checking by unscrewing the back plate and put it back. Some users have found success by carefully gluing the lens into place. However, you may void the warranty by doing so, do this at your own risk.
Drone Tuning
Proper tuning of your quadcopter can also help minimize vibrations, learn about tuning here: How to Tune FPV Drone Filters and PID with Blackbox. Ensure your propellers are fresh and well-balanced, your drone is free from resonance issues, and you’re using RPM filtering.
Jello After Stabilziation
If your raw footage looks fine, and stabilization works fine, but you get jello after stabilization, you could try applying a lowpass filter for the gyro data.
The value for the filter will vary depending on the frame rate (FPS) of your footage and the frequency of vibrations present. As such, some experimentation with the filtering value may be required until your footage appears as desired. However, as a general rule, it’s advised to avoid setting the filter lower than 30 Hz.
Split Recording
DJI cameras, including the O3, generally have a file size limit of 4GB. This means longer recordings are automatically split into several parts. If you’re aiming to stabilize these split videos, you’ll need to merge the parts first.
Thankfully, Gyroflow can manage this task for you. Simply drag and drop all the split files into the program, ensuring they’re in the correct sequence, then you con proceed with the stabilization. The software will merge these files for you when you export them.
FAQ
DJI O3 Camera Calibration Error
If you got a black screen (OSD is working but no image) with the warning “camera calibration error”, here’s how to fix it.
Power the O3 Air Unit (plug in a battery), connect the USB-C cable, connect it to DJI Assistant (Consumer Drone Series). You should be prompted to calibrate the camera. That should fix it.
If in DJI Assistant, you get the error “Refreshing calibration data failed! Restart device or contact DJI support”, and “failed to calibrate. 2-0-1”, you can try unplugging the camera from the O3 air unit and reconnect it again. Sometimes it could be a bad connection or a damaged connector that causes this error.
Edit History
- Jan 2023 – review published
- Mar 2023 – added a list of accessories
- Jun 2023 – added info on how to use Gyroflow with O3 camera
132 comments
Thanks so much! A wealth of info here. Having really poor range with Goggles 2 compared to Goggles V2. Hopefully the FCC hack does the trick. Also the camera/goggle settings mentioned above are pure gold! Thanks again for all this information.
I have do all of this but in my o3 lock only 5.8
Finally upgrading from OG o2 fpv air unit to O3 and seeing that the 3 in one cable has smaller connector, and not seeing anyone who makes a cable to adapt :-( really hoping this would be plug and play and not have to hack two cables together… just an FYI for anyone else upgrading also…
Can focus adjustment go mid? I mean, i’m not -2 but also -4
Unfortunately no, but I am -3 personally and -2 works just fine.
Hello Oscar Liang, I bought this drone bob57, but I’m having a problem with the signal goggles, I can’t drive it even 50m away, because the signal is very weak. I used dji goggles 2, with dji controler 2. I don’t know what could have happened. I have used Goggles 2 and Goggles V2 of the Dji brand, and the problem is the same in both goggles. I need to know what to do now to fix this problem, which I think is small! How to remove the drone no more than 50-60 meters, the signal of the goggles makes me until the red light!
I hope for your understanding and I expect you to help me solve this problem. Thank you in advance!
Xin chào Oscar,
Hiện nay O3 với Controler V2 hay bị rx loss (dù ở gần 10-20 met)
Xin hãy chỉ giúp tôi cách khắc phục
Trân trọng cảm ơn nhiều !
Hi Oscar,
What is the best googles I can use with DJI Matrice 3TD Drone?
DJI Goggles 2 are not compatible, or is there a way to connect them withe the drone?
Hello oscar liang, what is the image definition in the goggle 2 glasses (back video), with an air unit v1 and vista? 1080?
Those are the original DJI FPV system (V1) and the video feed resolution is 720p.
Excellent, very complete article. I already built a Pavo20 with the DJI air unit 03 and the V2 goggles. But I have experienced overheating problems and I would like to know how I can solve this problem since I am afraid that in the middle of a flight it will turn off and I will lose my drone. thank you so much.
I flew in 28 degree weather under direct sunlight for 8 minutes, no issue with overheating. And that was the naked DJI O3, I think the stock O3 should withstand even hotter condition. Making sure the O3 is getting airflow and cooling you should be fine.
Also turn down video resolution/framerate to reduce overheating. 4k/120fps generates a LOT of heat, hence shorter powered-up time. Try 2.7k/60fps or even lower to reduce the amount of generated heat. However, as Oscar stated, proper airflow is key!
Wow. This article was really useful as I’m new to FPV and I’m planning on purchasing a DJI Avata. I’ve been researching about the drone for about a month, and this article was probably my best source. I was debating on if I should buy the Integra goggles or the Goggles 2 because the blurry edges problem. And this has helped me come to the decision that I’m probably going to buy the Integra, but I need to do more digging. Thanks for the help!
Is there a difference in output power between 20MHz and 40Hz in FCC mode or both can do up to 2W? I have heard that 20MHz is limited to max 800mW.
If you can’t see your WiFi SSID on the Goggles 2, it might be because your Encryption (security level) on your router is set too high. ie. DJI Goggles 2 doesn’t show SSID’s secured with WPA3-PSK SAE; but it will show SSIDs using WPA2-PSK.
Does this support audio feed from air unit to goggles so I can listen to props/motors while flying? I’ve got fpv cam. mic. transmitting to goggles and using mono earpiece to listen in, can it do the same? It’s not quite the same flying mid-range deaf, less immersive and I like that I can hear as well as see if something bad is happening! I would say this is a deal breaker for me unless the air unit has a mic in it already (has someone opened one up?), the goggles have an audio out jack and it’s a few firmware updates away.
Unfortunately no, DJI O3 system doesn’t support audio.
Minimum bec for o3 is 27-36W.
Hi, i am using Dji goggles v2 with Air Unit O3 on the latest firmware and BF4.4.2 all work fine with HD.OSD, the issue is when recording video in the DVR there is no OSD into video !! during flight all OSD informations are available. can some one help me please, thx
Fantastic site! I just bought a bind and fly O3 drone to get into the hobby but have some questions from my anticipated use case. Can the Goggles 2 output their video to an external screen or a smartphone (via the dji app, perhaps)? Also, could the Dji RC 2 (not the fpv controller 2) be used to fly an O3 drone without goggles? Your knowledge is appreciated!
The answer to your first question is here: https://oscarliang.com/dji-o3-air-unit-fpv-goggles-2/#Video-Output
And you need the goggles for the remote to work.
Has this been solved yet?
Warning (23 Nov 2022): With the FPV Goggles V2, when you switch mode to use the O3 Air Unit, all your previous binds with the Vista and FPV Air Units will be lost! If you want to use your older air units and vista, you’d have to bind them again. Apparently, if you bind one of the old air units, all the binds come back (not confirmed), but then your binds with any O3 Air Units are gone. It seems to be more like a bug than a feature; hopefully, DJI can fix this in future firmware updates.
Hi Oscar,
I’ve seen a video of Mangorille where he is only using one antenna for the O3: youtu.be/WFZL-IyQUmQ
Will it not fry the O3 AU especially the side where he did not put on an antenna(the 2.4ghz side)?
Or will that side simply not work because it was not set to Betaflight to work as an SBUS Rx?
My goal is to try out a bunch of antennas without using the 2.4ghz side.
Question:
-Can I put only one antenna and not fry the O3?
Hello, could you help me? I have a question, is INAV compatible with dji O3? I connect my drone to INAV and the O3 does not work, the O3 leds are off, and with betaflight it does work, how can I solve this problem? Thank you very much
i have not tried inav with O3, but it does work with the Vista so I presume it should also work with the O3.
If the LED is off it doesn’t sound like it’s caused by FC firmware compatibility. The O3 wills till work without connecting to an FC, the only difference is that OSD might not work.
Double check your wiring (power and ground), make sure the O3 is being powered by an appropriate voltage.
It is compatible with INAV. It has a special interface which also allows you to see the HD screen like in BF. I have a wing and it works great.
Hi Oscar, I’m noticing that my Air Unit DVR is not recording gyro data.
settings were:
2k60fps
Wide
EIS Off
I recorded lots of video and no gyro data. Any idea why?
Anyone else wanna chime in? Rocksteady turned on looks like it’s not stabilized either.
You solve The problem?? Becouse i have The same
You have to record in 16:9 otherwise no gyro data.
Could be a faulty gyro in the camera module. It’s best to contact DJI support and see if they can repair or replace it for you. If you have a spare unit you can also try swapping the camera module and see if it works.
Hi Oscar, I crashed my drone quite a bit trying to fly line of sight and after I looked again into the goggles, the video feed hangs, after restarting everything, it now shows only black video and 0 mbps, is this an antennae issue or camera issue and how can i fix it? Thanks
It could be either or both, because the O3 won’t work if the camera isn’t working.
What LED lights are you getting on the O3 when powered on?
Is the compatibility chart still valid? Did anything change with firmware updates?
yes the chart is still valid til this day, not much has changed, except they have released a new Goggles Integra, which basically has the same compatibility as the Goggles 2. Also there’s a new firmware for the DJI Mini 3 Pro that supports the Goggles 2 and Motion Remote Controller V2 which I touched on here: DJI Mini 3 Pro vs DJI Mini 3: A Comprehensive Review and Key Differences to Help You Choose
Hey Oscar,
As usual, your reviews and tutorials are by far the most relevant and thorough in the industry.
I wanted to ask are the U.FL connectors frequency specific? For example, one connector is specifically for 5.8 and the other for 2.4? Or are there two identical antennas/connectors with both frequencies radiating from each antenna?
Connectors are not frequency specific, you can use it for both 2.4GHz and 5.8Hz. But the antenna it’s connected to is.
Hi, If I’m not mistaken Goggles 2 now works with DJI FPV Drone since the last firmware update? The compatibility table needs to be updated. Thanks for your excellent work on this page!
Help! DJI 03 canvas mode does not work. I’ve pretty much exhausted all ideas to get the OSD working on my goggles 2. No OSD information is displayed at all. The full camera image is displayed with the base DJI information:
Betaflight 4.4.1
DJI Goggles: V01.05.0000
DJI Air Unit: V01.02.0000
Crossfire latest version
Mamba F722_2022B flight controller
Flight Controller factory connector uses Uart4 to connect to DJI air unit
Peripherals dropdown set to VTX (MSP+Displayport) on Uart4 with Configuration/MSP slider on
OSD Option on Configuration page slider on
Video format on OSD page set to HD
DJI Goggles 2 display option set to HD
osd_canvas_width = 53
osd_canvas_height = 20
osd_displayport_device = MSP
DJI 03 RX connected to flight controller TX
DJI 03 TX connected to flight controller RX
Any ideas would be helpful. Thanks
Yeah I have the same problem and can not figure it out at all. Also same specs except for FC and using ELRS
Hi guys.
Please help me.
I’m test djo o3 with V2 googles and have some an unpleasant feature – when the bitrate is below 50 – the fps drops, at 20 mbps the fps is no longer pleasant on whist it was not there at 15 mbps you can get 120fps but the picture can crumble. It’s like you’re flying at 30 frames per second.
Is this only on V2 or is it an O3 feature?
video out only works on Android for now, not iPhone. It’s probably cheaper for you to buy an Android phone than a DJI controller, but either one will work.
Hi Oscar! I think I have a sort of unusual issue with one of my O3 units. This is an iFlight Defender BnF. I ended up buying two (long story) but one was PNP and the other TBS Crossfire. I am in the process of switching over all my quads to ELRS. The first Defender had no issues. The second worked but was getting no OSD or data at all from the Flight Controller (voltage showed as 0.0, no OSD text, no arming signal so video bandwidth stayed low).
I found that several tiny pins on the FC connector to the O3 had been smashed. They build those quads with NO spare wire length so it’s very difficult (for me) to get everything plugged back in. So, with a magnifying glass and LED on my head, and a tiny flat screwdriver and tiny pointy file, I was able to get all the pins straight — at least I thought so. Now keep in mind, I only need the first 4 pins with my ELRS setup, so the rest are not used. The plug went in ok and it seemed like everything would work. But now — I am getting voltage from the quad on screen, and it is sending an arming signal, so the video is fine and it starts recording. But otherwise I get NO OSD from betaflight. I assumed that OSD would be carried on the same wire as the telemetry data like voltage and arming? Or do you think I still have a smashed pin? I don’t mind trying to just solder directly to the tiny FC. BUT I don’t know which wire would carry that OSD data but not the craft voltage and arming signal.
I know I am probably being dumb with this. I don’t mind saying so as I am still kind of new to all this so I gotta start somewhere. I think I have 3 options — 1 – solder the wire that is not sending data through the connector. 2 – Fly it as is and don’t worry about the OSD since everything else works fine. or 3 – Use the O3 in a new build since it’s only the connector on the FC that is damaged, and after all I have another Defender 25 that works perfectly anyway. I can keep the rest of this one as spare parts I guess.
I’m using DJI Goggles 2 if it matters.
I really appreciate any info you can give me about which wire I need to look at more carefully.
Thanks so much for your amazing site. I cannot even begin to tell you how much I learn from your site and really appreciate the time you have given to the community!
Turn canvas mode on
Hello Oscar, I have not been able to get live video to the phone with googles 2 and air unit 03
You know how to do it?
Thank you.
Have you tried my instructions here? https://oscarliang.com/dji-o3-air-unit-fpv-goggles-2/#Video-Output
It works!!!
I tried it when I received the glasses and it was impossible for me.
Thanks oscar
Thank you Oscar! I came here for something unrelated but reading through this, I just realized my goggles 2 have been in CE mode since I bought them (pre-ordered with the Avata in the US). Wow I thought something wasn’t right, and the only 1 channel I had available at 40Hz had a lot of interference. I ordered directly from DJI in the US as soon as Avata was announced. Don’t know why they didn’t have it in FCC mode. Fixed now though.
My “unrelated” question… I know you say to disconnect the DJI HDL and GND wires from the dji cable if you are adding another receiver, but I’m wondering, if I have enough UARTS, can I just reconfigure it in Betaflight and leave it connected? (disable the DJI port and enable the TBS port?). Or will that cause interference even if it’s turned off in software but still connected physically? I have a lot of quads to switch over to TBS Crossfire or ELRS from DJI PNP so I just want to be sure if that’s necessary. Thank you!!
Yea, you can leave them connected if you make sure you DO NOT use that UART on the flight controller the HDL wire is connected to. If you are using that same UART for something else, it’s a good practice to disconnect the HDL wire to avoid potential issues.
Hi Oscar,
Many thanks for the review.
Is there any possibility to get the image directly on a small screen, maybe a smartphone of small display, without the need of the goggles?
Cheerse
Unfortunately you have to use the goggles to get the image. The goggles can output video to a smartphone via USB, but you still need the goggles.
Hi Oscar – any chance you might have a link to STL of the Nazgul v2 printed TPU O3 mount holder things shown in article?
Cheers
Hi – wonderful review – so complete and well done (and useful).
But I have a question about the FC to AU cable. I use a TX16S – so do I need to connect pins 5 and 6 of the FC to AU cable? These are the pins with the extra gnd and SBUS on them.
Hello Oscar, thanks very much for sharing your knowledge. I’ve just received a DJI O3 air unit. My plan was to upgrade my analog Nazgul V2 with it. It has SucceX-E F7 45A FC installed, can you please help me out with the wiring? I assume this will not be plug and play. Can I still use this FC? If so, can you tell me the wiring correspondences between the FC and the O3 AU? If not, will you please suggest a suitable FC? Thanks in advance.
Sure, here are the wires from the O3 you need to connect to the FC:
Power – because your FC doesn’t have a 9V BEC, so you’d have to power it from the battery (connect it to the BAT pad next to VO). But beware of the issue you might have by powering the O3 from battery as mentioned in this post.
Power Ground – connect it to any GND pad on the FC.
UART RX – connect it to any spare UART’s TX pad (I think UART 1 might be okay – TX1 pad)
UART TX – connect it to any spare UART’s RX pad (I think UART 1 might be okay – RX1 pad)
Then just follow this guide to set it up in Betaflight.
Let me add more information here, the FC is F722 and I plan to use the TBS nano CRSF already installed as my RC link. Thanks for helping me out as my knowledge is very limited, I pretty much always follow a guide on my builds but haven’t found a walkthrough my specific situation, so I’m totally lost. Although I believe there might be quite a few folks experiencing the same as the Nazgûl I fly was a total success. I love and I really look forward to fly it now that I’m a digital guy!
Sorry! I didn’t refresh the page and didn’t see your answer until after I reposted! Thanks again Oscar!
Hi Oscar, do you by any chance know how many goggles can be connected to O3 air unit in audience mode? I couldn’t find any information online, either on forums or DJI website.
Sorry I am not sure.
Hi Oscar, great review. Do you think there’s a difference, signal wise, in using two antennas on the quad (as the new evoque with the 03) instead of the two antennas housed in one single antenna(as it comes on the GEPRC cinebot 30 for ex)?
Thanks a lot!!!
Thank you very much for your content, verye useful!
Do you know if it is possible to use the o3 without any dji goggles?
Let’s say, for some weird reason, that I just want to use the 4k60fps recording capabilities of the air unit
Any chance one can start recording ‘at power’ without pressing any button?
It only works when it’s connected to the DJI goggles.
Hi, can you confirm that 1200mw and FCC hack are both working with vista and O3? Some people on the Internet are writing that FCC hack no longer works with O3 on the latest FW.
Nice review ! How about the stock antenna on the AU, is it good enough ? So, if I understand, i should replace the antenna with two aftermarket antennas like trueRC singularity ?
I’ve only ever used dshot600 on my builds. For 48hz PWM to get rid of jello is there an equivalent dshot frequency? All I’ve seen online is to use dshot – would I not want to do so?
Salut oscar , d’après ce que j’ai compris avec le vista et l’ancien air unit avec les goggles 2 c’est normal d’avoir un débit de 5 ou 7 mbps quand on n’est à côté genre a la maison, je viens de prendre des goggles 2 et j’ai pas encore volé avec , mais le débit faible sur les lunettes m’énerve , donc sa a un rapport avec le truc dynamique? Donc si tu vole avec le débit remonte?
Hi Oscar,
I‘m confused… do you know if I can use my Goggles v2 with my FPV Controller v2 and a Runcam Link now?
As I understand the Controller v2 on a Runcam Link is only possible with a Goggle 2 (without v).
Maybe someone tried it and could report if it works?
Best regards,
Martin
Yes if you update Vista/Goggles V2 firmware to V01.01.0000
No if they are still on V01.00.0608
Hello Oscar, thank you for your comprehensive review! I have although one question, on previous version fw of FPV Goggles V2 I had a option to switch to AV-IN and stream my monitor to the goggles, this option is now gone, is there any way to do it? Thanks!
Can you try to switch to DJI FPV Air Unit mode and try again?
Hi Oscar, I was wondering if you know anything about the bitrate issues that have plagued my caddx vista. I’m considering replacing it with an 03 unit, but if the overheat issues are still a problem, I wonder if this is too.
Essentially, after a certain point in time the bitrate of the connection to the goggles began to fluctuate wildly as soon as the quad was armed. The bitrate is stable in low power mode which suggests its connected to the heat issue, but confounding because everything works until the quad is armed.
This issue has been reported on a number of forums, and myself and others have tried all sorts of things ( https://forum.dji.com/thread-273475-1-1.html , https://intofpv.com/t-caddx-vista-bad?pid=140440 , https://www.reddit.com/r/fpv/comments/uotpb0/caddx_vista_drops_bitrate_when_i_arm_the_quad/ )
Do you think it’s just a result of overheat damage or possibly a different issue with the vista?
Best regards,
Ross
Yes i have similar bitrate issue with Vista with G2. It’s still flyable, I am not sure if it’s just a reporting bug but obviously the flying experience with the O3 is better than the Vista at the moment. Hopefully this can be improved in future firmware updates.
Hi Oscar, Do you know if Vista, Goggle V2 and Remote Controller v2 will binding each other?
I don’t have the controller 2 to confirm, but according to DJI they should work.
What you need to do:
Switch the goggles to DJI FPV mode and then update the firmware to V01.04.0000 using DJI Assistant 2 (Consumer Drones Series) software on your computer.
Update to the latest firmware on your Vista/FPV Air Unit (V01.01.0000).
Also update your Controller 2 to the latest version.
For more info check these sections:
https://oscarliang.com/dji-o3-air-unit-fpv-goggles-2/#DJI-FPV-Goggles-V2-Supports-O3-Air-Unit
https://oscarliang.com/dji-o3-air-unit-fpv-goggles-2/#DJI-Goggles-2-Supports-Vista-and-FPV-Air-Unit
Please Oscar,
i really do appreciate your time but i need your help. please. i know its sounds like i better learn myself if i want to get into this hobby. but i cant find help specially i started my own build on HD era. not like you guys came from analog and know the in’s and outs, so setup the DJI O3 is a piece of cake for you. but not for me.
i have DJI FPV drone, so im using the G2 and Controller 2. i did manage to bind them with the O3. but now. i dont know how to setup the rest. GPS, Motors, UART1,2,3. and ports.
can you please do one how to setup the O3 on beta flight. from A-Z.
Setting up the O3 in Betaflight is exactly the same as setting up the Vista or any other HD systems.
There are tutorials on my blog:
How to setup Betaflight: https://oscarliang.com/betaflight-firmware-setup/#Presets
How to setup GPS: https://oscarliang.com/gps-mini-quad/
Do you think that o3 system is much better than walksnail? I’ve bought walksnail some time ago and i’m kinda frustrated by quality and range it offers me at 720p100fps@50mbit. I’m wondering if it’s worthy upgrade.
I haven’t touched Walksnail for a couple of months now, so I don’t’ know how their latest firmware perform, I will test them again soon against the new O3 AU. But Go back 2-3 months, I did feel the DJI Vista with Goggles V2 had slightly better link quality especially when it comes to penetration and bitrate stability. Also the image looked ever so slightly clearer. They were getting close in terms of performance.
And I’d like to remind you that you should replace the antennas in the Avatar system with aftermarket ones! The original antennas are trash and don’t perform well at all.
Just got my 03 and Goggles 2 – your tutorial was very helpful and timely – thx.
Although Goggles 2 now supports original AU FPV, it doesn’t record that. Meaning that you can fly the original AUs using Goggles 2, but if you crash, you’ve got no DVR recording to help you locate the aircraft. Hoping that DJI fixes this. For now, I’ll continue flying my original AUs with the original Goggles.
I believe the issue is only that it will not auto start recording when armed with v1 units (there is currently no option), so you have to manually start the recording. If you use the DJI controller, I noticed the “record” button on the controller DOES work to start or stop the recording. If you are using another controller, I guess you have to do it through the awful Goggles 2 interface.
Is it really true that O3 aAir Unit does not output maximum RF power unless you use it with a flight controller (with MSP UART connected), which means it’s not ideal for wings without FC?
I can disable low-power state in the settings/control menu, so I believe when low-power state is disabled the Air Unit can run full power. What do you think?
You can check out Mad’s tech’s video, he tested it with and without connecting to a flight controller and confirmed this. Basically the output of the O3 air unit only went max when it gets an arm command through MSP. Simply turn off low power mode does not give you max power: https://www.youtube.com/watch?v=21C80SiUWZA
Thank you very much Oscar. Well, I fly fixed wing plane without flight controller, I simply don’t need it and now I don’t have max power + O3 Air unit doesn’t show its voltage and see only 0,0V on the screen. What to say?
Guess you can either go back to the good old vista, or just put a FC in your wing. I fly wings too, and I have been thinking to put iNav in it now that DJI might support iNav soon.
How do you change to 4:3 in the Googles? I cannot find an option for this on my Goggles V2. I have to change the onboard recording to 4:3 to make the the goggles show 4:3.
Make sure you are no in 4K. 4K only allows 16:9.
Hi Oscar,
How could we record the OSD data with air unit 3? I bought a Flywoo Explorer O3 but the .SRT file didn’t record most data (eg. Battery info, GPS…etc).
As far as I know you can only record OSD in your goggles, and it’s burned in, not stored in a separate SRT file.
Thank you Oscar!
The FOV of the O3 camera is 155. I guess it is diagonal.
What would it bei horizontal? The V1 was 122. So maybe 126 degrees?
I ask because I would like to design a mount without prop on view.
Thank you.
it’s not stated in the specs, but I guess it’s around that value. But mind you it’s only an estimated value, it could be slightly more or less in real life, if you are designing a frame for it you probably want to try it in the frame to avoid surprises.
The function to trim the quadcopter seems to be absent in the DJI goggles 2. Is there another way to trim now?
hello, I am an FPV pilot, I am planning to change my DJI OG version to DJI O3. Maybe you can help me with the question.
1. Is my flight controller compatible with the DJI o3 system?
€76.05 15% Off | HAKRC F722 40A AIO Dual USB Flight Control 4IN1 BLHELI_ S ESC 2-6S 25.5×25.5mm For DJI HD VTX CADDX CRSF FPV Racing Drone HAKRC
a.aliexpress.com/_mrGMJFg
2. Can I use the DJI connector on the flight controller and connect the DJI o3 air unit?
Using the onboard recording, can it record in 4:3 aspect ratio at 2.7k 120 fps? According to DJI’s website, you must switch to 2.7k 50/60 fps in order to record in 4:3.
Is there a way to activate the O3 if all you have are current Mac’s? The DJI Assistant (Consumer) only runs on ancient versions of OSX it appears. I ran parallels and Windows 11 and the DJI Assistant (Consumer) will update goggles V2 and my Vista units, but sits in limbo when I plug in a powered O3 that I have bound to my Googles V2 and DJI Controller (for now). I also see both the internal storage and the SD card appear when plugged into the USB.
I’m ready to fly my new build, with the exception of activating the unit.
Thank you
I was able to solve this as I scrounged up an old mac destined for donation. I have activated this, but I still am challenged running the DJI Assistant (Consumer) on Windows 11 using Parallels on an M1 Mac.
I’ll have to hang onto that old Mac for now. Again, the Windows 11 using Parallels on an M1 Mac works fine for the Googles V2 and Caddx Vista units, just not the O3 Air.
How would I implement a gimbal with the O3 airunit?
Do I still need a dedicated gimbal controller?, or just connect the motors with the ESC and have head tracking supported(when using FPV Goggles 2)?
As far as i know the O3 airunit doesn’t support gimbal. So yes, you still need a dedicated gimbal controller.
This needs some updating! The vista and og air unit are now compatible with goggles 2!
Does the O3 Air Unit transmit audio back to the goggles?
Thank you
No the O3 Air Uni doesn’t have mic.
(SOLUTION FOUND) THis might help some who have my problem with bind (Firmware is fully updated)
Problem: Latest firmware installed on both devices, when I hit bind on the controller it beeps, when I power up the air unit I get a green steady light, when I press bind on it nothing changes it stays steady green and does not bind.
Solution: When binding you have to have the 03 Air Unit bind to your drones power (USB only connect to Air Unit will not bind) in-addition for the TransTec Beetle the DJI cable connection even though the DJI cable fits into the flight controller, ALL INPUTS ARE REVERSED. So I cut all the wires on the DJI wire and reconnected them in reverse order so that from AIr unit to the Flight controller all inputs lined up correctly.
I’m trying to set up the original air unit with Goggles V2 on a plane using a Matek 722 FC compatible with the air unit.Crossfire connected to the the FC.Should I use Inav or Betaflight?Will I get OSD on my goggles?
Awesome wrap up as always Oscar – really appreciate the quality of your content 👍
I cannot seem to get my remote controller 2 to get any RC to the air unit, any idea why?
O3 Air Unit Dimension 30.5 x 30.5 x 1.45mm
I think the air unit is a bit higher than 1,45mm right? is it 14,5mm?
Yes it’s 14.5mm, a typo, fixed now. Thanks!
How do you set the gain and expo on the DJI remote controller V2? Everything will link with O3 air unit but the selection for gain/expo and button options is grayed out in the Goggles 2.
Hi, does the 03 unit work with inav.
I may be incorrect, but it seems that the new googles are just called googles 2 and the old ones are the FPV googles v2
Can O3 air unit works with XQ7 radio controller that have crossfire module on its back of my XQ7 radio controller, will the O3 air unit be working with XQ7 radio controller??? Please do let me know ASAP, if you can, please do, thank you!
Yes. The O3 Air unit has nothing to do with the radio link you use, you can use it with any radio links.
Rumors said that the O3 system would jam all previous Air Unit, Vista, and Link video transmissions nearby. I wonder if this had been encountered by the author.
I flew the Avata and another pilot the traditional DJI HD ship in the air at the same time. Avata is using the same O3 video standard and I could observe no interferences. Radios used were the motion stick on the Avata and CRSF on the “normal” quad.
Hi, can you get live video output to an HDMI cables from the goggles? And do the goggles support audience mode?
I have not been able to with the Air unit 03 and googles 2
I rectify, if it works, always with the osd in sight, although you can configure one of the three osd screens so that it is empty.
You should point out although slightly heavier than previous generation or model, that you are saving a TON of weight not having to mount a GoPro
He did.
Hello,
Is the osd with the new Air unit 03 also working in inav? I have triwd, without sucess.
Michael
inav will need to update their firmware to support it
That can take until next year…
Hi. What firmware do i need for linking the 03 air unit to my dji goggles v2 not the new goggles 2. Thanks
Switch the goggles to DJI FPV mode and then update the firmware to V01.04.0000 using DJI Assistant 2 (Consumer Drones Series) software on your computer
I have the same thought as Jachar. I would LOVE the Emax Babyhawk II HD with the O3 unit. Definitely my favorite drone so far.
Your last paragraph really sums it up. The things people both like (image quality) and hate (weight, cost, latency) about DJI both got stronger. I have DJI v2, but fly 90% HDZero now. Part of the reasons is I fly Toothpicks a lot, but it also just feels more connected.
Would love to hear more about your hd zero setups add I’m looking at doing some hd zero builds when batch 2 of the giggles drop
I have the HDZ goggles on order too. Can’t wait.
Here are some of my builds. Of the toothpicks, the 2S is my favorite- rotorbuilds.com/profile/10976
I absolutly want something like a Emax Babyhawk II HD with this O3 air unit. Yes, it’s havier than vista, but on the other hand I wouldn’t need to use any action cam on top, so overall lighter drone :D
Will the new DJI 03 work with Crossfire and Tango 2?
Yes sure any link of choice.