The DJI Avata 2’s release has created a lot of buzz within the drone community. After spending some time testing the DJI Avata 2, I’m here to share my insights on the drone’s performance and my thoughts on who this drone is truly for. I’ll also provide tips on how to set it up and recommended settings to help you get the most out of this impressive drone.

Learn more about the different FPV systems in our buyer’s guide: https://oscarliang.com/fpv-system/
Table of Contents
Where to Buy?
For those considering purchasing the DJI Avata 2, I highly recommend opting for the Fly More Combo. It includes three batteries, which are essential for extended flying sessions. Given that each battery offers about 15 minutes of flight time and takes around 30-45 minutes to charge, having three batteries allows you to fly almost non-stop. By the time you deplete the last battery, the first one should be ready to go.
Fly More Combo (3 batteries)
- AliExpress: https://s.click.aliexpress.com/e/_oCR1jno
- Amazon: https://amzn.to/3w0CyeX
- GetFPV: https://oscarliang.com/product-971p
- NewBeeDrone: https://oscarliang.com/product-oeb0
ND Filters
- AliExpress: https://s.click.aliexpress.com/e/_De3Mvgd
- Amazon: https://amzn.to/4ayjh3O
- GetFPV: https://oscarliang.com/product-shne
- FPV24: https://oscarliang.com/product-recn
DJI Avata 2 Drone Only
- GetFPV: https://oscarliang.com/product-b446
- FPV24: https://oscarliang.com/product-lub0
- Amazon: https://amzn.to/3Q1WiWx
DJI Goggles 3
- Amazon: https://amzn.to/43WRh7r
- GetFPV: https://oscarliang.com/product-omvc
- FPV24: https://oscarliang.com/product-opfq
- AliExpress: https://s.click.aliexpress.com/e/_DEpVUTV
- NewBeeDrone: https://oscarliang.com/product-cdyj
DJI Remote Controller 3
- AliExpress: https://s.click.aliexpress.com/e/_DdOqDDX
- Amazon: https://amzn.to/3xBY4Yd
- GetFPV: https://oscarliang.com/product-pz64
- FPV24: https://oscarliang.com/product-gb1l
Spare Batteries
- Amazon: https://amzn.to/4cZs9kA
- GetFPV: https://oscarliang.com/product-k7e5
- FPV24: https://oscarliang.com/product-luco
The Fly More Combo also includes a durable padded carry bag that neatly holds all your gear.

Here’s what comes with this comprehensive package:
- 1x DJI Goggles 3 -2.0D Corrective Lenses (Pair)
- 1x DJI Goggles 3 Additional Forehead Pad
- 1x DJI Avata 2 Intelligent Flight Battery
- 1x DJI Goggles 3 Foam Padding
- 1x DJI Avata 2 Gimbal Protector
- 1x Type-C to Type-C PD Cable
- 2x DJI Avata 2 Propellers (Pair)
- 8x DJI Avata 2 Propeller Screw
- 1x DJI RC Motion 3 Lanyard
- 1x USB-C OTG Cable
- 1x DJI Avata 2 Drone
- 1x DJI RC Motion 3
- 1x DJI Goggles 3
- 1x Screwdriver

Avata 2 vs. Avata 1
When comparing the DJI Avata 2 with its predecessor, several upgrades and enhancements become apparent.
Specifications
Here’s a detailed breakdown of the specifications between the two models.
| Feature | DJI Avata 2 | DJI Avata 1 |
| Weight | 377g | 410g |
| Dimensions | 185x212x64mm | 180×180×80mm |
| Internal Storage | 46GB | 20GB |
| Ascent Speed | 6 m/s (Normal Mode) 9 m/s (Sport Mode) | 6 m/s (Normal Mode, Sport Mode) |
| Max Speed | 8 m/s (Normal mode) 16 m/s (Sport mode) 27 m/s (Manual mode) | 8 m/s (Normal Mode) 14 m/s (Sport Mode) 27 m/s (Manual Mode) |
| Visual Positioning | Downward and Backward | Only Downward |
| Camera Sensor | 1/1.3-inch | 1/1.7-inch |
| Colour Modes | D-Log M 10-bit | D-Cinelike 10-bit |
| Max Resolution | 4K/60fps HDR | 4K/60fps |
| Video Transmission | O4 (OcuSync 4) | O3 (OcuSync 3) |
| Hover Time | 21 Minutes | 18 Minutes |
| Flight Time | 23 Minutes | 18 Minutes |
| Latency | 24ms (1080p/100fps) 40ms (1080p/60fps) | 30ms (1080p/100fps) 40ms (1080p/60fps) |
| Max Flight Distance | 13km | 11km |
| Max Video Range | 20km | 10km |
| Live View Quality | 1080p @ 30/50/60/100fps | 1080p @ 30fps |
| Max Bandwidth | Up to 60MHz | Up to 40MHz |
| Max Video Bitrate | 60Mbps | 50Mbps |
| Battery Capacity | 14.76V 2150mAh Li-ion | 14.76V 2420mAh Li-ion |
| Battery Charging Time | 45 minutes (via Charging Hub) 1 hour 28mins (via USB-C Port) | 2 hours 30 minutes |
| Battery Energy | 31.7 [email protected] | 35.7 [email protected] |
| Battery Weight | 145g | 162g |
| PD Fast Charging | Yes | No |
Feature Enhancements
- Weight and Propulsion: The Avata 2 is over 30 grams lighter than its predecessor, with an improved propulsion system that improves maximum flight distance from 11.6km to 13km.
- Flight Noise: Thanks to the reduced weight and updated propulsion system, the flight noise of the Avata 2 is significantly lower compared to the original model.
- Flight Path Accuracy: The addition of backward visual positioning helps the Avata 2 navigate tighter spaces more precisely.
- Camera and Stabilization: Enhanced camera capabilities and stabilization contribute to superior video quality in the Avata 2.
- Video Transmission: The introduction of DJI’s O4 video transmission system extends the maximum transmission distance to 13km and increases the maximum video bitrate from 50Mbps to 60Mbps, improving overall video quality.
- Charging: The Avata 2 supports PD fast charging, significantly reducing charging times. The included charging hub allows for a full recharge in just 45 minutes.
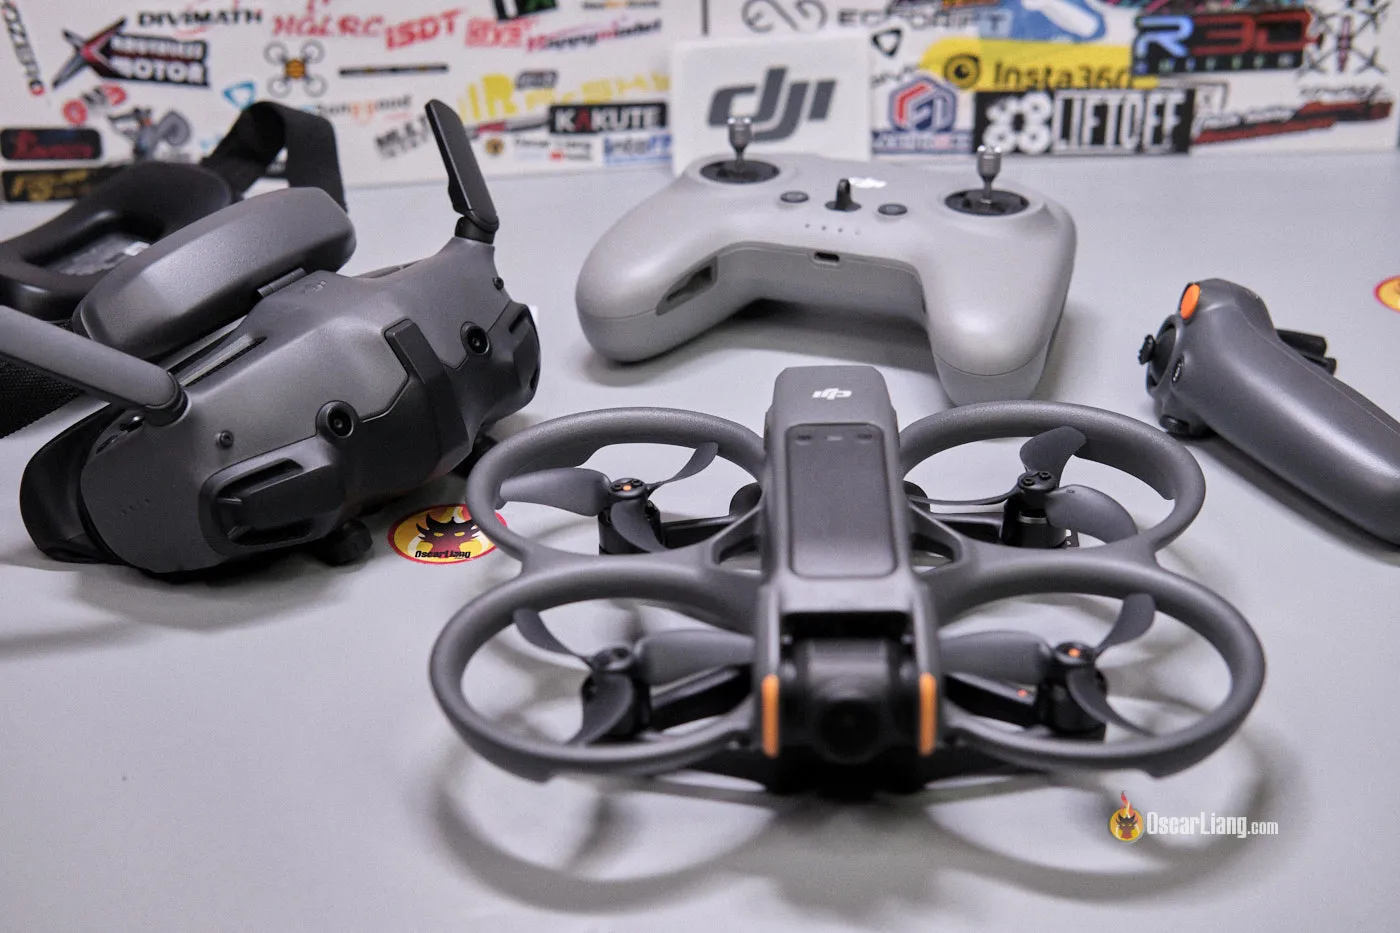
Closer Look at Avata 2

Design Changes
The DJI Avata 2 is designed as a cinewhoop, a type of FPV drone equipped with integrated propeller guards for enhanced safety. This design is particularly beneficial for flying at low altitudes and indoors, allowing you to safely get incredibly close to subjects.

Compared to its the original DJI Avata, the Avata 2 is noticeably lighter. A significant design change is the shift from a “pusher configuration,” where propellers are inverted, to a standard setup with motors on top.

One of the key improvements in the Avata 2 is the adoption of standard T-mount props. This update is particularly advantageous for drone enthusiasts who enjoy customizing their setups, as it allows for the easy replacement of propellers and the use of aftermarket options without requiring adapters.

The DJI Avata 2 weighs 239g without battery, or 386g including battery, slightly heavier than the advertised weight. Its weight complies with European class C1, which might be exciting news for EU pilots (The C1 label on the right side of the drone confirms that).
Storage
Moreover, the internal storage capacity has been increased from 20GB to 46GB. This upgrade significantly extends potential recording times, accommodating approximately 90 minutes at 1080p 60fps, 60 minutes at 2.7K 60fps, or 40 minutes at 4K 60fps. A 256GB SD card allows for 4 hours and 20 minutes of 4K 60fps footage.
For those who require additional storage, the drone still supports the use of an SD card. For optimal performance, especially when recording in 4K, selecting the right SD card is crucial. Check out my recommendations for the best SD cards for 4K video recording here: https://oscarliang.com/sd-cards-fpv/
The locaiton of the SD card slot and USB port is much easier to access compared to the previous Avata, and it’s protected by a rubber cover from water splash and dusts.

Camera and Video Quality
The camera on the DJI Avata 2 marks a significant upgrade from its predecessors, incorporating a 1/1.3-inch sensor similar to that found in the DJI Osmo Action 4. This larger sensor enhances imaging capabilities, particularly in low-light conditions, and offers improved dynamic range, making it adept at handling scenes with varied lighting.
The camera’s quality is good enough that many users might find it a viable replacement for separate action cameras like the GoPro Hero or DJI Osmo Action. The inclusion of 10-bit Dlog-M is particularly beneficial for post-production, allowing for finer color grading and detail enhancements.

The drone’s Electronic Image Stabilization (EIS) has also seen improvements. The built-in Rocksteady 3.0 Stabilizatio is particularly useful for those who require immediately usable footage without additional processing.
For users seeking more granular control over stabilization, Gyroflow can be used. This is an open source software allows for detailed adjustments to stabilization parameters, offering a customizable approach to managing video smoothness. However, for convenience and ease of use, RockSteady provides instant stabilization directly from the drone, eliminating the need to run footage through additional software.
Note that ND filters can be used on the Avata 2, but need to be purchased separately here:
- AliExpress: https://s.click.aliexpress.com/e/_De3Mvgd
- Amazon: https://amzn.to/4ayjh3O
- GetFPV: https://oscarliang.com/product-shne
- FPV24: https://oscarliang.com/product-recn


Battery and Charging
The DJI Avata 2 represents a notable advancement from its predecessor, particularly in terms of battery life and the mechanism for battery installation. The introduction of a new pinch mechanism simplifies the process of swapping batteries and ensures they remain securely in place even during a crash.


Unlike typical LiPo batteries found in many FPV drones, the Avata 2 uses lithium-ion batteries. These batteries have a nominal voltage of 14.76V and a maximum voltage of 17V, which is comparable to a 4S. The compact yet robust 4S 2150mAh battery supports impressive flight times of up to 15 minutes.
There are two ways to charge the battery: using the Charging Hub or directly charging the drone with the battery installed.

Charging Time:
| Charging Hub (max 60W) | Directly Charging Drone (max 30W) | |
| From 0 to 100% | approx. 45 min | approx. 88 min |
| From 10 to 90% | approx. 30 min | approx. 60 min |
The charging hub is quite smart, it charges one battery at a time and prioritizes the battery with the most charge remaining. This ensures the quickest turnaround possible, enabling you to get back in the air with minimal downtime.
Get some spare batteries here:
- Amazon: https://amzn.to/4cZs9kA
- GetFPV: https://oscarliang.com/product-k7e5
- FPV24: https://oscarliang.com/product-luco
The charging hub also acts as a powerbank to charge your smartphone, GoPro, remote controller or goggles. Connect the device via USB-C, and it will use the drone battery as power source. It always discharges the battery with the lowest power level first.
Sensors

Unfortunately, the DJI Avata 2 does not come equipped with obstacle avoidance capabilities, unlike the typical DJI camera drones such as the Mini 4 Pro.
However, the Avata 2 does incorporate downward and backward visual positioning sensors. These are utilized primarily in Normal and Sport modes to enhance flight precision in tight spaces and position hold when hovering.
Remote Controller
For those familiar with the motion controller from the original Avata, the experience with the Avata 2 feels even more intuitive. The Motion Controller simplifies the learning process, allowing users to quickly learn flying the Avata 2 without the need for extensive and complicated training.
When using the Motion Controller, you don’t really think about roll, pitch or yaw, the system will do all the coordination for you. All you need to do is to control the speed and direction.


For those who prefer flying the Avata 2 like a traditional FPV drone, the Remote Controller 3 (RC3) is available for separate purchase. It’s important to note that the older Remote Controller 2 (RC2) is not compatible with the Avata 2.
Get the DJI Remote Controller 3 here:
- AliExpress: https://s.click.aliexpress.com/e/_DdOqDDX
- Amazon: https://amzn.to/3xBY4Yd
- GetFPV: https://oscarliang.com/product-pz64
- FPV24: https://oscarliang.com/product-gb1l

While the new RC3 may look similar to its predecessor, it features an internal antenna and removable gimbal sticks, enhancing its compactness and ease of handling. In fact, the remote communicates with the drone via the Goggles 3 using Bluetooth—there are no direct communications. This reduces design complexity and power consumption in the radio, making the it lighter and more compact. However, this means your goggles must remain powered on at all times during flight. If you power down the goggles while flying the Avata 2, you will lose both the video and radio signals.
One significant advantage of the RC3 is its capability to operate in manual mode (M mode), granting pilots complete freedom to navigate the skies.


Additionally, the RC3 is compatible with most FPV simulators, supporting the majority of popular options featured in our guide: https://oscarliang.com/fpv-simulator/
For those serious about flying, the RC3 is essential. It provides much more precise control compared to the Motion Controller. However, it’s worth mentioning that while the RC3 should satisfy most pilots, it has its limitations. The smaller gimbals on the RC3 do not provide the same level of resolution and control feel as full-size gimbals found on more advanced controllers.

The battery life of the remote is impressive, lasting about 10 hours on a single charge. Although the battery is not removable, it can be conveniently recharged using a USB-C port (5V 2A).
FPV Goggles

For a more detailed dive in the DJI Goggles 3, and how they compare to the Goggles 2, see my review here: https://oscarliang.com/dji-goggles-3/
Get the DJI Goggles 3 from:
- Amazon: https://amzn.to/43WRh7r
- GetFPV: https://oscarliang.com/product-omvc
- FPV24: https://oscarliang.com/product-opfq
- AliExpress: https://s.click.aliexpress.com/e/_DEpVUTV
- NewBeeDrone: https://oscarliang.com/product-cdyj
Compatibility
As of now, the DJI Avata 2 is compatible exclusively with the following devices:
- DJI Goggles 3
- DJI RC Motion 3
- DJI FPV Remote Controller 3
Unfortunately, it does not currently support previous DJI FPV systems, including DJI Goggles 2, Integra, Goggles V2, O3 Air Unit, and Vista. However, the Goggles 3 does support the DJI Air 3 and DJI Mini 4 Pro drones and is also compatible with the Remote Controller 2.
There is hope within the community that DJI will extend backward compatibility to older gear, as they have done in the past following the release of the Goggles 2 and the original Avata. We are optimistic that such updates may be provided in the near future.
User Experience
For anyone new, there is a significant amount of information to absorb. Later in this review, I will try to explain the setup process in detail and ease the learning curve. But using the Avata 2 with the Goggles 3 offers a seamless and engaging experience right out of the box.
The goggles fit more comfortably thanks to the focus on distributing weight and pressure to the forehead rather than other sensitive areas like the nose or eyes. This design helps in reducing light leaks and provides a more immersive viewing experience.
The motion controller is an innovative addition, ideal for beginners due to its intuitive control mechanism. It allows new users to fly the drone with minimal training effectively. Additionally, the motion controller can be used as an AR cursor within the goggles’ interface, providing a unique way to navigate settings and options. For more advanced flying, however, the Remote Controller 3 is recommended for its superior precision and control.
A notable safety feature is the low voltage warning triggered when the battery reaches around 20%. In this scenario, the drone automatically initiates a return-to-home procedure, which can be manually overridden by pressing the Lock button. This allows the pilot to regain control, but the speed of the drone will be limited to preserver energy.
The Avata 2 also introduces ‘Easy Acro’ mode, which simplifies performing flips and rolls with the push of a button, makes acro more accessible to beginners. But for intermediate and advanced users, it felt pretty pointless to be honest. It’s like what a $20 toy drone could do, and there’s a big pause between each move, just doesn’t look good in footage.
Flight Performance
The first thing I noticed about the DJI Avata 2 was how much quieter it is compared to the original Avata—not just in terms of volume, but the sound profile was far less irritating too.
When it’s just hovering, position hold is pretty impressive. It can still drift a little bit when it’s windy outside, or when it’s dark, but when it’s indoor it’s surprisingly stable thanks to the additional visual positioning sensors. When you hit the wall, the drone will just drop to the ground and disarm, minimizing impact and damage.
In manual mode, it hovers around 30-35% throttle, which is not bad for a cinewhoop powered by a Li-ion battery. Normal mode feels conservative, offering slow and smooth flight characteristics. However, switching to Sport mode truly unleashes the drone’s full potential, significantly boosting its speed and maneuverability.
In terms of overall flight performance, the Avata 2 met my expectations for a cinewhoop. It’s more agile and responsive than the original Avata, thanks to its lighter weight. For a cinewhoop, it’s quite capably. However, when compared to a freestyle FPV drone, it feels somewhat underpowered and can appear wobbly during sharp turns—a typical trait for cinewhoops, but it still showed improvement over the original Avata, which tended to dip during aggressive maneuvers. While the Avata 2 isn’t designed for aggressive freestyle maneuvers—it struggles to recover from dives and inverted moves—it excels at cinematic cruising, whether indoors or out. It’s important for newcomers to be aware of these characteristics to set realistic expectations.
I really enjoyed using the motion controller, it felt intuitive and offered a totally different flight experience – it’s like playing a video game. As an experienced FPV pilot, I still prefer the traditional remote controller for its precision and familiarity—it’s just what feels right after years of flying. However, for beginners, the motion controller offers a straightforward and engaging way to quickly get into the game.
The drone also handled 20MPH winds reasonably well, though it did experience some wobbling and struggled against headwinds, especially when it voltage gets low. Avoiding flying in excessively windy conditions with the Avata 2 to prevent these issues.
The top speed of the Avata 2 is around 100km/h, officially it’s capped at 97km/h (and 68.4km/h in Europe).
Durability
One noticeable change in the DJI Avata 2 is its construction, which feels slightly more fragile than its predecessor. This seems to be a deliberate trade-off to reduce weight and increase flight performance.

It’s not particularly crash-resistant to be totally honest; I had a few crashes with trees and it fell to the ground from 1-2 meters high, and the plastic on the propeller guard cracked.

I’ve been cautious to avoid crashes since I bought this drone with my own money and don’t want to break it (just yet), but if I, as a pilot with over 10 years of experience, can damage it within my first week of flying it, new pilots are likely to break it too. That’s why it’s important to get DJI Care when you pick up the Avata 2, so you can have it repaired or replaced at a lower cost. They even cover “fly-aways,” which is nice.
Range and Reliability
The previous DJI O3 video link—used in the Avata V1 and Goggles 2—was already impressive, but DJI has gone one step further with the introduction of O4. The new system not only provides solid connectivity but also delivers exceptional video quality.
The Avata 2 boasts an impressive video range of up to 13km, which is a commendable improvement. Additionally, the drone is equipped with a GPS-based Return to Home feature that acts as a safety net in case of video link loss or when the drone hits a failsafe. This reliable feature ensures that the drone can autonomously return to its launch point (fingers crossed), which is a reassurance for any pilot flying in challenging conditions.
To determine if you can fly further, you should monitor the bitrate (bottom right of your screen), which will decrease as you fly further away. When the bitrate gets too low, you will start to see a blurry image and even stuttering in the video feed, indicating that it’s time to turn back to avoid the risk of losing signal entirely.
If you are in FCC mode with the maximum bitrate set to 60Mbps and flying line of sight in a relatively interference-free environment, you can expect the bitrate to remain around 55-60Mbps within 1km of range. The bitrate could drop to 40-45Mbps at 2km, and 15-20Mbps at 5km.

Equally important to consider is the flight time—whether you have enough battery to return. When it’s windy, you will use more power flying into a headwind, so it’s unwise to assume you can fly away using 50% of the battery and use the other half to fly back home; it doesn’t always work that way due to wind conditions. Always leave some margin for error, reserve some battery just in case, and avoid attempting long-range flights on windy days.
As a matter of fact, I do believe the O4 link is capable of long-range, but the Avata 2 drone itself is the actual bottleneck—the battery runs out before the video link (taking into account the distance you need to cover to return home).
No FCC for European Users?
If you live in Europe, you should think twice about buying the Avata 2.
Before delving into the specifics, it’s crucial to understand what FCC and CE modes mean. The Federal Communications Commission (FCC) in the United States and Conformité Européenne (CE) in Europe regulate the power output and frequencies that electronic devices, including drones, can legally use.
So the Avata 2 is in either FCC or CE mode. In FCC mode, you get all the channels and RF power available from the Avata 2. However, in CE mode, channels are restricted and RF power is massively reduced to meet European regulations.
In CE mode, Channel Mode is locked to Auto (the option is grayed out), and you cannot select Manual mode anymore, let alone change frequency, channel, or bandwidth. This change has understandably led to frustration among European users, as this means their range and video quality will be severely reduced.
The DJI Avata 2, like its predecessors, was expected to allow users to switch between FCC and CE modes using a known hack—the “ham file”. For those in FCC regions, the hack still works. However, the situation in CE regions is quite different. While the ham file doesn’t unlock additional channels as it used to in the original Avata and Goggles 2, it does enhance RF output power, allowing the drone to operate in what appears to be an FCC RF power mode. This hack also unlocks the EU speed limit.
Simply get the file “ham_cfg_support” and unzip it to the root directory of the SD card and put it in the DJI Goggles 3. Download here: https://drive.google.com/file/d/1ug2U_i5kdrKQQ2I17NLJBXm2tKQeNj5Q/view?usp=share_link
Third-party solutions like the Drone Tweaks app on Android or iOS devices are supposed to be able to unlock true FCC mode on the Avata 2 (so you can change channel, frequency and bandwidth etc), but it costs €26 per year. There is also the free app called B3YOND but unavailable on iOS and works in older Android versions. While I have not personally tested this app and not sure how it affects your warranty, it’s currently the only potential solution I am aware of. This app allows the drone to operate in FCC mode by modifying the original DJI Fly app. Once installed, users can manually select FCC mode upon connecting the drone, unlocking both higher RF power and additional channels. The hack should still work when you change the battery, but when you connect the drone to the official DJI Fly app or perform a factory reset, you will have to reapply this hack. It’s frustrating that users have to pay extra just to get the full capability of their drone, and it’s unclear if DJI will block this hack in future firmware updates.
This hack is not legal in the EU: the regulations do not allow you to exceed the authorized power or occupy certain frequencies. You can remove this hack by simply resetting the headset through the “Settings” -> “About” -> “Reset All” menu.
Final Thoughts: Who Is the DJI Avata 2 For?
The DJI Avata 2 incorporates some of the most advanced technology available in the drone market today, but it may not be the perfect fit for everyone.
Cinematic Flying and Cinematography
Designed with flexibility in mind, the Avata 2 is an ideal tool for videographers who prefer to avoid the complexities associated with traditional FPV drones. Its ability to hold position and feature a tiltable camera adds a level of versatility unmatched by typical FPV drones, making it a superb choice for aerial filming.
Get the Fly More Combo here:
- AliExpress: https://s.click.aliexpress.com/e/_oCR1jno
- Amazon: https://amzn.to/3w0CyeX
- GetFPV: https://oscarliang.com/product-971p
- NewBeeDrone: https://oscarliang.com/product-oeb0
Building your own cinewhoop provides unparalleled flexibility. You have complete control over every component, from the motors to the camera and beyond, allowing you to tailor your drone to your exact specifications and flying style. This level of customization can lead to superior performance, especially for those who enjoy tweaking and optimizing their setups.
Out of the box, the DJI Avata 2 is tuned for optimal performance, with no need for adjustments. It flies beautifully but has its speed capped at 97km/h (in Europe that’s 68km/h), which can feel somewhat limiting, especially when trying to execute more complex maneuvers that require faster speeds.
However, a custom build involves a steep learning curve, especially for newcomers to the hobby. Building and maintaining your drone requires a thorough understanding of its components and systems, which can be daunting but rewarding for those who enjoy the technical challenges.
The DJI Avata 2 comes as a complete package, including goggles, a remote controller, batteries, chargers, and the drone itself. This all-in-one solution is ready to fly straight out of the box with very decent video quality. It’s equipped with built-in GPS for return-to-home functionality and one of the best video transmission systems on the market. For those less inclined to delve into the technical aspects of drone building and maintenance, the Avata 2 is a fantastic choice. It offers a hassle-free experience with the added benefit of professional appearance, which can be a significant factor for commercial use, such as aerial videography for real estate. It also looks more professional than custom built cinewhoops which matters for some people.
Beginners
For those new to the drone scene, the Avata 2 presents an appealing option. It’s particularly suitable for individuals interested in experiencing FPV without the daunting learning curve. Although the initial investment might be substantial, the performance and features offered justify the cost for those serious about getting that high quality FPV footage.
Freestyle
For FPV pilots focused on freestyle and fast pace flying, the Avata 2 may not be the best drone. While it offers an easy entry point for beginners to pick up and fly, building your own drone can provide superior flight performance at a much lower cost. Check out how cheaply you can build a high performance freestyle drone: https://oscarliang.com/cheapest-fpv-drone-build/
Long Range
While not the most efficient option for long-range flights, the Avata 2 can actually be a decent drone for mid/long range flights thanks to its impressive video/control link, GPS capabilities and relatively long flight time. It’s been proven that the Avata 2 is capable of completing 5km round trip (covering 10km+ total distance).
The Pros and Cons
Let me sum up the pros and cons of the Avata 2:
Pros
- Quieter than other cinewhoops of this size.
- No need for an extra GoPro on the drone.
- It can actually fly very far with great video feed and signal.
- The built-in 46GB memory will save you when you forget your SD card at home.
- Painless Experience: If you like flying cinewhoop, the Avata 2 is genuinely a great drone. More than good enough to save you from all the trouble of building your own.
- Feature Rich: Lots of great features, such as position hold, altitude hold and return to home features, it’s just brilliant.
- Dynamic Control: While in flight, the ability to start and stop recordings or adjust the camera angle mid-air enhances flexibility and control, allowing for dynamic shot composition.
- Beginner-Friendly: Excluding the cost, the Avata 2 is actually an excellent drone for beginners due to its intuitive controls and forgiving flight characteristics.
Cons
- Height limit of 500 meters and speed limit of 97km/h
- Lack of compatibility with older DJI gear.
- Power is limited by the system when voltage is low.
- Flight performance is not as good as custom built drones – the Avata 2 feels underpowered with a suboptimal tune
- No FCC Mode Outside US: For most people outside of the US, especially for those in Europe, it’s a shame DJI has forced CE mode on the Avata 2 and there’s no easy way to unlock FCC at the moment. CE mode have very limited range and channel selection.
- Cost: As is typical with DJI products, the price tag is substantial. Not only is the initial purchase pricey, but so are the spare batteries and repairs.
- Locked Ecosystem: The drone operates within a closed system, meaning you cannot upgrade components, including the camera. While it’s possible to mount an external action camera like a GoPro, doing so could adversely affect the drone’s flight performance.
- Limited Frame Rates: Similar to the O3 system, the live view shares settings with HD recording, limiting the usability of lower frame rates like 30fps due to latency issues with lower frame rates. The best performing setting for live flying is at 100fps. That’s why the Avata 2 may not entirely replace the need for a separate HD camera for optimal recording quality.
- Remote Controller Limitations: The DJI Remote Controller 3, while functional, features small gimbals that lack the resolution and control feel of full-size radio controllers. This can be a significant drawback for those who require precise control over their drone.
How to Setup the Avata 2?
I have a step by step tutorial explaining how to setup the DJI Avata 2 for your first flight, also tips and tricks to improve flight performance and image quality: https://oscarliang.com/setup-dji-avata-2/
DJI Avata 2 Firmware Update (1st Jun 2024)
The update runs directly via the DJI Fly app, so make sure you first update it to the latest version (v1.13.4). If in doubt, just uninstall it from your phone, then download the latest version from DJI’s website.
The new update for the DJI Avata 2 has the version number v01.00.0300. You also need to update other devices if you want them to work with the Avata 2:
- DJI Goggles 2: v01.10.0000
- DJI FPV Controller V2: V02.00.1000
By updating the Avata 2 firmware you get the following benefits.
Added New Compatibility:
One of the most significant updates is the expanded compatibility. The Avata 2 now works seamlessly with a range of DJI devices, including the DJI remote controller, Goggles 2, and the RC Motion 2. This means you don’t need to purchase an entire new set of equipment if you’re upgrading from the Avata 1. Simply bind the Avata 2 to your existing devices and start flying. However, it’s worth noting that the Goggles 3 are still not compatible with the O3 air units, which might be inconvenient for some users who have custom FPV drones.
4K 100fps Recording:
Another exciting feature of this firmware update is the ability to record in 4K at 100fps. Previously, the highest frame rate available was 4K at 60fps. This new option allows for super slow-motion footage, giving you even more flexibility and creativity in capturing epic shots with the Avata 2.
D-Log M Color Display Assist:
For those who shoot in D-Log M, there’s now a color display assist feature. This enhancement allows you to see a colored version of your footage inside the goggles, even while the camera continues to record in a flat color profile. This makes it easier to spot details and navigate while flying, without sacrificing the flexibility of post-processing your footage.
LightCut App Integration:
The firmware update also brings new features to the DJI-supported LightCut app. This mobile app, available on Android and iOS, allows you to connect to the Avata 2 wirelessly. You can access and edit your footage directly from the drone, using AI to automatically edit your clips or add creative overlays. The Sky View feature offers video game-like overlays, enhancing the visual appeal of your footage. The app’s AI capabilities also enable auto-editing, making it easier to create shareable content quickly.
Goggles 3 Now Supports O3 Air Unit (29 July 2024)
For more info: https://oscarliang.com/dji-goggles-3-supports-o3/
Edit History
- Mar 2024 – published news about the Avata 2
- Apr 2024 – review published
10 comments
Being a newbie I can say that DJI Avata 2 is a true beginner drone.
Everyone drone manufacturer, especially less expensive ready to fly models do advertise their drones as beginner drone, and that is not true. Avata 2 flies as a Camera Drone, and in Manual/Acro mode both being FPV flights. You can use RC Motion 3, or RC FPV 3, for a Manual flight experience. It is indeed a beginner’s drone, that does not dismay at all. Of course, a beginner drone in contrast the frame DIY drones.
However, the ‘Death Roll’ syndrome, the ‘Yaw Tumble’ effect (if I am naming these maladies correctly), Avata 2 does
suffer from both.
I just started learning flying in manual, and I have been crashing Avata 2 almost at every flight with the Death Roll collapse, where the Avata 2 will roll to one side (after a sharp Yaw turn I presume), like collapsing at one side and then falls down crashing if you are not in higher altitudes to catch yourself; or losses control after that sharp drop of at one side; I think it goes spinning, like DJI Neo drone, then crashing.
I don’t trust flying Avata 2 anymore. Every other crash I break a prop, and that is after crashing into the grass, perhaps hitting some headstone in the process. I do utilize a 3D print bumper guard, which breaks after a crash or two, leaving the camera intact.
Avata 2 served its purpose as a ‘beginner’ drone, perhaps it is time to jump into the real deal of Drones.. and here at Oscar’s articles I binge, trying to fathom more of the experience and knowledge he does kindly share.. in hopes to make that jump swiftly.. (like from Windows PC to Linux) Thank you Oscar..
Touchpad is much more enjoyable. the sound beeps produced by the 5d joystick is way too loud to be enjoyable
This is by far the most technical and indepth review of the Avata 2 I’ve seen on the internet, well done Oscar.
Two things I notice:
1. Avata 1 doesn’t record audio but Avata 2 yes
Avata 2 is worst comparing FPS options
Avata 1
* With DJI Goggles 2:
* 4K@30/50/60fps
* 2.7K@30/50/60/100/120fps
* 1080p@30/50/60/100/120fps
Avata 2
* 4K (4∶3): 3840×2880@30/50/60fps
* 4K (16∶9): 3840×2160@30/50/60fps
* 2.7K (4∶3): 2688×2016@30/50/60fps
* 2.7K (16∶9): 2688×1512@30/50/120fps
* 1080p (4∶3): 1440×1080@30/50/120fps
* 1080p (16∶9): 1920×1080@30/50/120fps
What is the maximum FPS when using ultrawide? On O3 is 60
Really, there’s audio support in Avata 2? You sure about that? I’ve heard the opposite. I’ve also tried it with 4k60 mode myself and video was very much silent. As DJI FPV owner I would loove to have audio support in Avata 2 also but how?
Thanks a lot for your reviews. You have the best fpv channel.
Did you mention, that this is the only C1 fpv drone available? It can be flown inside cities (in Europe) legally! :-D
I don’t live in EU countries so I haven’t looked into that, but it’s good to know!
When 1440p 144hz?
sounds like DJI will be raking in dough right about the time they release the Avata 2