Gyroflow is a popular open-source tool that stabilizes FPV drone footage using gyro data from your camera or drone. It’s free and works with a wide range of cameras, allowing you to stabilize video using gyro data recorded internally (in-camera) or externally (like Betaflight Blackbox), then imported into Gyroflow. In this tutorial, I’ll walk you through using Gyroflow—from installing the software and adjusting settings to exporting your stabilized footage. Whether you’re a beginner or an experienced pilot, this guide will help you make the most of Gyroflow.

Interested in leveling up your FPV videos? Don’t forget to check out this color grading tutorial for beginners: https://oscarliang.com/color-grade-fpv-videos/
Table of Contents
Advantages of Gyroflow
What is Gyroflow?
Gyroflow is open-source stabilization software that leverages gyro data. Compared to paid tools like Reelsteady GO, Gyroflow offers:
- Open-sournce and completely free (vs. Reelsteady GO’s $99)
- Support for almost any camera (Reelsteady GO is GoPro-only)
- User-friendly interface
- Smooth preview playback and speedy exports
- Decent results that often rival professional software
Download Gyroflow

First, download and unzip the latest version of Gyroflow from the official website: https://github.com/gyroflow/gyroflow/releases
Once downloaded, unzip the file and run the Gyroflow executable inside the folder. There’s no need for installation—Gyroflow is ready to use right out of the box.
Supported Cameras

You’ll need a camera that has an onboard gyroscope and records motion data along with the video footage. Here’s a list of popular cameras used in FPV drones that are compatible with Gyroflow out of the box:
- GoPro Hero (5 Black and newer)
- DJI Osmo Action 2/4/5
- DJI O3 Air Unit,
- DJI O4 and O4 Pro,
- DJI Avata, Avata 2, Neo
- Runcam Thumb Pro, Thumb 2
- Hawkeye Thumb 4K
- Walksnail Moonlight
- …and more!
See my HD camera recommendations here: https://oscarliang.com/action-camera/
Most of these cameras embed the gyro data directly into the video file, making it easy to use with Gyroflow—just drag and drop the video into the app. However, some cameras (like the Runcam Thumb) record gyro data in a separate CSV file, which you’ll need to import manually into Gyroflow. Check your camera’s manual for details on how it records and stores gyro data.
If your camera doesn’t support built-in gyro data recording or isn’t natively supported by Gyroflow, you can still use it by recording motion data externally (e.g., using Betaflight Blackbox logs or a dedicated flight controller). However, this process is more advanced and outside the scope of this beginner guide. For simplicity and ease of use, I recommend sticking with one of the cameras listed above that is fully compatible with Gyroflow.
Importing Video
Launch Gyroflow on your computer and simply drag and drop your video file into the application.

If your video is split into multiple files from the same flight (common when file size exceeds the camera’s limit), you can select all of them, drag and drop them into Gyroflow. You’ll then be prompted to combine them into a single video file. I personally prefer combining them, then deleting the original files to keep things tidy and easier to manage.

Missing Gyro Data?
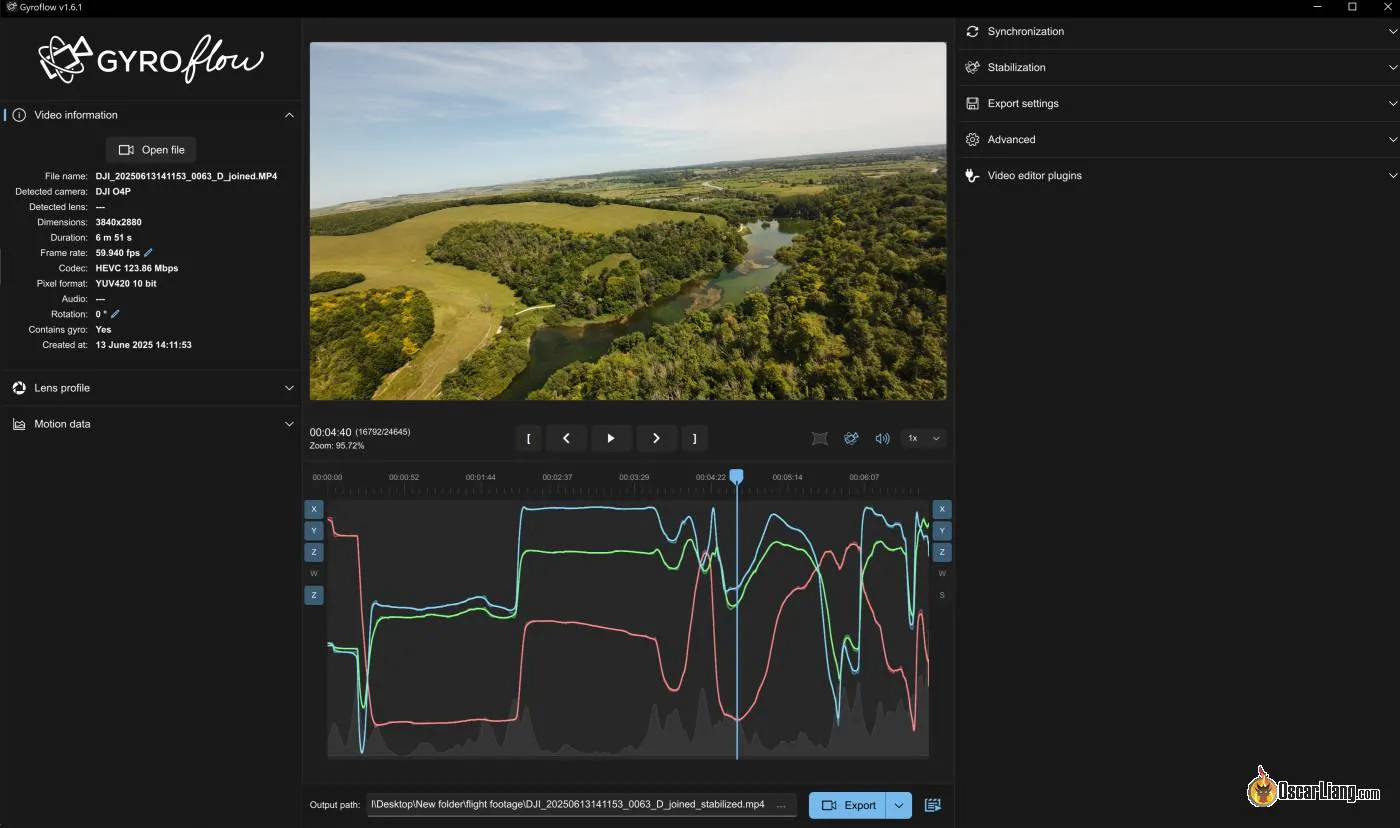
If your camera stores gyro data within the video file, you’ll see 3 traces in the timeline representing gyro movement across the X, Y, and Z axes. If these traces are missing, the video likely doesn’t contain gyro data, and you’ll need to load it manually. This can be done under the Motion Data section, usually by importing a separate CSV file if your camera records it that way.

Note: On DJI O3 and O4 (Lite & Pro), only certain camera settings will enable gyro data recording. Check my DJI O4 Pro tutorial for more details: https://oscarliang.com/how-to-setup-dji-o4-pro/#Video-Stabilization
Lens Profile
If your camera has a supported lens profile, Gyroflow will automatically load it when you import the video. If it doesn’t, you can manually select a profile or even create a custom one. Accurate lens profiles help Gyroflow understand the optical distortion of your camera’s lens, significantly improving stabilization results.

Syncing Gyro Data with Video
If you’re using GoPro or DJI cameras, gyro syncing should be automatic. You don’t need to do anything or add a sync point—in fact, doing so can be counterproductive. Gyroflow uses timestamp data to automatically align the gyro data with the video.
However, with some cheaper cameras, syncing might not be perfect out of the box. In these cases, try using the Auto Sync function under the Stabilization tab. If that doesn’t yield good results, you can manually tweak the Offset slider to align gyro data with the video.
You can also try Optical Flow, which analyzes motion in the video by tracking objects frame by frame. It’s helpful as a secondary check but can be thrown off by moving foreground elements or shifting lighting, so results may vary.
Trimming Video
Under the preview window, you can use the [ and ] buttons to trim your footage to the desired length. If you look over to the right, the button next to the volume icon allows you to enable or disable stabilization in the preview display.

Stabilization Settings
While Gyroflow performs well with its default settings, there are a few adjustments you might consider depending on your needs.
Stabilization Modes
Gyroflow offers several stabilization modes, including “Plain 3D”, which provides a look similar to Reelsteady. Within each mode, you can fine-tune parameters to tailor the stabilization effect to your specific style or footage. The “Default” mode typically works well for most FPV videos.

Clicking “Advanced” will reveal additional settings for those who want more control over the stabilization process.
Smoothness
The Smoothness setting controls how much stabilization is applied to the video. Higher values result in smoother footage but require more cropping. Typically, a setting between 10% and 30% works well for most FPV videos in my opinion, assuming your drone flight is relatively stable. If your footage is shaky, you may need to increase the smoothness value—just be aware that the video will appear more zoomed in.
The Max Smoothness sliders influence the time window used for stabilization—lower values generally mean less cropping, but also less effective stabilization. The default values are usually a good starting point.

Lock Horizon
Lock Horizon keeps the horizon level throughout the video. It’s especially useful if your drone is constantly tilted to one side during flight, or for smooth indoor cinewhoop shots. For freestyle flying, I usually leave this feature turned off, as it can interfere with the dynamic movement style of freestyle footage.
Image Cropping
Cropping is an unavoidable part of video stabilization—Gyroflow needs extra space around the edges of your frame to adjust and stabilize motion.
Gyroflow offers several cropping strategies:
- Dynamic Cropping – Recommended for FPV. It adjusts the crop amount in real time to maximize the visible image while still stabilizing effectively.
- Static Crop – Maintains a constant crop throughout the video. This ensures a stable frame size but usually results in more cropping than necessary.
- No Cropping – Preserves the full original frame, but you may see black edges when the image shifts beyond the frame boundaries during stabilization.
If you’re using Dynamic Cropping, you can also adjust the Zooming Speed, which controls how quickly the zoom level changes during stabilization. A faster zoom makes stabilization more responsive but may look abrupt or unnatural. I personally prefer a 5-second zoom speed for relaxed cruising footage—it feels more natural. However, if your video includes lots of rapid movements like flips and rolls, a faster zoom speed might deliver more effective results. In the end, it comes down to personal preference and flight style.
Lens Correction
Adjust this setting between 25% and 100%, depending on your preference. A lower value retains more of the original fisheye effect, preserving that wide-angle look. A higher value reduces the fisheye distortion by zooming in slightly, resulting in a more natural-looking image with straighter lines.
FOV
Click “Advanced” under Lens Correction reveals additional settings such as FOV and video speed.

The FOV (field of view) slider controls how much of the original footage is visible after stabilization. Increasing the FOV allows you to keep more of the scene in view, but be careful not to push it too far—doing so may introduce black borders (indicated by red lines in the timeline).
Tip: Adjust FOV as high as possible without triggering red warnings in the timeline to get the best balance between wide view and clean framing.

Rolling Shutter Correction
Rolling shutter correction is another important feature that compensates for the distortion caused by CMOS sensors, which is especially noticeable in fast movements. Increasing this value can significantly improve image quality when shooting with fast movements or vibrations.
Previewing and Exporting Stabilized Footage
Click the “Play” button to preview your stabilized footage. You can tweak the stabilization settings in real-time and immediately see how they affect the video. If it looks good, you’re ready to export.
When exporting, you have control over settings such as video codec, resolution, bitrate, and file format. Choose a resolution that matches your original footage, or adjust it based on your output requirements—such as social media sharing, editing, or archiving.
Advanced Techniques: Keyframing and Dynamic Zoom
Gyroflow also supports keyframing, allowing for specific adjustments at various points in the footage. For example, you can manually increase the zoom during rapid movements like a snap roll to make stabilization less noticeable and more natural. While this technique is powerful, it’s labor-intensive and best suited for professional-grade projects.
Tips and Tricks
Record in a Native Aspect Ratio
Recording in full sensor aspect ratio that gives you the biggest possible FOV—such as 8:7 in the latest GoPro cameras, or 4:3 in most DJI cameras. This provides more FOV for stabilization without sacrificing too much image quality. Combined with a higher recording resolution (e.g. recording in 4K for a final 2.7K output, or 2.7K recording for 1080p output), this gives you much more flexibility during stabilization.
Balance Stability and Cropping
Finding the right balance between stabilization smoothness and image cropping is key. Setting smoothness too high can create an unnatural feel and lead to heavy cropping. Experiment with different settings for each type of footage to find the best results for your flying style and environment.
Conclusion
Gyroflow is a powerful tool for stabilizing FPV drone footage, delivering professional-quality results—for free. With the help of this step-by-step guide, you can turn shaky FPV clips into smooth, cinematic videos. Whether you fly with high-end cameras like DJI or GoPro, or budget-friendly options like the Runcam Thumb, Gyroflow makes stabilization both accessible and effective.
Give it a try—you might be surprised at just how polished your footage can look. Happy flying!
Edit History
- Apr 2022 – Tutorial created for version 1.0.0 RC
- Sep 2024 – Updated for version 1.5.4
- Jul 2025 – Updated for version 1.6.1
14 comments
this doesnt match setting in current gyroflow. The zoom is in percentage now. Can you please update?
Hello, I shot with red komodo but I cannot stabilize it. Everything seems fine I see the gyro data. But the images are not stabilized. Is there a setting you recommend?
It amazes me how gyroflow can preview 100Mbps in good quality and smooth, when Davinci resolve just dying 😛
both software work fine for me with 100Mbps footage, so probably just a hardware compatibility issue :)
Gyroflow 1.4.2 does not stabilize Footage from Sony a7SIII 4k 50p !
After stabilization I have more shaking in the clip than without stabilization, although the gyro data was supposedly read.
what video settings should I have my gopro hero4 silver set to? any time I load a video it says “no motion data was found”
you need to turn off Hypersmooth in camera settings
CAN SOMEONE PLESE HELP!! Im trying to use gyroflow. WHOEVER CAN HELP ILL PAY THEM $30!! I have the dji avata and im trying to use gyro flow on an dell xps 13 i5. When i upload videos from the avata to the gyroflow app it says there is no gyro data. But the settings to get proper gyro data are to set it on wide and no stablizer turned on in the camera. Even when i do that it says there is no gyro data. i dont know what to do. can someone please please help im super duper frustrated and am about to drop gyroflow. id like to donate but ive had a terrible terrible time trying to figure out the app.
Make sure your camera settings are on wide FOV and eis off.
Can gyro data be extracted from Ardupilot flight controllers to use with Gyroflow? Thanks…
Just discovered Gyroflow. Thanks for your write up. Is there a way to batch process multiple files? I can’t seem to see this option but someone mentioned there was. Can you point me in the right direction?
Gyroflow does not work with any camera as you so proudly state. there are no lens profiles for ANY Garmin camera nor does it allow for import of the Garmin gyro data which is stored in .fit files by Garmin accessories and cameras so please review your statements or provide me with some solutions proving me wrong. If I could convert this fit file to a format that Gyroflow could read it would help then I could at least use my gyro data to attempt to use this software which at first glance looks very promising. I have loaded a lens profile I created but this is without rolling shutter compensation. I still can’t find any software that will level the horizon in kitesurfing footage taken on a Garmin Virb XE at 1920 x 1440 pixels, maybe you can assist.
Having trouble exporting I must be missing a procedure that I don’t see in front of me
Im not entirely sure if its your problem but the issue i had with exporting was forgetting to sync