This tutorial explains how to setup TBS Crossfire for OpenTX radios such as the TX16S. I will also show you how to connect Crossfire receiver to a flight controller and configure it in Betaflight. Tracer is similar to Crossfire when it comes to setup, so most of the steps in this guide also apply.

Further Reading: How to choose radio transmitter?
Table of Contents
What’s TBS Crossfire?
TBS Crossfire is a popular radio control link for FPV drones, which is known to be reliable, easy to setup and great for long range flying.
Crossfire is an external RF module that can be installed directly on the back of a radio transmitter (i.e. JR module bay). The TBS Tango 2 radio also has Crossfire built in.
Rather than using the more common 2.4GHz, Crossfire operates on the 900MHz band. The low frequency is better at signal penetration through obstacles. Many pilots prefer Crossfire even though they don’t intent to fly long range but for the stable link connection and resistance to failsafe in challenging environment. Range can largely depend on the conditions of the environment, but based on personal experience, I can fly 5 miles out easily using 250mW, and I wasn’t even pushing the limit there. One of the main downsides of Crossfire is perhaps the larger receiver antennas which can be challenging to mount on smaller FPV drones.
Crossfire TX Modules
| TBS Crossfire TX Module | TBS Crossfire Micro TX V2 |
| – Built-in screen for changing settings – Max Power up to 2W – Extra features: Spectrum analyzer, Bluetooth module | – More practical and greater value – No screen, settings changed via LUA script only – Max Power up to 1W (1000mW) – Lighter, smaller, cheaper |
| AliExpress Amazon NBD | GetFPV NBD Amazon |
| TBS Crossfire V2 Nano Module | TBS Tango 2 Radio (review) |
 | |
| Same features and performance as the V2 JR module, but has Lite interface (for the Lite module bay such as the Jumper T-Lite, Frsky X-Lite and Tandem X20 radios) | Compact and great build quality and yet with excellent ergonomics. The only radio with Crossfire built-in. |
| AliExpress BuddyRC GetFPV | GetFPV RMRC Amazon |
I think the Micro V2 module is more than capable for most people flying freestyle and racing. The built-in screen in the full size module is no big deal as you can change pretty much all the settings in the radio. The additional features of the full size module are not really that useful to be honest for most pilots. The only advantage IMO is having the 2W output power option, and I don’t remember a time I need more than 250mW :)
TX Antennas
| Stock Antenna | Diamond Antenna (Upgrade) |
 | 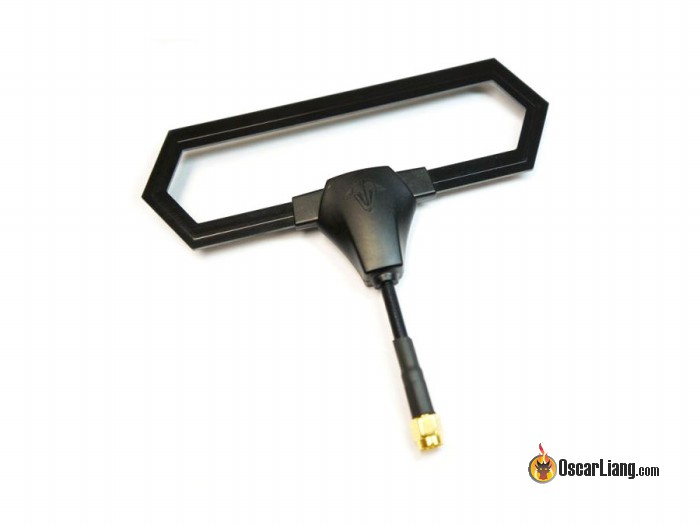 |
| – Good enough for most pilots – Durable, Cheap – Can be used for receiver | – Slightly more reliable performance – Slightly more directional, more range in front of the pilot than behind – Durable design for transport |
| Amazon | AliExpress | GetFPV | Amazon |
Receivers
| Crossfire Micro RX | Crossfire Nano RX |
 |  |
| It uses a JST header for connection | Same capability as the Micro RX, but a lot smaller! Connection is solder pads |
| Amazon | GetFPV | GetFPV | Amazon | NBD |
| Crossfire Diversity Nano RX |
 |
| Dual antennas allows better range; Additional features to existing RX |
| Amazon | GetFPV | AliExpress |
RX Antennas
| MicroVee Antenna | Immortal T Antenna |
 |  |
| – Cheap, simple, lightweight and flexible | – Same performance but stronger, and heavier |
| 915MHz: Amazon | GetFPV 868MHz: Amazon | GetFPV | Amazon | GetFPV | AliExpress |
| Mini Immortal T |
 |
| 2g lighter than Immortal T and much smaller, great for micro drones, but range is largely reduced compared to full size antenna |
| Review (Discontinued) |
Updating EdgeTX
Before we begin setting up Crossfire, it’s always a good idea to make sure your radio’s operating system (i.e. OpenTX or EdgeTX) is up to date for bug fixes and improvements.
Make sure to update SD card content as well as it contains the latest Crossfire LUA script for configuring Crossfire module and receivers.
Updating TBS Crossfire Firmware
The first thing you should do is to update the firmware on your Crossfire TX module for the latest features and bug fixes.
Back in the days (before 2020), we had to download and install TBS Agent on our computers, but now we can use a web based tool to do flash firmware on our Crossfire module which is super handy.
The online tool is called AgentM, it’s basically just a website: https://www.team-blacksheep.com/agentm/ (Note: it only supports Google Chrome and Microsoft Edge browsers at the moment)
Login with the same account that you use on TBS’s website, username should be your email address. If you don’t have a login, just register on TBS’s website (https://www.team-blacksheep.com).

Connect your Crossfire TX module to the computer using a USB cable. No need to power on your radio for this to work, the module gets power from USB.

And in Agent M, click “link USB device”, you will be prompted to connect to TBS Crossfire.

Once connected, you will land on a new page where you can configure the Crossfire TX module.
To update the firmware, click the “Firmware” button at the bottom, you should see a list of available firmware. The firmware version you are currently on will be marked with a blue tag “Current”.

The update should only take a minute or two to complete.
Every time you update the firmware on your TX module, you also need to update the firmware on your receivers – this cannot get any simpler, just power on your radio and your quad, try to bind them again and you should be prompted to update firmware on the receiver (wirelessly).
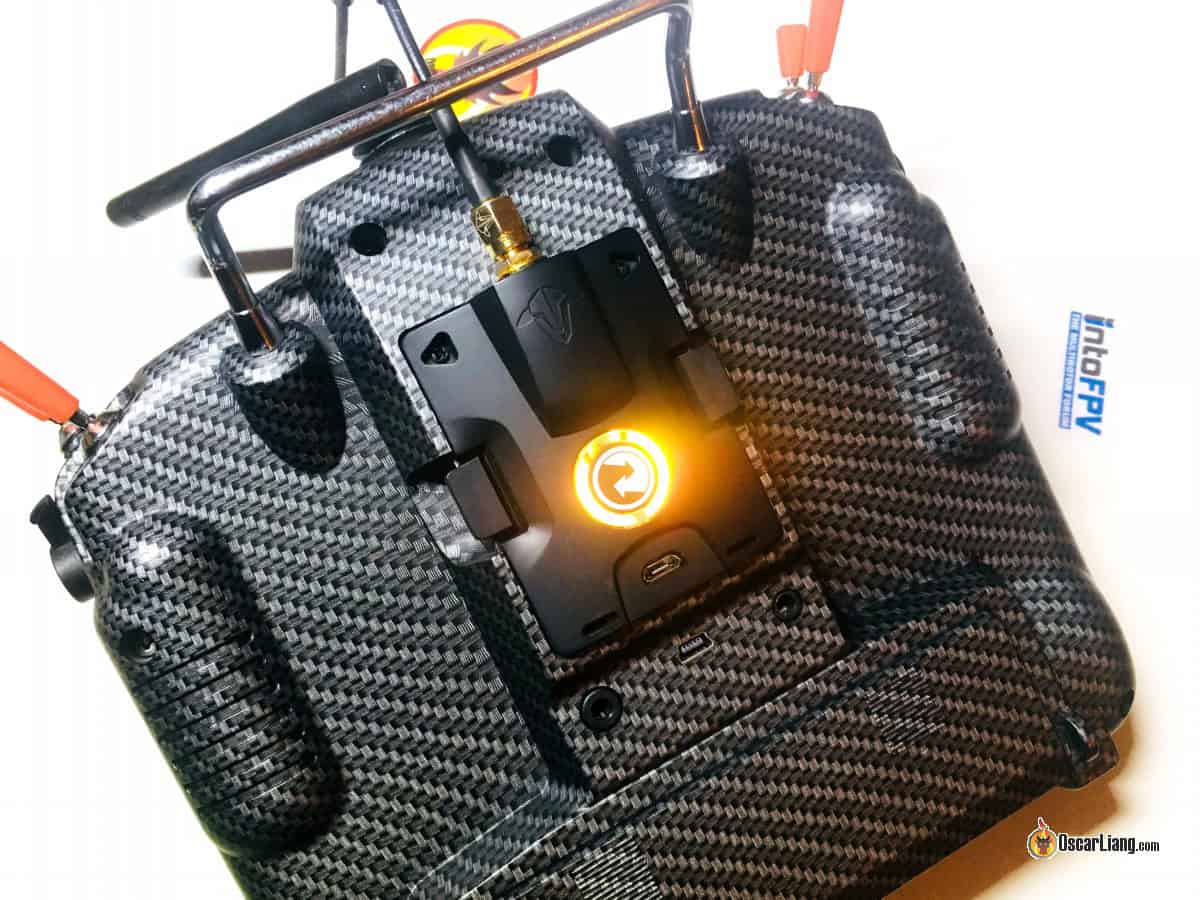
Installing Crossfire TX module in the Radio
You can install the Crossfire TX module directly in the external JR module bay on the back of the radio. Insert the module carefully, make sure all the pins go into the sockets of the Crossfire module properly.
![]()
The Crossfire module is fully compatible with radios with a JR module bay such as the Frsky Taranis X9D+, Jumper T18, T16, the RadioMaster TX16S and Radiomaster Boxer.
It also works with Taranis Q X7, and Horus X10S, but there are some minor issues due to these radios’ inability to operate at full baud rate, causing problems such as constant warning of “telemetry lost”. There is a DIY mod you can do to fix it, but it’s quite difficult to do (involves soldering to the main processor) and therefore I don’t recommend using these radios with Crossfire. Update: by flashing EdgeTX to these radios, you no longer need to do this hardware mod.
Setup Radio to Enable Crossfire TX Module
You will have to create a new model in the radio for Crossfire. A simple way is to duplicate an existing model and rename it to “Crossfire”. If you want to set it up from scratch, here is a tutorial on how to.
Short press the Menu button to enter the Model Setup page, scroll down to “Internal RF” and set mode to “OFF“.
Next set the mode under “External RF” to “CRSF” and change “Channel Range” to “CH1-16“.

Once you’ve done this and exit this menu, the Crossfire TX module should power up (LED lights up on the back).
RX and FC Connection
Remember that almost all of the pins on the Crossfire receiver can be mapped in software. This means you can configure them to output whatever you want, and so there are more than 1 way to connect your RX to the flight controller.
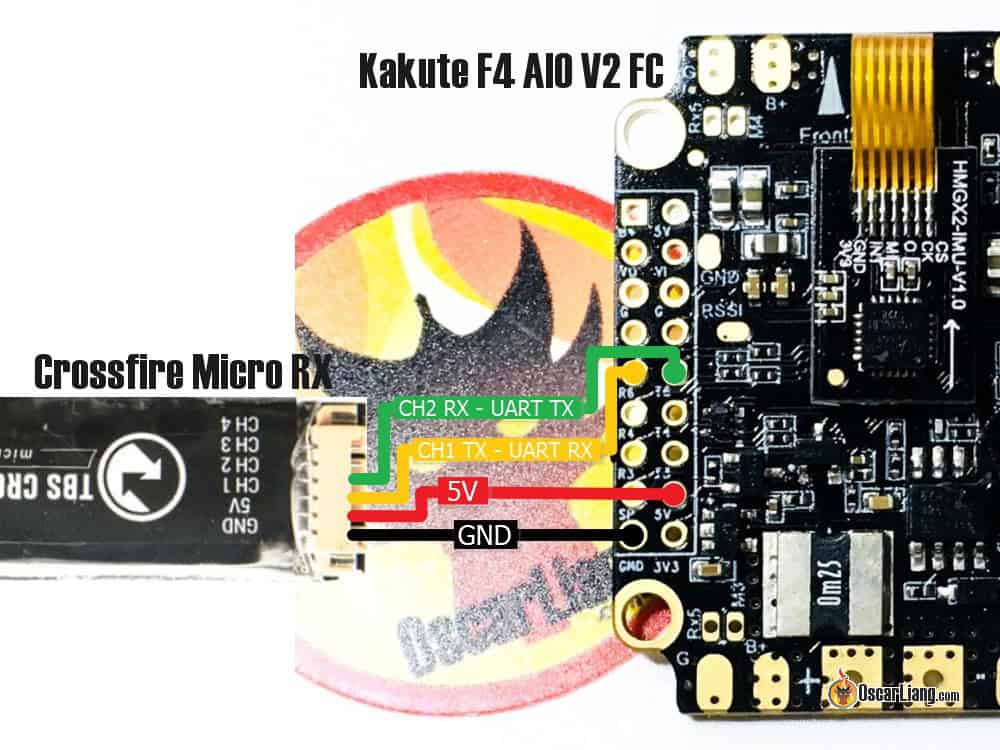
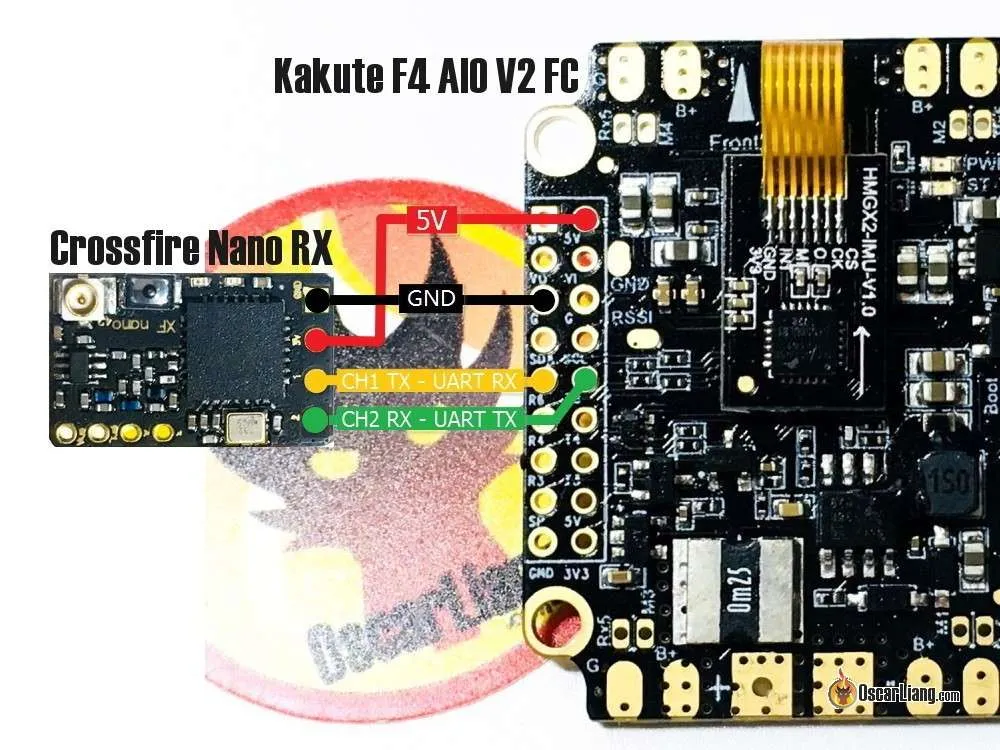
The way I show you here is kind of the standard way that most people use, here are the connections:
- 5V to 5V
- GND to GND
- CH1 (Crossfire TX) to UART RX (FC)
- CH2 (Crossfire RX) to UART TX (FC)
You can use any spare UART on the flight controller.
Tutorial: How to setup Crossfire to output SBUS instead of CRSF
You can also configure Crossfire receiver to output SBUS, this allows you to connect only CH1 to an RX pin on the FC, and leave CH2 unconnected. This is useful if you don’t have a TX pin on the FC, but CRSF is a better protocol than SBUS because it’s faster and also allows telemetry and that’s what I would recommend.
You must not use Soft Serial for Crossfire receiver because it’s not fast enough to handle CRSF signal.
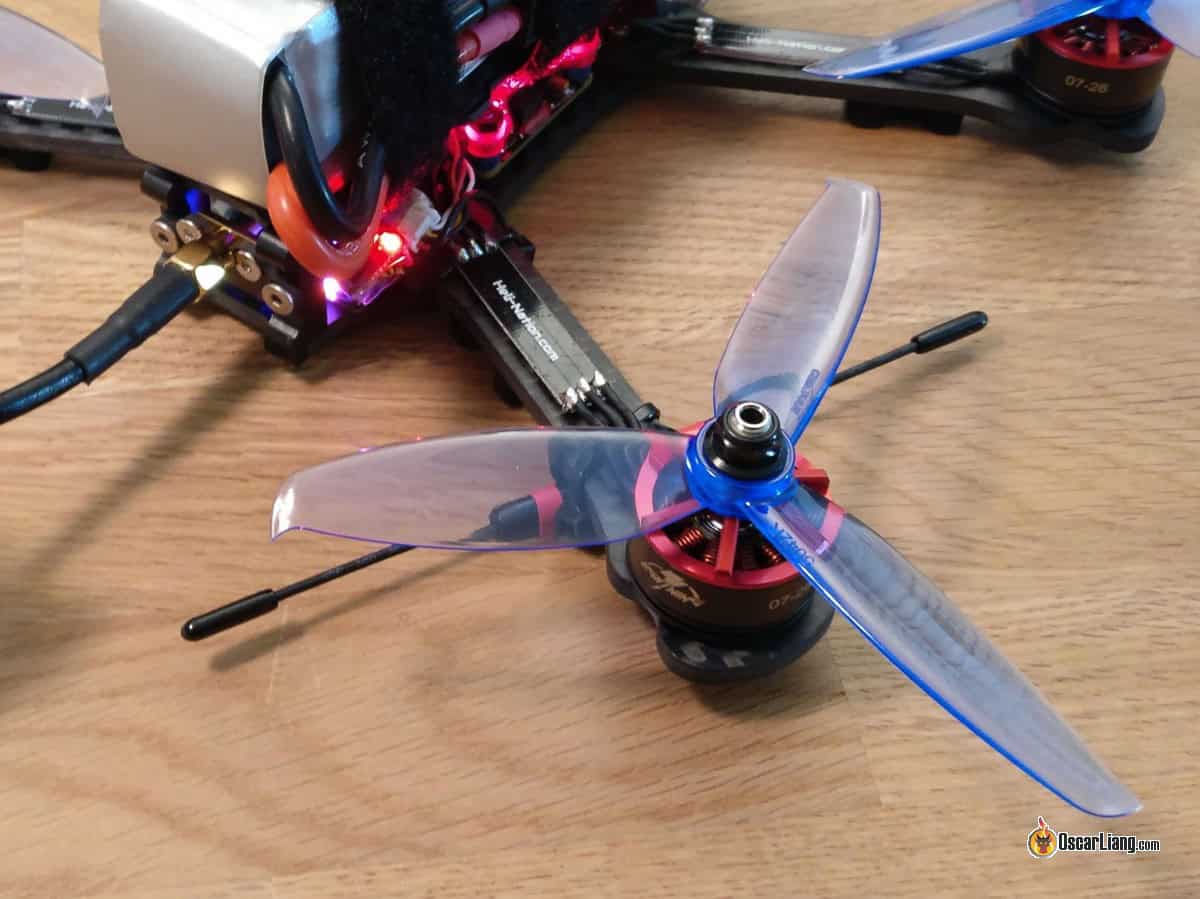
In this example, I am connecting the Crossfire receiver to the UART 6 of the Kakute F4 AIO V2 FC.
Crossfire Micro Receiver:
Crossfire Nano Receiver:
Binding Crossfire Receiver
Crossfire Receiver Binding is very simple (most of the times), you can activate binding mode in the Crossfire LUA script. This LUA script comes with the latest version of EdgeTX and OpenTX, so you DO NOT need to download anything.
TBS Crossfire “Full” Module Installed on the back of the Horus X10
Here are the steps to bind the Crossfire TX module and RX:
- Power on the RX, it should be flashing green, which indicates it’s waiting to bind (if it’s LED stays red, press the bind button on the RX, it should start flashing green)
- Turn on your radio, long press the System button to go to Radio Setup
- On the “Tools” page, select “TBS Agent Lite”

In the next screen, select “XF Micro TX” (that’s your TX module).

In the next screen, select the second option “Bind”.

You will be prompted the message “Binding…”, It should only take a few seconds to bind.
If the RX has outdated firmware, you will be prompted to update it, which will take a few minutes. Once it’s done, the receiver will flash green rapidly for a few seconds (loading firmware), then the green lights on both the RX and TX module will become solid. If update got stuck or fail, just try again.

When binding is complete the radio will automatically exit binding mode, and the receiver LED should turn from red to green (solid).
Hit the exit button on your radio to configure the Crossfire Nano receiver.
Configuring RX from Radio
Once your receiver is bound, you can now configure both the TBS Crossfire TX module and receiver from your radio’s Crossfire Configure Tool. If you don’t see the option “XF Micro/Nano RX”, it means your receiver is either not bound or it’s powered off.
The first thing you want to configure would be your receiver output mapping to get it talking to your flight controller.
To do this, select “XF Nano RX“, scroll down to “Output Map“, and change “Output 1” to “CRSF TX“, “Output 2” to “CRSF RX“. That’s it :)


Now you can configure the TX module.
Region
Leaving the “Region” setting to “Open” will allow maximum output power regardless which frequency you select.


Credit: Crossfire Manual
Frequency
It’s important to make sure you are using the correct frequency depends on where you fly. You have two options, 868MHz and 915MHz, one of these frequency will be used by the cellular system, which you should avoid otherwise you will get interference from cellular system, causing dropouts and failsafe.
According to the Crossfire manual, the Blue and Purple regions should be using 915MHz while the Yellow region should be using 868MHz. For example, US should be using 915MHz while Europe should be using 868MHz.

Credit: Crossfire Manual
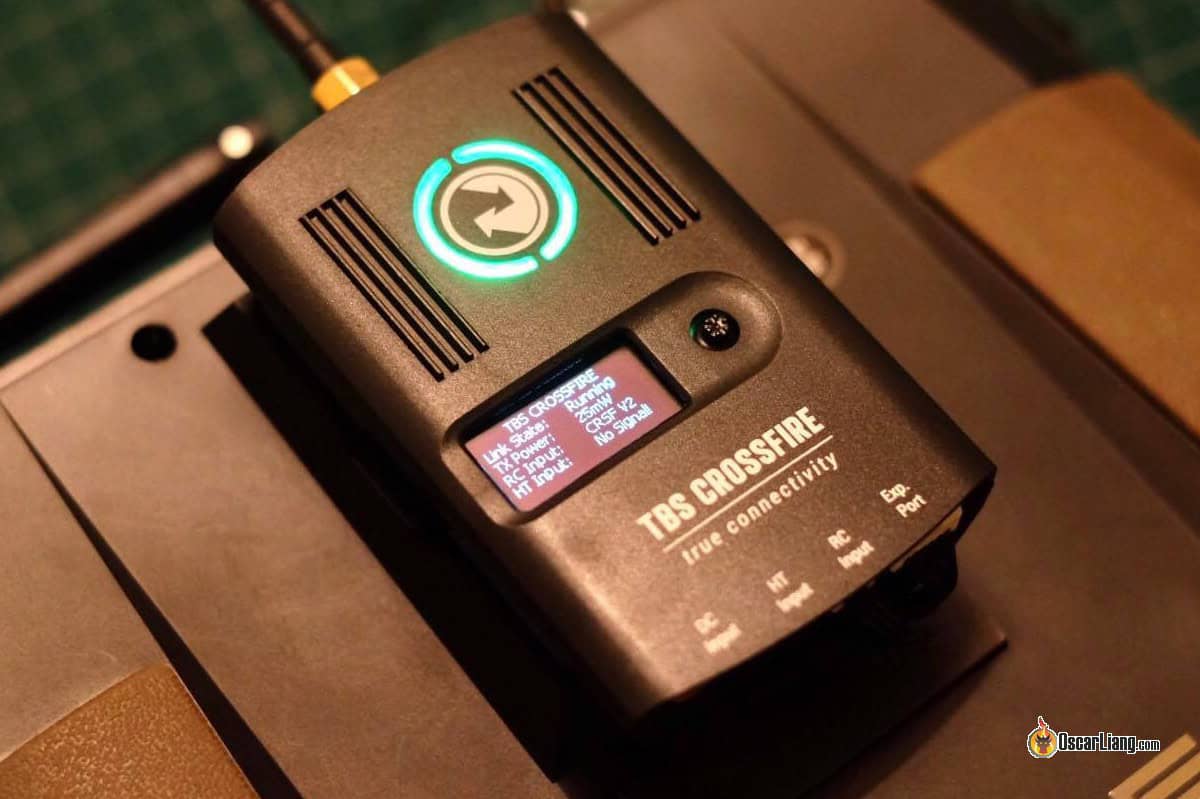
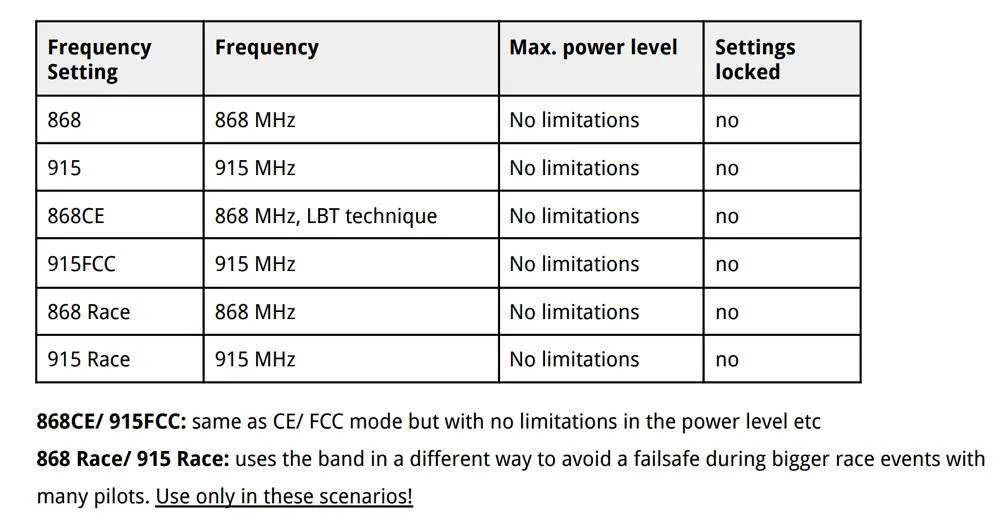
Here are the different frequency options. Only use the Race frequencies if you are actually racing as they sacrifice range for bandwidth for more consistent data packets. LBT means “listen before talk”.
Max Power
Higher output power means more range, but you don’t always want to run at max output power.
Firstly, higher output power drains the battery faster. Secondly if you fly with other people (especially if you are all using Crossfire or other 900MHz systems), it can interfere with other pilots and cause signal dropouts and failsafe if all are using max output power. For short distance (such as racing), it’s probably a good idea to use 25mW.
For a typical FPV drone setup, setting power to around 250mW is adequate in most situations, which can give you miles of range in line of sight.
Dyn. Power
The dynamic output power option can help mitigate some of the problems mentioned with maximum output power. It dynamically adjusts the output power depending on signal strength. Beware that as soon as you unplug the quad, the transmitter will automatically go to maximum output power, which is not a good idea when you fly with other people who are also using Crossfire.
In Tracer, you have 25mW, 100mW and Ludicrous which is about 1W. Because Tracer doesn’t have as much range as Crossfire most people would just run Ludicrous with Dynamic power enabled so it brings the power down when you are flying nearby.
Receiver Mode
There’s one more settings you want to change, which is “Mode” in Receiver settings. You can only access receiver option when you have your receiver bound to the transmitter and powered on. These options are saved per receiver, so you have to set these for every quad you have.
Mode is the number of channels you want to use, you have two options, 8 Ch and 12 Ch.
Just select 12 channels.
You will get four more channels to use. Maybe you don’t need them, but 8Ch mode and 12Ch modes have basically no difference in terms of performance, the extra 4 channels will come in handy when you need them.
However for fixed wings if you want all channels to have full resolution, you should leave it at 8Ch instead. But for multirotor it’s fine to use 12ch.
Make sure telemetry is on, and set Failsafe to Cut so that the motors stop spinning in the event of signal loss, and your quad will drop out of the sky to minimize damage.
RF Profile
You can select which packet rate you want to run, options are 50Hz, 150Hz or Dynamic.
It depends on if you want lower latency or long distance. 50Hz will have higher latency but gives you way more range because it has higher receiver sensitivity and also uses LORA modulation while 150Hz has lower latency but less range.
You can set it to dynamic, it will shift to the lower latency as your signal gets weaker. However Betaflight devs actually don’t recommend using Dynamic due to RC signal smoothing in the FC firmware which is tied to a fixed packet rate value, it won’t work properly with dynamically changing packet rate. If you fly long range, lock it to 50Hz, if you do racing or just in close range, 150Hz should be fine.
Configure Betaflight for Crossfire
The last step in our software setup is enabling Crossfire protocol in Betaflight.
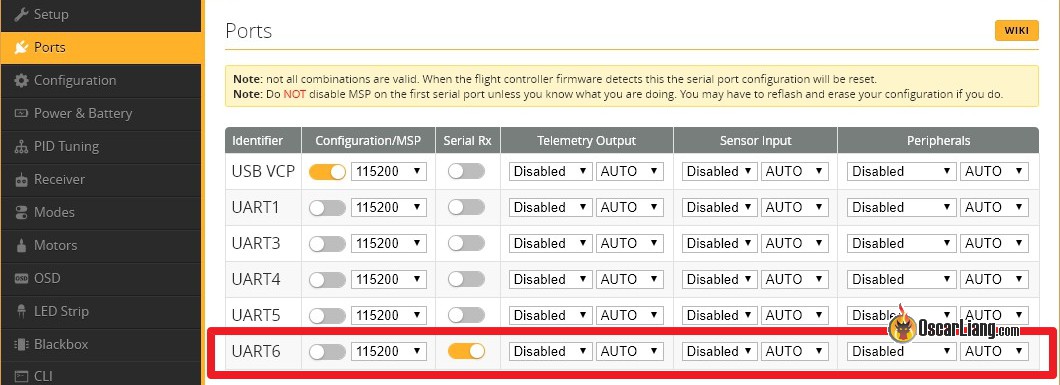
Go to the “Ports” tab in the Betaflight configurator, and enable “Serial RX” in the UART you’ve connected to the TBS Crossfire receiver. Press “Save”.
Now go to the “Receiver” tab, under the “Receiver” Section, select “Serial (via UART)“, and select “CRSF” in the second option. Don’t forget to enable “Telemetry” as well before pressing “Save“.

That’s it, you have successfully setup Crossfire in Betaflight :)
Go back to the “Receiver” tab, you should now see response from stick movement. This means your receiver is working! If the channels are in the wrong order, just try a different “Channel Map”.
Check if end points (1000 and 2000) and mid points (1500) are correct, see this guide how to adjust if they aren’t correct.
No stick movement? Try this command in CLI: set serialrx_inverted = OFF
If you are still not getting any stick response, go back and check your wiring, Output Map setting in the receiver, and Betaflight configurations. Still nothing? Get some help over at IntoFPV.com!
Telemetry
To make sure Telemetry is working correctly, go to the Telemetry page in the radio, and select the option “Discover new sensors”, it should begin to pick up data from the flight controller including RxBt (drone battery voltage).
Here is a list of available Crossfire Telemetry data, and what each means. To name a few frequently used ones: RxBt = Battery voltage, RQly = Link Quality, RFMD = Update Rate.

Mounting Crossfire Receiver Antenna
If you have been using other radio systems, the first problem you are going to run into is mounting the unusually large receiver antenna. Learn about the different ways of mounting Crossfire antenna and their effects.
LQ and RSSI
LQ and RSSI are the two measurements of how good your radio signal is. I have a detail tutorial explaining how to read LQ and RSSI in Crossfire. In this tutorial I will also explain how to display them on your Betaflight OSD, and setup voice warning in your radio.
How many people can fly on Crossfire?
According to TBS, theoretically, up to 50 people can fly at the same time using Crossfire. Real life tests have shown when 12 people are flying at the same time, radio link quality becomes noticeably worse but still flyable, so TBS don’t recommend any more than that flying at the same time :)
Edit History
- Mar 2018 – Guide created
- Jan 2019 – Updated product links and setup detail
- Dec 2019 – Added screenshots for Jumper T16
- Jun 2020 – Updated Agent X new version, Crossfire LUA script changed to Tools in OpenTX, added Micro TX V2
- Feb 2023 – Updated instructions and product links
85 comments
hello, after I upgraded my TX16s from Open TX to Edge TX, there is no Lua script for Crossfire external JR bay module… :-/
yep im having the same problem.. what a mess
Hello,
I would appreciate any input regarding the problem detailed below.
The problem: in betaflight no date at all from the receiver the receiver tabs are blanc.
A friend and me bought a CF module for our Zorro, i got a diversity receiver and he got a pro+normal.
The wireings are good (tx-rx) no shorts, and we stayed with the last official version 2022, no newer betas.
Binding is ok constant green.
On betaflight the corect uart. to make sure i tryed to solder to diferent free ports the the outcome is the same.
In betaflight we chose serial+CRSF.
The outcome is always the same, no data at all from the receiver the receiver tabs are totaly blanc and no option to celect telemetry and rx_failsafe
Hi all. Does anyone have any information regarding JR pinout for CRSF? The “bottom” pin seems to output some kind of signal, and it changes with stick movement, but the crsf arduino library does not recognize it, while the output from the elrs/tbs receiver recognizes it perfectly. I’m only using one signal wire, similar to sbus, no telemetry yet.
However, the crsf from the elrs receiver and the crsf from the JR Bay are different crsf?
Does anyone know how the pinout goes for the Nano module?
I need to custom-make a cable from the module to my Jumper T20 bay.
Hi Oscar, I have one question regarding the “Discover new sensors” procedure and I can’t find anything online… how often do we have to discover new sensors? Is it one time thing only, and when we arm our quad next time, next day or after a week, will those discovered sensors already be in there if we discovered them once, or do we have to do that before each flight? I use CRSF on half of my custom built quads, and ELRS on other half.
You only need to do it when there’re missing sensors/telemetry.
Thank you so much! Much clearer now. Thank you for all your effort you’re putting into this. You are one of the few who are the solid concrete base of FPV. So many are learning from amazingly invaluable information you’re unselfishly providing. Thank you!
Ciao Oscar,
fantastica guida! Grazie.
Uso Crossfire da 3 anni su una Taranis x9d+2019, ma dopo l´aggiornamento TBS e l´aggiornamento a betaflight 4.4 ho un problema grave di potenza… impostazione micro 1W potenza e non dinamico.
Tuttavia a 2 Km il drone inizia a perdere drasticamnete segnale e a volte mi da anche in RTH.
cosa mi consigli?
grazie mille in anticopo.
There is typo in
”
CH1 (Crossfire RX) to UART RX (FC)
CH2 (Crossfire RX) to UART TX (FC)
”
CH1 should be TX.
Hi Oscar. I bought a new Nano TX and it came with CE mode enabled. Even though I clicked the Bind button 10 – 20 times, the setting did not open. How do I switch to Open mode for Nano TX?
Thank you.
Hello Oscar…
I got a new radio radio master Boxer. With a full size crossfire Module.
I’m so frustrated. That my radio cannot find my crossfire or cannot communicate with my crossfire Module.
I try even to create a new model from scratch like you say. But you show an open TX and I got edge tx. So the step that you show is not the same.
I am so sad. Finally I got everything and still I cannot fly my new drone.
What do you mean by “your radio cannot find the crossfire”? Does the light on the Crossfire module turn on when you plug it in?
The steps are almost the same in EdgeTX and OpenTX for setting up Crossfire. With the Boxer, you just need to turn off Internal RF, and Enable CRSF in External RF. That should do it.
Hello Oscar,
thanks for the info!
I just updated to 6.19 but my TX16S still shows me I am using CRSFshot instead of CRSF V3.
Whats wrong ?
Thanks!
I have the same question !
Same Here.
Hello Oscar,
I’m using Crossfire lite & 8ch diversity receiver. Everything updated. Binding ok but i can’t see Sbus option in TX16S output page. I want to use this for my Ronin 2 Gimbal.
Pls help me solving this.
Thanks
Hello Oscar!
I have a question. I am using RadioLink AT10ii as RC and I am flying without crossfire or tracer. I am flying ok in like 1-2km range, and it’s working fine at these distances. I wanna extend my flight range. I have been reading about Crossfire and Tracer, but what I am wondering, is how am I gonna mount the TX to the RC. There is a video where someone shows how to bind them Crossfire and Radiolink at10ii, but I see most controllers have like a case, where TX just “clicks” in.
My question is this. Is there any suggestion on which TX would be best for my RC and if there a video or a guide showing if it’s possible to mount the TX to the RC, by casing it in? This would really help me, rather than patent wrapping it around as I had it in mind :)
Also, all TX are compatible with RC? I just hope Crossfire Nano TX is compatible with my RC “)
Any suggestions or advices would be helpful. Thank you in advance :)
To be honest I am not quite sure, Radiolink radios are not very popular in the FPV scene and I am not familiar with their products. Just a quick google it seems it’s compatible with Crossfire but it requires some special cable it appears and mounting it isn’t very straightforward as other more popular radios that have a JR module bay on the back are plug and play. Sorry I am not much help.
Hi Oscar.
I have a question: i d’ont know why i’m unable to have vspd sensor with crossfire micro tx and last firmware 6.19
All is up to date. this is the only sensor i d’ont have. My drone is flywoo explorer v2.
Thanks
Great tutorial. This is probably going to be a stupid question but this is all very new to me having returned to the hobby from a long absense. Is there a way to power the micro RX from a standard RX battery pack? I want to fit it into a fixed wing without a FC. I have the servo header board but it only appears to give 4 channels pin outs, or can one of these be used for power?
So the usb cable was bumped during firmware update to my crossfire now its blinking blue and in agent m shows no firmware. Thanks
In the manual it says slow blinking of blue LED means update confirmation required. Not sure exactly what that means you might need to contact TBS customer service: https://www.team-blacksheep.com/tbs-crossfire-manual.pdf#:~:text=Slow%20blue%20blinking
Hi Oscar.
I have a question: I have a Crossfire NanoRX, and this 4ch PWM adapter for foam planes: rcmaniak.pl/pl/p/TBS-Crossfire-Nano-Adapter-PWM-4ch-6ch/4501
Is possible read main (for engine) Li-Po battery voltage from this receiver without a flight controller? Maybe some sensor? My radio is Taranis 2019SE+TBS Crossfire Micro TX 868MHz transmitter .
Thanks in advance.
Not without some sort of micro processor, as the receiver only takes serial digital signal. In that case it would be easier to just use a flight controller as it would be much more complicated to make your own.
Are you flying FPV? Can you get one of those camera without VBAT display on screen?
If not, maybe do a few test run and see how fast voltage drops, and set up a timer on your radio. I do that on a few of my LOS quads and works pretty well.
Hi
I use the original TBS 6CH PWM adaptor with the bridge to use the battery for receiver and servos. On my TX16S with EdgeTX I get the RxBt value without any FC.
Hi Oscar, is it possible to connect TBS CROSSFIRE TX modul with old Futtaba FF9 through ppm trainer port…?
Yes, i know. I don’t wanna get the maximum latency, only fly far away by glider…
I am not 100% sure.
But i checked the manual it seems the full size Crossfire module has an RC input that can take PPM input from the radio (at least that what I think it does from reading the manual). The Lite module doesn’t seem to have this RC input connector.
If you can afford Crossfire why not upgrade the radio to a modern one? All the latest mainstream radios support Crossfire out of the box.
Hi, I face an issue with my Crossfire nano RX which only bind (and power up) when connecting to my PC. Every time I unplug the USB cable, the RX lights desappear and the RX powers off.
Do you have any idea of what I can do to fix this ?
Thanks in advance for your advice.
Hi Oscar, can i increase tx power output from the 250 mw to the higher. It can help to increase my range?
Hi all
Can I bind my micro tx module to nano rx?
I am having frustration with tbs agent lite. It doesn’t seem to find the device. Also i have it set to crsf in the modle setup(tx16s). In my old qx7 it works fine but obviously i want to use my new reciever. Please help
Hi Oscar, thanks for the awesome instructions. I’m using a tbs crossfire micro tx v2 and a 2016 taranis x9d+. I have followed your instruction up until setting the quad/ crossfire unit up in betaflight because I keep getting constant low RF signal alarms on my taranis. I power up the transmitter and as soon as I power up the drone the alarms begin. Both the micro tx and nano rx are bound. I’m starting to feel like the micro tx unit maybe damaged in some way? Any help is greatly appreciated and thanks!
Return to home in Betaflight. Crossfire failsafe set to drop will override return to home. Can crossfire failsafe be disabled? That’s definite. This next bit is what I think is happening – Using set sticks position also appears to override Betaflight return to home because you can set the switch to rth but the crossfire receiver continues to manipulate stick inputs and so overrides the return to home. Any answers from anyone would be welcome I’ve searched all over for this and can’t find definitive answers or advice.
Hi Oscar. Went through this amazing tutorial and almost finished.
My situation now is that the RX only turns on when I plug in a battery (not a show stopper) but on the receiver it looks like the channels are all messed up and in the preview it looks like the quad is spinning around…
Any idea how I can align the channels map on both ends?
Thank you so much! I always purchase using your links as my humble contribution to this channel!
Excellent instructions – straight forward and easy to follow. Thank you!
Hi Oscar, thanks for all the advice. I have installed the TBS Crossfire Micro TX2 with DJI Air unit. The stick inputs are working but none of the switches are so I cant arm the quad. Any ideas? Many thanks
Hi Oscar, I am thinking of installing the TBS crossfire unit on my Taranis XRD Plus. I assume that once this has been installed on the unit that any of my existing drones using Taranis TX’s will need to be changed over the TBS TX’s. Ie will the radio run both protocols depending upon which quad I am using.
Thanks
Patrick
You can still use the internal Frsky TX module. Just setup different model profiles for different protocols. For example, one profile with disabled External RF and enabled Internal RF, that way you can keep flying with you existing quads.
I have a tracer sixty9, when binding either from agent x, button on back of tx or lua, I get a solid red light on rx after update and binding on tx. If I turn off tx light on rx flashes red. I then cycle power on rx same thing happens. Recent open tax and firmware on micro tx. There are times it flashes red fast after update.
Has anyone ever had their outputs page registering anything other than 100.0 on their TX16S? If so, how did you correct it. I’m planning on doing fw update later today to see if it will change the values to 100.0. These output readings show up on all my models and even on new models when created. I’m stumped ?
Hi,
Which TBS RC do you think is good for industrial/service sector drones? For example, Drone for mapping, where stability and range are the key and flight almost goes autonomous.
I checked with TBS and found “RadioMaster MasterFire Combo TX16S Transmitter with TBS Crossfire Micro TX V2” to be good. What will you suggest?
Thank you
Thank you for this blog, it has been amazingly helpful for me over the past several years of my FPV experiences.
I recently got a Crossfire Nano Tx and am in the process of setting it up. I have had an issue when I try to go to the crossfire setup, and whether I go to it in the tools section or try to execute the script via the SD card, I get the same error message:
“script syntax error
?:0
attempt to perform arith”
Any ideas?
Never seen this error before, can you try updating OpenTX to the latest version, and also the SD card content?
You might have put the script files in the /TOOLS folder rather than the /SD/TOOLS folder
Hi Oscar,
Thank you for a very informative article.
I have a Jumper T16 and a Jumper T-Lite Is it possible to easily use the same Crossfire TX module on both radios as they have different bays?
I know that TBS make cheap cased so you can use the Mini V2 insides in a Nano case and the other way round. Ideally I want to be able to use some sort of adaptor to switch between radios.
Failing this do you know where I can get the pin outs for both modules so I can make my own adaptor?
Best wishes,
Robert
This post might help: https://oscarliang.com/xlite-crossfire-support/
Inside is a link to an adapter that convert JR module to Lite module
Hi,
I have a Eachine Cinecan (crazybeef4DX) with a TBS nano RX and a Radiomaster with a TX16S with a TBS XF Micro TX module. I was using betaflight 4.2.0 on the board with opentx 2.3.8 on the radiomaster and either firmware version 3.28 or 3.72 (not sure anymore) on the TX and RX. Everything was working fine. I decided to update:
– Betaflight to 4.2.8
– Radiomaster Opentx to 2.3.11
– TBS Crossfire to 4.10
I backed up settings and firmware beforehand. Upgrading everything seemed to work just fine, I erased the chip while flashing betaflight firmware and manually put in the exact same configuration as used before. However, while checking everything in Betaflight, the receiver tab is not showing any instrument input from the transmitter anymore and the throttle etc simply will not respond. I also tried with just a battery attached and no USB connection. I can still bin de TX and RX and telemetry is working just fine, but controls are not.
After a lot of troubleshooting I decided to downgrade again, but the problem still persists even then.
I then checked the following things:
– Uart 2 serial Rx checked in betaflight (exactly same as with earlier working config, I did not change anything on the hardware side either)
– Tried setting ‘ set serialrx_inverted = OFF’ and ‘ set serialrx_inverted = ON’, (neither made a difference as far as I can tell)
– doublechecked if output map for XF Nano RX was set to CRSF TX on Output1 and CRSF RX on Output 2 (which was the case) in Crossfire configuration on Radiomaster T16S
– Not sure if sensible, but also deleted all sensors and rediscovered telemetry sensors (which all give a reading except for one error: FM shows !ERR*, not sure if this may be related to the issue of the instrument inputs not working).
– doublechecked channel modes (is use TAER) is same in betaflight and on transmitter model
– tried several different betaflight firmware versions (while using same configuration settings, manually set every time)
– tried several different TBS firmware versions
I have no idea how to troubleshoot further and are desperately looking for support. I hope someone can help me further! (Not sure if useful, but attached is the basic config I used with several betaflight firmware versions)
Thanks in advance!
Ralph
With the fact that telemetry is working but control is not, means that the RX isn’t talking to the FC, or the config of that part is incorrect.
1. Go to the mixer page on your radio, and make sure values in each channels are actually responding to your sticks correctly?
2. Use the “Reset Settings” in the setup tab, and set up Crossfire again? (ports tab, then configuration tab) You don’t want to touch “serialrx_inverted”, that’s for Frsky receivers.
3. Try using a different UART if there is one available?
So the wiring diagram is backwards for the new Nano receiver modules. I have it wired the way you have it in your diagram and my Nano receiver heats up real real fast. Looking at the official TBS document, the wiring is different. You should update your photo.
Diagram is correct, you are just being careless. TBS recently changed the shape of the solder pads and it might have caused some confusion, but the pads and connection are the same.
The pads are even labelled 5V and GND, you just can’t do it wrong if you look at it.
Suggestion for the agentx link: https://www.team-blacksheep.com/products/prod:agentx
A mac version exists. :)
Update info for TBS Crossfire Micro TX v2, updating with firmware v3.78 now can operate with 1000mw TX Power
I can bind and read sensors. No receiver activity in beta flight. Any ideas?
The picture indicating the wiring of the crossfire nano is backwards. The square pad is – not the one opposite it. Im hoping I didn’t fry my nano.
No, it’s correct. They changed the shape of the pad, wiring is still the same. Just look at the names next to the pads.
I’m new to OpenTX and crossfire world and I have a binding problem… When I open my Jumper T12 and my Quad … each time need to bind my receiver, I have to go to my model to bind my receiver every time ….It cause me a lot of trial & error to arm…
don’t know wtah to do….
I’m trying to have joystick response in Betaflight to finish my new build. The FC is a Succex e mini v2 with the esc board. I’ve wired a TBS Unify Pro HV and have video transmition. For the RC, It’s a Nirvana NV14 under open tx with a Crossfire. The receiver is a Crossfire nano diversity. I followed this diagram and git uart2 with serial activated. The crossfire tx and rx are on fix green but impossible to have the rc joystick moving in Betaflight.
Any suggestion? I struggled to get crossfire binded with rx and finally got it. I had to update both rx and tx yo get a solid bind. I reflashed the fc to BTFL4 without any change…
Disable serial…
Hi,
I’m exactly the same as Alex, I followed exactly what Oscar explains and no response in BetaFlight … If I solder the rx in SBUS (only one wire therefore) it works, but I would like to benefit from the advantages of the Crossfire If anyone has an idea it would be really great …! Equipment: F4sd omnibus and crsf nano diversity (also tried with a micro crsf)
Hello! I am building out an iFlight F4 Micro V2.1 board on an Armattan Tadpole frame. I have hooked up a Crossfire Nano to the board, and I’m flying with a Taranis QX7s. I successfully performed the hardware mod and have managed to set the Taranis to the appropriate settings. My Crossfire TX Module is bound to the receiver, and my RSSI reads 99 on my Taranis telemetry screen. I have also set my Betaflight settings according to this article and iFlight’s own wiring diagram for the Crossfire Nano. However, my issue is that my sticks and switches don’t respond in Betaflight. I get absolutely no response from my inputs, yet everything seems to be connected and working properly. Any thoughts?
Hallo habe mir die Frsky Horus X10 gekauft und das Tbs Mikro Tx plus Nano Rx Empfänger habe auch alles hin bekommen wie es sein soll der Empfänger ist gebunden habe in der Funke alles eingestellt und in Betaflight genauso aber ich bekomme um fas verrecken keine Knüppel Ausschläge oder das ein Schalter angezeigt wird habe auch deinen rar bevolgt und CLI:set serialrx_inverted = OFF eingestellt und gespeichert dennoch null Ausschläge bin mittlerweile am verzweifeln und weiß nicht mehr weiter.
Gruß Christian
I get a warning every time I put crossfire into 1w or above, even with a external battery. what is the best battery to use and is my radio going to explode if I ignore the warning
crossfire micro tx / nano rx
WILL NOT BIND IN CE MODE on FW : 2.95, 2.93 2.42
make sure you reset the TX to open by pressing the bind button on the tx 10 times –
then everything works as described.
Hi Oscar,
I purchased CRSF a few months ago as the “lite” version. I purchased a BNF quad with CRSF as the receiver a week ago, figuring that I would like to learn how to use CRSF. I have a Terranis X9D Plus. I plugged the module into the back of the X9D and created a new model, turned off the internal module and turned on the external set to CRSF. The module does not power up. I really did not know what I was doing but I used a 2S battery for external power with which I was able to update the firmware using Agent X, bind the receiver {nano RX}, update the receiver, and set the failsafe. The Crossfire does not show up on page 2 of the radio setup menu. I was not sure if it should or not. Apparently the radio is not communicating with the module. I got everything in Betaflight taken care of except the receiver section, which even though I am bound to it, will not respond to the radio. Any ideas? Thanks for any help you can offer.
Excellent tutorial! Thanks a million! I have a question that is a bit out of topic : how did you change the font on de taranis x9d plus?
Thanks!!
Can CF Nano wire to R3 and T3? im using TBS Tango. Please advice. I’m abit confuse about uninverted, auto inversion.
Crossfire receivers are fine to connect directly to flight controllers, they are not inverted.
I have a TBS crossfire set up, it binded ok, set beta flight on the FC, connected to uart 6 TX/RX.
I have a horus x12 with firm ware 1.5.xx
there is no option for CRSF in the RF system page. so there is no receiver activity.
can you use the frOS or only OpenTX can use TBS crossfire.
In openTX do you use a single model and just bind each RX or can you use different models?
You can use a single model
I am getting ready to attempt to setup crossfire on my Emax Hawk 5 with the Magnum F4 AIO. I cannot find out which pins have UART on them. Has anyone else attempted this? If so which TX and RX pads have uarts on them?
There are two UARTS in the reach of the Magnum F4 AIO. Look behind the VTX and you will see pads that say TX6, RX6, 5V, –
This UART will work with CROSSFIRE. I would connect channel 1 to the TX and channel 2 to the RX. Good luck!
Hi there,
Any idea where it is best to connect my GPS to ? Got RX TX SCL and SDA, best connecting them to Crossfire NANO or to my flight controller ?
Just connect to Flight Controller, make sure you have enough UART port to provide maximum feature of the GPS
My 6″ and 7″ Long Range setup uses Omnibus F4 v2/Pro Flight Controller, I choose this because it have enough UART port and with GPS enabled, you have feature like Magnetometer, Barometer, Compass…
I have the same problem and I will try to connect it to the crossfire nano. At least SDA and SCL. I made the mistake to buy an Omnibus AIO F7 V2 from Airbot and you only have 3 full UART : UART1 UART3 and UART6
UART2 and UART7 have only RX which means they are absolutely useless.
I need to connect :
– Tramp Telemetry (on a TX)
– Crossfire on an UART (TX and RX)
– GPS (another complete UART)
– Compass (I2c which means SCL/SDA)
If I don’t connect compass to the Nano, i’ll have to skip Tramp telemetry which is a pain for a long range frame. The problem is I don’t even know if it does work? there is very poor literature on the subject, and even Oscar Liang that I admire skips the subject of SCL/SDA pads on the Nano
Hi, I’ve interested in getting crossfire but was wondering whether it would work with Turnigy 9XR PRO? Does it work with any OpenTX transmitter?
FYI – Frsky Taranis is running openTX.
Check with TBS, sorry i am not sure.
Hi! Thanks for very good instrucfion!
I am interested, can I install the crossfire mini in my flysky 9X transmitter?
Thank You very much!
Hi,
As usual, very informative.
Only thing i can comment on is that TBS as well as Trappy on interviews indicate that you should monitor LQ and not RSSI. (I.E send LQ on one of the receiver channels and preset it on the OSD).
On top in the Taranis the recommend configuring alerts base on calculation of RFMD and LQ (using special function, and logical switches)
Hey Oscar,
showing the RSSI-value on my OSD doesn’t work, when I set CH8 to RSSI. But it’s working, if I set CH8 to “LQ”…do you know what the problem could be?
Yes I think i might have made a mistake about using RSSI as RSSI… LQ is the right one but there are extra steps to convert the value or something, i need to dig into that and update the guide.
In crsf set channel 12 to lq. Then in b.f receiver tab rssi to channel 8
Can you change vtx through lua this way?
I wired channel 4 to smart audio channel(tx 1)
Then in crossfire tx changed ch.4 to smart audio.
If i don’t have to do these extra steps then that me great.
Thank you!