Who says you have to have an USBasp AVR programmer to flash the KK2.0 or KK2.1? I have flashed ATTiny microcontrollers before using Arduino as the ISP programmer, so why not try that on the KK2.0? And I happen to have a couple of Arduinos lying around, so I decided to give it a try. I will show you how I flash KK2.0 flight controller using the Arduino.

These instructions should work for both the Arduino Uno and the Arduino Mega. it saves you money buying extra parts when you have the Arduino available.
Note that this tutorial also works with KK2.1, the latest KK2 board.
Preparation for Flashing the KK2 board with Arduino
Software wise, you need follow these steps first.
- Install Arduino IDE 1.0.5 or later version.
- Download the KK 2.0 windows flashing tool.
- Downloaded the latest Firmware for the KK 2.0 board.
Firmware 1.5
https://code.google.com/p/kk2-0/downloads/list
Firmware 1.6
http://www.rcgroups.com/forums/attachment.php?attachmentid=5799951 - Unzip all files.
You will need the following hardware components.
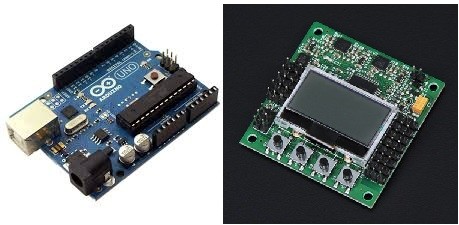
- Hobbyking KK 2.0 flight controller board.
- One of the Arduino Board such as Arduino Uno, Nano, or Mega.
- A 10 uF Capacitor (optional)
- Some female to female and Male to Female jumper wires.
Arduino Setup and Wire Connection
Do not power up anything just yet.
First you need to connect your Arduino to your PC using USB cable, in the IDE open up the example sketch in File->Examples->ArduinoISP. Upload this sketch to your Arduino, it will make your Arduino an ISP programmer.
Connect the Arduino and the KK2.0 board according to the following pin layout

click picture to enlarge.

Arduino Uno / Nano
Arduino Pin 10 – SS / Reset Arduino Pin 11 – MOSI Arduino Pin 12 – MISO Arduino Pin 13 – SCK
Arduino Mega
Arduino Pin 50 – MISO Arduino Pin 51 – MOSI Arduino Pin 52 – SCK Arduino Pin 53 – SS / Reset
Do not power the KK 2.0 with your arduino, and avoid sharing the same power source. You might failed if you do that. The easiest thing to do is, power your Arduino with the USB cable from the computer, and use external power source to power your KK board, for example an ESC 5V BEC from your quadcopter.
Now power up your KK2.0 board.
Next you need to put a 10 uF capacitor between the SS/Reset pin and the GND (I flased two KK2.0 without this, and it seems working fine). Check the below picture for more details. Basically, the long leg of the capacitor should be connected to the Reset side and the shorter leg should be connected to the GND.
I have seen people got away without connecting the capacitor, but do this at your own risk!

Let’s Start Flashing in Command Line
Don’t get freaked out by command line, all you need to do is to type the following lines in the CMD and check whether the output is the same as mine.
Please double check your ISP pin connections before you proceed. Now that everything is powered and connected, we can run the following command to check if everything is ready to be flashed.
Arduino Uno
D:kkflashtoollibavrdudewindowsavrdude.exe -P COM3 -p m324pa -c arduino -b 19200
Arduino Mega 2560
D:kkflashtoollibavrdudewindowsavrdude.exe -P COM3 -p m324pa -c avrisp -b 19200
Replace COM3 with the port on which your Arduino is connected to.
The output should be similar to this.

If it says “Ok”, then we are ready to flash the KK2.0 board. If the Device signature is all zeros, you’ve probably connected the ISP pins on the KK board the wrong way around. Just double check and plug it in other way.
To start the firmware flash, execute the following commands.
Arduino Uno R3
D:kkflashtoollibavrdudewindowsavrdude.exe -P COM3 -b 19200 -c arduino -p m324pa -v -e -U flash:w:"D:KK2_1V6KK2_1V6kk2.hex":i
Arduino Mega 2560
D:kkflashtoollibavrdudewindowsavrdude.exe -P COM3 -b 19200 -c avrisp -p m8 -v -e -U flash:w:"D:KK2_1V6KK2_1V6kk2.hex":i
- Replace COM3 with the port on which your Arduino is connected to.
- Replace “D:kk2.hex” with the full path to your firmware file.
The output should be something like this.

Please note that the screen will become white during and after flashing, this is normal.
After it’s done and you see “Thank you” on the screen, restart KK2.0 and you should see the new firmware number which means you have upgraded the firmware successfully. Enjoy flying! :-)
Firmware on KK2.1 and KK2.1.5
I heard the 1.6 Firmware has bugs on the KK2.1, kind people have been working hard to provide new firmware to fix these bugs, check out Stevie’s KK Firmware.
Also notice the KK2.1 and KK2.1.5 has a different chip, which is m644p, so you need to use a different command to flash it.
C:UsersOscar>D:flashlibavrdudewindowsavrdude.exe -P COM1 -b 19200 -c avr isp -p m644p -v -e -U flash:w:"D:kk2KK2V1_1V11S2.hex":i
Possible Errors When Flashing Firmware
avrdude.exe: Expected signature for for ATmega8 is 1E 93 07
Double check chip, or use -F to override this check.
You need to change the original command to
C:UsersOscar>D:flashlibavrdudewindowsavrdude.exe -P COM1 -b 19200 -c avr isp -p m644p -v -e -U flash:w:"D:kk2KK2V1_1V11S2.hex":i
50 comments
hi oscar while updating kk2.1.5 when i run these cmd avrdude.exe -P COM3 -b 19200 -c arduino -p m324pa -v -e -U flash:w:” C:\Users\Dipesh\Desktop\kkfirmware\KK2V1_1V19S1Pro”:i
i got a error that invalid argument and than the operation failed
Thanks for the help man it worked took some time to figure out what i was doing wrong but it worked.
I used the Arduino to power the kk2 board and used a 10uf cap as you mentioned above and flashed the latest kk2.1.19s1 pro firmware.
I think they have integrated arduino isp into the kkflashing software, i have to check for that till then thanks.
hello i get this error when i was flashing kk2.1.5 board.
C:\Users\admin>D:\flashing\lib\avrdude\windows\avrdude.exe -P COM6 -p m644p -c a
vrisp -b 19200
avrdude.exe: stk500_recv(): programmer is not responding
help me.
C:\Xilinx\14.2\ISE_DS>C:\Users\AKSHAY\Desktop\kkflashtool\lib\avrdude\windows\avrdude.exe -P COM8 -p m328p -c arduino -b 19200
for the above code i got this error please help
‘avrdude.exe: stk500_getsync(): not in sync: resp=0x15’
http://lazyzero.de/en/modellbau/kkmulticopterflashtool
it is not opening…how can i get the flash tool?????
Hi Oscar,
I’ve been slightly confused about what to do after I flash the KK2 board with a newer version. I am using v1.9S1 by Steveis and everything updated properly, but I do not know if I should adjust the PID settings or not. Does the update take care of that for you so don’t have to change those settings? Or does it reset everything making it so that you have to manually adjust the PID settings from scratch? I believe I still need to re-calibrate the self leveling setting and reenter the calculated mixer settings so that the board knows where each motor is. Thanks.
I got Error on screen of my kK2.1.5 instead of “SAFE “…..PLZ help
i would really appreciate it if you could post your questions on the forum: http://intoFPV.com … I only check my blog comments once a week, but I use the forum everyday!
hii oscar
in kk2.1.5 there is 644pa microcotroller but m644pa is not available we have to use m644p.Do you think it would work properly??
hii Oscar
Thank you for such a comprehensive guide.I want to know can i update my kk2.1.5 board with these steps??any changes…i cant understand this avrdude thing..please can you explain
it should still be the same. I don’t understand it fully either, it’s just a command you need to type it in… don’t worry about it too much.
hi this is the problem i have any help i have a kk2 1.6 connected to a arduino uno and i get this
Microsoft Windows [Version 10.0.10240]
(c) 2015 Microsoft Corporation. All rights reserved.
C:\Users\DAD>C:kkflashtoollibavrdudewindowsavrdude.exe -P COM3 -p m324pa -c arduino -b 19200
‘C:kkflashtoollibavrdudewindowsavrdude.exe’ is not recognized as an internal or external command,
operable program or batch file.
C:\Users\DAD>cd/
C:\>C:kkflashtoollibavrdudewindowsavrdude.exe -P COM3 -p m324pa -c arduino -b 19200
‘C:kkflashtoollibavrdudewindowsavrdude.exe’ is not recognized as an internal or external command,
operable program or batch file.
C:\>C:\kkmulticopterflashtool_0.77\lib\avrdude\windows\avrdude.exe -P COM3 -p m324pa -c arduino -b 19200
avrdude.exe: AVR device initialized and ready to accept instructions
Reading | ################################################## | 100% 0.02s
avrdude.exe: Device signature = 0x1e960a
avrdude.exe: Expected signature for ATmega324PA is 1E 95 11
Double check chip, or use -F to override this check.
avrdude.exe done. Thank you.
C:\>
Hi Oscar,
What is with the flashing? Why is it done? I have kk2.1.5 flight control though haven’t set up anything yet.
A custom Firmware is basically a software that is written by third party (not the manufacturer), they sometimes have additional functionality, or better performance.
The default KK2 firmware is absolutely fine! And you don’t have to flash other firmware if you don’t want to. But read about what the new firmware can do, see if there is any additional features that might interest you to do it.
Hi Oscar,
I want to know does this procedure work for kk5.5 blackboard too or not…??
thanxx please leave a rep
sorry i don’t know the KK5.5.
I wish I would have known about this before I wasted 10 hours with a bad USBASP cable. You are a lifesaver!
no problem :)
On my kk board 2.0 i had to put a completely different code, the flashing tool does not work either. I’v put m324pa insead of m8 as said in example.
D:kkflashtoollibavrdudewindowsavrdude.exe -P COM52 -b 19200 -c avrisp -p m324pa -v -e -U flash:w:”D:KK2_1V6KK2_1V6kk2.hex”:i
I did this and now my kk2 has white screen and no beep, but if I connect 5v to ISP header it comes on and shuts off if disconnected from the arduino. I switched escs to see if that was the problem and still nothing. It was the kk2 hc which I was told is the same just remote screen and buttons. Any help appreciated.
as far as i remember the HC is a 2.0 board.
get the RC911 [1.6+++ R3 AIO] or Stevies FW [1.19. NOT 1.9]
Oscar,
Thanks so much for this guide! It’s very comprehensive and worked great for flashing Stevies Firmware to my KK2.1.5! Everything went smooth and worked great!
I do not see the function of KK 2.0 windows flashing tool in the above step. then for what I downloaded this software? could be explained again, I want to try this step. because I do not have usb downloader. thanks before.
Unfortunately it hasn’t work yet for me. I used V1.18S1 Pro and got this readout:
Reading | ################################################## | 100% 3.36s
avrdude.exe: verifying …
avrdude.exe: 4420 bytes of flash verified
avrdude.exe done. Thank you.
Flashing of firmware was successful.
Then after powering the KK2.1 the software is stuck at version 1.2. Any suggestions?
Thanks for this guide! For the first time I have real use of my Arduino :)
But I have one question.. I soldered an adapter to connect from the Arduino to KK, but when I power up the Arduino and connecting the FC it automaticly takes the power from the Arduino.. But in your guide you wrote that the Arduino and the KK board should not share power.. I’m confused.. Should I skip the 5V lead from the Arduino and just connect 5 leads to the KK? And then power the KK with UBEC? I don’t think that I should connect the UBEC when The KK gets power from the Arduino at the same time :)
yes I admit what I wrote is confusing. In the diagram, I was actually powering the KK2 from the Arduino, which is not recommended. (it worked for me the first time, that’s why I drew it this way, but I realized it’s not safe later on. I should have updated the diagram)
The right way should be connecting the 5V from the KK2 to an external power source, such as an UBEC, or ESC BEC 5V instead, and connect the ground of the BEC to the arduino GND (Common Ground), so the 5V on the Arduino is not connected to anything.
I did not use the 5V from the arduino as you wrote and It worked perfekt! Thanks for the guide again!
that’s great :-)
Hi Oscar, this looks great, does it matter what voltage the capacitor is? 16V? 25V?
the voltage rating on the capacitor means what the max voltage you can use with these caps.
We are only working with 5V, so anything above that would be fine.
In fact, I flashed a couple of boards without the capacitor successfully.
Oscar,
Every tutorial of yours is perfect; thank you so much for taking the time to document this process. I did exactly as you described and everything worked exactly as you said it would.
Thanks again
Great! glad you find it useful! :-D
Aw, this was an incredibly good post. Finding the time and actual
effort to make a very good article… but what can I say… I put things off a whole
lot and never manage to get anything done.
You use the deicated KK flasing tool along with the arduino as described here.This allows you to get the very latest firmwares from a central repository with each variation an version displayed.
When using this software and I recommend you do so simply select atmel avrisp as the programmer and select the correct com port.
Hey thanks for the awesome tutorial… only one amendment in the command for flashing the kk2.0 with megaduino… the board written there is m8, it should be m324pa
so the command becomes
D:kkflashtoollibavrdudewindowsavrdude.exe -P COM3 -b 19200 -c avrisp -p m324pa -v -e -U flash:w:”D:KK2_1V6KK2_1V6kk2.hex”:i
that’s odd, i tried m324pa it didn’t work, that’s why i used m8.
Anyway there is no harm trying, if anyone failed using one then they should try the other.
thanks for the tip.
When I type in the command from the “Possible Errors When Flashing Firmware”, it says: avrdude.exe: Can’t find programmer id “avr”
Valid programmers are:
[List of valid programmers]
Please help.
Philip
I have a problem: when I paste in:
C:UsersGamesflashlibavrdudewindowsavrdude.exe -P COM5 -b 19200 -c avr isp -p m644p -v -e -U flash:w:”D:kk2KK2V1_1V11S2.hex”:i
It says “The system cannot find the path specified”.
Please help.
Hello Oscar
I have a KK2.0 V1.2 and i want to update it to the newest version… though i have heard that it doesnt support the new Firmware 1.6. Is this true? can i upload the new Firmware on my KK2.0?
thank you
I downloaded the 1.6 firmware from the KK2.1 product page on Hobbyking, works fine for me.
Hello! Could you please give me some schematics of the circuit? I have a hard time to see what goes where, and I am not that experienced with Arduino. It would really help me and my class out!
Thx :)
Sure, i will upload a picture shortly.
It works with a 4.7 uf capacitor, But for other people i recommand you to make better pictures when you explain how to connect the capacitor !!
thanks for the comment, i agree the picture was a little confusing. I will do a better picture when I flash the new board KK2.1… :-D
Do you mean 47uf or 4.7 uf ?
no, 47uF
Hi, can i also use a 10uf capacitor ????
yes, you will need a 10uf capacitor.
no, i mean a 100uf capacitor?
Because with the Arduino starter kit you have:
5 Capacitors 100nF
3 Capacitors 100uF
5 Capacitor 100pF
arduino.cc/en/Main/ArduinoStarterKit
i see. I have seen people got away with 1uF and 47uF capactiors.
I don’t know if that would work with 100uF because I haven’t tried it.