In this article, I’ll explain the basics of the Inputs, Mixes, and Outputs pages in EdgeTX radios and what they are for. As someone new to EdgeTX, these screens in the model setup might initially seem complicated and overwhelming. However, as your setups become more advanced, especially when flying complex planes without an FC, you’ll begin to appreciate the flexibility and power of having these separate stages in dealing with inputs and outputs. Let’s break it down step by step to see how they fit together and where they come into play for different setups.

EdgeTX is a popular open source radio system. All the radio I currently recommended use EdgeTX, check them out here: https://oscarliang.com/radio-transmitter/#Radio-Recommendations
Table of Contents
Why Use Three Screens?
If you only fly quadcopters, you probably rarely have to deal with the Inputs and Outputs screens. The Mixes screen is all you need to map controls to channels.
The three separate stages are a tradition that carried over from when radio receivers were directly connected to ESCs and servos without flight controllers, in earlier days. This was common in RC models like gliders, wings, and planes. Without an FC, all the programming had to be done in the radio itself, so having these distinct stages in OpenTX/EdgeTX gives you more control over manipulating inputs and outputs.
Now, if you use a flight controller, most complex functions (rates, expo, mixing etc.) can be handled there. All you typically need to do in EdgeTX is mapping the controls to the channels in the Mixes screen. However, the Inputs and Outputs pages are still useful when you require advanced setups and adjustments, or when you don’t use a flight controller in your plane.
Here’s a brief summary of what each screen does:
- Inputs: Apply settings like expo or rates once if the input is used across multiple channels in Mixes.
- Mixes: This is where the complex programming happens. You can map one input to a channels, or even mix different inputs to a single channel, and configure behavior for specific channels.
- Outputs: Fine-tune how signals are sent to servos or your flight controller. For example, you can reverse the output of a channel if needed or adjust midpoints and endpoints.
Let’s dive deeper into each of these screens.
Inputs: Where Control Begins
The Inputs screen is the first stop for raw data from your physical controls, such as sticks, switches, knobs and sliders. It fine-tunes your control inputs before sending them to the Mixes screen. You can assign names, adjust weight, apply Expo curves, set rates, and tweak offsets to adjust how inputs behave.
The key benefit of the Inputs screen is the ability to apply changes in one place and distribute that modified input across multiple channels. This avoids the need to set up the same adjustments repeatedly for each individual channel in the Mixes, simplifying the setup process.
For example, if you’re flying a plane (without FC) with multiple ESCs and need the same throttle signal sent to all of them, you adjust the throttle input in one place and route it to all necessary channels in the Mixes screen.
A common use case is applying Expo to soften mid-stick sensitivity. Once set here, any other function referencing the aileron input will use the modified value. Without this screen, you’d have to set this up individually for each channel in the mixer, which could be time-consuming.
While multi-rotor pilots might not use this screen often, fixed-wing and glider pilots rely on it to adjust rates and expo. For quadcopters, the default input settings typically work just fine.
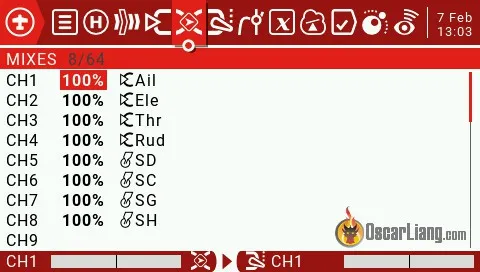
Mixes: Mapping Inputs to Channels
The Mixes screen is where physical inputs (e.g., throttle or arm switch) are mapped to specific channels.
For example, a fixed-wing aircraft with elevons (where elevator and aileron inputs are combined), the Mixes screen allows you to send both pitch and roll inputs to the same channel. You can also configure channel-specific settings like limiting servo movement or adding delays for smooth transitions (useful for flaps or landing gear). Here’s an example where I setup the Mixes screen for a flying-wing without FC (and adjusting expo in the Inputs screen): https://oscarliang.com/taranis-mixer-for-wings/
For FPV drones like quadcopters, setup is more straightforward: you map an input to a channel, and mixing isn’t needed. I have a full tutorial on setting up Mixes for FPV drones here: https://oscarliang.com/taranis-mixer-for-wings/
Once the radio transmits the channels to the drone, the flight controller doesn’t know what each channel is for, all it sees are just a bunch of numbers. You’ll need to tell the flight controller what the channels are, i.e. which channel is throttle and which channel is the arm switch etc. You can do this in Betaflight’s receiver tab, and select a channel map for the first 4 chanenls (e.g., AETR1234, which maps aileron to Channel 1, elevator to Channel 2, etc.). And then you can define the rest of the channel in the Modes tab as these are normally used for switches. For more details on setting up channel maps, check out this post: https://oscarliang.com/channel-map/
Outputs: Final Output to the Model
The Outputs is where your mix gets translated into the final signal sent to the flight controller, ESC or servos. In the Outputs screen, you can perform small modifications such as setting sub-trim, adjusting min/max values for channels (to adjust end points), reverse the direction of control, and ensure your servos or ESCs don’t move beyond their physical limits, etc. Both multi-rotor pilots and fixed-wing pilots will find this screen useful.
Both multi-rotor and fixed-wing pilots will find this screen useful, especially for fine-tuning their models. For more information on adjusting midpoints and endpoints in the Outputs screen, check out my detailed guide here: https://oscarliang.com/adjust-tx-channel-mid-end-point/.
Conclusion
Once you understand the purpose of Inputs, Mixes, and Outputs in EdgeTX, the system’s true power becomes clear. For simpler models like multirotors, some of these screens may seem redundant, but for more complex setups—like planes without a flight controller, or ground vehicles with intricate steering mechanisms—having this level of control is invaluable.
The three-stage setup might feel overwhelming at first, but as you advance, you’ll find that this system offers unmatched flexibility and precision. Whether you’re fine-tuning your quadcopter setup or managing complex control surfaces on a fixed-wing aircraft, EdgeTX’s input, mixer, and output screens provide the tools you need to succeed.