If you’re using EdgeTX, setting up control sticks and switches on the Mixes page is essential for flying your FPV drone. Whether you’re configuring the sticks for basic flight control or setting up switches for arming, flight modes, or other functions, this guide will walk you through the process step by step.


By the end of this tutorial, you’ll know how to assign your control sticks to channels, set up switches for different actions like arming or flight mode changes, and test the setup to make sure everything is working correctly.
Check out my other EdgeTX related posts: https://oscarliang.com/tag/edgetx/
Table of Contents
Access the Mixes Page
To begin, you’ll need to open the Mixes page on your EdgeTX radio. This is where you’ll map your control sticks and switches to various channels that your flight controller uses.
- Turn on your EdgeTX radio.
- From the Home screen, press the Model button.
- Navigate to the Mixes tab by either pressing the Page button until you find it or selecting it from the menu if you’re on a touchscreen radio.
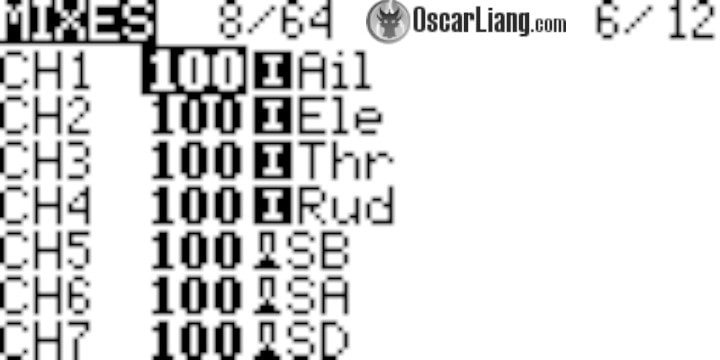
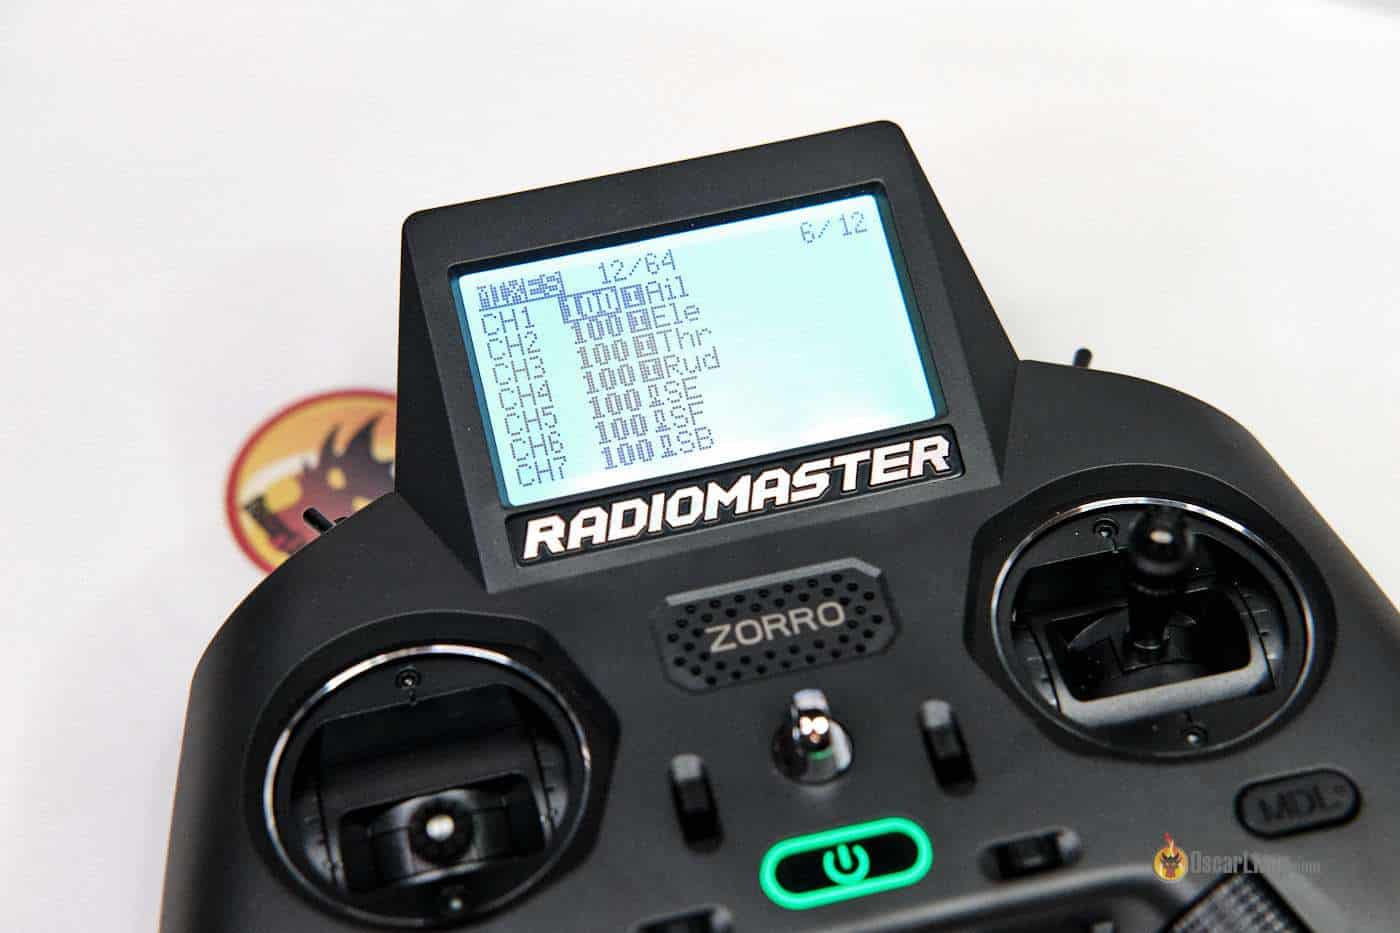
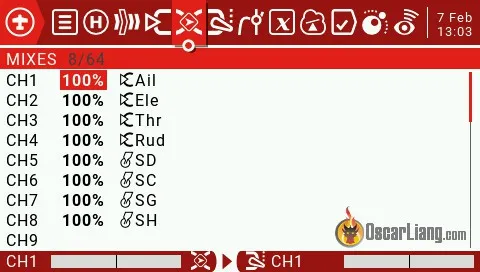
Here, you’ll find a list of channels (e.g., CH1, CH2, CH3, etc.). Each channel can be mapped to a specific input, like a stick or switch.
Assign Control Sticks to Channels
For most models, the first four channels (CH1 to CH4) are typically assigned to the main controls: roll, pitch, throttle, and yaw. For example:
- Channel 1: Roll (Aileron)
- Channel 2: Pitch (Elevator)
- Channel 3: Yaw (Rudder)
- Channel 4: Throttle
Usually, this should be automatically configured for you when you create a new model, but if not, you can do it yourself:
- Channel 1 (Roll):
- Highlight CH1 using the jog wheel and press to enter the setup.
- Set the Source to your aileron stick.
- Optionally, you can adjust Weight (how much of the stick movement is passed through to the output) or apply Expo for smoother control.
- Channel 2 (Pitch):
- Highlight CH2.
- Set the Source to the elevator stick.
- Channel 3 (Throttle):
- Highlight CH3.
- Set the Source to the throttle stick.
- Channel 4 (Yaw):
- Highlight CH4.
- Set the Source to the rudder stick.
Setup Switches
Now that your control sticks are configured, it’s time to assign functions to your switches. These switches can be used for various tasks like arming, changing flight modes, or activating features like a buzzer or GPS rescue.
Setting Up an Arm Switch

In ExpressLRS, it’s recommended to use Channel 5 (CH5) for the Arm switch. Here’s how to set it up:
- Highlight CH5 in the Mixes page.
- Press the jog wheel to enter the mix setup.
- Scroll to Source and flip the switch you want to use for arming (e.g., SD). The switch you flip will automatically appear as the source, so you don’t need to manually search through a list.
- Leave the remaining settings at their default values.

Setting Up a Mode Switch

For configuring flight modes (e.g., Acro Mode, Angle Mode, Horizon Mode), you’ll typically use a 3-position switch. Let’s use CH6 for this example.
- Highlight CH6 in the Mixes page.
- Assign a 3-position switch (e.g., SC) to control the different flight modes.
How Many Switches Can You Set Up?
Most radios come with more switches than you’ll ever need. While you can assign all of them to the available channels, it’s usually not necessary. For most FPV drone setups, you’ll only need a few switches.
The number of channels available depends on your radio link. In ExpressLRS, you can have 8 to 16 channels based on the switch mode. The default setup for most FPV drones allows for 12 channels, with 8 channels available for switches after the first 4 are used for control sticks.
How Many Switches Do You Really Need?
For most FPV drones, I typically use 3-4 switches:
- Arm switch: To arm/disarm the drone.
- Buzzer switch: To locate the drone when lost.
- Flight mode switch: To toggle between Acro, Angle, or Horizon modes.
- GPS Rescue Mode switch (if applicable): To enable GPS Rescue in case of signal loss.
Test Your Setup
Once your sticks and switches are mapped, it’s important to test them:
- Connect your drone and open the Receiver tab in Betaflight (or your flight controller’s configuration tool).
- Move the sticks and flip the switches to see if the corresponding channels are responding correctly. If your drone needs to be powered for this step, remove the propellers before connecting the battery for safety.
- Switch assigned to CH5, correspond to AUX 1, CH6 to AUX 2, and so on.
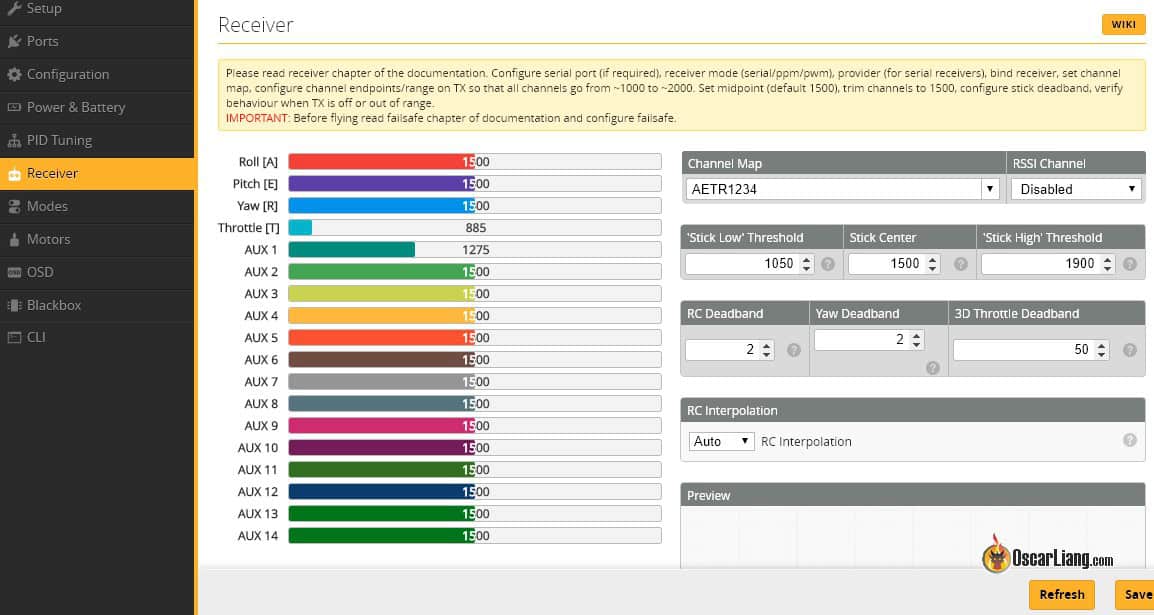
Now you can move on to assigning functions to those auxiliary channels you just setup in Betaflight modes.

Conclusion
Setting up control sticks and switches in the Mixes page of your EdgeTX radio is a key step in configuring your FPV drone for smooth, responsive control. Whether you’re assigning control sticks to basic functions or configuring switches for arming and flight modes, following these steps will ensure that everything is mapped correctly and ready for flight.
Edit History
- Sep 2018 – tutorial created
- Sep 2019 – updated
- Oct 2024 – updated for EdgeTX and ExpressLRS
32 comments
So I am using the Radiomaster Pocket. I am trying to set up 2 step Arming and want to use the lowest button on the Left Hand Side (which is spring loaded press button), to Pre Arm and then hit the normal Arm Button (Aux1, which is right above it). But I can get either Betaflight or the Radio to even recognize anything I do w that pre arm button). I followed the directions above and when I pressed that button, i expected it to populate on Ch5. Any ideas?
Very interesting and easy instruction. I like it.
Congrats.
Hallo,
wo kann ich bei der TBS Mambo zusätzliche Schalter aktivieren?
Es ist mir nicht möglich mehr als 4 Schalter zu aktivieren, sprich AUX 1-4 ist bei mir nur möglich?!
Wo kann man von 8 Kanäle auf 10 oder 12 Kanäle hochstellen? Im Setup finde ich nichts.
Bitte um technische Hilfe und eine Schritt für Schritt Anleitung, dafür wäre ich sehr dankbar.
Vielen Dank schon mal im Voraus.
Hello,
where can I activate additional switches on the TBS Mambo?
It is not possible for me to activate more than 4 switches, i.e. AUX 1-4 is only possible for me?!
Where can you upgrade from 8 channels to 10 or 12 channels? I can’t find anything in the setup.
Request for technical help and a step by step guide, I would be very grateful.
Thank you in advance.
I’ve watched a few guides on this now, and nobody is covering how to change the ppm-values of each switch-position. My 3-step switches default at 1000-1500-1000ppm, where I would obviously like one of the 1000’s to be 2000. Another switch defaults at 1500-1507, I have no idea what I’m doing wrong here.
How do you find out what each channel does? I know 1 – 4 are the stick inputs and 5 is arm, 6 is modes, 7 is beeper and 8 MAYBE turtle mode (flip). I have a SPCMaker Bat 78 and the leds on the back don’t come on. Is there an Aux channel for that I can add on in the mix/inputs ? I’ve Googled FlySky channel mapping but don’t get this kind of info. Thanks.
You create the switches/channels in the radio, but you have to assign a job to these channels inside Betaflight, telling Betaflight what these channels do.
Help me please!!! Thanks for your help for fpv Community
I broke my arm switch and also my USB connecter lol. Any way I can change my arm switch to a different switch? I try go into the arm SWITCH edit the source to a different one and then it still don’t arm? Any tricks?
Took me quite a while to understand why I only saw 4 AUX channels on Betaflight after configuring one of the buttons to CH9. My channel range was only 1-8, duh! The switch on CH5 was unused, so I put the prearm momentary button there.
Can someone point me in the direction of a tutorial that explains how the Source is linked to a specific Output? In Oscar’s example, he sets Channel 5 to Arm. He then names it and flips a switch. How does OpenTX know that the desired Output is Arm? How EXACTLY do Channels 6,7, and 8 become Mode, Beeper, and Free? Simply naming them and selecting the Source does not produce the desired result. All the tutorials I can find gloss over this. I watched an X-Lite setup video where the guy says, “now I’m going to set up turtle mode,” and then cuts away from the video to do it. WTF. Can someone please explain this very non-intuitive step?
OpenTX doesn’t care what you name them.
Names I gave them in OpenTX is only for my own reference. You can call them whatever you want, or even not giving them a name at all.
Because I always assign Channel 5 (AUX1) as my arm swtich, and Channel 7 (AUX 3) as my beeper, that’s why I give those channels names in OpenTX which is not necessary, but useful if someone else wants to fly my quad and they can look at those channel names and know what controls to use.
Thanks Oscar. I get that part, but where is the logical connection that links the SD switch on Channel 5 to the Arm command itself? Stated differently, if OpenTX doesn’t care what you name them, how does it know that you want it to Arm on Channel 5? Are the AUX commands set in a different menu?
In Betaflight, you can assign whichever channel you want to Arm. In this case it would be channel 5 (AUX 1).
Thank you! On to the next tutorial…
Hi Jared, I’m looking for the same informations like you, did you found these on other sources? Seems to be very difficult to understand by interlocutors, even if the question should be very clear
Hi Oscar, many tutorials on the topic talk about configuring the Input tab and then the Mixer tab. You don’t mention the Input tab at all. Do I have to set-up the Input tab for the switches to work? Can you explain the difference between Input and Mixer?
Input is not needed for switches, only need mixer.
where can one find the ‘gain’ switch using an physical switch!
thanks for the time it takes,
If I change from 16 ch down to 8 ch on my transmitter do I have to rebind the receiver?
I had no problem setting up switches on my x-lite using this great tutorial.
Then… I removed and recharged my transmitter batteries.
My quads no longer armed… so I checked modes tab. Arm slider value was set to 1200, switch value had changed… only traveling from 1500 to 1253.
I moved mode slider to 1300, but I feel this is not a good fix.
How do I change the switch endpoint?
Have you tried calibration?
@Viktor Alvarsson, @Hunt I have the solution. Long press menu->press 5x page (hardware screen)->go down to switches and change “none” to toggle/2pos/3pos.
@Viktor Alvarsson, @Hunt I have the same issue. Any solution?
@Hunt Im having the same issue. When choosing source only S1 and S2 show up. None of the SA through SE lettered switches show up. Did you solve this issue? Any guidance?
hi oscar i have got my new tarnis plus when i go to input and on channel 5 there is switch option when i go there i only see maximum 2 switches se and s2 rest of the switches wont appear there what im doing wrong or is the any fault im worried im using it internal d8 protocol and another crossfire with 85x 4k whoop kindly tell me what do i do to get all my switches and be assure that the taranis plus is fine.
Probably not added to the system. Go to system setup (long press Menu), go to the hardware tab, scroll down to switches and change none to 2pos or 3pos
Why do we have to create inputs? I have my switches set up only by mixer.
Thx! This helpful!
how can i set up my taranis to fly a SIM – my PC does not recognize it as a joystick
Once you have connected the USB cable, go into model setup and change USB connection to Joystick.
Hi I managed to screw up the configuration on my Taranis X9D plus. I was hoping this forum could provide some guidance.
The taranis is bound to the drone, however I cant for some reason start the drone. I reviewed your list above and that seems fine, however the drone doesn’t kick in the motors when using throttle. When I switch the drone off, the controller says lost telemetry so i believe it has bound correctly. Any ideas ?
Sounds like you need some step by step walk through, please join our forum for prompt help! http://www.intofpv.com
Another way to do it is to create a mixer with input source ‘MAX’, with the desired value in ‘gain’ (-100 = 1500µs and +100 = 2000µs).
Then, with physical or logical switch, you can active the mixer or not, changing the output value with it.
You can also use more than on mixer for each channel, to get for exemple 3 different values depending of the switch selection.