I will show you how to build an arduino hexapod robot, from building the body, to how to implement the algorithm. To learn about the implementation of the algorithm, read this first, if you are not sure what is IK, read this.

中文翻译:https://oscarliang.com/arduino-liu-zhua-kun-chong-liu-zhua-shou-ji-yuan-dai-ma/
Arduino Hexapod Robot Design
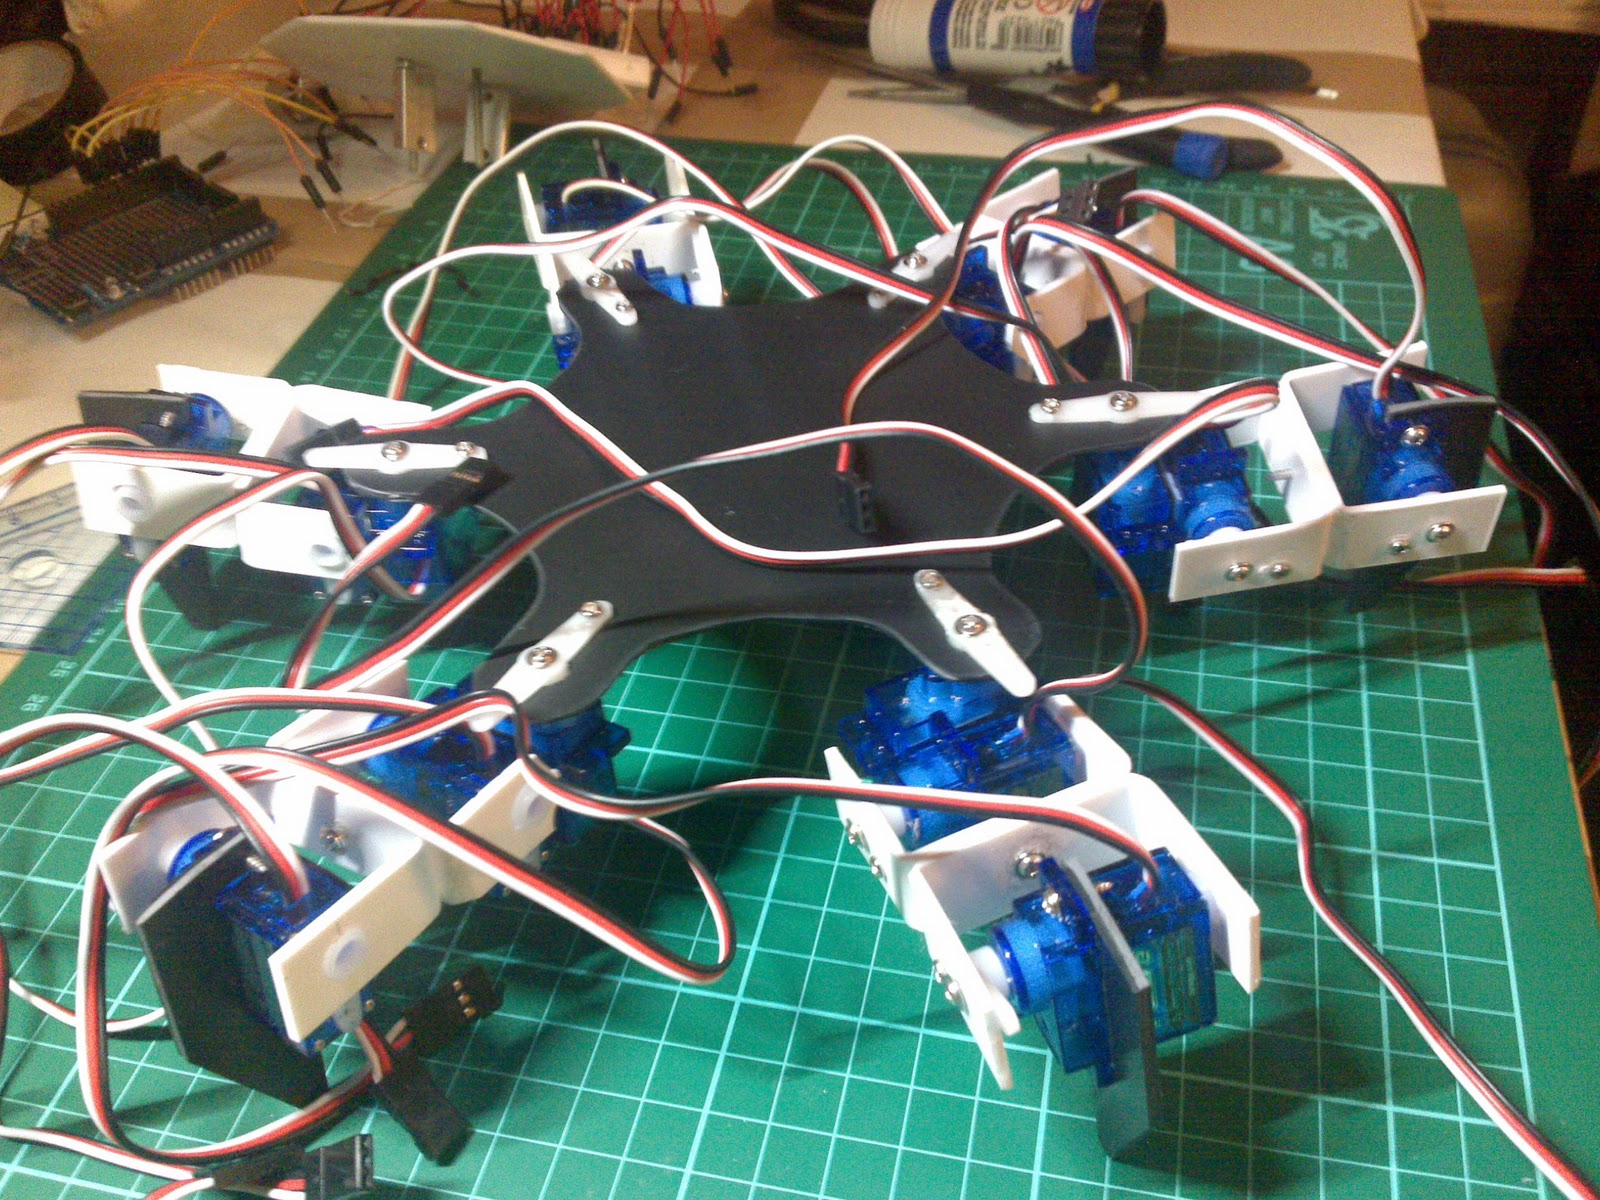
I ordered parts from a robot frame manufacturer, but they will take a while to arrive. So I decided before that, I will build a smaller version Arduino Hexapod Robot using plastic to implement the algorithms. Most of the parts in this project would be inherited from the 2DOF Arduino Hexapod Robot, except the base.
This is link of the 2DOF Arduino Hexapod Robot:
https://oscarliang.com/hexapod-robot-with-2-dof-legs/
Here are the results:
[31/Jan/2012]
[13/Feb/2012]
[03/Apr/2012]
[22/Aug/2012]
Arduino Hexapod Robot – base

Arduino Hexapod Robot – leg

Arduino Hexapod Robot – whole

I wanted to make a servo interface with the shield I bought off ebay for Arduino Hexapod Robot, which would making it so easy to install the servos without making a mess. In theory i could use 48 servos on a Mega board, but I only soldered 20 servo ports, just to keep wires tidy and compact. I need only 18 servos for the legs and possibly 2 for the sensors anyway. I am leaving some space on the right hand side of the board to put a adjustable voltage regulator in, as I am planning to use 8xAA batteries, or 3 lipo 11V batteries in the future.
Arduino Hexapod Robot – Arduino shield


Arduino Hexapod Robot

Update 28/01/2012
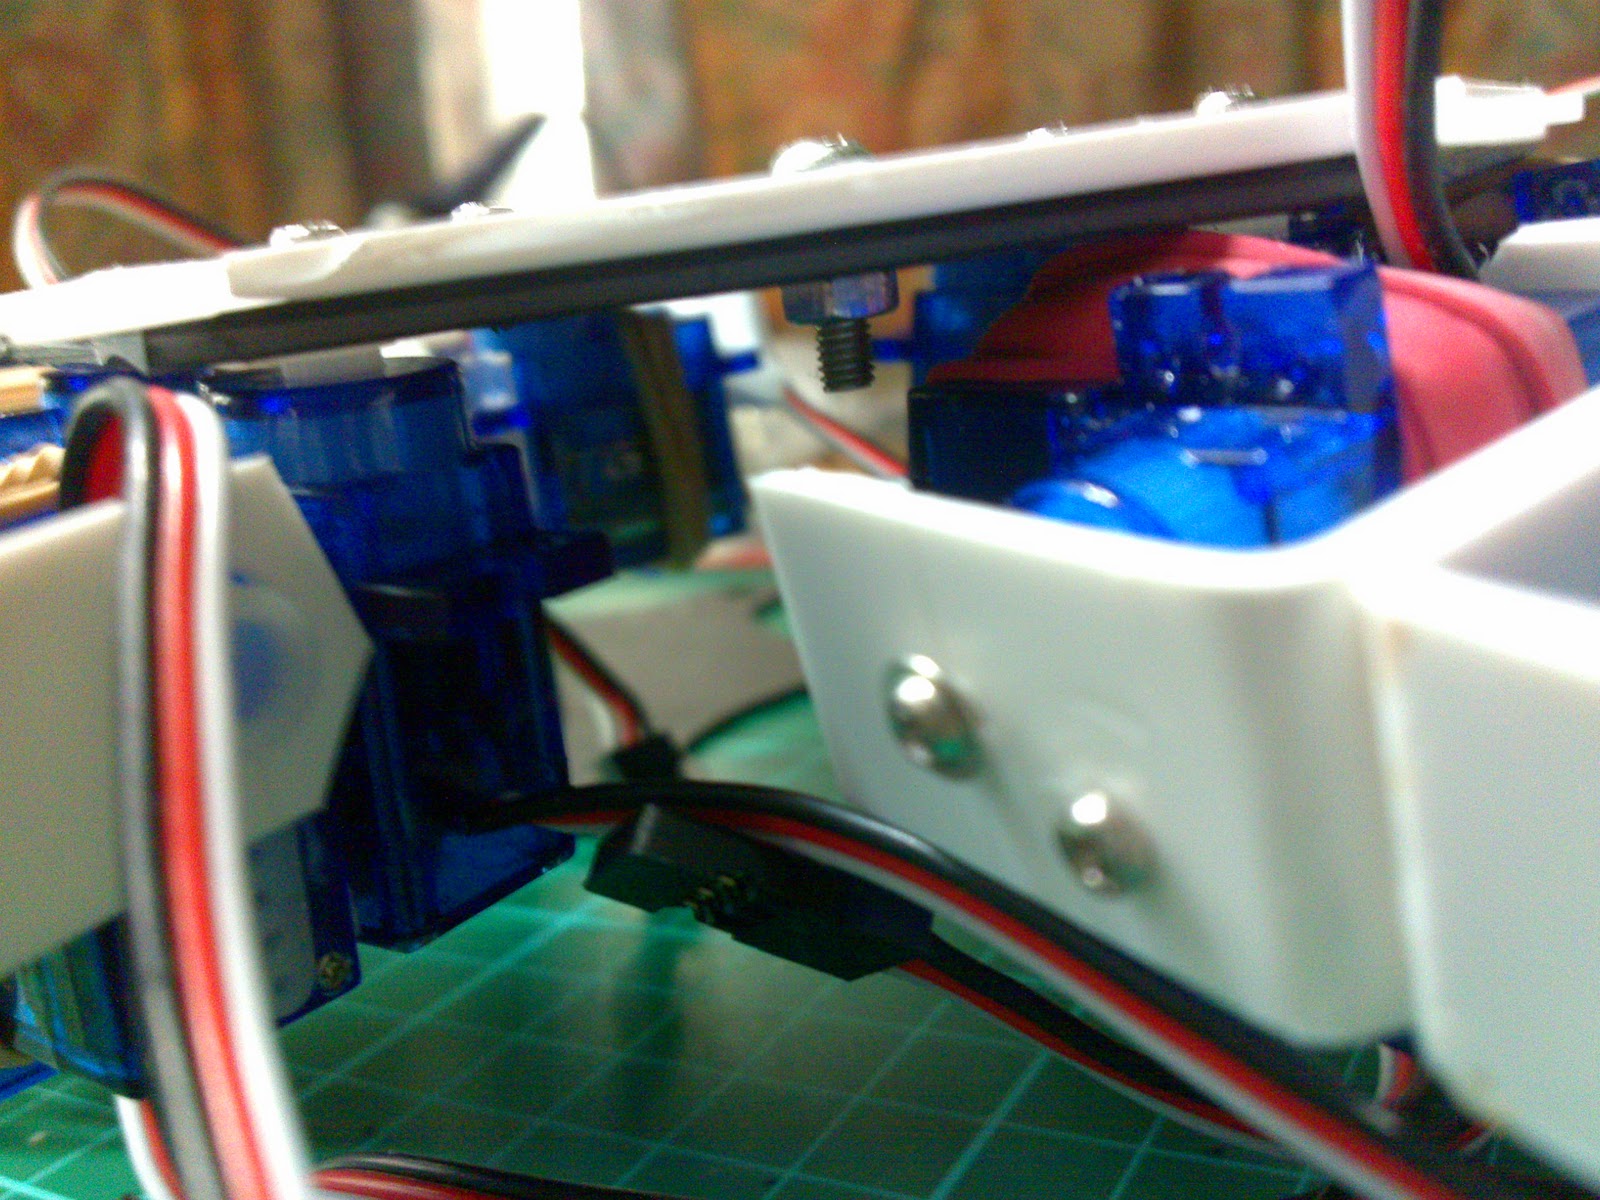
Redesigned and made another base, with smaller diameter and larger thickness. the Previous one was too thin that it actually bends a little when it’s standing.


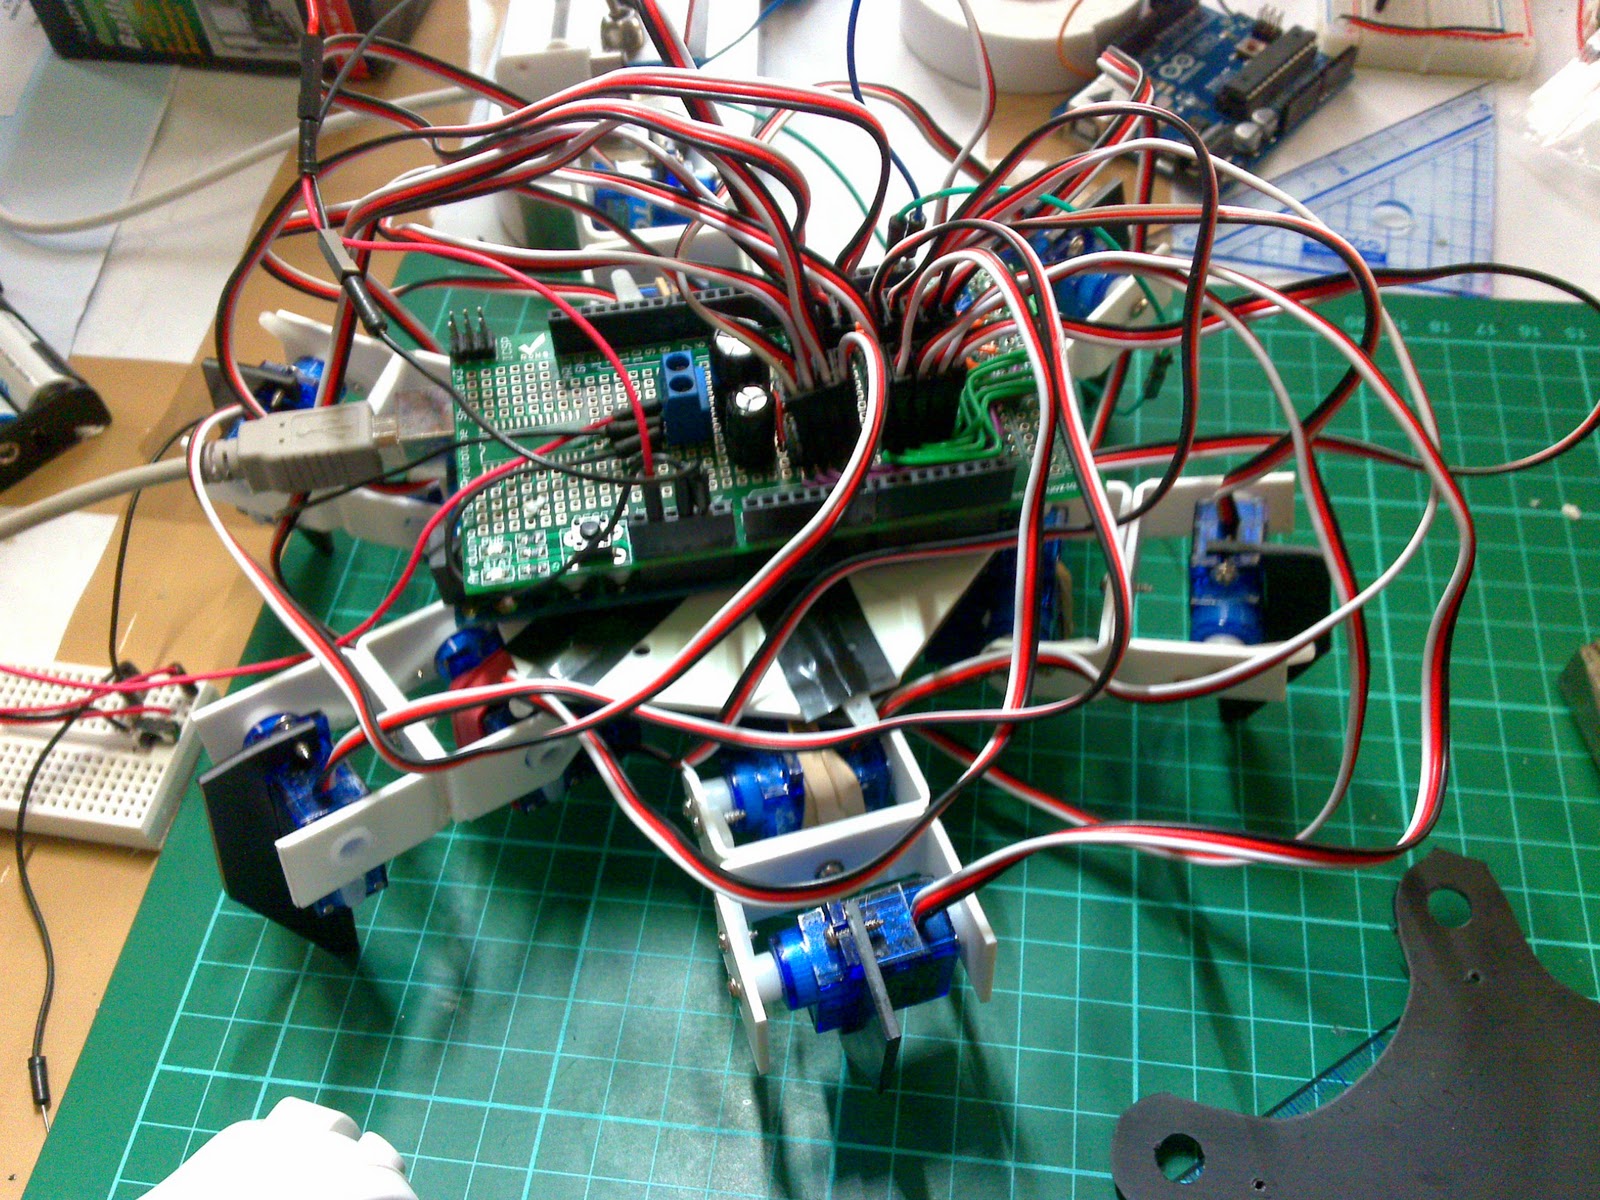
Arduino Hexapod Robot – messy cable
found that when casting float to int, numbers are floor rounded e.g 4.4 = 4, 4.8 also = 4. which would introduce round-off error. need to implement number casting function to resolve this.
int FloatToInt(float input){
 // this is an alternative to cast number directly, to avoid floor rounding

 int temp = (int)input; // floor-rounded input
 float dif = input - (float)temp; //
 if (dif < 0.5) return temp;
 else return temp+1;
}
Also there is another problem with responding speed. I check the resulted in the C++ code against the simulation excel spreadsheet, found the error margin is quite big, because I was using int for all the calculations. I then change all of them into float. Although it works on the robot, but the responding time increased quite obviously, also the Arduino Hexapod Robot movement become unstable. I think it’s because of the computational power of the Arduino just isn’t good enough to do pure floating point IK cacluation. I will need to think of a way to balance between accuracy and computational load. I have also place 2 4xAA battery holders in parallel to supply more current, because i found it could draw up to 1.5A when the servos are loaded which causes voltage to drop and fail to supply enough current and lead to legs paralysis.
Update 29/01/2012
Found a coupld of bugs in the algorithm, thanks to my Excel spread sheet simulation! Now the pitch and roll movements finally work properly, although the legs are still quite unstable. I still don’t know why that is, maybe the dimension is still not correct, or maybe there are still bugs in the algorithms.
Update 09/02/2012
I have now adapted rotation matrix in Body IK algorithm, instead of estimating coordinate changes, i will be using formula derive from rotation matrix to calculate these changes (detail could be found in my last post, IK implementation). I have also started to use micro seconds instead of degrees to write servos. I have also had a major modification on the legs. It’s now doubled the length of the original.

Found a problem with pin22 and pin32 when using them as servo pins. These two pins interference with each other, ie, control one of them would control the other one too. Luckily I made 20 pins, so I can just easily move up all the pins by 1, ie, now using 23 – 41. We had a water tank overflow on the roof tonight, was a bit scary and we spent hours looking at the problem, so didn’t do much testing on the new setup. will try tomorrow. The main problem with it at the moment remains to be leg-end position accuracy. I don’t know whether it’s the hardware or the software. But since I have move all the calculation into floating point, it should give relatively good numerical results. I have started looking at Gait, might implement 6 step ripple gait for the Arduino Hexapod Robot first.
Update 12/02/2012
Last night, I implemented a simple 6 step ripple gait, which I will explain in a minute. Let me explain what’s the problem I discovered first with the IK algorithm. When the legs are meant to move along Z axis, the front and rear legs are actually moving toward Z-X direction, which is not right. So I wrote a test program to test the leg IK algorithm by checking the actually physical change of the leg position, versus the coordinate I entered manually. Again the legs won’t move solely along one particular axis (X or Z), but tend to go somewhere in between. Spent an evening thinking about it, realize the original idea of calculation IK isn’t perfect for my type of Arduino Hexapod Robot, which each leg are in a different frame (frame – Axis system), but I have always been assuming they are in the same frame as the center of body. for example, the frame of the front right leg is rotated -30 degree from the frame of the center of body (see below picture), so before we calculate the change of angles from leg IK algorithm, we need to do coordinate transformation first, to convert it from body frame to the coxa frame. A common way would be using rotation matrix. detail please go to my IK implementation post. after the modification, the robot can finally walk like one. ; )
Update 19/02/2012
Good news from Robotshop! My parts have finally arrived their warehouse and has been already shipped to me. So I got to hurry up finishing body balance algorithm this week (probably my last implementation on IK) This weekend I: 1. tidied up the code a lot! 2. implemented fast SIN, COS, ACOS functions (about 10 times faster than standard C trig functions! body rotation is so much smoother now) 3. implemented 7 more gaits (thanks to Jeroen Janssen’s source code, I copied most of the stuff over) (1) Ripple 12 steps (2) Quadripple 9 steps (3) Tripod 4 steps (4) Tripod 6 steps (5) Tripod 8 steps (6) Wave 12 steps (7) Wave 18 steps 4. modified code to avoid using ‘delay()’, but to get the time using ‘millis()’, so processor can do other stuff while waiting rather than just freezes there. Also brings a bit more smooth movement there. All looking great! however because I am getting so many functions and gaits now, I am having trouble with controlling the arduino hexapod robot… nun-chuck is simple and handy, but it’s very limited in terms of control options. I might need to come up with a menu system that I can switch between modes (body rotation, walking mode), and under walking mode i can also switch between gait types… I just love the nunchuck and don’t want to replace it, it’s so easy to use with the Arduino Hexapod Robot!
Update 03/04/2012
Took me 2 weeks to assemble the new body from Lynxmotion… (13 days of watching TV and 1 day of actually working :p ). The new body is great, although a bit too heavy than i thought it would be. The servos and the battery works very well together, max current supply is now up to 30A !!


Haven’t been doing too much, so couldn’t update. Just posted another Arduino Hexapod Robot video showing all the gaits, with or without Balance mode. also wrote a menu system for the Wii remote, so it’s easier to switch between body rotation and walking modes, also different gaits… Here it is: Each box represents a state, and I have 3 LEDs to indicate the different states I am in…


I have also tidied up the code a lot!!! reduced about 50% of the lines… although there are more functions. I am still thinking should I use an extra Arduino to load the sensors for my next goal… maybe i should try it without first… that’s it….
Update 10/08/2012
I started learning writing Android Apps in Java recently, and I always wanted to go ‘cordless’, so I decided to write one for controlling the Arduino Hexapod Robot via bluetooth. It was quite tough at the first few days, had no clue what to do since I had no at all experience on android app development, especially the bluetooth part, I can get it to be switched, that’s about it! Luckily I bumped into a couple great source code showing how to use bluetooth and simple graphics design (I used surface layout): http://android-meda.blogspot.co.uk/2012/01/writing-your-first-android-app-body.html http://www.elecfreaks.com/677.html I wrote my first android app that controls LEDs on the arduino.
Update 12/08/2012
The Arduino Hexapod Robot Controller App is finally looking promising. Here is the communication design: Command format: 4 bytes [type] [x] [y] [extra] type – is the type of action, or type of command x – first input, could be the input of X axis y – second input, could be the input of Y axis extra – third input, e.g. speed of the movement, or just 0 if not needed Communication: 1. arduino will wait for a start-up command from the phone 2. arduino sends a signal back to the phone when it’s available to process another command 3. the phone sends command whenever the ‘acknowledge signal’ is received from arduino, even input is 0.
Update 13/08/2012
need to do:
1. to adjust speed, add extra packet when adjusting speed, delay of driving each servo would also change cap min and max speed, probably 1 to 30 delay = (int)20/resol;
2. i can’t adjust speed while controlling the arduino hexapod robot walking, so i need to add a toggle switch, to lock down the movement input, so i can adjust speed. add code and radio button for translating around Y axis add code, so when using Acce for Z, X rotation, the joystick can do Y rotation
Update 14/08/2012
Because I didn’t setup the servo constrain properly, tragedy happened! The teeth of the gear (the top copper one) are broken… probably happened because it was forcing it while the servo can’t move anymore… i could see how this happened! Luckily ( should i say that?) they have gear on ebay, although it’s not cheap but still better than buying a new one which is nearly 30!
Now I just have to wait!!!

Update 22/08/2012
Fantastic! The part finally arrived! What’s even better is, the ebayer sent me the whole servo instead of the gear… :D so let’s fix it and make a video about my new android control app!

Source Code Download And Fund Raising
To raise money for future projects, I am starting a fund raise. To say thank you, anyone who donate more than UK£10, I will send you the source code of this project. Amount does not matter, every little helps. You can donate through paypal via the link on the side bar (right hand side – Donate button). Please drop me a private message as soon as the donation is made and point out which project you are interested in. However I can’t give you any technical support on this project anymore as I am no longer working one it.
(Please don’t expect my source code will work straight after uploading on your robot. It would be best only for your reference. Although it’s possible, but it will take some effort to rewrite the code, therefore I don’t recommend Arduino/programming beginners to get it)
125 comments
Hello, I am interested in your project, where could I donate to have the source code, I await your response
Hello, I am making a project for my kids, it would be a great thing if you can share the source code to as please. We are also willing to donate. Thanks
just donated hope I can get the source code. Is it still available?
Thank you, I just sent you the files.
Hi Oscar…
Fantastic article/project. Is the code and related files still available if I donate? Doing a project with kids and was stuck with IK and think your source code can inspire us…
Best regards, JN
Yes still available for a small donation. thanks
Hallo met Jana,
mijn vriend heeft een Hexpod helemaal inelkaar gezet,
en het programma Arduino staat op mijn pc, we willen als laatste stap hem laten lopen met de ps2 controller
maar wat voor codes heb je nodig of hoe kan je hem daad werkelijk laten lopen?
Groetjes Jana van Iwaarden
Hi Oscar, I’m considering building a hexapod as part of my college course, ideally I’d like to build it with a 4th degree of freedom, but still working on the inverse kinematics as every way I look at drawing it I get two Scalene triangles and can’t solve it just yet. As for the source code do you feel it can be adapted to a 4 dof hexapod?
is that code still available if i donate now
Yes, it is.
Hi, is the code still available now? Can I donate £10 to get the code hexapod IK robot and the quardruped IK robot ?and can i get the all of data so i can make this project?
Thanks ..
Yes, it’s still available, but there is no technical support.
hello, i will now transfer 10 pounds, and i would like to get an answer but I will say easier, I am a very keen modeller. air, car, tanks …. now I decided to do something interesting, I did the whole mechanical part, then I would throw the photo. but I am absolutely far from programming. (although I am the chief engineer). help to realize this project, my children like my projects very much …
just sent you the codes!
photos.app.goo.gl/2FdcQqDNDH7Yq4HG7
Hello, as I promised, This is a link to the photo of the hexapod. It is almost ready, but I do not understand where the legs are connected, and when compiling the project, it cannot find the file (“WProgram.h”). He is not in the project. If not difficult, help …
I believe the header file WProgram.h is from the older version of Arduino IDE.
Like I said in the email, if you want to compile the files I sent you you have to download the older version.
Sorry I am unable to give you any further technical support, this project was done 6 years ago and I’ve forgotten the details.
Hi, is the code still available now? Can I donate £10 to get the code?
Yes it’s still available.
Hello, if it’s not asking too much could you send me the inverse kinematic implementation(don’t need the whole source code) even without the donation?
I have been doing a project and unfortunately, I can’t spend money on donations(not that well off in a country that isn’t well off either). And I wanted to have an example of an implementation to base mine off.
In any case, thank you, your page on IK has been of much help.
Hi, is the code still available now? Can I donate £10 to get the code?
yes still available.
Hi, is the code always available? do I have to donate £10? thank you
Yes
Hi,
I’ve loved your blog so far and am interested in the source code and am willing to donate for it but I have to ask, is it still available? I notice it has been some time since this was written
-Daniel
yes the code is still available but i have not updated the code since. I also cannot provide any technical support or advice since it’s been such a long time. Feel free to donate and I will send the code to you in exchange.
Donated, but no responce. Also not in the spambox.
Hi, sorry the email was sent to the wrong person :( I just sent again now.
Hi Oscar
I have a couple of questions:
// Define Leg Numbers
#define RF 0
#define RM 1
#define RR 2
#define LR 3
#define LM 4
#define LF 5
This is looking at the robot from top view? Assuming it will walk forward to FRONT?
FRONT
5 LF RF 0
4 LM RM 1
3 LR RR 2
And….
to go FORWARD/BACKWARD is the Y axis?
Finally,
The code shows only ripple gait while you mention you have implemented:
3. implemented 7 more gaits (thanks to Jeroen Janssen’s source code, I copied most of the stuff over) (1) Ripple 12 steps (2) Quadripple 9 steps (3) Tripod 4 steps (4) Tripod 6 steps (5) Tripod 8 steps (6) Wave 12 steps (7) Wave 18 steps 4. modified code to avoid using ‘delay()’, but to get the time using ‘millis()’, so process….
Thank you
1. Yes, as you are looking down from above.
2. Yes, it walks forward to the front
3. I don’t remember what axis I used to represent the 3D dimension, but it should be pretty easy to tell. make sure to check out this article first: https://oscarliang.com/inverse-kinematics-implementation-hexapod-robots/
4. I believe I’ve sent you the rest of the gait a few days ago.
Hi, I’m also developing my own robot, could you dump your sources (code)? I live in a Russian country and there are huge problems, with the development of such robots, there is almost no information about them) I would be very grateful
Hi Oscar your project is very good, I’m developing my Hexapod too, I used your spreadsheet, can you send me the Hexapod code so I can study, and finish mine?
Grateful.
i sent you the code on Wednesday, please could you check your junk inbox?
Hi Oscar
Your project is incredible. I try to make my own hexapod too. Could you send me your code to make improvements?
Thanks
Hi Oscar,
Thanks, it is a good project.
Please, could you send me the code and the excel sheets.
sent
Hi Oscar,
I just donated with Paypal..
please send me the code..
thanks.
code sent :)
Hi Oscar,
Just sent through the donation for the code.
Thanks heaps
Cheers, code sent!
Hi Oscar,
the HEXAPOD robot can be controlled by the PS2 controller with your code??
no it’s not designed for PS2 controller.
Hey Oscar,
Before I donate for the code, how difficult would it be to implement the hexapod code for an octopod? Does the code work well for n legs?
Thanks
I have donated and would like a copy of your Arduino code for hexapods. Thanks.
code sent :)
i need a program to run 12 servo motors…….please help
i need a program for 12 servos using arduino mega 2560 its very urgent…….
how many limbs does ur robot have????
am also build a robt with four legs ….using arduino mega 2560 …
…also need a source code
H,
I just donated with paypal.
Can you share the source code that you succeed?
My Son is waiting for the movement of my Hexapod for 2 years. ^^
Thanks
Sincerely Brian
Sorry!
I modified my e-mail address just before.
sent :) thanks for the donation.
Hi Oscar
Thanks for such a great blog. I just donated via the PayPal link. I would appreciate the hexapod source code
Andy
just sent you the code Andy.
hello Oscar,
I need Hexapod source code. but, Im using Arbotix controller with 3 DOF. Is your code compatible with Arbotix also?.Please reply me.
Thanks & Regards,
Vasu dev Mukku
Hello Oscar , I have made a donation in your future projects . Send me a program code hexapod and what concerns this Drafts . Thank you.
code sent :)
Hi Oscar your project is amazing!Do you still share your code if I donated?
I’m very interesting in hexapod robot
Yes the code is still available, however I cannot provide any technical support with the code or project since it’s a few years old :)
Hi Oscar,
Thanks for all the work you have done.
I am quite interested in trying your source code and I am quite happy to make a donation.
Before I donate tho I was wondering would you be able to provide simple instructions on how to configure your code to suit a particular robot? Such as the length of legs, pin connection for servos, etc. I am hoping to control a hexapod (with arduino mega 2560) through a 10 channel RC radio which I used for a hex quad.
I have some experience configuring different versions of multiwii flight controller firmware and different versions of marlin 3D printer firmware, but I suspect configuring your code to work is quit a step up?
Thanks for your time in advance.
Kind regards
Gordon
Hi Gordon,
sorry i wouldn’t be able to give you any additional help on the source code.
This project is 4 years old.
The source code would be reference at its best, i doubt you can just copy and paste it in your IDE and expect it to work right away.
thanks
Oscar
Hi Oscar, wow great job!. Just made a small contribution to support yr projects. I built a 3dof hexapod sometime ago using neither servo shield nor any kinematic process, just simple tripod and wave gaits with an Arduino Mega5260. Worked fine tho. I was thinking of building a better one soon, and this time it will be with FK or IK. These few days I was surfing the net struggling to learn more bout these thingies and how to integrate Danevit-Hartenberg tranformation matrix into Arduino C programs, and there mind you, it’s my lucky day today to drop accidentally onto OscarLiang.com. I am really excited to learn how you deal with IK calculations and ofcos yr source codes and simulation Excel spreadsheets would enlighten me. This will also avoid me to scratch my head for many many days to come, lol……….. Thanks in advance. Have a great day Oscar. rgds Wong
Hi Oscar
I found your pages amazing. Many thanks
I have just made a small donation. I would appreciate if you could send me your excel sheet where you do simulation.
If you could also send me the source code that would be great but I am more interested in the excel.
Many thanks
sent.
Hi Oscar
I proceed for the donation,so I would know if this website is still active and you’re still there to support me.
detail request to know
-detail of hexapod inverse kinematics code (each leg have 3 motor servo)
I want to know steps payment and How to contact you when I donated already.
deatails request
-detail of hexapod inverse kinematics code
Hi Oscar, I am very interested in this project – just wondering where you got the parts from;; could you email me the manufacturer’s details please? thanks
Hi Oscar,
I’m working on a Hexapod 3DOF just like yours. I’ve developed a board that link 20 servos and other sensors and loads, but use an ATSAMD21. I also made an Android App to control it via Bluetooth, I control it without use the inverse kinematics.
Do you still send your code if I donate you? Would it be difficult to program it out of the Arduino IDE?
Hi Marcos, yes I still send out the code to donators.
I am having trouble getting wiimenu.h to compile.
I get
In file included from Hexapod-aug2012.cpp:22:
/wiimenu.h: In member function ‘void Wiimenu::MenuProcess(int, int, boolean, boolean, int*)’:
wiimenu.h:56: error: expected primary-expression before ‘switch’
wiimenu.h:79: error: expected ‘)’ before ‘}’ token
wiimenu.h:79: error: expected primary-expression before ‘}’ token
wiimenu.h:79: error: expected ‘;’ before ‘}’ token
I haven’t changed anything, this is straight out of the downloaded zip file. I have different vintages of Arduino back to Arduino0020 with te same result. Any suggestions anybody?
Hi oscar,
Im starting with this hexapod robot before i build a robot with wheels. Now i want walking robot so how can i start with which servo should i choose. It will be a heavy one.
Hi, i’m trying to make an hexapod using arduino mega 2560 without a shield availment. My hexapod has got three servo leg. I’m encountering various problem when the number of leg to be actuated exceeds three value of three. The arduino and the servo feeders are powered by two different sources with common gnd. It seems there are some interferences between the signal and power circuits. Do i have to get off the idea to make the hexapod without an arduino shield?
Hi, I’m working on an hexapod with an Arduino Mega, and I’m having troubles trying to move the 18 servos at the same time, they just don’t respond, i can just move 9 servos and they work fine, but when i try to move 10 the whole thing stops working :(
I’m using the Arduino Servo library and the servos just have to move through an independent array of values.
If anybody knows what I’m doing wrong I appreciate some tips.
And thanks for this post, your explanations helped me a lot on the IK of my robot!
what are your total amps?
cool hexapod
is it possible to make a 3 legged hexapod with arduino uno?. and if its possible, how can i prodgram it?. its my first arduino project.
what do you mean by 3 legged hexapod? hexapod has 6 legs.
Hi Oscar, do you still give out you code with a donation? How much is it in USD?
I have made a Hexapod for a Boy Scouting project and would like to improve his walking. It took me about 1000 hours to 3D print all the parts. I would really love to add IK to his walking, it looks so cool. 18 Varsity Scouts built these:
youtube.com/watch?v=KN3hOfVMdiU
yes!
i am building a hexapod having 3DOF and i have ardiuno mega and a self created shield with the 15 7806 regulators for power to each servo motor and i am using 6 towerpro sg5010 , 6 vigor vs2 and 6 dooman dm-s0600 servos.
i have completed creating my physical structure if the robot
i want your guidance for source code for gait motions of robot. this is my first project on arduino and i am a student.
By proving us the info needed you can contribute in some science work and we will acknowledge your contribution.
Thank you
Hello
I am working biomimicry project based on hexapod I which we will study walking pattern of few insects. Can you tell me how to create new gaits as you did.
As far I know there are two phase one swing other is stance. what I am doing is put three legs in to swing and three in stance then alternately repeat it.Then I saw your excel sheet like the way you are doing your gait.
I will really thank full to you if you provide me some different gait in excel sheet only gait with little bit information about the gait and how you are generating them.it well help me to mimic gait of some insects. I just need excel work no coding. And what type of power source you are using for hexapod what is its rating?
Hi Oscar – I must say really great articles you wrote there! I’m very interested in the sources of your project as I’d like to build and experiment on my own hexapod robot. Could you send me the sources? I donated to your website of course ;-) keep up the great work!
Cheers, I just sent you the email :-D
Oscar,
Some time ago I made a donation, but I have been unable to locate the actual code. You implied somewhere that the code was here, but I can not find a link. I had hoped that at the very least you might have responded to the donation, but 6 weeks have passed or more.
Please provide a download link or a response @ my email address.
Thank you
HI, could you provide me with the name and date you made the donation? I can’t seem to find it with your email.
sorry i should have made it clear to contact me right after the payment.
Very impressive work :). I’m planning to do something similar with a group of friends. I’ve donated the money about two weeks ago but I still haven’t received the code. Would you please send it so we can start working on our project? Thank you so much and keep up the good work (y)
HI, could you provide me with the name and date you made the donation? I can’t seem to find it with your email.
sorry i should have made it clear to contact me right after the payment.
Hi Oscar!
Great work. The links provided in the site was great help on starting up our hexapod! However, vere not able to have working gait and leg implementation. Can you send me your working ik leg implementation and tripod gait? Thank you!
Hi Oscar,
Just a quick note to commend you on the excellent work you have done with this. I am currently putting together a hexapod with some fairly advanced features, which I will post about as soon as I have enough of a working model! I’ve donated to your site and would very much like a copy of the source code for your system.
Thanks Jon
Hi Oscar,
Donation done….please send me the code….Thanks in advance
Chris
Hi Oscar, I am a fan of your works and I have started to build my hexapod using the brackets from a chinese supplier. The brackets are exact replica from Lynxmotion, this is my only way of fulfilling my dreams since shipping alone from lynxmotion to my country would cost already >$150 + taxes…. Anyway, I have a original SSC-32 board with me and a original Arduino mega 2560. For a starter like me, I would like to see first my project start correctly and from there I would like to discover things in a “reverse engineering” way since I actually don’t have the luxury of time to always sit on my projects.
Before I proceed for the donation, please reply first on my email so I would know if this website is still active and you’re still there to support me with my thirst on knowledge on robotics. Thanks
Chris
yes, the website is still active.
Can you please provide me the working code of arduino for controlling 18 servo on hexapod
Good work, i’m working on my exapod arduino based; i’ve implemented IK for leg, but i don’t understand body IK and how to connect to the leg.
Hi Oscar,
Thank you very much for the code
I have just a few questions, I am using a Pololu Maestro servo controller (I have added a Lib called PMCtrl):
– The Z-coordinate is “forward (+)/backward (-)”?
– I have numbered the legs according the sequence you are processing the, is this correct?
—
// Define Leg Numbers
#define RF 0
#define RM 1
#define RR 2
#define LR 3
#define LM 4
#define LF 5
—
Thanks
Kind regards,
Hervé
Hi Herve! :-)
1. Yes, The Z-coordinate is “forward (+)/backward (-)”
2. the leg numbers are correct, they are clock-wise.
I have edited your comment now as well.
Thanks!
Oscar, congratulations on your coding, I am currently building my little project and have donated to help you with your developments. I do have a couple of quick questions about controlling the motion directly from the serial port, basically what commands to send, I can see a 4 byte packet is required but struggling to really understand the structure.
thank you so much for your support! :-)
I am not sure how your code is written and what data is needed to control your robot. But for mine, it requires minimum 2 bytes of data to control it (X axis and Z axis input).
But to walk and tilt the body at the same time, we need 2×2 = 4 bytes (doing two things at the same time)
To walk, tilt the body, and rotate body at the same time, we need 6 bytes (3 things at the same time)
so you can see, how much data we need to send the robot, depends on how many things we want to control.
Feel free to start a post in the forum, it’s easier for me to keep track of things :-)
Commenting on the casting of float to int with rounding to the nearest, it is more effective just to write: int result = (float) (input + 0.5);
Sorry, I meant: int result = (int) (input + 0.5);
that’s true! I am working on a new version hexapod robot library, i will include this in the change.
thank you!
Just a question when you move from the body frame to coxa frame why do you not take into account the coxa distance offset from the body in your leg ik code
// moving from global frame to local frame
coor RC_FeetPos;
RC_FeetPos.X = RB_FeetPos.X*fcos(angleOffset) – RB_FeetPos.Z*fsin(angleOffset);
RC_FeetPos.Z = RB_FeetPos.X*fsin(angleOffset) + RB_FeetPos.Z*fcos(angleOffset);
RC_FeetPos.Y = RB_FeetPos.Y;
why not
RC_FeetPos.X = (RB_FeetPos-Coxa_Distance_Offset.X).X*fcos(angleOffset) – (RB_FeetPos.Z-Coxa_Distance_Offset.Z)*fsin(angleOffset);
No, the origin of the coxa frame is the point of rotation of the Coxa servo.
So “RC_FeetPos” includes the Coxa distance offset.
Hi Oscar thanks for your prompt response,
so each time android screen button press( let say straight right button ) will sent x=1.5 y=0?
an move one gait to the right
Hi Oscar,
when in walking mode (let say move forward), given input X=10,Z=0-> moving stright forward
in your code just move 1 leg forward. how about the rest of leg wait next command?
if (mode == 122){ // if walking, delay according to speed
delaytime = constrain((int)6/(int)speed, 2, 6);
Resolution = speed;
}
for (int i=0; i<18; i++){
ServoChange[i] = (Angle[i] – Angle_Old[i])/Resolution;
}
for (int j=0; j=0; i–){
Angle_Old[i] = Angle_Old[i]+ServoChange[i];
int mSecond = constrain(RadToMicroV2(Angle_Old[i]+PIby2) + servoOffset[i], servoMin[i%3], servoMax[i%3]);
legServo[i].writeMicroseconds(mSecond);
delay(delaytime);
}
}
I am not sure I understand your question completely.
The legs’ positions are calculated and moved one by one, one leg per cycle. When the program (void loop() ) run through from first line to the last line, that’s one cycle.
So to move the robot fully to the new position (X=10, Z=0), you will have to have the same input for 6 cycles. (e.g. holding down the button on your controller for 6 cycles.)
Hope that makes sense, also just a little correction to your question: when X=10 and Z=0, the robot will be walking site way to the left or right (can’t remember which way exactly).
hi oscar ,
in your code
case 122: // Walking (JOYSTICK)
jX = packet[1];
jZ = packet[2];
WalkLength.X = map(jX, 0, 255, -70, 70); // normally 80
WalkLength.Z = map(jZ, 0, 255, -70, 70);
speed = packet[3];
break;
why walking reffer to x&Z axis, not x&y axis
In the tutorial, I used Z to represent vertical axis. But in the robot source code (this post), I used Y.
The inconsistency was caused by my unthoughtfulness. But it doesn’t matter too much if you understand how it works.
hi Oscar,
i’m building quadpod robot, can u share android code controller ?
thanks
Aslam o Alakum Oscar,
I have to work on quadruped with machine vision in my final year project, but i dont have much know how about machine vision and quaruped. so i decided to start work on quaruped and then proceed to machine vision because it would be a part of our course in next curricular year. Can you please give me the idea of IK, and programming code for quaruped
Before the quadruped robot, I built the Hexapod robot, and I wrote a couple articles about IK. I re-used exactly the same IK code for my quadruped robot, it’s not great, but it works.
So I suggest you to read my previous articles on how to implement IK on Hexapod robot first.
https://oscarliang.com/inverse-kinematics-and-trigonometry-basics/
https://oscarliang.com/inverse-kinematics-implementation-hexapod-robots/
There are also excel spreadsheet I created for both Quadruped robot and Hexapod robot showing all the calculations, hopefully you get the idea.
Thanks for getting back to me so promptly Oscar. Just thought I might ping you again… I’m currently working on getting my Android dev environment set up and studying with the guidance of a friend on some basics of Android apps.
Glad the site is back up, thanks for sharing and I hope to share back soon!
Hi! I had commented a couple weeks with an inquiry for the code to run the android app. Just inquiring again on the possibility of gaining that to hack on as well?
Regards,
David
Hi David, Sorry about that, My webhost erased all my data a few days back including your comments, I could only recover from 10 days back… and couldn’t find your email address.
Anyway, I have sent you my Android Control App Source Code just now.
Regards
oscar
1. The second “else” belongs to the second “if”.
2. Arduino supports C.
Place the braces where you want them. Possible rewrite:
int RadToMicroV2(float rad){
if (rad < 0) rad = -rad;
if (rad == 0) return 0;
return(2400 – 1800*rad/PI);
}
First, thanks for posting the IK code.
I am porting your code to an Xi;inx FPGA based machine built with mostly lynxmotion hardware.
Currently using a Microblaze softcore which is a 32-bit, 50MHz CPU with all the I/O defined
in hardware.
While translating to C I noticed a problem in the RadToMicroV2 routine. If the input “rad”” is zero,
the routine never computes a return value.
George
int RadToMicroV2(float rad){

	if (rad<0)
           rad = -rad;
        else if (rad == 0)
           return 0;
	else
           return 2400 - 1800*rad/PI;
}
Thanks for the message, you means this functino?
that's weird, I have explicitly wriiten a condition for case of zero input, so it always return zero.
anyway, Not sure why it's not working when ported to C and I don't have any C-based hardware to test that, if you don't mind can you post your solution here so more people can see it?
thanks!
Oscar
Hi Oscar, do you mind sharing the contact of the robot frame manufacture whom you bought the
parts from ???
the manufacturer is lynxmotion
But I don’t recommend it, the frame is too heavy, and too expensive. I would recommend getting someone to print it for you using 3D printers.
There are a lot of people sharing their 3D printed design (including dimensions) on the internet.
what robot are you trying to build?
It could be a good start with excel (calculation) ;-) I try to understand IK or to adapt lynxmotion code to arduino, start with moving only one leg could be a good start (later for gaits)
I bought:
– the same hex frame
– chinese 32 channels controler,
– arduino nano mega,
– 20X996R servos,
– a lot of M3 (incredible the number of srew needed :-O around 160),
– a big regulator step down ( http://www.ebay.com/itm/181072927354?ssPageName=STRK:MEWNX:IT&_trksid=p3984.m1497.l2649 )
– ball bearings
Just wait for all of this shipped to france !
Hey, you have got much better hardware than I had! :p
Why don’t you download the spreadsheet with all six legs in operation (at the very bottom of the article)? It’s got detailed Calculation for each leg, so you can just look at one if you want.
I have also uploaded my full source code in this article. It’s written for Arduino so might be helpful to you!
IK for one leg is very easy, the difficult part is Gait Generation! How to manage all six legs at the same time :) It took me a whole week to tackle it!
cool, are you the man o android bluetooth !!!
Hi,
Very impressive hex ;-)
I’m looking for a simple IK code for 1 leg 3 DOF.
Do you have something like this ?
Thanks
sorry, you mean the IK code for one of the 6 legs?
I think I wrote a Excel spreadsheet to simulate that (with all the calculation), would you be interested?