
Betaflight F3 Flight controller and Quadrant 25A ESC are new products from FPVModel. In this review we will have a look at how they perform on a new mini quad build.

Betaflight F3 FC and Quadrant 25A ESC were provided by FPVModel for this review. Article is written by Artur Banach
Betaflight F3 Flight Controller
Betaflight F3 Flight controller (BFF3) is designed by FPVModel with co-operation of Boris B. (Betaflight creator and developer). It was made to support all Betaflight features in one single board. The BFF3 came flashed with Betaflight 3.1 firmware.
Table of Contents
Specification
- F3 Processor
- MPU6000 Gyro/ACC Sensor
- 3 x UART ports (one for radio receiver)
- Built in 3A 5V BEC
- Built in OSD – configurable via Betaflight GUI
- SD Card adapter for BlackBox
- Current sensor
- Power distribution board with six-layer PCB
- Weights 8.6g
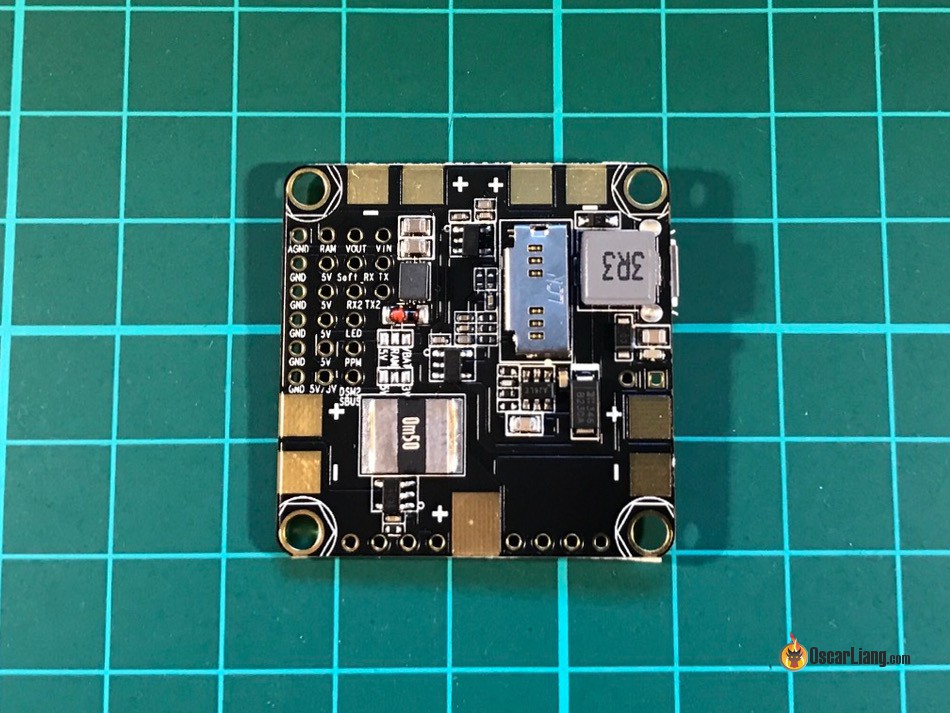
Betaflight F3 has components built on both sides of the board. Motor signals and ground pads are located near the 4 corners according to Betaflight motors order. ESC power pads and TF card adapter are located on the underside of the board. LiPo power connector pads are on both sides (ground on top, positive on bottom). It also has buzzer pads and bootloader button.

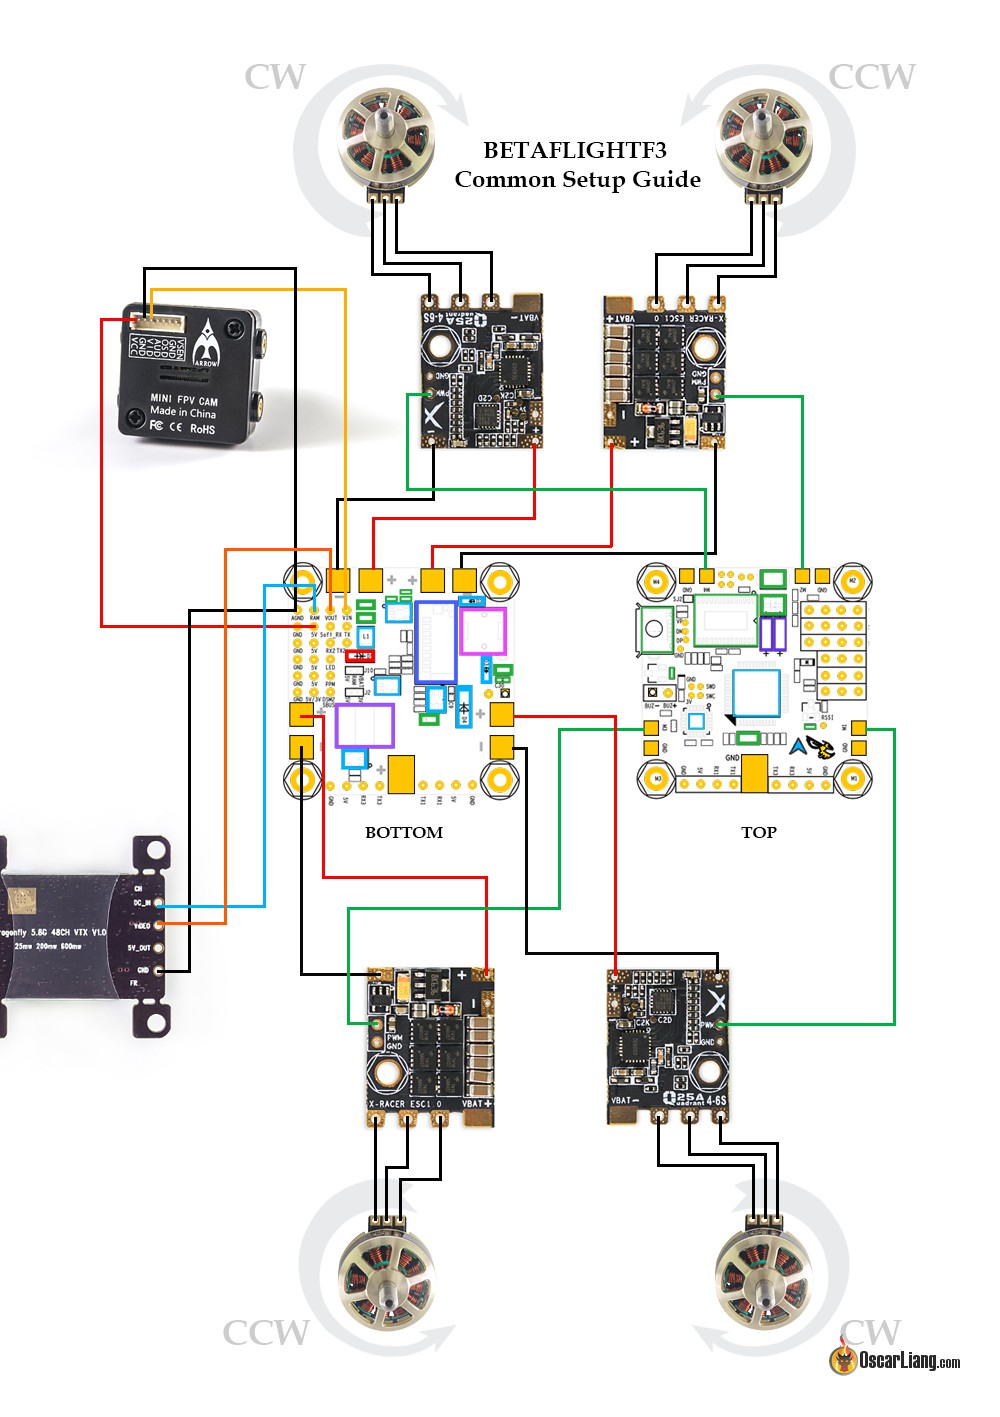
Wiring
The BFF3 a FC with integrated Power Distribution (PDB). Signal pads and pinholes are fully described. It’s best to solder ESC negative and positive wires to the board first because pads are located on the underside making it tricky or almost impossible if board sits on standoffs already.


For the mini quad build I soldered a 25V 470uf capacitor to the XT-60 wire to make sure that the board is safe from the voltage spikes (this is not compulsory).

TIP: to avoid issues with OSD and VTX it’s best to do common ground – to solder camera and video transmitter grounds together.
Smart audio wire needs to be soldered to TX of one of the board’s UARTs to allow two way communication with video transmitter (if you are using TBS Unify or ImmersionRC Tramp VTX).

There are two solder bridges we need to jump, one is the power selection for Video Transmitter input power (either using regulated 5V or direct power from LiPo) and another for Radio Receiver power (3V or 5V). These need to be soldered based on your build requirements.
OSD
Betaflight F3 FC has built in OSD configurable via Betaflight Configurator app.
Here is a list of things we can change using the OSD:
- Alarms
- OSD screen layout
- PIDs and rates
- Video transmitter channels, bands and output power (with TBS Unify or ImmersionRC Tramp)
- and more…
OSD menu is very simple and intuitive. To access it simply put throttle stick in MID position and yaw LEFT while moving pitch stick UP.

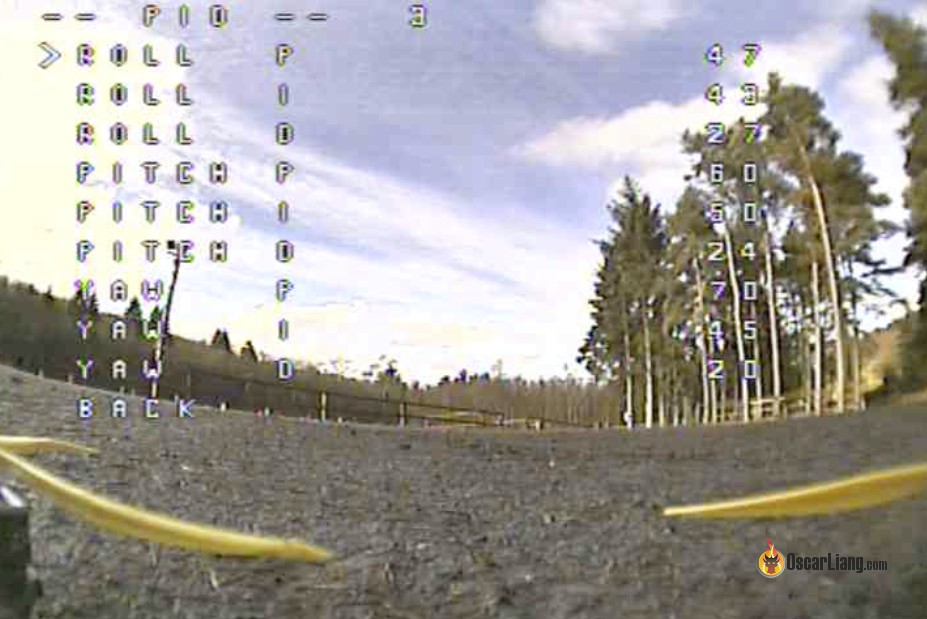


OSD is fully configurable using Betaflight configurator. There is no need for any external application to change settings. OSD screen elements can be re-arranged there as well by dragging them with the cursor. There is variety of OSD elements that can be chosen for the OSD layout. Most useful for FPV are the voltage info, timer, pilots name and amps consumed.

Great things about Betaflight F3 Flight Controller
Features are
- Integrated PDB
- Built in OSD customizable via Betaflight OSD
- Current sensor
- Intuitive layout
- SD card slot for BlackBox
- Tailored to support Betaflight
- When running 8K/8K, CPU usage remains low
Things to consider with Betaflight F3 FC
- It’s a bit tricky when soldering ESC positive and negative pads located on the bottom side
- The firmware that came with the board (Betaflight 3.1) didn’t support smart audio feature in OSD
Quadrant 25A ESC
Quadrant ESC is an unusual product because it can be a 4in1 ESC or just a standalone “one per arm” ESC.


Specification
- Supports 4S-6S LiPo
- Weight: 2.5g each
- Powered by EFM8BB21 MCU
- BLHeli_S supporting Oneshot42, Oneshot125, Multishot, Dshot150/300/600
- 25A costant load, 30A burst

To make use the Quadrant in 4in1 configuration, the positive and negative pads need to be soldered together. It’s best to install the ESCs onto standoffs first and then do the soldering.


In my build, I decided to installed them separately on each arm. These ESCs don’t come with any wires, I had to use my own wires I kept from previous builds (very handy to keep the wires, who knows when you gonna need them : ) )
First I soldered the signal and ground wires.


Great things about Quadrant 25A ESC
- Flexible installation – they can be installed individually or as a 4in1 stack under the FC
- The Quadrant can act as a PDB when soldered together
- DSHOT supported out of the box
Things to consider
- If soldered together there is a higher chance of failure
- No wires included
Flight Experience and Final Verdict
I built the QAV-X with the following components to test Betaflight F3 and Quadrant 25A ESC combo:
- QAV-X Frame
- ZMX 2207 2300kv motors
- FrSky XM+ Radio Receiver
- TBS Unify Pro HV Video Transmitter
This combo gives a very smooth flying experience. Throttle response is great and quad felt snappy on latest Betaflight firmware. Having built in OSD to see voltage and timer without extra separate OSD hardware is great. Also option for Dshot600 out of the box is the most welcome addition. There is no need to modify ESC capacitors in order to make that to work.
In my opinion Betaflight F3 is without a doubt the best Betaflight board on the market, purely based on amount of features it offers and ease of configuration.
Quadrant 25A ESCs offer great flexibility for any type of build as well as solid performance.
16 comments
I have switched my fleet over to the BFF3 and have been flying them for a little while now. One thing I have noticed and Boris has mentioned is that the 5V circuit and the RAM circuit are weak. This has caused many problems for me as the board doesn’t have enough juice to run my VTX and Cam. So I switch them to the ESC hot pads, which leads to lots of noise in the feed… so now I am adding capacitors to it and the trickle down effects of this continue. I am hoping that they come out with a V2 of this board because other than the weak circuits I have been happy.
I have also recently switched to a 4-1 Cicada 30A ESC on all my quads. The wiring actually wasn’t too difficult, you do your battery hot to the BFF3, and battery ground to the ESC. Then glob on a hot lead from the shunt resistor on the BFF3 to the hot pad on the ESC using an equally sized conductor as the battery lead. Lastly use a motor lead conductor from the BFF3 ground to the ESC ground. This is only for ground sensing and is why you can use an undersized conductor.
Any reason this FC can not be installed bottom up to ease the soldering pain?
I ordered this exact package but am beginning to regret it because the 4in1 ESC board appears a bit oversized and will be difficult to fit compact 5″ X quads. My Flaco needs a 4in1 configuration!
What a pain in the ass to solder this bord. The solder won’t stick to the solderpads.
You have to use high heat on the ground pads especially. They used a bunch of copper in the board to be able to handle the 120A burst rating (total) to the ESCs.
I’m want to build mini quad with 4 in 1 esc but really in most FC can’t figure out how to connect it. It will be great if somebody write some articles about it. I think a lot of people have same problem.
I picked mine up at fpvdrones.xyz the other day and they told me the current sensor is not calibrated and also using individual esc’s is the best option because how the board is laid out. The other thing I ran into ( I almost cooked the board ) is to solder the correct power output you need. These AIO boards are a little more complex to install than my Lux and Dodo. Anyway, I like that XRacers support DShot OTB because I rip capacitors off of my Aikons and Racerstars.
I will not let the person that do the soldering on that board solder any of my electronic component!! Holy smack!!
can I use 5-6S Lipo with this flight controller?
I have the same question, can it run 5s batteries?????
I’ve been having desync issues with spedix 30a and EFAW 2500kv :/ runs amazing on 5s but I don’t think it can handle the 5s
My problem is that there seems to be no way for the board to properly wire a 4in1 ESC which so many people are moving to. I have spent days on end trying to get the board to work this way and tried to get answers from from FPVDirect but they are not co-operative in this which leads me to think you either use their bulky quadrant solution or individual esc’s which is a shame.
I’m in the same boat.. but I’m using a BF F3 FC… at oscar/ Artur. Any suggestions for using the current shunt on the BF FC ?
I am building a QAV-Skitzo with this FC and I have a Cicada 4in1 30A ESC but after much thought will probably go with individual ESCs as it seems to make more sense. I am wondering about the battery monitoring- does this fc just do it automatically if you solder the bridge for vbat?
From what I’ve read, yes. The capacitor (or whatever is actually called, I’m not good with this tech stuff) is included right in the board. Everything you need to get full use of the OSD is already included. That’s why I ended up ordering one, anyways.
Board layout and vendor spoils what should be a good board.