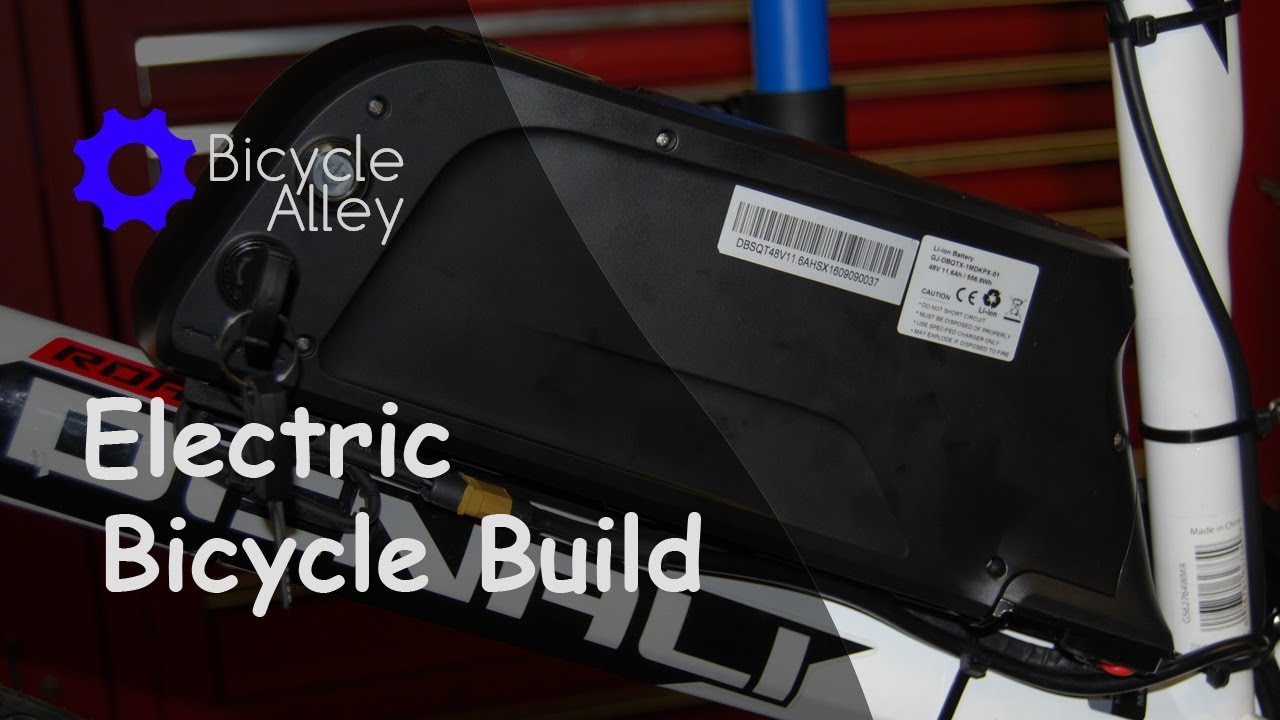
With zero experience in modifying and repairing bicycles, I am challenging myself to build an electric bike! I am using a Bafang BBS02 mid-drive motor kit, and converting my cheap road bike into a powerhouse that can outperform most commercially available e-bike at half the price.

Disclaimer: I have been doing a lot of research on this topics, but being a beginner to bike repair and modification, I cannot guarantee all my information is accurate. In this post I am just documenting my ebike conversion process, if you decide to follow any of my instruction, do so at your own risk.
Some of the links in this post are affiliated links, I get a small commission from the sellers when you buy from these links, but it doesn’t cost you anything.

Table of Contents
What Do You Need?
A Bike
The motor kit I used in this conversion should work with most hybrid bikes, road bikes and mountain bikes out there.
I got the cheapest and most basic bike I can find in our local bike shop – Apollo Guru. Brand new is only around £200. Before the conversion, I had been riding this bike for about 6 months, it’s been a reliable and decent light weight bike for the road. The motor kit weighs almost as much as the bike itself!

Motor Kit
There are 3 options when it comes to motor kits – front hub, rear hub and mid drive.
I went with mid drive, because the installation seemed to be relatively easy. Mid drive is also very efficient because it uses the gear which keeps the motor in the optimal RPM, and it makes very little noise even when going at full speed.
With some research, Bafang seems to be the go-to brand when it comes to mid drive motors, so I got one of their Mid-Drive Motor Conversion Kits. Get it here:
AliExpress:
- 250W: https://s.click.aliexpress.com/e/_DFiA24f
- 500W: https://s.click.aliexpress.com/e/_DDAEd1N
- 750W: https://s.click.aliexpress.com/e/_DB35TOr
- 1000W: https://s.click.aliexpress.com/e/_DkMXiiT
Amazon:
- 250W: https://amzn.to/3ZGJOqH
- 500W: https://amzn.to/3iuzCk3
- 750W: https://amzn.to/3IIPydg
- 1000W: https://amzn.to/3W4rAfq
You can choose between 250W (BBS01B Motor), 500W (BBS02B Motor), 750W (BBS02B Motor) and 1000W (BBS-HD Motor). If you want to go fast and climb hills, higher power is better. But check your local regulation and see what the maximum power is allowed on an electric bike. Pay attention what battery voltage your motor support.
When choosing a battery, you need to decide on battery voltage (typically 36V or 48V) and capacity (typically between 10Ah and 20Ah). The higher voltage can usually deliver more power (and higher watt-hour at the same capacity). Choose a capacity depending on your travel distance requirement. It’s pretty hard to estimate what sort of range a given battery can give you without actually test it, because all the uphill/downhill, stoppings at traffic light, how much you use pedal assist and throttle mode etc all have huge impact on power consumption. Voltage also plays a role in your range, because the energy stored in a battery is measured in watt hour (Wh), that’s capacity multiplied by voltage. With two batteries of the same voltage, you can just compare their capacity, however to compare two batteries of different voltage, you need to work out their respective watt hour.
To give you some ideas,
- a 48V 16Ah battery (768Wh) can provide *roughly* 39-51 miles (63km – 82km)
- a 36V 10Ah battery (360Wh) can provide *roughly* 18-24 miles (29km – 39km)
There’s a selection of displays to choose from. The display DOES NOT have any impact on your motor performance or features, so just choose your favourite color :)
You also need to choose an appropriate bottom bracket size, 68mm, 100mm or 120mm. Measure your bike before ordering. And make sure the inner diameter of the bottom bracket tube is 33.5mm.

Tools
I read many tutorials and got all the tools mentioned, but in the end there were quite a few tools that I didn’t need at all, and there were also tools that I was missing which would have been helpful.
What tools you need, really depends on the type of bike you have, and there is no one answer for all. Obviously it’s a waste of your money to recommend a tool that you didn’t need. I suggest to watch as many tutorial videos as you can, and get an idea what the essential tools are to get started. You can always get the missing tools during your build! Most tools you’d probably only ever use it once, so if you can borrow them from somewhere, or improvise using different tools you already have, that’s even better. Some motor kits come with a few tools, so make sure you check before ordering the same tools!
Just to name a few tools that were useful during my build:
Crank Puller (for removing the crank arms)
- AliExpress: https://s.click.aliexpress.com/e/_DCqZadt
- Amazon: https://amzn.to/3QvXKPO

A chain tool to remove your bike’s chain
- AliExpress: https://s.click.aliexpress.com/e/_DFpqdb1
- Amazon: https://amzn.to/3X5DxCT

Adjustable wrenches (ideally a small one 6″ and a big one 15″, it would be handy to have a set of the fixed wrenches of different sizes too)
- AliExpress: https://s.click.aliexpress.com/e/_DDH3l0T
- Amazon: https://amzn.to/3ZrrK3B

Allen Hex Key Set (there are many different bolt sizes in a bike)
- AliExpress: https://s.click.aliexpress.com/e/_Dn5vE9v
- Amazon: https://amzn.to/3vVYrsh

The appropriate bottom bracket tool to remove your specific bike’s bottom bracket. To my knowledge, many modern bikes use a 20-tooth socket tool, but mine requires the old school HCW4 and HCW5.
- AliExpress: https://s.click.aliexpress.com/e/_DCSuOMn
- Amazon: https://amzn.to/3GAACLr


Phillip’s head screwdriver
- AliExpress: https://s.click.aliexpress.com/e/_DCicrdN
- Amazon: https://amzn.to/3ZuBcmH

A Cable and Housing Cutter (for cutting the rear derailleur cable sleeve to install the gear shift sensor, I think you can do it with a Dremel and cutting wheel too – maybe an overkill. I tried using a small wire cutter, it sort of worked but not ideal, it took a lot of effort and the cut was far from clean)
- AliExpress: https://s.click.aliexpress.com/e/_DeGzuMf
- Amazon: https://amzn.to/3IJ28cE

You also need the Bafang Wrench Installation Tool, designed to fit the Bafang motor lockrings, mine came with the motor kit so you probably don’t need to order it separately.
Useful Videos
There are quite a few videos which really helped me with the installation. I
Very clear installation instructions:


Installation of the controls and sensors:

This video also uses V-Brake like me, so it was useful to see how it’s done.

This video has the same bottom bracket as me, it was great help understanding which way I should turn to loosen the rings.
Lots of good tips in this video, especially how to manage the cables.

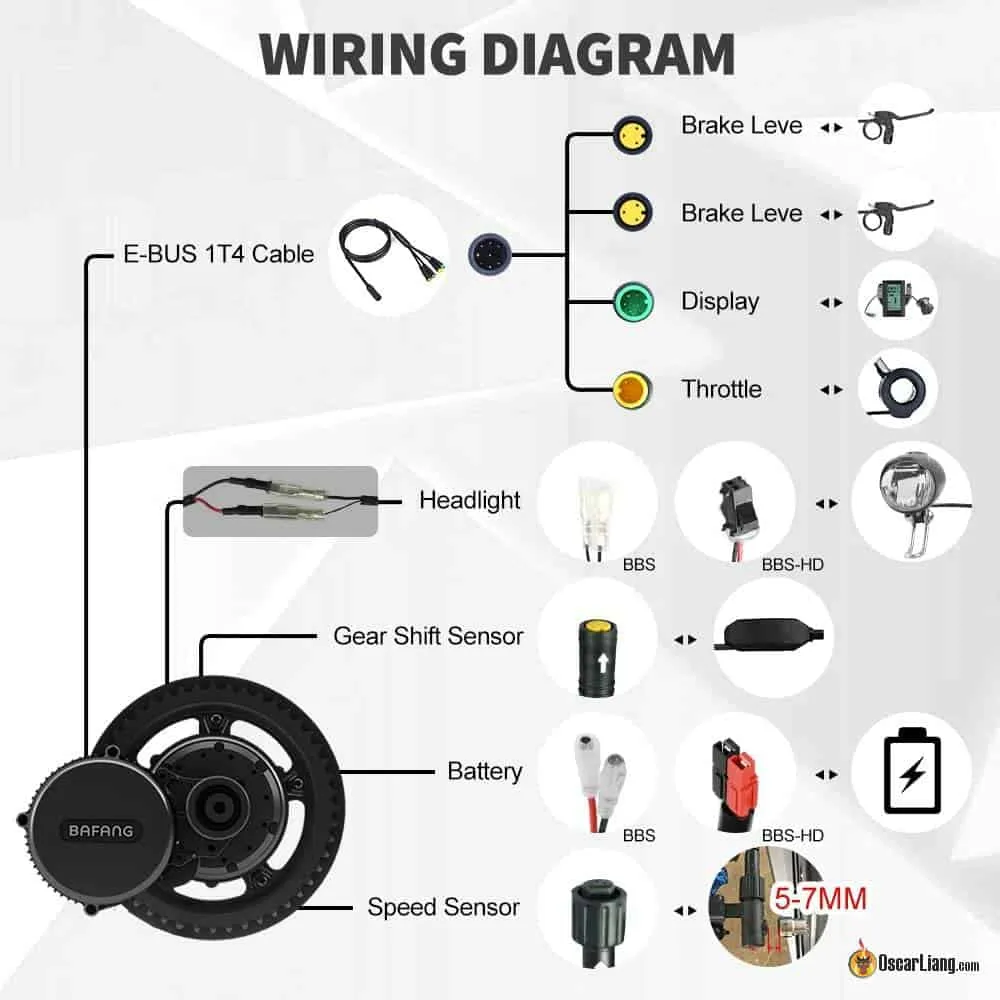
Wiring Diagram
There are 5 wires that come out of the motor:
- Speed Sensor
- Battery holder
- Gear shift sensor
- Headlight
- E-BUS 1T4 (it connects to a 1-to-4 split cable)
- Display (green)
- Front Brake lever (yellow female)
- Rear Brake lever (yellow female)
- Throttle (yellow male)
All the cables are color-coded it’s easy to identify.

Steps
Removing pedals, crank arms and bottom bracket
Remove pedals and cranks.

To remove the bottom bracket (BB) lockrings, usually it requires a socket tool, but mine has an old style one and it requires HCW4 / HCW5 wrenches (even my local bike shop doesn’t have those tools around when I asked them!). I found them online but they cost over £15 each and 3 days delivery time. Considering I would probably only ever use it once, so I improvised.
For the lockring with 3 notches, I just used a large slotted screwdriver and hit it with a hammer. Turning it CCW to loosen.

For the lockring with flats, I used a big adjustable wrench. Note that the distance between the two flats is about 36mm, so a 15″ adjustable wrench should work. Some 12″ might be able to do it too if the grip width is 36+mm. Turning it CW to loosen.

Success!

Honestly this is probably one of the hardest parts of the conversion! I am not joking, it was extremely difficult to get the bottom bracket lockring off, maybe I just don’t have the right tools. See the damage it did to my steel wrench.

Removing front derailleur
Unscrew and remove the front derailleur from the bike frame.

You won’t need the cable anymore, so just remove the cable end cap (ferrule) with a pair of pliers (or just cut it off) and pull the cable from the handle bar shifter.

To remove the front derailleur completely, you need to get the chain out of the derailleur cage, which means you’d have to break the chain using the chain tool.
The way it works is by pushing the center pin out of one of the chain links, it separates the inner chain and outer chain.

But be extremely careful not to push it out completely, leave the end of the pin inside the outer chain so you can push the pin back in when you are done. When pushing it out, it’s hard to rotate the handle at the beginning, it will get easier after you push the pin out of the first leg of the outer chain, then it will get harder to rotate again as you are approaching the next outer chain leg, and this is when you know you should slow down and check. If you are not sure, just turn a tiny bit, open the tool and check.
After taking the front derailleur out, you can reattach the chain, just reverse the chain in the tool and push the pin back in.
What to do if you accidentally push the pin out (like me):
It’s really hard to push it back it because the tolerance is tiny. If you don’t want to waste time you could obviously just buy a new chain.
If you have the cutoff from the original chain (or a few spare links of it) that would make it a lot easier. Just take the chain apart at the next link down from where you lost the pin (being more careful this time) and then take two half-links from the cutoff and install them.
Alternatively You could always push out the pin of the next link (not fully, obviously) and reattach it where you removed the first pin. You’d lose a link (and possibly a gear) but that’s a small price to pay and it’s the easiest work around.
Another method that worked for me was putting the pin inside the inner chain for holding the pin in place and put it in the chain tool, then place the outer chain (which I removed the pin from) next to the inner chain with the holes aligned. I also removed another link so I could place an inner chain inside the legs of the outer chain in the tool for support, otherwise when you try to push the pin in, the outer chain will just bend. Being a newbie to bike repair, it took me almost two hours to figure it out :)
Installing Motor
This is where I encountered another major challenge – the bottom bracket doesn’t fit the motor! It gets stuck half way when I try to push the motor through.
Upon closer inspection, the inside of the tube has some uneven surfaces. Although I spent 2 hours trying to smooth it out with a file, and scratched off the paint on the motor cylinder with some sand paper, it still didn’t fit.
Some googling suggests I could get a 33mm (1.5/16″) hole saw bit and a Dremel to remove any extra material that’s blocking the motor. Buy it here:
- Amazon: https://bit.ly/3w1aqVm
- AliExpress: https://s.click.aliexpress.com/e/_DEAdrLp

The hole saw is just small enough to slide into the bottom bracket tube (the BB tube diameter is 33.5mm), but it also got stuck half way through just like the motor, so drilling it out (very carefully) worked like a charm! I had to repeat it a few times from both sides, but that only took me like 5 mins, I should have done this instead of filing by hands.
Optionally, apply some grease on the motor before pushing it through the BB.

Install the mounting bracket on the motor, the poke-out side should be facing towards the frame. Put the two Allen screws on but do not tighten them yet.
Install the lockring with 4 notches, it requires a special Bafang wrench tool which is included in my motor kit. If you don’t have it, you can buy it here for about £6:
- Amazon: https://amzn.to/3kdR5Os
- AliExpress: https://s.click.aliexpress.com/e/_DeE9DNl
Optionally you might want to apply some threadlocker to prevent it from coming loose. Make sure the motor is pressing all the way up against the frame so the motor isn’t going anywhere under torque. I had to insert some rubber stops between the motor and frame to create some space, because the motor is pressing up against the rear derailleur cable. Now you can tighten the two bracket hex screws.

Finally there’s a outer cap to put on, it prevents the lockring from coming loose. It also requires the same special wrench we used just now. No need to apply Loctite for this one.
Finishing off motor installation
Push the cables coming from the motor through the back of the seat tube. Some people route them in front of the motor, I don’t recommend it in case you hit a rock or something, it’s going to crash into the wires first.

Install the chainring and chain guard on the drive side. Bigger chain ring is faster but puts more stress on the chain system (good for riding fast on flat), smaller is slower but provides more torque and less stress on the chain (better for climbing hills for example). I think the default 44T is a good balance between torque and speed.

Install the crank arms that come with the motor kit using the provided Allen bolts, and install the original pedals. Note that they have left and right, don’t get them mixed up. Repeat for both sides.

Installing Speed Sensor
Find a good place to install the speed sensor, it should be pretty straight forward and self-explanatory. Note that the sensor should be around 5-7mm away from the magnet (recommended in the manual, but some tutorials even suggest 2mm). You can adjust it anyway by pushing the sensor in/out before tightening the screw.

Connect Wiring Harness to Motor
Attach the 1-to-4 split cable.


Mounting Displaying and Controlls
Remove Brake cables, if you are not sure how, just google it, pretty straightforward even for someone never done it before (me).
Remove handle grips (slide a screwdriver under and apply some WD40 then twist it, wash with soap after), brakes, gear shifters.

You can now install the screen, throttle and the brakes that come with the kit (they have brake sensors built-in to them to stop the motors when you brake). When connecting the controls, line up the arrows/notch, do not force it or you could mess up the tiny pins inside. Route the cables around the frame as you see fit, and secure with zip ties.
If you have V-brake like me, this video helped me setting up the brakes again:

Installing gear sensor

I just followed this video to install my gear sensor:

After you are done, make sure it’s shifting correctly. It’s smooth sailing from here.
Mounting battery holder
I will be mounting the battery holder on the downtube.
The downtube screw holes on my frame are very low, so before the motor kit arrived and checking the images of the battery mount, I thought I needed an extension board. It turns out the battery holder has extra screw holes on the bottom part which would have totally worked without the extension board. Well I spent £20 on the extension board, I might as well just use it, this way I can use 4 bolts instead of just 2 to secure the battery holder, maybe that’s a good thing after all.
If you need a battery mount extension board, get it here:
- Amazon: https://amzn.to/3vY1NLk
- AliExpress: https://s.click.aliexpress.com/e/_Dl6pDWR

Finished – cable management
I took some close up photos of my DIY electric bike on my first ride. Took some time to make the wiring look nice and tidy, but it was worth it!

- Amazon: https://amzn.to/3vTV7ht
- AliExpress: https://s.click.aliexpress.com/e/_Dd7Ty8R


Programming Dafang Motor
There are many motor parameters you can set in the computer program, which are not shown in the display menu settings. You don’t have to program your motor, but it might improve performance.
Disclaimer: you can damage your motor or cause unintended behaviour if you program it incorrectly, do this at your own risk.
To program your Bafang motor, you will need to purchaser the programming cable:
- Amazon: https://amzn.to/3X2XZEI
- AliExpress: https://s.click.aliexpress.com/e/_DBJZdZd
The programming software only works with Windows. And it would be easier with a laptop so you can bring it closer to the bike.
Download software here (this is a 3rd party software, I have not checked for virus or bugs, download/use at your own risk): https://penoff.me/2016/01/13/e-bike-conversion-software/
Unplug the display, connect the programming cable to the display cable (green) from the motor.
You need to connect the motor to the battery (and turn it on) otherwise your computer won’t see the motor. When the battery is connected to the motor, the LED on the programming cable should light up (even before plugging it into the computer).
However I have trouble getting it to work, the computer sees the USB cable as it appears on the COM port, I also had the driver installed properly, but upon pressing the “connect” button in the software, it gives me “Serial Error” pop up, and it never connects.
Luckily there’s an Android app available that does the exact same thing! It’s called “Speeed – Bafang BBS01/02 BBSHD“: https://play.google.com/store/apps/details?id=com.mkopa.speeed. All the settings are there. Of course, you will need an Android phone, and an OTG adapter to connect the programming cable to your phone.
On each tab, you have to press “Read” first, let it populate all the settings before making any changes.

This post explains what each setting mean, and what you should set them to (that are different from defaults): https://edrivenet.com/bafang-programming/
Performance
I will update some more results and videos when I have a chance, I need to spend a bit more time testing it :) But the first few rides have been a blast! Riding a bicycle has never been more fun and effortless :) She handles 40-degree uphill like a champ! Top speed is about 50Km/h :)
1 comment
where can i order