In this tutorial, we will guide you through the process of flashing ExpressLRS firmware to ImmersionRC Ghost Atto Receiver using the STlink V2 Tool. This method also applies to other receivers, like Jumper or Frsky R9. We will break down the process into easy-to-follow steps.
Warning: as far as I know, there’s no going back. Once you flash ExpressLRS there’s no easy way to flash Ghost firmware.
There’s absolutely no need to buy the Ghost Atto receiver to use ExpressLRS, there are a lot of cheaper alternative that are designed for ExpressLRS. I’m flashing my Ghost Atto receiver because I no longer use Ghost and don’t want them to be sitting around.
Table of Contents
Purchasing a STLink Tool
You will need a STM32 STLink Tool that allows you to upload firmware file directly to the processor via the STM32 ST-Link Utility program.
Buy the ST-Link V2 Tool here:
- Amazon: https://amzn.to/3XpI3f4
- AliExpress: https://s.click.aliexpress.com/e/_DCalVOh
Preparing the Receiver
If your receiver is connected to a flight controller, remove it from the drone so you can easily access the four small solder pads as labelled in the above image.
Identify the pinout on the receiver for 3.3V, ground (GND), I/O (DIO), and Clock (CLK). Do not power the receiver from both 5V and 3.3V at the same time, pick one. Connect the receiver to the STlink V2 Tool:
- 3.3V to 3.3V
- GND to GND
- SWCLK to CLK
- SWDIO to DIO
Removing Protection
Download and install the STM32 ST-Link Utility: https://www.st.com/en/development-tools/stsw-link004.html
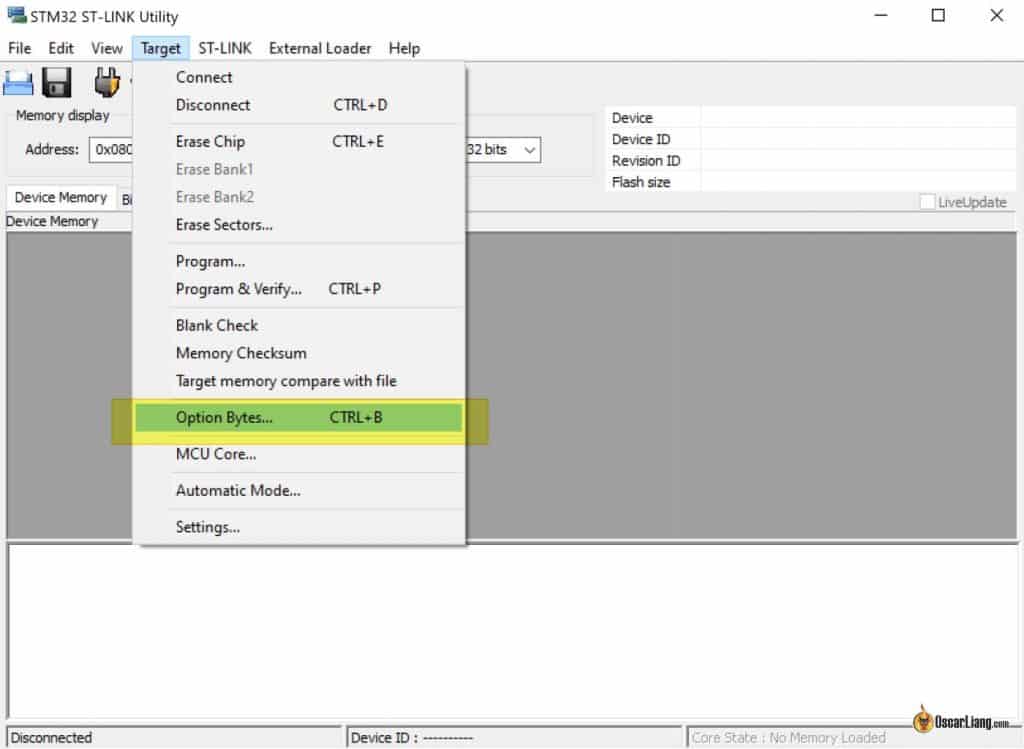
Connect the receiver to the STLink tool, and plug it into your computer and launch the STM32 Link Utility. Go to Target > Option Bytes.
Remove the read protection by switching “Read out Protection” to level 0.
Then click “Unselect all” under Flash sectors protection, and click ‘Apply’ to save the changes.
After getting the “Option bytes udated successfully” message, you can now close the STM32 ST-LINK Utility program.
Flashing ExpressLRS
Download and install the ExpressLRS Configurator: https://oscarliang.com/setup-expresslrs-2-4ghz/#Download-ExpressLRS-Configurator
Open the configurator and select the appropriate branch and target for your receiver, in this case, ImmersionRC Ghost and GHOST ATTO 2400 RX. Under Flashing method, select STLink.
Configure your binding phrase, connection options, and telemetry settings as desired. This section explains what the settings mean: https://oscarliang.com/setup-expresslrs-2-4ghz/#Compile-and-Flash-TX-Firmware
Click ‘Build and Flash’ to start the flashing process.
Wait for the process to complete, during flashing, the status LED on the ST-Link programmer should blink rapidly. This should only take less than a minute to complete.
Testing and Final Steps
Connect the receiver to your flight controller and ensure it works properly in Betaflight: https://oscarliang.com/setup-expresslrs-2-4ghz/#Connect-ELRS-Receiver-to-FC
From now on, you should be able to flash ExpressLRS to the receiver via Betaflight Pass-through as documented here: https://oscarliang.com/setup-expresslrs-2-4ghz/#Flash-RX-Firmware-via-Betaflight-Passthrough
That’s it.


9 comments
Oscar thank you for posting and sharing this excellent tutorial. I was able to successfully flash ELRS onto my Ghost Atto RX and was able to bind as well. My question is:
Normally when binding the Atto to it’s Ghost TX, the binding light is green. After i was able to bind with my Radiomaster Ranger Micro TX, the light in the Atto turns Blue. I also noticed if i changed the packet rate to different Hz’s, the colors in the RX also changed.
Would you be able to let me know what those settings should be? Like Packet Rate, Telem Ratio, Switch Mode ?
Thanks in advance
Here’s my recommended settings: https://oscarliang.com/setup-expresslrs-2-4ghz/#Best-Settings
Hi Oscar,
I did follow the steps, ST link utility ok, protection level 0 removed.
Then with the ELRS configurator v1.6, I have a fail message saying ST link is not connected.
Do you have an idea ?
regards
Hello Oscar,
thank you very much for your great work. I Love your homepage and learned a lot from here.
Do you know if its possible to flash a rxsr as well with elrs firmware?
Haven´t found somethin on the web. Should I trie it or is the hardware not compatible?
No, unfortunately it’s not compatible.
Thank you very much
I would like to know if this can be done on zepto and the builtin rx on new beebrain v4.
Hi Oscar, thank you for such a tutorial, anyway in the picture shown, is it okay if we power up the receiver without any antennae attached? (it may overheat the chip and burn) CMIIW..
Thank you
They do have telemetry (transmitter), so yea it’s best to have antenna attached. This is a bad example i guess.