Soldering is an essential skill for any FPV drone builder, but it can be intimidating for beginners. In this guide, we’ll cover everything you need to know to get started with soldering and create strong, reliable connections for your drone.

New to FPV and still wondering what tools you might need to build and repair FPV drones? See this post for the list of essential tools you will need.
Table of Contents
What’s Soldering?
Soldering is a fundamental skill in the world of FPV drone building and repair. It involves using molten solder to join two metal components together. While it may seem simple, it requires plenty of practice to master. Before diving into the soldering process, it’s important to keep a few things in mind.
- Steady hands (and patience) are crucial – so try to limit your caffeine intake :)
- It’s essential to use a good quality solder iron with an interchangeable tip to ensure a smooth and precise soldering experience.
- Patience and decisiveness are key – the best solder joints are done quickly but without rushing.
- Finally, always be careful not to burn yourself in the process!
Soldering Tools
Having high-quality equipment is just as important as having good soldering skills. This post provides recommendations for soldering equipment including soldering iron, solder, and other tools: https://oscarliang.com/soldering-iron-buyers-guide/.

Practice Makes Perfect
If you’re just learning how to solder, it’s best to start with a cheap solder practice board rather than an expensive piece of electronics. These practice boards feature the same type of pads found on flight controllers and ESCs, making them perfect for the FPV hobbyist.
Get some soldering practice board:
- AliExpress: https://s.click.aliexpress.com/e/_DcHrTPp
- Amazon: https://amzn.to/4cwoPwm
- GetFPV: https://oscarliang.com/product-f8jx
- RDQ: https://oscarliang.com/product-thnx
Preparation Before Soldering
Solder can spit when heated, sending tiny molten balls of solder flying in random direction. These droplets can cause shorts between electrical contacts or components when you power the device. So it’s a good idea to cover up areas on your flight controller where you are not soldering with some masking tape, electrical tape or Kapton tape.

Next, make sure your soldering iron is heated to the correct temperature. For smaller joints, you should heat the iron to around 390°C, and for larger joints, around 450°C. Cheaper irons usually can’t supply enough heat, so it’s important to make sure your iron can reach the necessary temperature.
Dull grey and brown residue can build up on the tip of your soldering iron, which affects its ability to transfer heat to your work. To clean the tip, simply wipe it with a wet sponge or brass wool, then add a bit of solder to the tip. This will help improve heat transfer to the solder joint.

A pro tip to extend the life of your soldering iron tip is to add a decent amount of solder to the tip before turning the iron off. This adds a protective layer and will help prevent oxidation.
Hold the PCB or component in place securely with a soldering helping hand. Blu-tack is useful and quick for fixing wires and PCB in place on your desk too.

Tinning Contacts
Always “tin” the solder pads and wires first before attempting to solder them together, this will make joining them much easier later on.
Tinning basically means covering the wires and solder pads with an appropriate amount of solder prior to joining. Tinning allows you to solder more quickly as you have already saturated your pad and wire with solder.
For solder pads, apply some solder to the iron and touch it to the pad. Be sure not to use too much solder, as this can cause the solder to flow over the edge of the pad and make a mess. If you are not using solder with rosin core, or if the solder isn’t sticking to the pad, then you might want to apply some solder flux to the pad first.
For wires, strip it to expose just long enough metal wires for the solder pads, then twist it and tin it. When heating up the wire, be sure to use the soldering iron to apply heat to the wire, not the solder itself. When the wire is hot enough, the solder will melt and bond with the wire. Again, if the solder isn’t sticking to the wire, apply some solder flux to the wire before soldering.

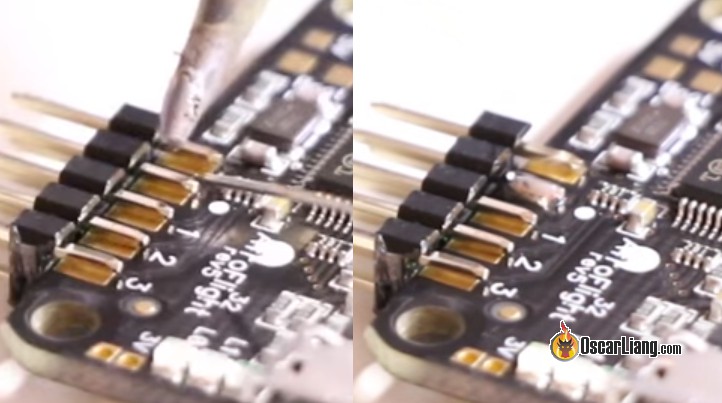
Before tinning, After tinning
Soldering Small Wire to Pad
The most common soldering job is soldering a wire to a pad on a flight controller.
To get started, make sure your wire and pad have been tinned and that your soldering iron is up to temperature. Then, melt the solder blob on the pad by bringing the soldering iron to it and place the wire onto the pad. Be sure to avoid pushing on the wire with the soldering iron, as this can cause the wire strands to fray.
Once the wire and pad are joined under a smooth dome of solder, gently remove your soldering iron and hold the wire in place for a few seconds until the solder joint cools and solidifies completely. Remember to avoid moving the parts while the soldering joint is still cooling down, as this can cause fractures in the joint that may fail more easily due to vibrations and crashes.

Pro Tip: Don’t be afraid to use a bit more solder. When you don’t use enough, the joint can easily come off. If a solder joint doesn’t have enough solder, it will look bumpy, and the strands of wire will be visible. By using more solder, you can ensure a stronger and more secure connection.
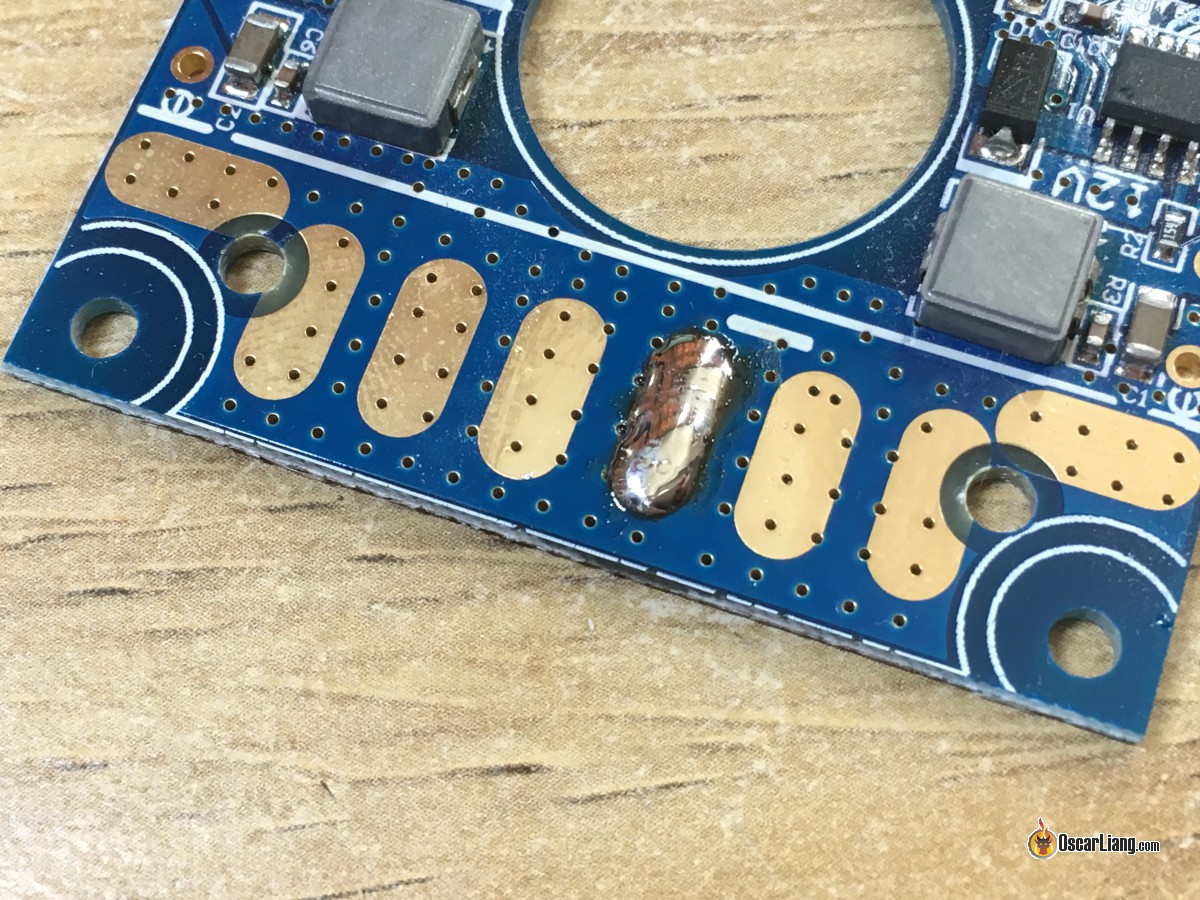
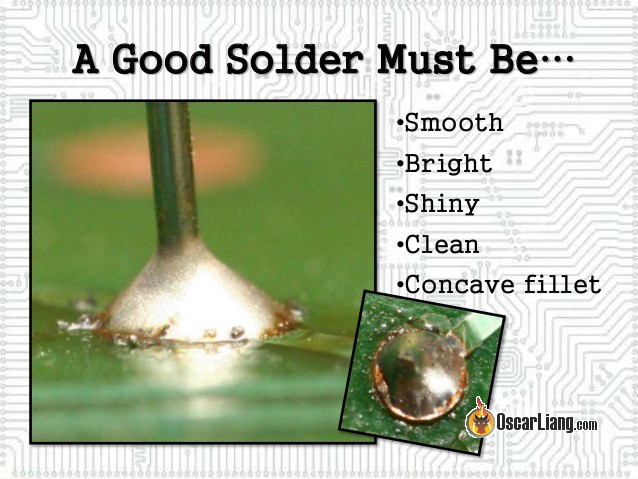
The finished joints should look round, shiny, solid, and completely covered by solder. Here is an example of how a properly soldered joint should look like.

Soldering Large Wire to Pad
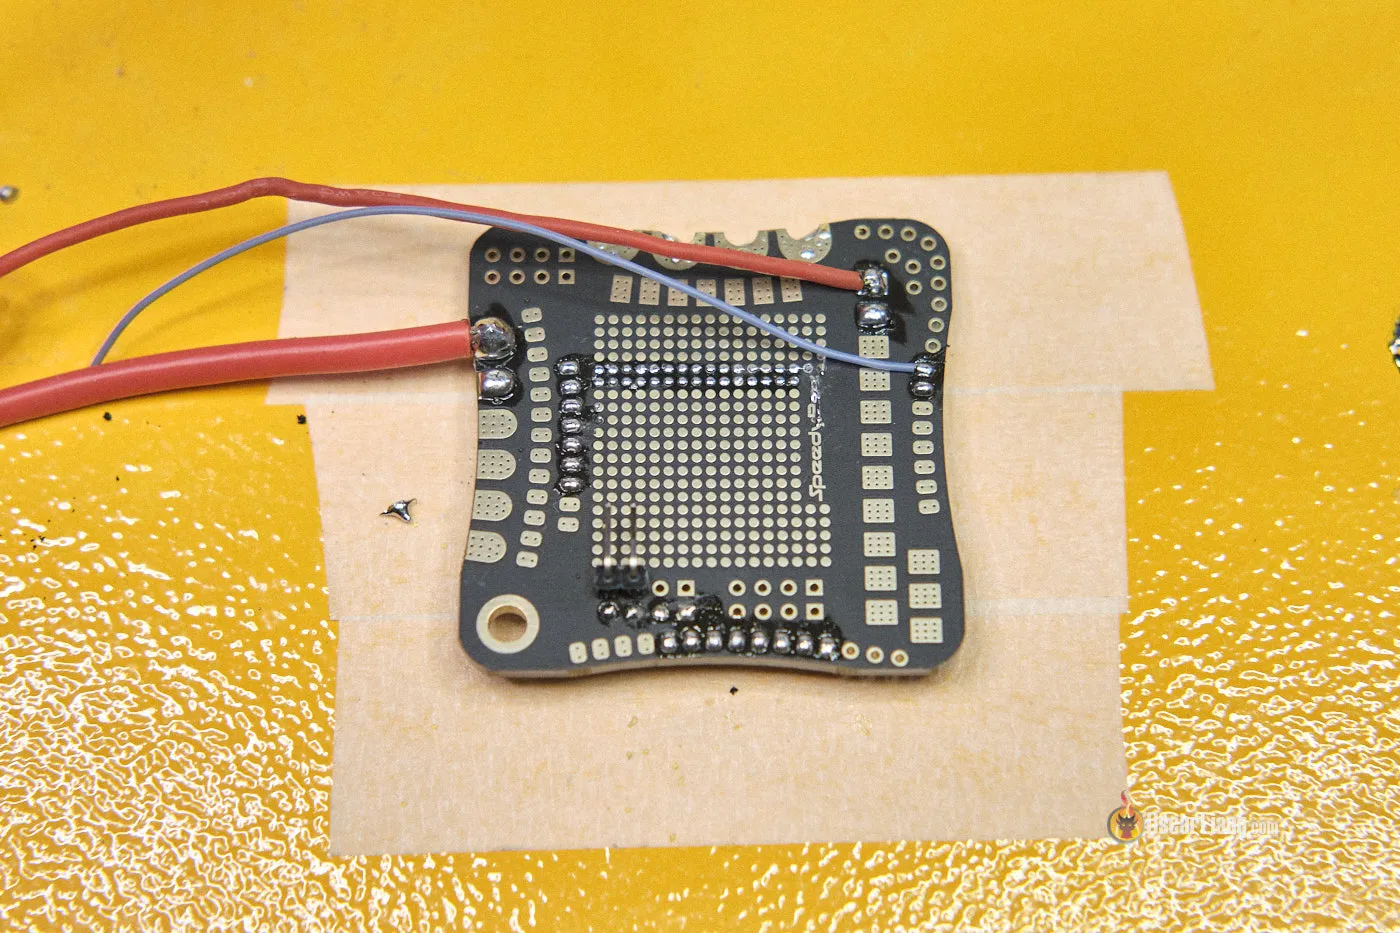
When soldering large wires, such as an XT60 pigtail to the ESC, it’s important to adjust your soldering iron’s temperature accordingly and use a larger soldering tip. This ensures that the thicker wire is heated adequately.
When tinning the larger wires and pads, use as much solder as the pad can take (see example below), but not too much to cause solder bridge.

Applying a decent amount of solder flux on the pad before joining the wire is also recommended.

It’s going to take longer to melt the solder on the battery lead solder joints, because of the bigger chunk of metal. Be careful not to press too hard with the soldering iron when melting the solder on the large wire, as this can unravel the wire strands.
A successful solder joint for larger wires should be round, shiny, and completely cover the wire strands.

Header Pin to Through-Hole
When soldering header pins to through-holes, don’t pre-tin the contacts or you won’t be able to get the header pin through the hole.
- Insert the header pin through the hole, hold it at the desired angle with your fingers or blu-tack
- Heat up both the header pin and the ring on the through hole for a couple of seconds
- Bring the solder to the joint and it should make a solid, shiny, “volcano” like bond
Here is how you can remove header pins from through holes.

Wire to Through-Hole
There are two ways to approach this, you can either treat the through-hole like a solder pad (rest the wire on top of the hole and solder from the top), or do it like soldering a header pin (push the wire through the hole, then solder from the bottom). It depends on which side of the board you can access more easily.
Here is how to solder a wire directly on top of a through-hole:

Here is how to insert a wire through the hole, and solder from the bottom just like a header pin.

Joining Two Wires
When it comes to joining two wires, having “helping hands” or blu-tack putty is extremely helpful. If you plan to use heatshrink, remember to slide the heatshrink tubing onto the wires before soldering.
For small wires and quick jobs, you can solder one wire directly next to the other. It’s also helpful to twist them together before soldering to increase the mechanical strength of the joint.

When joining two larger gauge multi-strand wires together, spread the strands and push the two wires together head to head, then twist them together to prevent them from coming apart. Apply some solder flux and solder the wires together.
This method maximizes the contact area of the metals, resulting in a smaller, stronger solder joint. Either way, as long as the joint is solid, it will work just fine.

Header Pin on a Pad
You don’t tin the header pin nor the solder pad in this job.
- Bring the header pin to the pad and hold it there with a Third Hand or blue tack
- Heat up both the pin and pad for a couple of seconds, and bring solder to the joint
- Remove solder iron and let it cool down
When soldering multiple header pins, make sure the first pin is straight. The whole job will be easier when it is secured firmly in the right place by the first pin.
XT60 Connector
- Secure the XT60 connector in a helping hand or bench clamp to keep it stable during the soldering process.
- Use a small amount of solder to very lightly tin the inside of the XT60 connector. Too much solder can make it difficult to insert the wire into the holes.
- Tin the electrical wire by heating it up with the soldering iron and applying solder until it is evenly coated.
- Insert the tinned wire into the hole on the XT60 connector and heat up both the wire and the connector with the soldering iron.
- Bring solder to the joint and allow it to flow onto the wire until it is fully covered and buried in solder. Be careful not to apply too much solder, as this can cause unwanted bridges between the connections.
- Once the joint is complete, remove the soldering iron and allow the joint to cool for at least 10 seconds before handling it.


Pro Tip: Before soldering, plug the female XT60 into a male connector, this can prevent the plastic from deforming with the heat.

Cleaning Solder Joints
After soldering, you might find residue around solder joints which is burnt flux, or just leftover flux. Some fluxes are more conductive than others depending on the type, so it’s best to clean them off. Leaving a little bit of flux residue is usually ok, but having a large amount can cause a short circuit especially at higher voltage e.g. between the XT60 positive and negative pads.
You can use a cotton swab dipped in isopropyl alcohol to wipe the residue and flux off. You can also use an old toothbrush instead with alcohol, but make sure it’s a soft-bristled brush to avoid scratching the components too hard.

Common Soldering Mistakes and How to Fix Them
Soldering is an essential skill for building and repairing FPV drones, but even the most experienced hobbyists can make mistakes. In this section, we’ll look at some common soldering mistakes and how to fix them.
Overheating
It’s crucial to avoid overheating small solder pads when soldering. Leaving the iron on the pad for too long can cause the copper layer to detach from the fiberglass circuit board, leading to expensive repairs or even scrapping the entire component.
Cold Joint
If the solder didn’t fully melt, or if you use insufficient solder. A cold solder joint looks grainy and dull, it’s considered a bad contact between the components and is often unreliable. The fix is to reheat the joint and apply more solder until it becomes shiny.
Another issue that can arise is when the solder sticks to the iron as you remove it from the joint. This is a sign that the flux has burned out, and it’s time to add some more solder flux or use fresh solder.

Solder Bridges
Solder bridge occurs when two adjacent solder pads are accidentally bridged with solder, creating a short circuit. The solution is to remove the excess solder using a desoldering tool or a solder wick.
Not Cleaning the Tip
A dirty or oxidized tip can prevent proper heat transfer and result in cold solder joints. Regular cleaning with a damp sponge or brass wool can solve this problem.
Soldering Temperature
Leaving the iron on the soldering pad for too long can cause overheating, leading to component damage or the copper pad falling off (possible fix). Therefore, it’s important to get your iron in and out quickly.
To achieve this, it’s advisable to use a slightly higher temperature that melts the solder more quickly. But be careful not to use too high a temperature, as this can also cause damage.
It’s important to note that using low heat can actually increase the risk of overheating, as it takes longer to melt the solder, which means keeping the iron on the pad for longer.
As a guideline for temperature, I prefer to use the following temperatures when using good quality 63/37 solder:
- 300C° (580°F) for extremely delicate jobs
- 390C° (734°F) for soldering signal wires on a flight controller or ESCs
- 450C° (842°F) for large connectors, ESC power, and XT60 pigtail
If you’re having difficulty soldering large connectors or wires, don’t blindly increase the temperature. First, check the quality and type of solder you’re using (my recommendations), try a bigger tip that can transfer heat more efficiently, and apply flux to the joint before soldering.
Temperature vs. Power
Higher temperatures and a larger tip can help transfer heat faster. Additionally, using a higher power iron can help heat up your work faster and prevent the temperature from dropping too much when you apply the iron to the joint.
It’s important to keep in mind that when the iron comes in contact with the joint, the temperature will start to drop as heat is dissipated through the metal. This can be especially challenging when soldering larger components or thicker wires, as they act as heat sinks and can quickly cool down the joint. That’s where a larger tip comes in handy – it holds more heat and can melt larger areas of solder faster than a smaller tip.
Useful Resources
- How NOT to solder by IntoFPV – http://intofpv.com/t-how-not-to-solder
- General soldering by Adafuit – https://learn.adafruit.com/adafruit-guide-excellent-soldering
Edit History
- Sep 2017 – Tutorial created
- Dec 2018 – Added more pro tips and uploaded more example images
- Mar 2019 – Added “cleaning up solder joints”, and some more tools
- Dec 2019 – Updated
- Mar 2023 – Tutorial revised
14 comments
Castellated pads (half moon ones)… could you add some more info about that?
I see more and more of them, i guess it saves weight and is as effective if soldered on properly
Can you help me out please! No matter what I do I cannot get the wire and pad to stick together! I put a bit of solder on the pad, it sticks. Then I have solder on the wire too, that’s also fine. When I put the wire tip on top of the pad and melt the two together to bond, the solder on thr pad comes off and makes a lump on the wire tip and it won’t stick again to the pad! I have tried numerous times. I have tried applying flux, to no avail. The solder I use is most likely very low quality as it came with the soldering kit from Amazon, but even if the solder isn’t good quality should it still not stick at least a bit? This is seriously disheartening.
Does the wire stay on the pad if you hold it until the joint completely cools down? It should only take a second or two for the molten solder on the pad to solidify, and that should hold the wire on the pad.
And like you said it could be the low quality solder, you could try to get the recommended solder on this page.
The soldering guide is really very helpful. All points are very well explained. Thanks for sharing the blog.
Hello Oscar – can I ask you to say a word or two about De-Soldering? And perhaps suggest some sort of exercie one can do to practice before committing to actual components.
Thanks for all your work getting me and others like me airborne.
Thanks for the feedback, yes i will add some instructions on how to use the solder wick and solder sucker :)
Hi Oscar,
I really enjoy reading your how-to articles and how-not to as well.I ruined 2 xm+ receivers because my hands shake really badly from a medical condition i have so i purchased a Diatone Soldering Practice Board and i’m trying to learn this way but still i have along way to go.Thanks for the help Oscar!
Harry L.
Is ESD/EOS a thing to consider when soldering drones?
Hola Oscar.
Glad you are back.
When soldering XT60, a good practice is to insert the other connector in the one you are soldering. That will secure the metal sockets inside the connector, in order for them not to move when applying too much heat.
That’s a good tip :)
You should really have a wattage along with those temperatures. Low effect (35W-50W) soldering irons might need it as high as you’re setting it, but if you have a high wattage iron (65W+), you shouldn’t really need to go that high with leaded solder.
The higher the temperature, the quicker your tips will oxidise, which makes it harder to get good contact with the solder, which means you have to use a higher temperature, which will oxidise them further, which makes it harder… And so on.
Interesting video before the weekend published by Joshua Bardwell saying that the reccomendation should be 63/37 not 60/40
The reason given is that it has a much shorter transitional time between liquid and solid which prevents dry joints.
I personally don’t find them that much a difference for the little soldering I do :)
Just use whatever works for you.