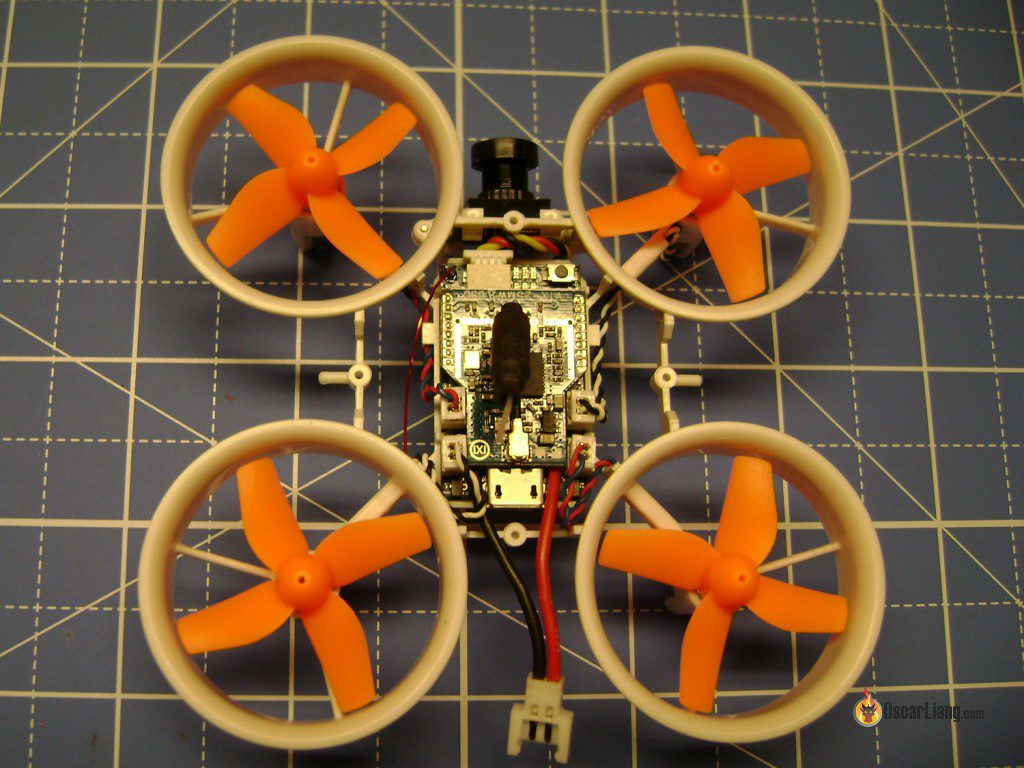
This review is of another entry into the tiny whoop category of quadcopters. An increasingly popular category because they are inexpensive, easy and just fun to fly. This entry from Oversky, like most in this class, is primarily an indoor flyer being too light to fly in much of a breeze.
This review is written by Sirdude of IntoFPV. The quadcopter is provided by Gearbest for this review. You can get the Warlark80 from here.
UNPACKING
The Warlark arrived in a fairly stout cardboard box with a piece of foam cut so the quad fit into it and the various accessories that were shipped with it. There were no instructions or documentations of any kind. There is a manual online and can be found by going to the OverSky site and I have included it as a part of this review.
It came with four extra props, a charging cable and one 300mAh battery.
SPECIFICATIONS
- WarLark 80 Micro Quad
- Wheelbase: 80mm
- Weight: 36.6g (with battery but without canopy), 38g (with battery and canopy I personally did most of my flying without the canopy as that extra 2g makes a big difference in flight performance and flight time
- Flight controller: Scisky Micro F3 Brushed FC+ receiver +VTX 25MW +Camera
- Firmware version: Cleanflight 1.3.0
- Motor: 0716 Brushed Motor
- Prop Size: 35mm 4-blade prop
- Battery: 250mAh~300mAh 3.7V (mine was supplied with a 300mAh 3.7v 35C battery)
- Receiver: Built-in Frsky compatible 8ch SBUS receiver/ Flysky receiver/ DSMX/DSM2 receiver/Futaba SFHSS
- OSD: VTX comes with an OSD
- Camera: 600TVL HD CMOS 1/4 inch Camera
- AV Wireless Transmitter: 5.8g 25mw 40CH
- Flight time: 5 minutes (the best I could do was about two minutes, thirty seconds – without the canopy)
GENERAL IMPRESSIONS
Overall this is a very good little flyer. Control for the most part, is very precise. The F3 flight controller is a full function unit with the ability to change configuration settings either through Cleanflight, or on your FPV monitor (or goggles) using your transmitter. The VTX frequencies are charged in the same way and it is the only way (there are no dip switches on the VTX).
Table of Contents
Frame
The frame is very durable, well made and designed with one major exception. The USB port is positioned very close to and right behind one of the frame members. This prevents a USB plug from lining up with it sufficiently to plug in. The only way I was able to get mine to plug in was to actually flex the frame a bit. That worked, but when you let the frame relax, it places upward tension on the plug which is transferred to the port on the board. In retrospect I should have shaved a little of the housing of the plug I was using. The frame member cannot be moved down as it would interfere with the placement of the battery.
Flight Controller
The controller is a Scisky Micro F3 Brushed FC. It is fully configurable and as such is capable of configuration for acro flight. However, acro style flying is limited to a large degree by lack of motor torque. Additionally attempts at acro flying will noticeable shorten your flight time.
Motors
This machine comes with 0716 Brushed Motors installed. So far they have been reliable and are adequate for the job. These motors plug into the FC so you don’t have to solder them. I have not (yet) seen replacement motors so I can only assume they are shipped with connectors already soldered to the wires.
FPV Equipment
This camera is somewhat proprietary in nature. The camera PCB is constructed with small “ears” on each corner so that it will fit into the mounting system (which is adjustable). The bottom two ears fit into slots in a piece that screws to the bottom of the two front ducts. By loosening these two screws the holder can be moved down and the camera rotated to any of five positions for optimum viewing angle.
Aside from having a proprietary mounting system, the camera has a very difficult time adjusting to changing lighting conditions. Additionally, the camera is blinded to a great extent by bright lights….even just light coming through the windows can make it almost impossible to see where you’re going in some instances. As the lighting conditions dim the camera switches to B/W, which is most of the time indoors.
This Unit is equipped with a fully functional OSD system. Unfortunately, mine stopped working early on. The machine took some pretty hard licks, so it well may have been my fault.
Additionally, you can address all your PID’s using your transmitter and adjust them on screen (if you had a working OSD).
VTX channels are changed via your transmitter (and it is the only way to change them), There are six LED’s on the FC. You press the bind button one time to see which frequency you’re currently on (indicated by number and position of the six LED’s that are lit. You change the channel by pressing the bind button twice and then use your pitch stick to change channel. It actually works surprisingly well.
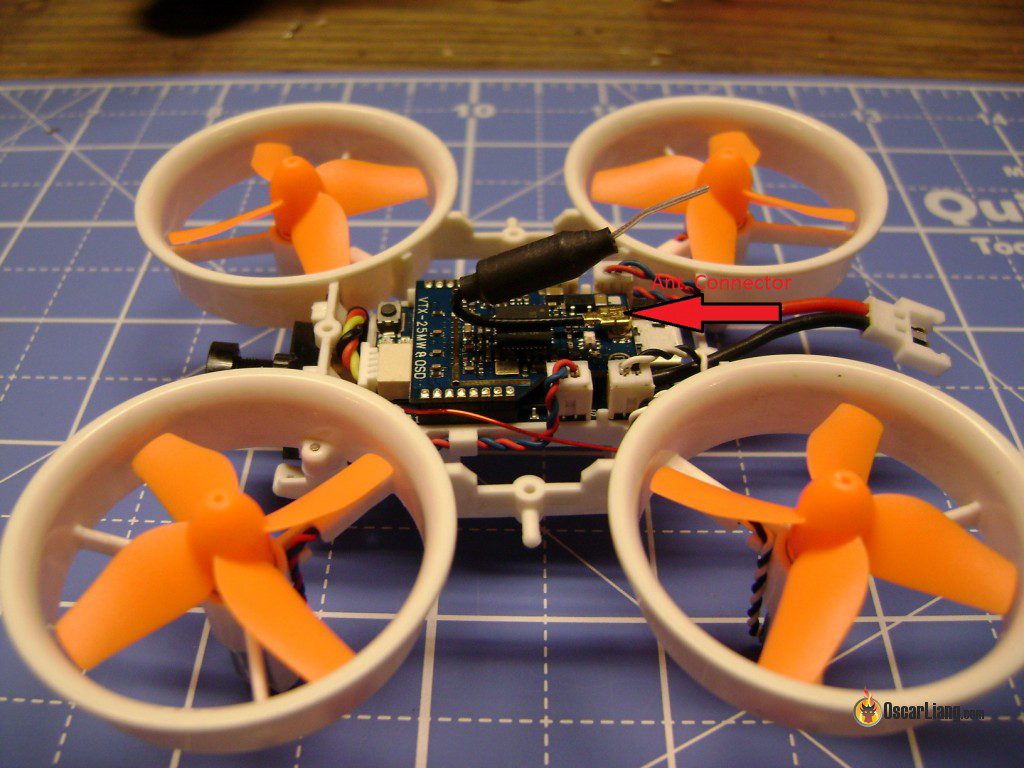
The VTX is a 25mW unit that pigg- backs on top of the FC. The VTX antenna is fastened to the board via a small connector instead of being soldered directly. This allows you to replace it with minimal difficulty.
Battery
Mine was supplied with a 1S 300mAh 35C battery. The battery comes down hot. Even during “mild” flying, the battery is very very warm. It also appears to be puffed slightly after each flight. Some of this may be “normal” just because of the high current drain from such a small battery.
I don’t know if the obviously high current drain will affect the service life of this battery (so far no problems after probably 8 or 10 flights), but I’ve got some more on order. The battery doesn’t really fit the holder very well. It’s too narrow. Perhaps that would allow more room for something with a slightly higher capacity, but again….extra weight would affect agility….. The battery is frequently ejected during hard landings.
Warlark 80 Outdoors flight – This flight was performed with a light breeze in the late afternoon. Temperature was about 70 degrees. As you will see, the OSD had already failed this point.
Conclusions
This is a very good little flyer. The frame is strong and it’s very stable and forgiving. However, it needs to be redesigned so that a USB connector can be plugged into the port without causing stress to the frame, the FC and/or the port itself.
It’s a shame the OSD went out so soon, but truth be known, you really don’t need an OSD for a small vehicle like this. That said, I was missing out on the convenience of adjusting PID’s on screen (it could still be done in Cleanflight through the USB port though).
The battery gets a little too hot for my liking and flight time is pretty short (approximately 2 and a half minutes). It literally drops out of the sky when the battery gets to 2.9 volts, but it jumps right back to about 3.2 volts as soon as it is no longer under load.
Furthermore, the camera and mounting system need to be changed. It’s really nice that it’s adjustable, but If it gets broken, I am not sure where one would find a replacement given the fact that the PDB needs to be shaped like it is so that it will fit into the current mount. Additionally, the camera does a really poor job of adjusting to changing lighting conditions.
Overall, even with all the little issues, this is a lot of fun to fly. However, given the issues with the camera, and the frame, I am not sure I could recommend this quad.


1 comment
Great review, I am am looking to replace my Inductrix, I will see what is the next review