Not everyone has the opportunity to fly during daylight, or perhaps you just want to explore the night sky with your FPV drone. In this article, I’ll share essential tips and tricks to ensure you fly safely at night and help you choose the best analog FPV camera for low light.


You can learn more about FPV cameras in this buyer’s guide: https://oscarliang.com/fpv-camera/
Table of Contents
The Best Low Light FPV Cameras

While there are many FPV camera options on the market, not all are suited for low-light conditions. Fortunately, each major FPV camera brand offers a camera specifically designed for these scenarios. I’ve conducted comprehensive testing on all of them to provide you with a detailed roundup!
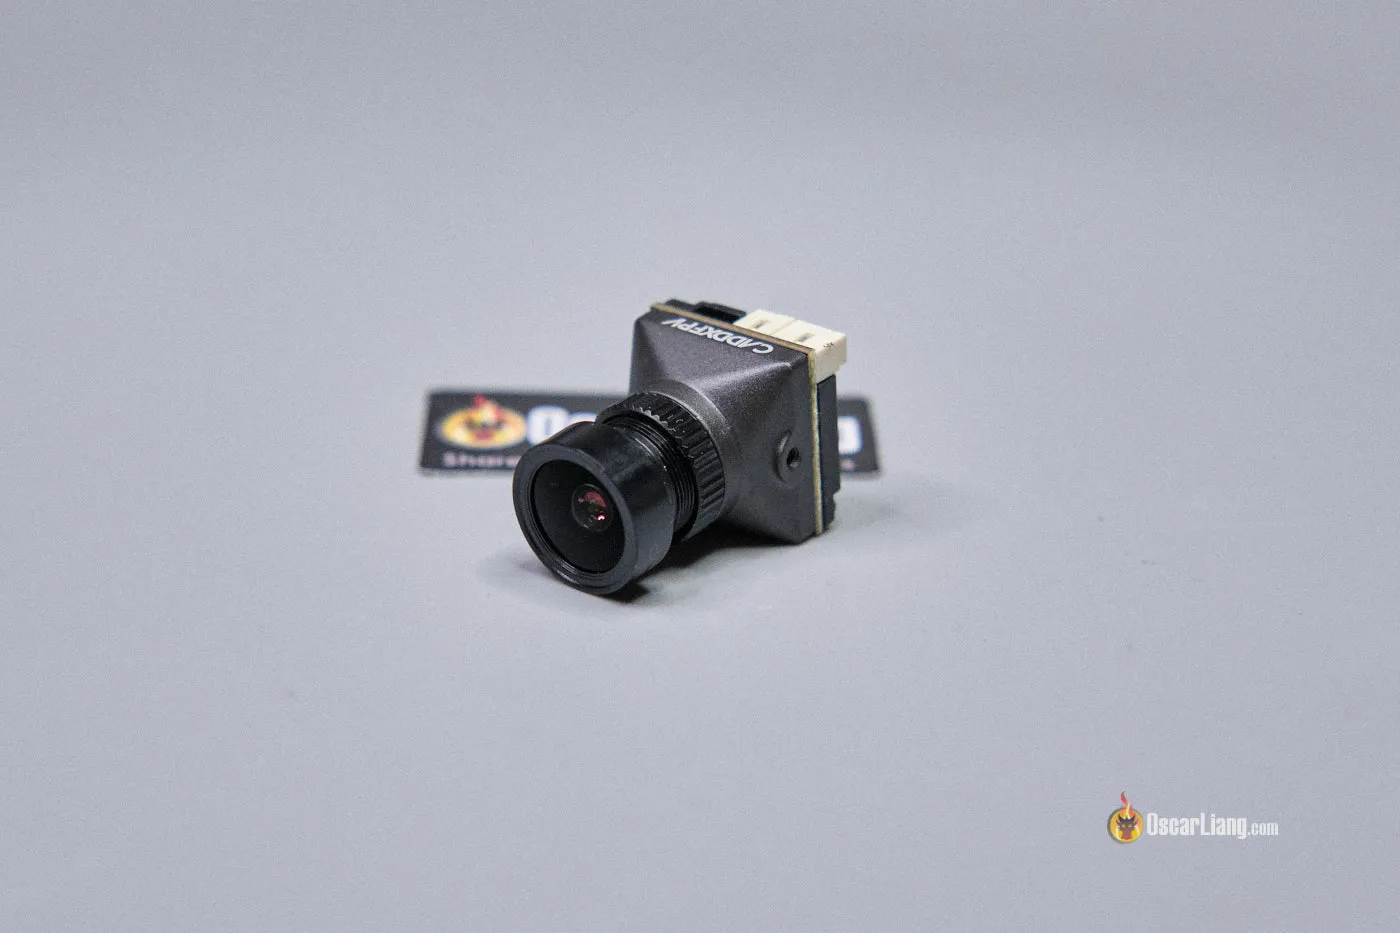
Caddx Ratel Pro
Get the Caddx Ratel Pro camera from these vendors:
- Caddx: https://oscarliang.com/product-b0o5
- AliExpress: https://s.click.aliexpress.com/e/_DDa4vCt
- Banggood: https://oscarliang.com/product-rmaq
- RDQ: https://oscarliang.com/product-v7m3
Foxeer CAT 3

Get the Foxeer CAT 3 from these vendors:
- AliExpress: https://s.click.aliexpress.com/e/_DBijUlB
- RDQ: https://oscarliang.com/product-qxsv
- GetFPV: https://oscarliang.com/product-7ezk
Runcam Night Eagle 3

Get the Runcam Night Eagle from these vendors:
- AliExpress: https://s.click.aliexpress.com/e/_DcftoLj
- GetFPV: https://oscarliang.com/product-iz6x
- Speedybee: https://oscarliang.com/product-ok0b
Day and Night Footage Comparison
Like many other reviews and tutorial, it takes time and money to do – making this comparison took a whole day and cost over $150 buying these cameras. I hope you enjoy this type of content and consider supporting me on Patreon.
In low light conditions, the Runcam Night Eagle 3 and Caddx Ratel Pro emerge as the clear winners! They both perform exceptionally well, even in near-total darkness. The presence of just a few streetlights significantly improves visibility. The Night Eagle is noticeably less noisy/grainy than the Ratel Pro, displaying its unmatched low light performance.
During the day, both the Caddx Ratel Pro and the Foxeer Cat 3 deliver outstanding images. The Ratel Pro’s image quality is more contrasty, sharper, and the colors are more vivid, but it just feels over sharpened and the digital noise can be distracting. The Cat 3 offers a softer and smoother image with a slightly lower saturation. In my initial review, I questioned the Ratel Pro’s small field of view (FOV) compared to typical FPV cameras. Now I begin to wonder if Caddx was just trying to align with their competitors’ low-light cameras, as I realized that all three cameras feature a similarly narrow FOV.
Overall, the Caddx Ratel Pro stands out as the best all-rounder, excelling in both daytime and nighttime conditions. While the Runcam Night Eagle 3 slightly surpasses it in low light performance, it’s a close call. However, since it only works in black and white, it’s not as well-suited for daytime flying.
How Well FPV Cameras Perform At Night?
Low light capable cameras excel at maximizing available light. Their performance in low light environment is measured by a parameter known as “LUX.” The lower the LUX value, the superior the camera’s night performance. Today, it’s possible to find FPV cameras boasting as low as 0.00001 LUX in black and white mode, ideal for night flying.
Here’s an example demonstrating the capabilities of these cameras at night. Below is how dark the playground appears to the naked eye or through a standard phone camera:

Low light environment captured from a phone camera
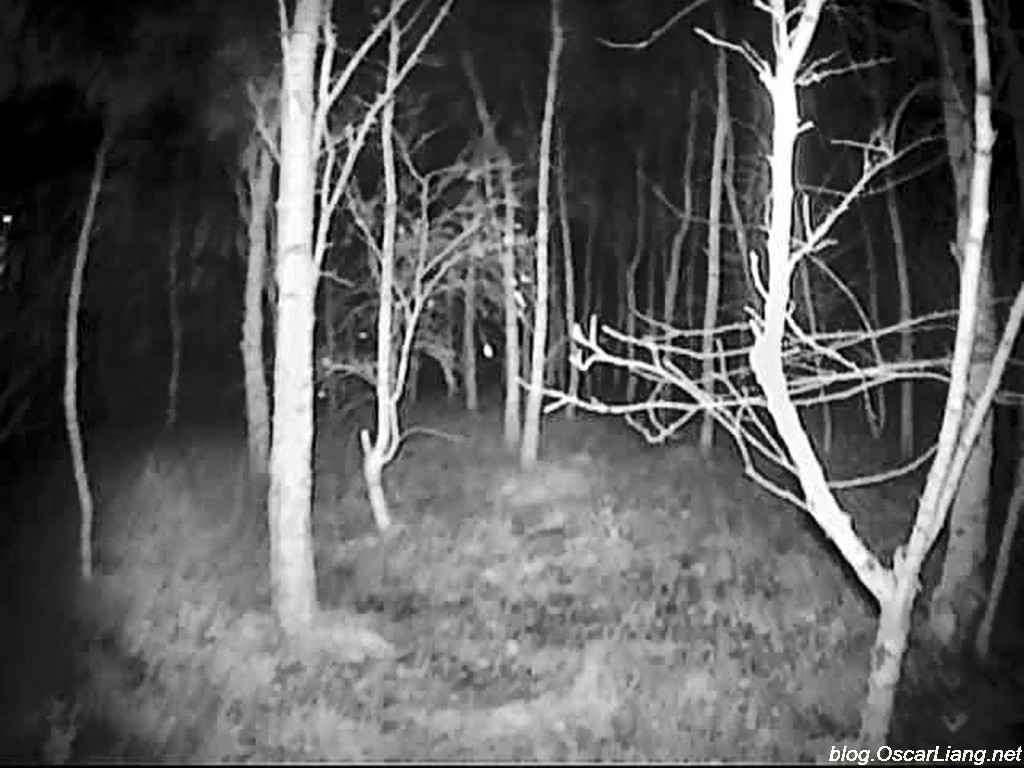
Contrastingly, here’s the same scene viewed through our low-light capable FPV cameras, significantly enhanced even without additional light sources:

Low light environment captured from a low-light capable FPV camera
However, without the benefit of a clear sky and a full moon, or the illumination from nearby street lights, your camera may still face challenges in providing a crisp image. That’s where a DIY IR torch would come in handy.
Building IR Torch
In extremely dark environments, the image quality of your FPV camera can significantly degrade, resulting in noisy and blurry footage that’s difficult to navigate with. However, there’s a practical solution to this problem.
One way to improve visibility without sacrificing the stealth aspect of night flying is by using IR (Infrared) LEDs . Unlike visible light, IR light is invisible to the human eye but can be detected only by digital cameras.
The most effective solution I’ve found involves using 48 IR LED boards, which cost around £6 (US$8). The only modification required was soldering a female balance plug connector to the LED board, enabling direct connection to a 3S battery, as they take 12V input. If you are using 4S or 6S LiPo, you might need an external voltage regulator to step down to 12V.
Get this IR LED board from:
- Amazon: https://amzn.to/49rzoP2
- AliExpress: https://s.click.aliexpress.com/e/_Dllw9rT

I simply mounted the LED board on a GoPro mount, placing it on top of the quad. This setup is particularly convenient because it allows for angle adjustments.
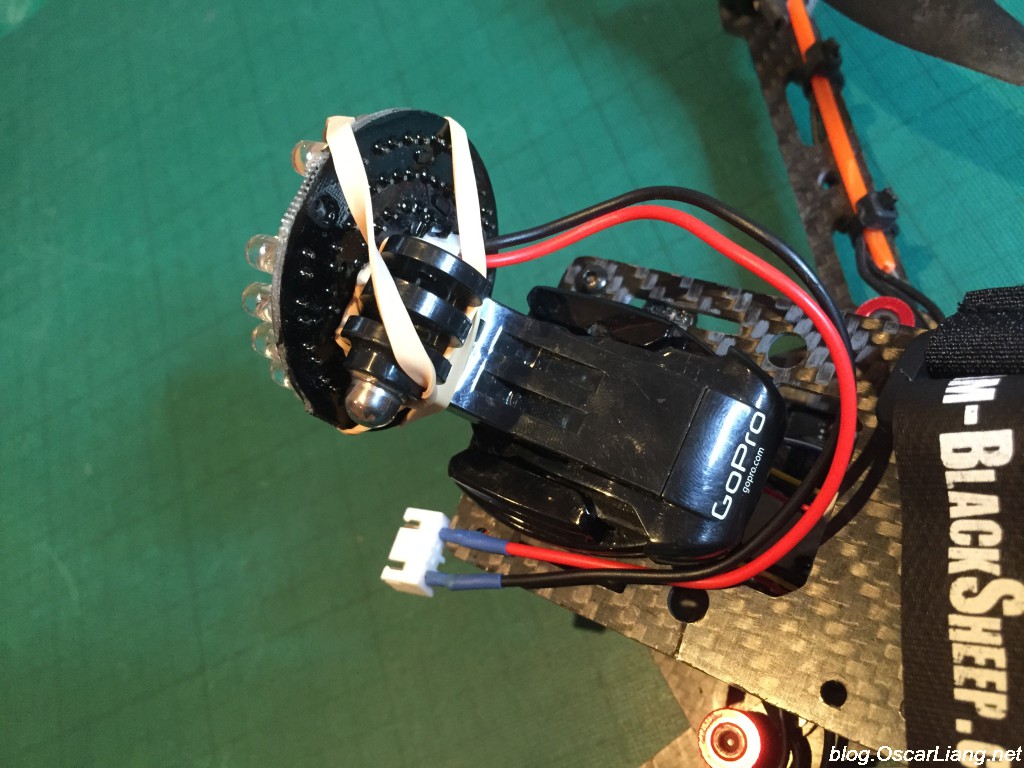
For those without a GoPro mount, consider the creative alternative shared by fellow pilot, Konrad Stepanajtys. He mounted the LED panel on a cardboard box, which then sits on top of the quad.

To prevent glare, ensure the LED is positioned away from the camera lens.

Unlike a ordinary torch, the IR LED doesn’t produce a glaring white spot but instead emits a soft, widespread glow, enhancing visibility without being obtrusive.

Tips for Using a DIY IR Torch:
- Your FPV camera must NOT have an IR filter in order to effectively see the IR light.
- Keep the IR LED at a distance from your camera lens to avoid reflective glare, which can reduce visibility.
- Verify the voltage requirements of your IR LED panel. My 12v panel connects directly to the quad’s 3S LiPo battery via the balance port. If using a 4S or 6S LiPo, a voltage regulator or BEC from the flight controller will be necessary to supply power appropriately.
Flying Tips for Low Light Conditions
Black and White Mode: On your FPV camera, adjust the Day/Night setting to auto or set it to black and white. This mode provides better visibility at night, reducing digital noise compared to color mode.
Slow Down: The reduced visibility inherent to night flying means you should fly slower to allow enough time for reacting to obstacles.
Maintain Line of Sight: In low light conditions, it’s challenging enough to navigate; you don’t want to compound that difficulty with signal issues by flying behind obstacles. Even with a clear camera feed, keeping your drone within visual line of sight ensures reliable video transmission and is a critical safety practice.
Get a Spotter: Flying with a spotter who can alert you to approaching people or animals you might not see in your goggles can improve safety.
Choose a good Location: Flying in areas with some light sources, such as near street lights, can significantly improve visibility at night.
Add a Self-powered Buzzer and Tracker: To prevent losing your drone, attaching a buzzer with an integrated battery is advisable: https://oscarliang.com/drone-buzzers-with-battery/. A tracker can also help locate your downed drone more easily.
GoPro Settings for Low Light: If you’re capturing your flight with a GoPro, consider my recommended settings for low-light conditions, available here: https://oscarliang.com/gopro-settings-fpv/#For-LowlightNight-Shooting
Camera Comparison in 2018
Back in 2018, I conducted a comparison of several low light FPV cameras, most of which have since been discontinued. However, they might still be available second-hand, so I’ve decided to leave the video here. The cameras were tested at night in two locations with different levels of brightness.
In this particular test, the Runcam Night Eagle emerged as the clear winner, though it’s worth noting it only works in black and white, making it less appealing for daytime use.
The Runcam Micro Eagle slightly outperformed the Runcam Owl 2 Pro, despite the latter being designed for low light conditions. However, the Owl did exhibit less digital noise in testing. Notably, the Eagle offered superior image quality during the day compared to the Owl, positioning it as a more versatile “All-Around” camera. Thus, the Micro Eagle ranks as my second choice.
The Foxeer Falkor stood out for its exceptional daytime image quality – arguably among the best. Yet, for low light or night flying, I found it unsuitable, primarily due to a bug in the “Auto Day/Night” mode that caused the screen to flicker at certain brightness levels due to constant switching between color and black & white. A helpful tip for reducing digital noise in low light is to adjust the DNR setting from 0 to 1; I observed no further improvements by increasing it beyond that.
Conclusion
Night flying with FPV drones offers an unmatched experience. With the right camera, careful planning, and adherence to safety and regulations, pilots can safely explore this challenging yet rewarding aspect of drone flying. As you venture into the night, remember that thorough preparation and selecting the right equipment are crucial.
Edit History
- Dec 2015: Article created.
- Dec 2017: Article updated with the latest FPV camera options.
- Nov 2018: Added night FPV camera comparison.
- Apr 2024: Article updated with the newest FPV camera options and comparisons.
17 comments
… I forgot to mention also, for the Runcam Night Eagle 3, that i did a quick test with a NIR source (a simple laser diode at 980 nm) : it works greatly !
Hi Oscar, as usual you did a great study on these current low light cameras ! I was using in a previous night vision monocular project a Runcam Night Eagle 2 Pro with a great success and pleasure.
Currently i currently work on an other NV monocular, but this time based on the Runcam Night Eagle 3, with a 35mm/0.95 lens. It works amazingly well and i can confirm your constatation about the NE3. The OSD is rich of various parameters which allow to easily enhance the low light capacity of this little camera. One improvement for a future coming low light FPV camera would be to allow to lower a bit the fps and unitary time exposure for increasing the light gathering capability of this camera (but probably not adequate for drone users requiring high reactivity and the lowest latency as possible, i admit…). Again thank you for your work !
I did something different I took a IR Flashlight took it apart and mounted the IR Flashlight bulb and lens on the bottom of my quad copter and took the 1850 battery and connector and switch to the side of my quad copter and it works great. I can see 60 feet ahead.
Bonjour, je trouve tout cela très instructif pour moi qui débute je souhaiterais monter un drone vision nocturne équipé de ce système de torche IR. Mais toutes ces caméras n’on pas l’air d’être compatible avec le air unit o3. Donc ma question est peut-être bête mais comment cela peut fonctionner ?
Hi Oscar, long time reader and pilot. Love the article. Would love to have a 2022 update on the best night time cameras!
Hi Oscar, excellent tutorial again, would that IR LED also work well with the Caddx Polar HD coupled with the DJI air unit. Thanks.
Im wondering the exact same thing!
Hi Oscar
Runcam Eagle 2 PRO is not good for Night Flying at all.
Since they reduce it’s “Min. Illumination” From [email protected] (Eagle 2)
to [email protected] (Eagle 2 Pro)
As an Eagle 2 owner, I am satisfied with its Night performance. I am getting a new Night Eagle 2 Pro. Your article really helps!
Hi Oscar, are you keen to review the last night fpv cameras?
The new one have a bit more sensitivity
We are currently reviewing the Night Eagle 2 :)
it should be the state of art in terms of night FPV camera.
Great review plus Tips Carlos !
Regarding the NUT, these are Bluetooth only (not GPS)?
I’ve read mixed reviews on the performance of these trackers (in general) – some work, some not at all .
Can I ask please, what mobile phone App you use to “track” the Tag?
Most of these nuts are based on bluetooth LE, which has poor range.
After trying a couple of those I found the KeyRinger, this system uses 2 identical tags which make a loud beeping pattern when triggered. Its twin hears the sound and starts making loud alarm beeps so you can localize it.
I’ve crashed my drones in nature a lot and have never lost any.
(I’m not flying long range though)
Hey everyone,
i’ve also been flying at night with IR LED and it’s great! even in pitch black i can see well enough to fly about 50% to 75% of my top speed. Hovering visibility is just fine and can see great out to about 30 feet / 10m. I use different IR LED’s that are from ebay. They are specified at 5 watts but i measured them at about 3 with my setup. I use 4 of the LED’s and angle them differently so all of my cameras FOV is illuminated. I pull about 20 watts or 1.7amps at 12V.
However: beware if the light from the leds gets straight into the lens, it will cause a drop in contrast and destroy your image. My setup did this and it showed a ring in the middle of my view.
Oscar,
All I can say is thank you for your blog and all the time you take to share your knowledge. I have only been flying for a little over a year and I find all your information just awesome. There are few places people can go to get the kind of information you share and nowhere can you find it all in one place, as you have done. I am overjoyed that I finally found your oscarliang.net site, it’s people like you that make this community so great.
Thank you for all your time and effort!!!
Hi Oscar ! As you said multirotor is very addictive , i make also night FPV and love it . So i suggest you to try an 4mm low illumination lens ( it is very very big but awesome) ! When you got a little bit of light its in color
Love your blog !
Will one of those 12V ring-stye IR led rings work properly if you just wired it into the 10V rail on your FC? That way, no extra battery, and you don’t need to worry if the led system is compatible with the voltage you are flying at.
Excellent article! Good to know about the Starlight cam, using IR light. This might be a direction I want to go soon.
Another alternative worth mentioning is the TrueRC.net light systems made by Hugo (Hugeone on RCGroups). He has been doing night flying for a couple years using super powerful LED lights, with elaborate liquid cooling systems, on model planes. And more recently he has released a miniquad LED system, which yeild about 2000 lumens and is very lightweight – I just installed one on my miniquad and will try it tonight. These systems enable use of conventional FPV CCD cameras