I recently got my hands on the BetaFPV Meteor75 Pro O4, and I’m excited to share my experience. This review covers how I installed the O4, set it up, and my flight experience.

Further Reading:
- What’s DJI O4 Air Unit? https://oscarliang.com/dji-o4-air-unit-lite/
- My Tiny Whoop Recommendations: https://oscarliang.com/best-tiny-whoop/
Table of Contents
Where to Buy
Get the Meteor75 Pro O4 whoop from:
- AliExpress: https://s.click.aliexpress.com/e/_oCD6EWm
- BetaFPV: https://oscarliang.com/product-kfb6
- GetFPV (PNP Only): https://oscarliang.com/product-ni9u
It comes in two versions:
- DJI O4 Version: Priced at around $199.99.
- PNP Version (Without DJI O4): Priced at $79.99, but you’ll need to buy your own DJI O4 Air Unit.
To be honest, if you don’t mind extra work assembling the drone, it might be worth getting the PNP version. The DJI O4 is only $109, which means you can save $11 by building it yourself.
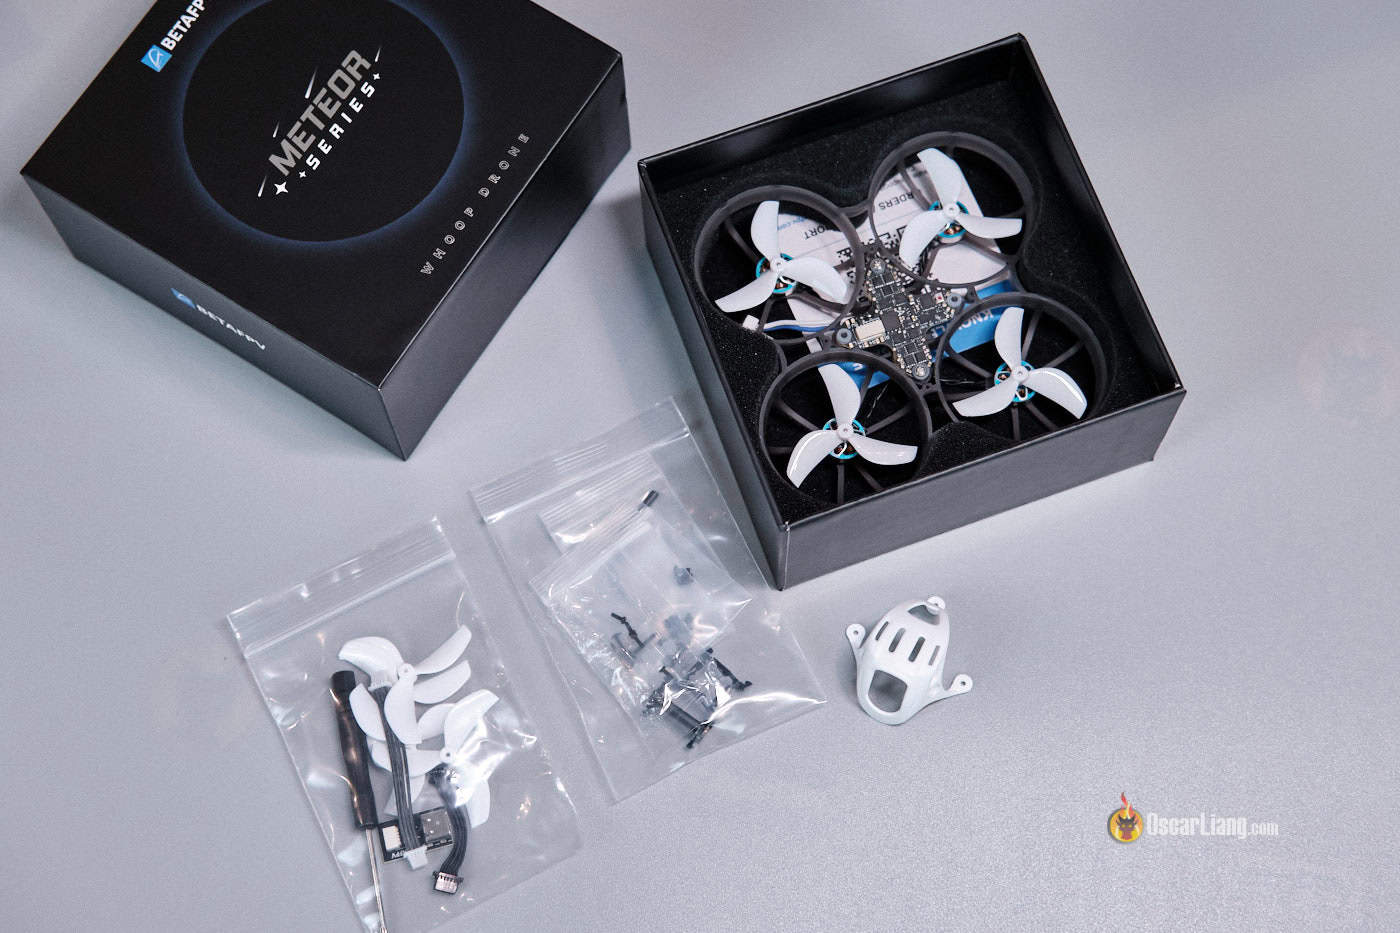
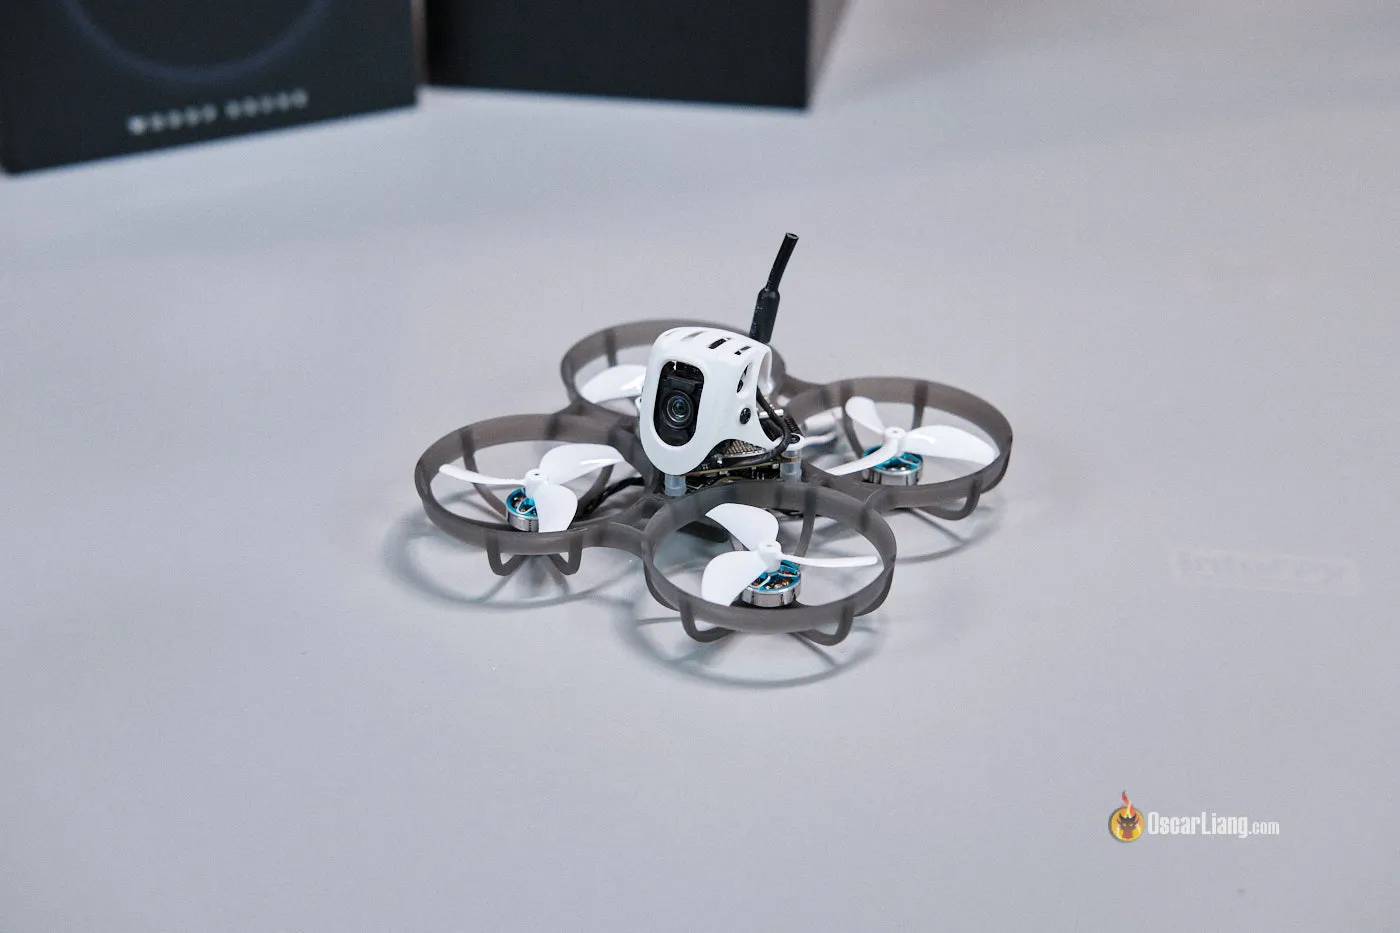
Unboxing
I am reviewing the PNP version, which does not include the O4 Air Unit. It comes with all the necessary accessories, including a replacement antenna and an O4-to-FC cable, so you’re ready to install the O4 in the Meteor75 Pro right out of the box—no extra parts or tools required.
The quad weighs 37.2g (including the DJI O4) or 51.4g including a 1S 550mAh battery.
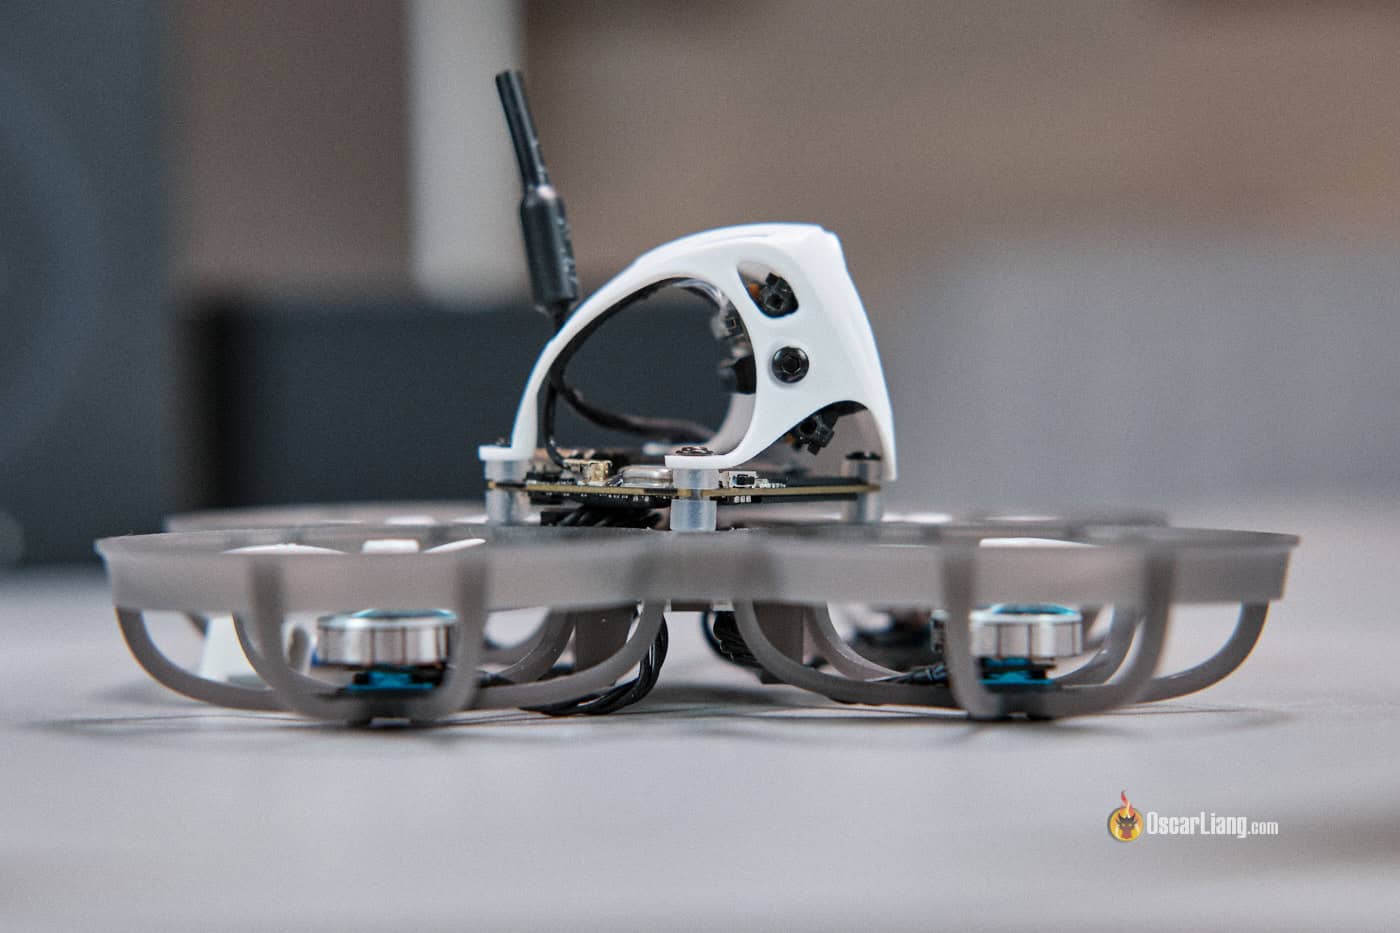
Canopy
The new canopy features a large cutout, allowing for a wide angle adjustment for the O4 camera.
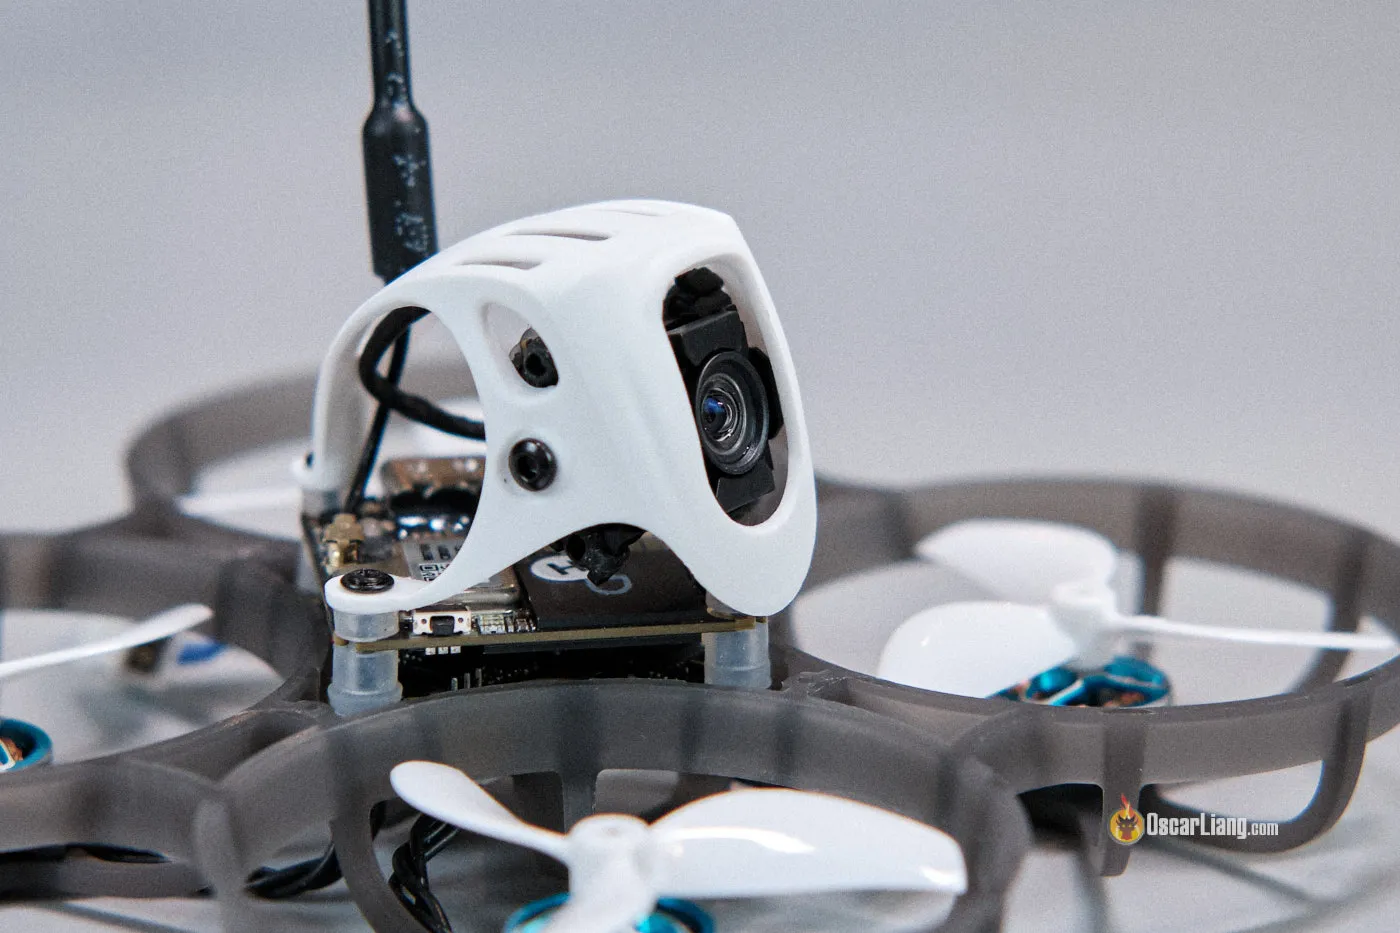
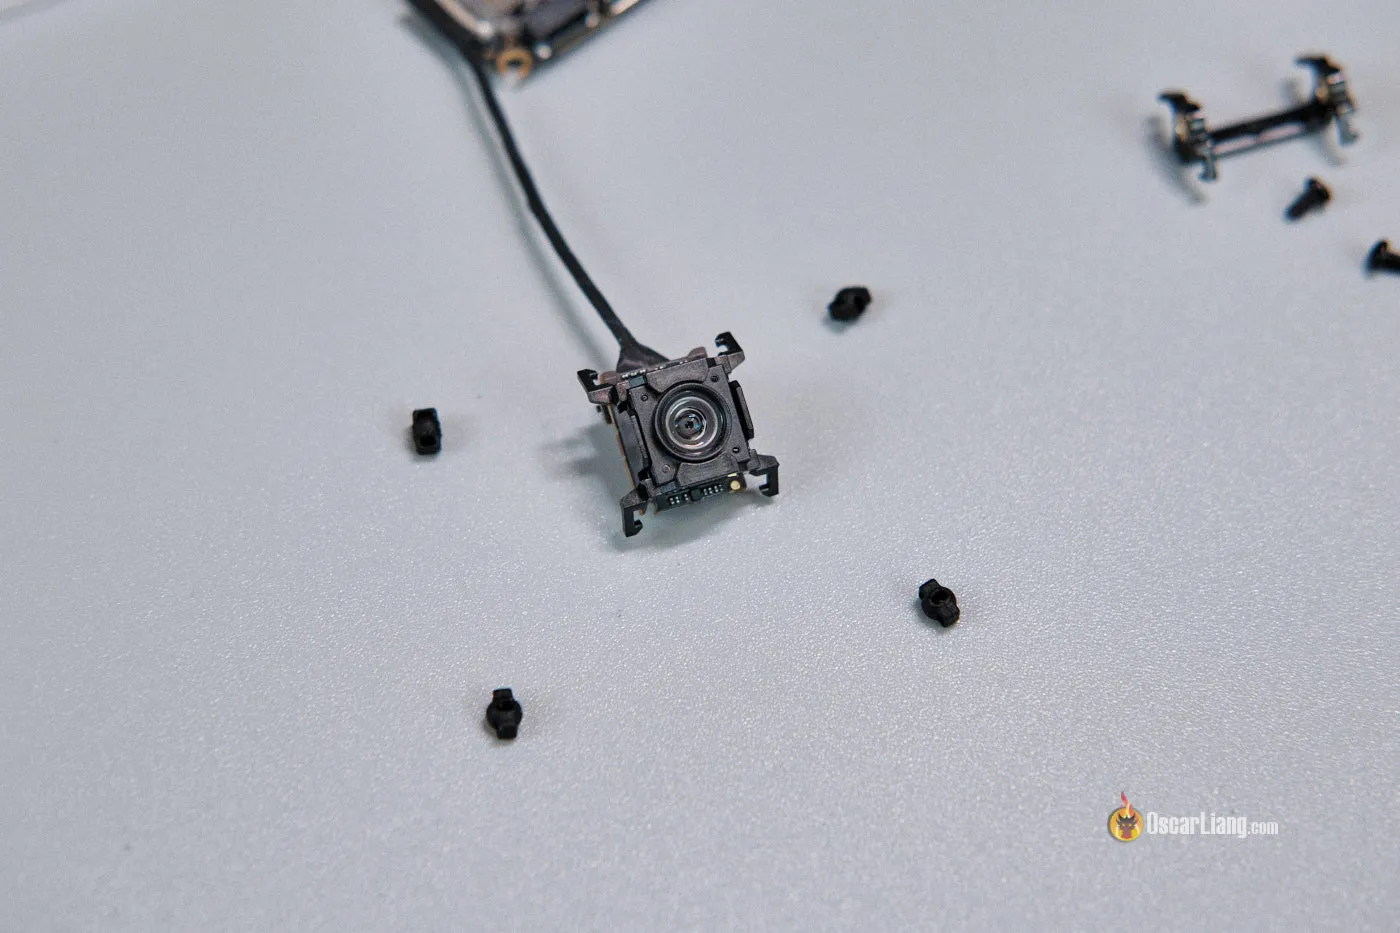
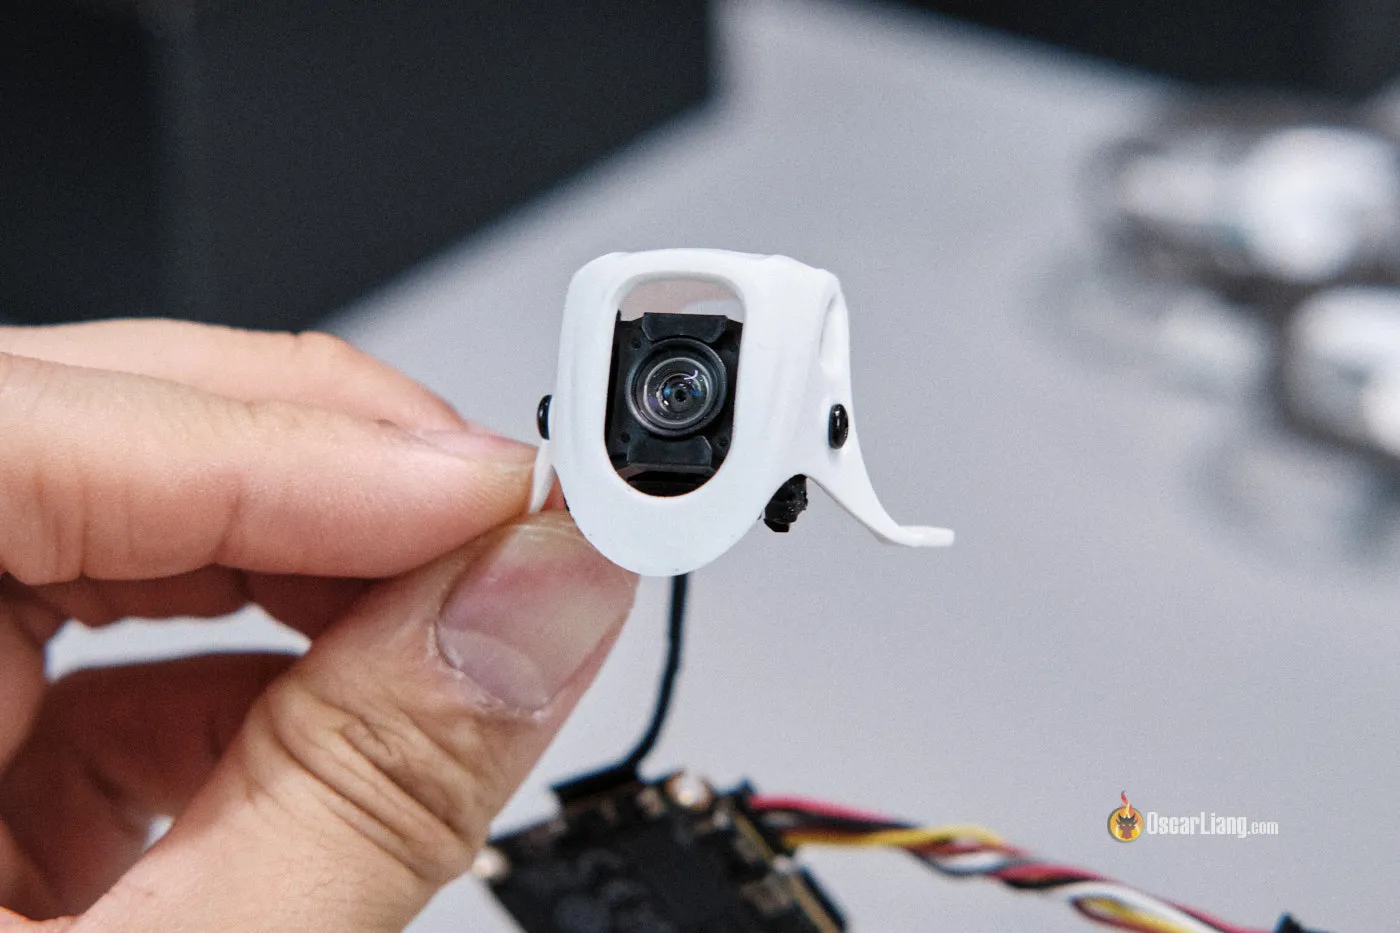
I am quite impressed by the camera’s soft mounting mechanism that BetaFPV has developed—it’s perhaps one of the first “proper” soft mounting solutions for the DJI O4 thus far, which is essential to achieve jello-free footage with the demanding O4 camera.
The mount features a two-piece design—a back piece with two mounting screws on the sides (19mm width, micro FPV camera size) and a front clamp that secures the camera. The two pieces are connected by four vibration-dampening “balls,” which reduce the vibrations reaching the camera.
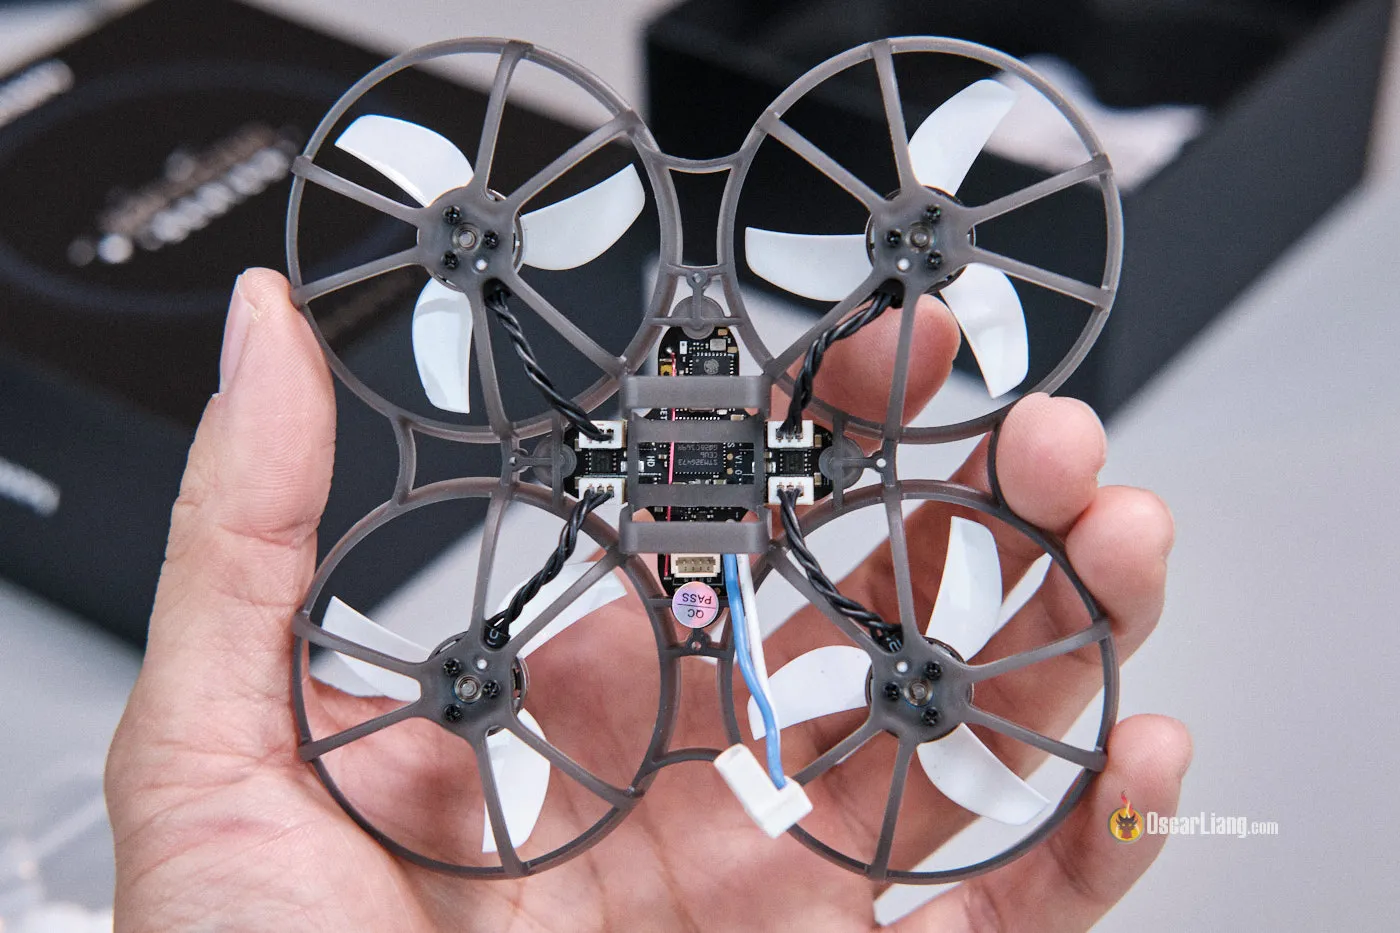
Flight Controller
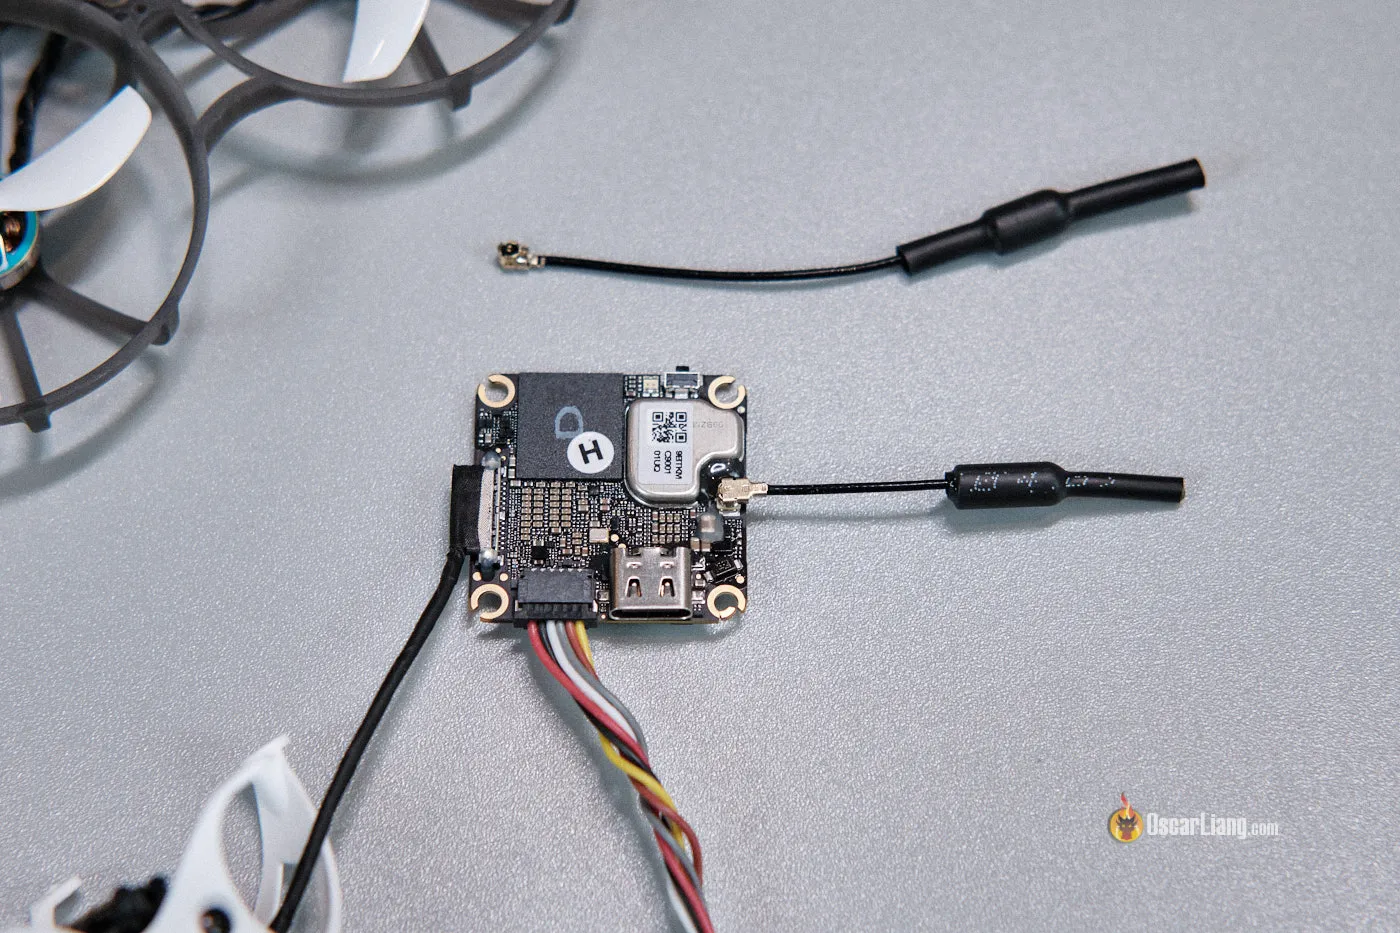
Apart from the new canopy and camera soft mounting design, the Meteor75 Pro has also received an upgrade to the flight controller—the Matrix 3-in-1 FC.
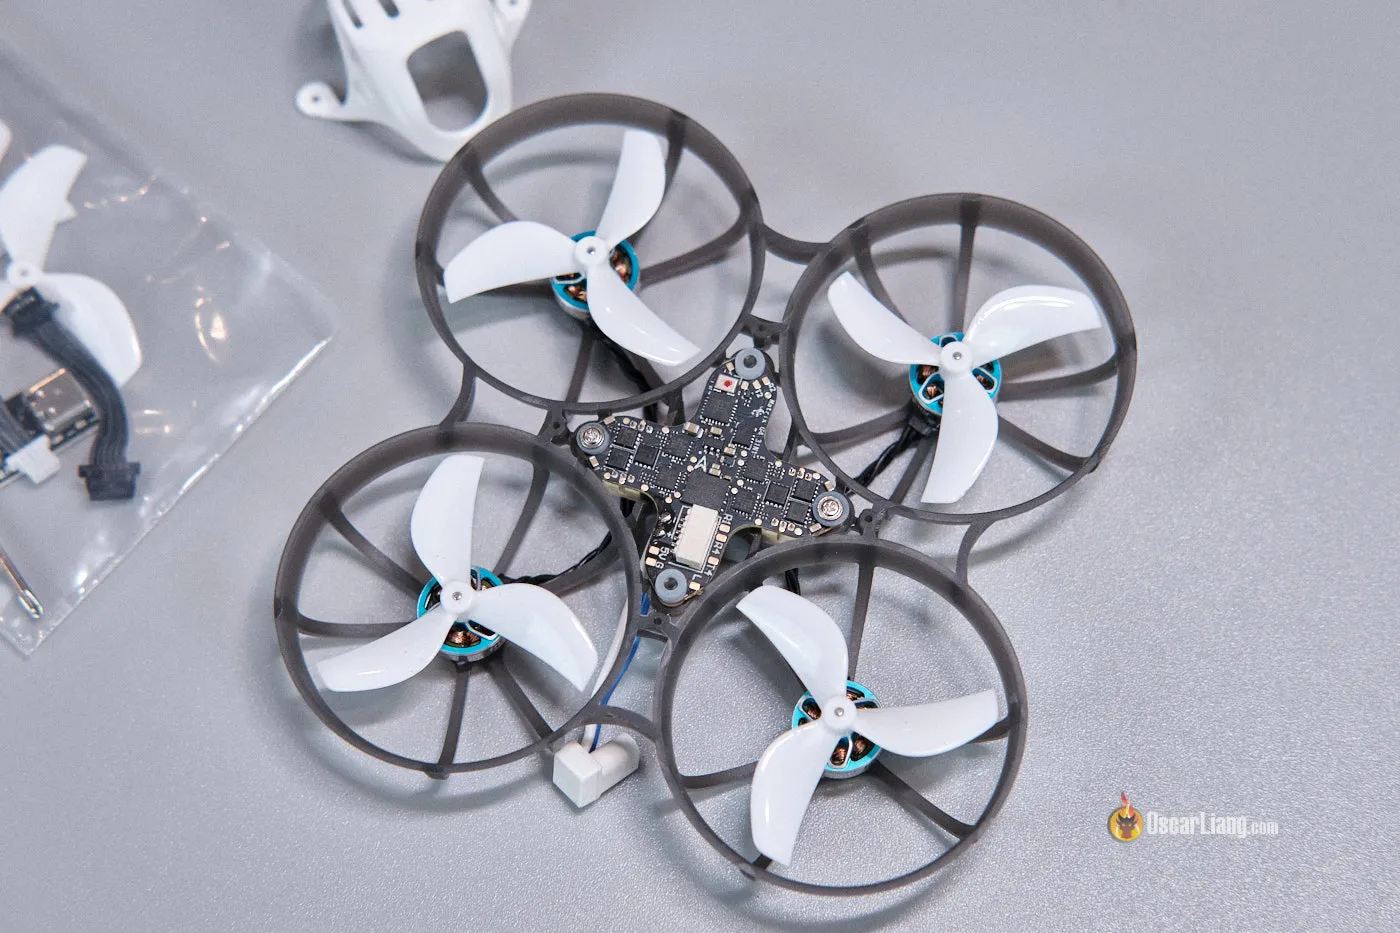
It’s designed specifically for the DJI O4 Air Unit (Lite), featuring a connector that plugs directly into the O4 Air Unit without soldering. It’s a 1S board, and as we know, the O4 doesn’t perform well with voltages below 3.7V. Therefore, BetaFPV has added a 5V BEC to this FC, providing enough power for the O4 even at maximum RF power.
There’s 16MB of memory for the blackbox and a total of 4 UARTs available, although only 2 are used.
Just like any BetaFPV tiny whoop, to keep the weight down, there’s no USB port on the FC; to access Betaflight, you’ll need to use BetaFPV’s dedicated dongle.

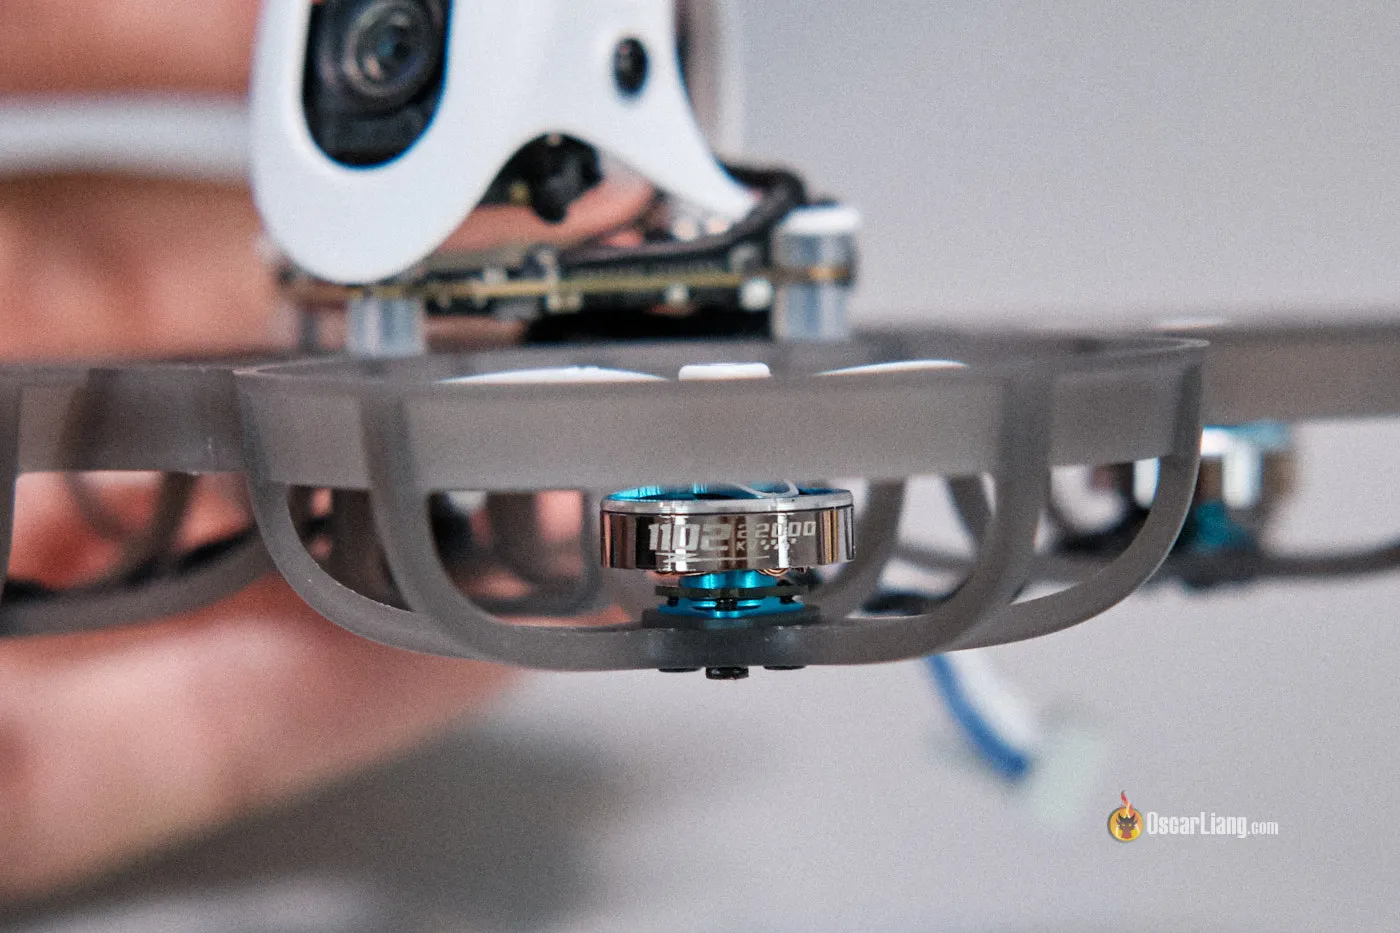
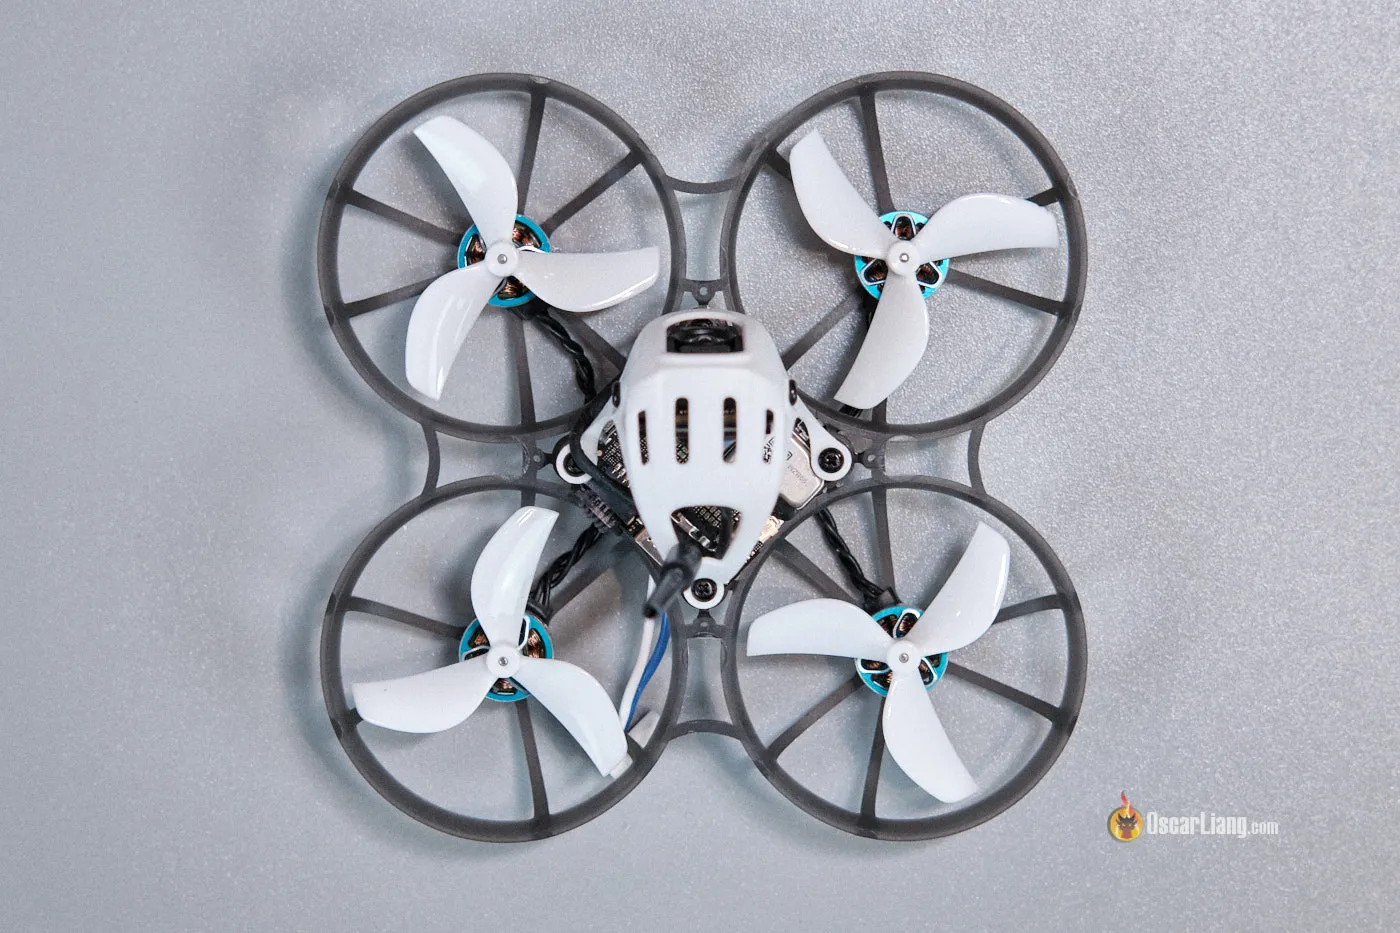
Motors and Propellers
The Meteor75 Pro O4 is not strictly a 75mm whoop—the diagonal motor distance is actually over 80mm, so it should really be called the Meteor80. The increase in size accommodates larger propellers—these are 45mm tri-blade props, not the 40mm props used in typical 75mm tiny whoops. Due to the extra weight of the DJI O4, larger propellers make sense, as they provide more power and efficiency. To spin those larger props, BetaFPV uses larger 1102 22000KV motors.
Durability
There have been mixed reports from the community regarding durability, mainly due to the DJI O4 Air Unit, not the Meteor75 itself. Some users have experienced malfunctions or damage to the board after a few hard crashes. While I haven’t encountered any major issues yet—since I’ve been flying gently because this is the only DJI O4 I have—I would caution against treating the O4 whoop the same way you would a cheap analog whoop.
Installing DJI O4 Air Unit
Installing your own O4 might sound challenging, especially given the fiddly parts involved in the soft mounting. However, it turned out to be pretty straightforward—as long as you have steady hands. It only took me about 30 minutes to complete the build.
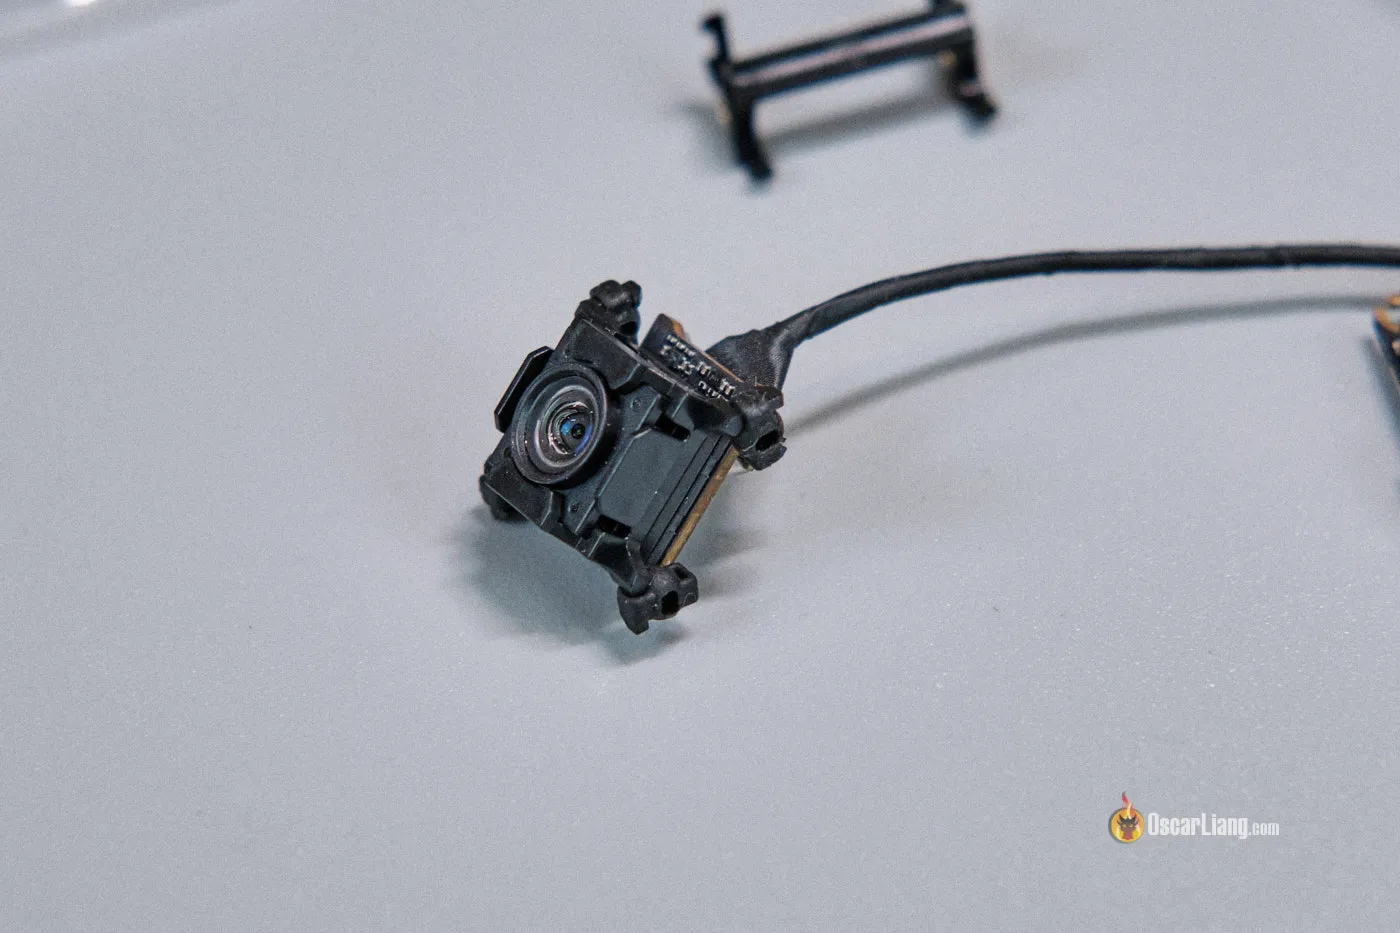
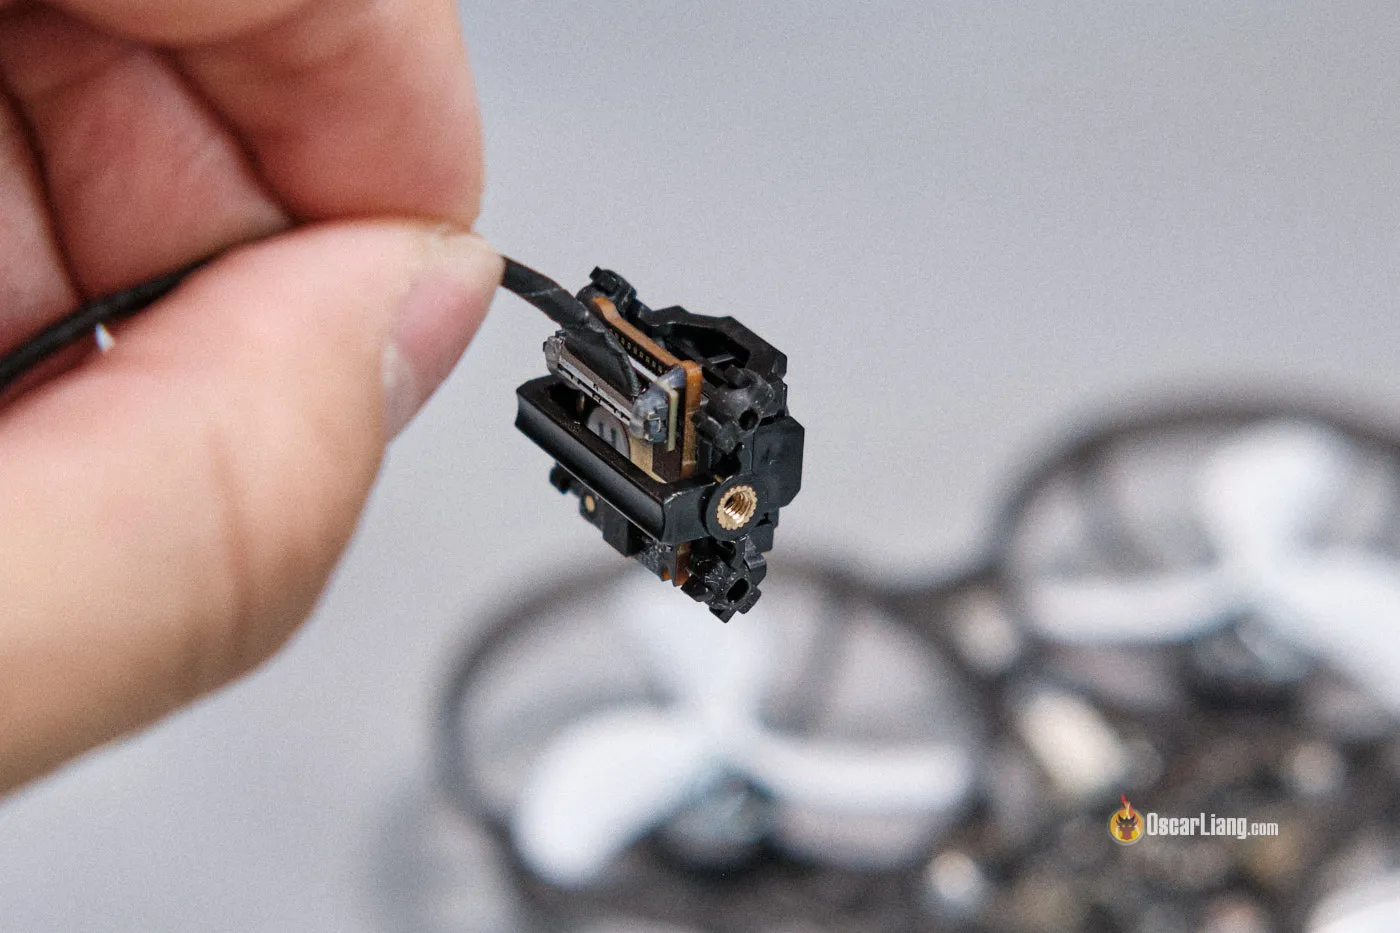
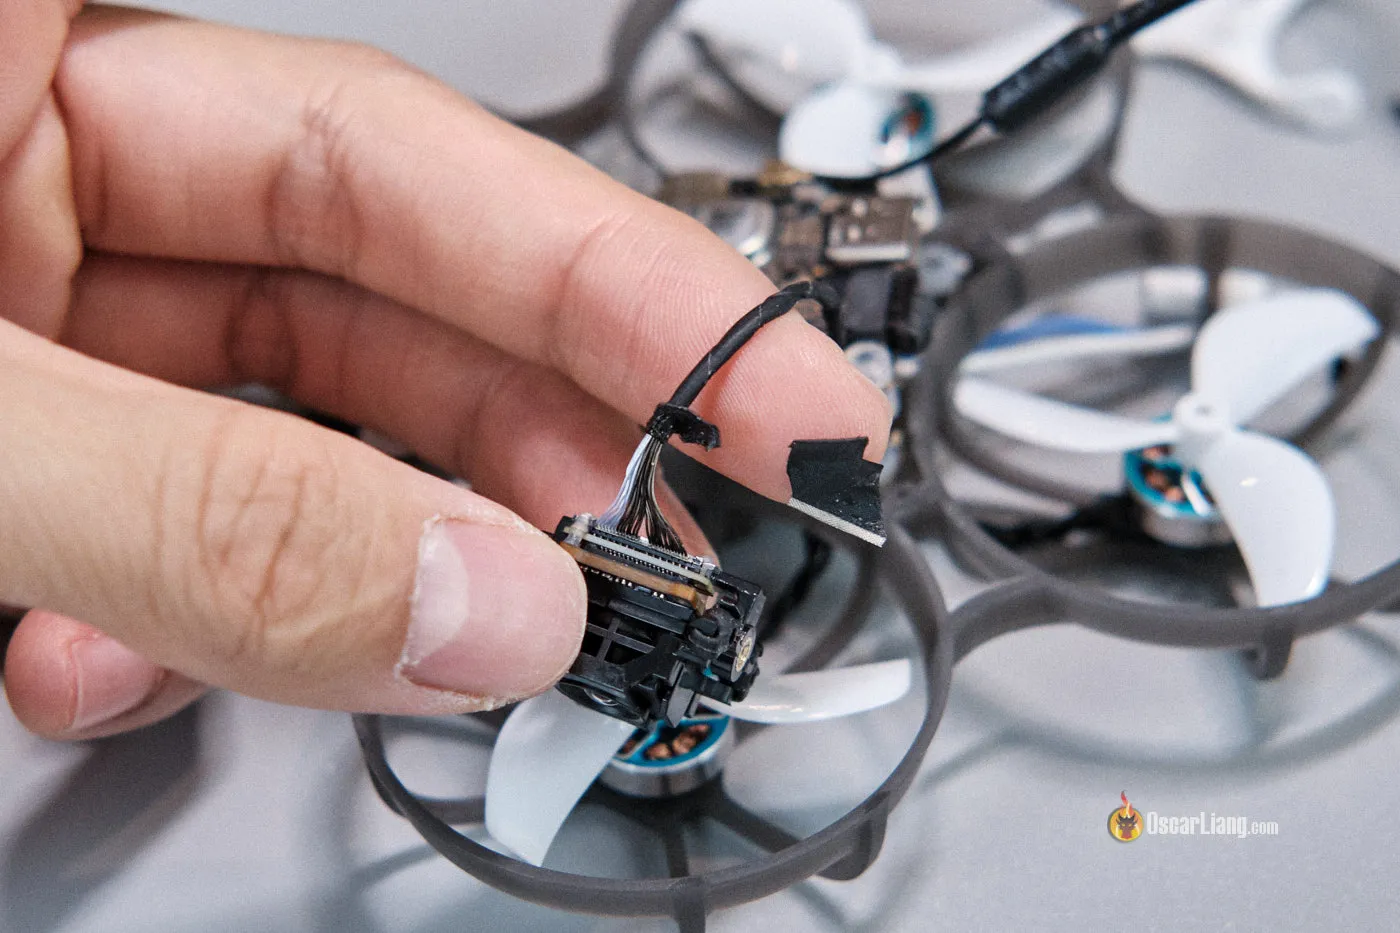
Pro Tip: The O4 camera cable is quite stiff due to the protective tape used, and it can transfer vibration from the frame/canopy to the camera. To solve this, I removed the tape near the camera connector, which exposes the flexible part of the wires. Be extremely careful if you decide to do this, and do not damage the wires in the process.

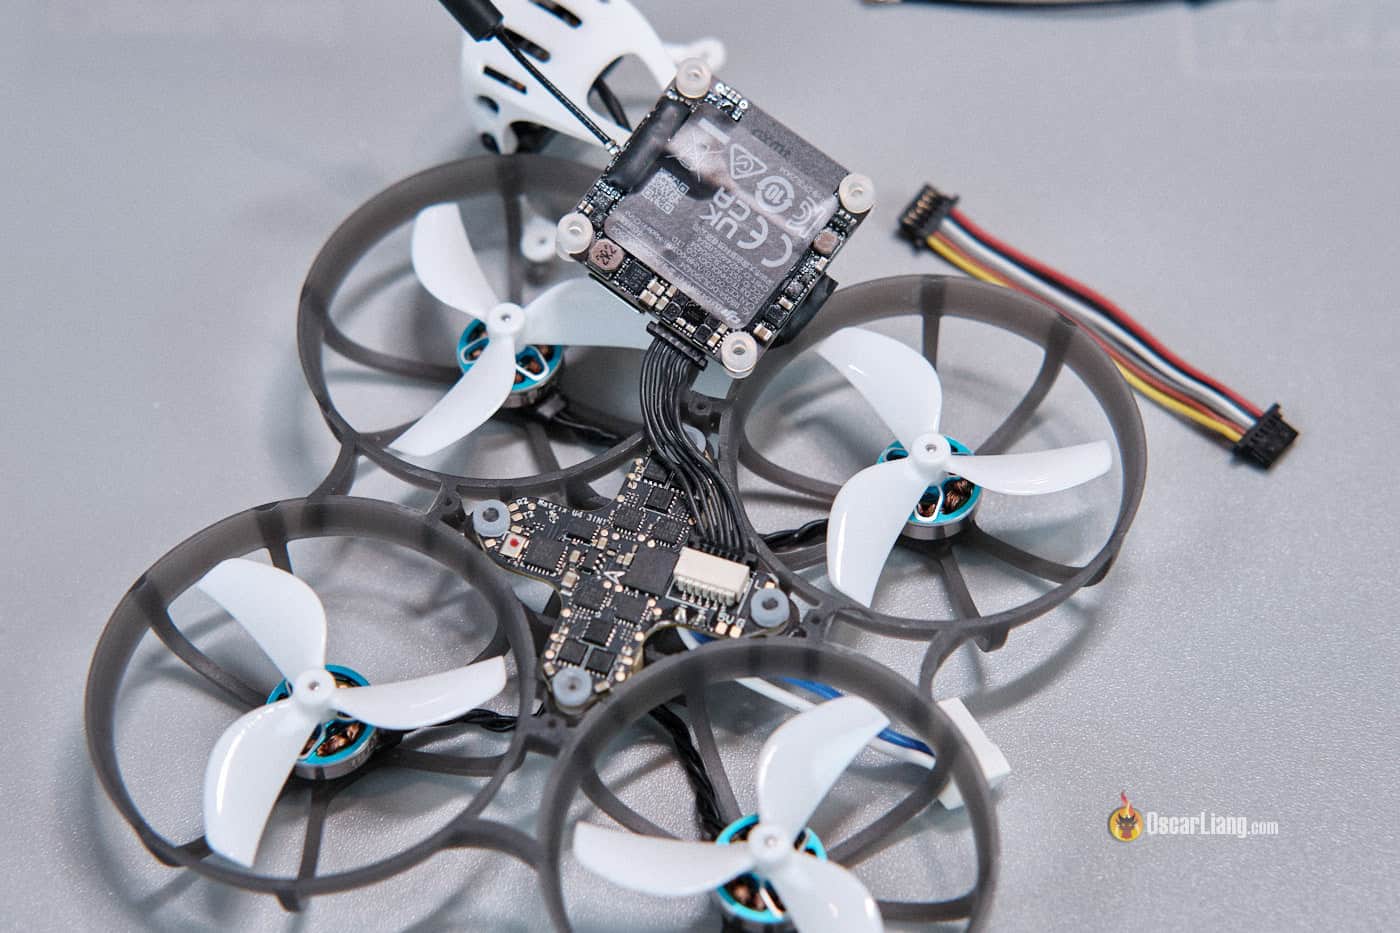


However, I do have concerns about the threaded tubes on the frame that holds the FC in place. They only extend to the top of the FC silicone grommets (aka gummies) and don’t actually provide any support for the O4 Air Unit when it’s mounted on top of the FC. The O4 gummies are pressed against the FC gummies using longer screws. While this method sort of works, it has its flaws. If the screws are not tight enough, the O4 might have wiggle room—especially during flips and rolls. On the other hand, if the screws are too tight, they will press too hard on the FC gummies, which is not ideal for soft mounting. The frame is injection-molded, and it’s expensive to create a new mold just for a small design change, so I understand why BetaFPV opted for this workaround.
Battery and Flight Time
BetaFPV recommends their LAVA 1S 550mAh LiHV batteries. You can also use the lighter, smaller 450mAh batteries, but flight time is considerably shorter. I am getting around 5 minutes of flight time when flying indoors with the 550mAh battery, and around 3.5 minutes with the 450mAh.
Get some 1S 550mah batteries here:
-
- AliExpress: https://s.click.aliexpress.com/e/_DFJK7pH
- BetaFPV: https://oscarliang.com/product-j5ig

Flight Performance
I have seen several videos of the Meteor75 Pro with O4 from when it was first released, and they all seem to have pretty bad jello. I am not sure if BetaFPV has made improvements to the design because I haven’t noticed any jello or vibration during my indoor testing (I received mine just last week). Also, the way I installed the O4 might have contributed to the improved image quality.
The stock tune worked quite well. I made several changes to the settings to suit my flying style, but overall, the quad was pretty responsive and stable out of the box.
Stabilization seems to work fine as expected, here’s the same footage with 30% stabilization in Gyroflow:
This whoop is quite stable for outdoor flying, but it lacks the power and speed compared to 2S and bigger whoops. In my experience, a tiny whoop at this lightweight easily gets pushed around by the breeze unless you have perfectly windless conditions. For outdoor flying, larger and more powerful models are better suited.
If you want a whoop to fly predominantly outside, I think the BetaFPV Femto might be a better choice, which I am still testing and will publish a review in the next few days comparing it to the Meteor75 Pro.
How to Setup
The FC target is BETAFPVG473, and it came loaded with Betaflight 4.5.1. The original CLI diff can be found here.
- Bind ELRS Receiver: For some reason, the ELRS receiver won’t go into WiFi mode after waiting a couple of minutes, so I had to bind the receiver using another method. I simply clicked the “bind receiver” option in the receiver tab in Betaflight. Then, on my radio, I went into the ExpressLRS Lua script and selected the Bind option. And binding was done.
- Pair O4 to Goggles 3:
- follow instructions here: https://oscarliang.com/how-to-setup-dji-o4-lite/#Pairing-DJI-Goggles-3-with-O4-Lite
- Useful settings: On the goggles, turn on Race mode to take advantage of the low latency, and use auto channel and power.
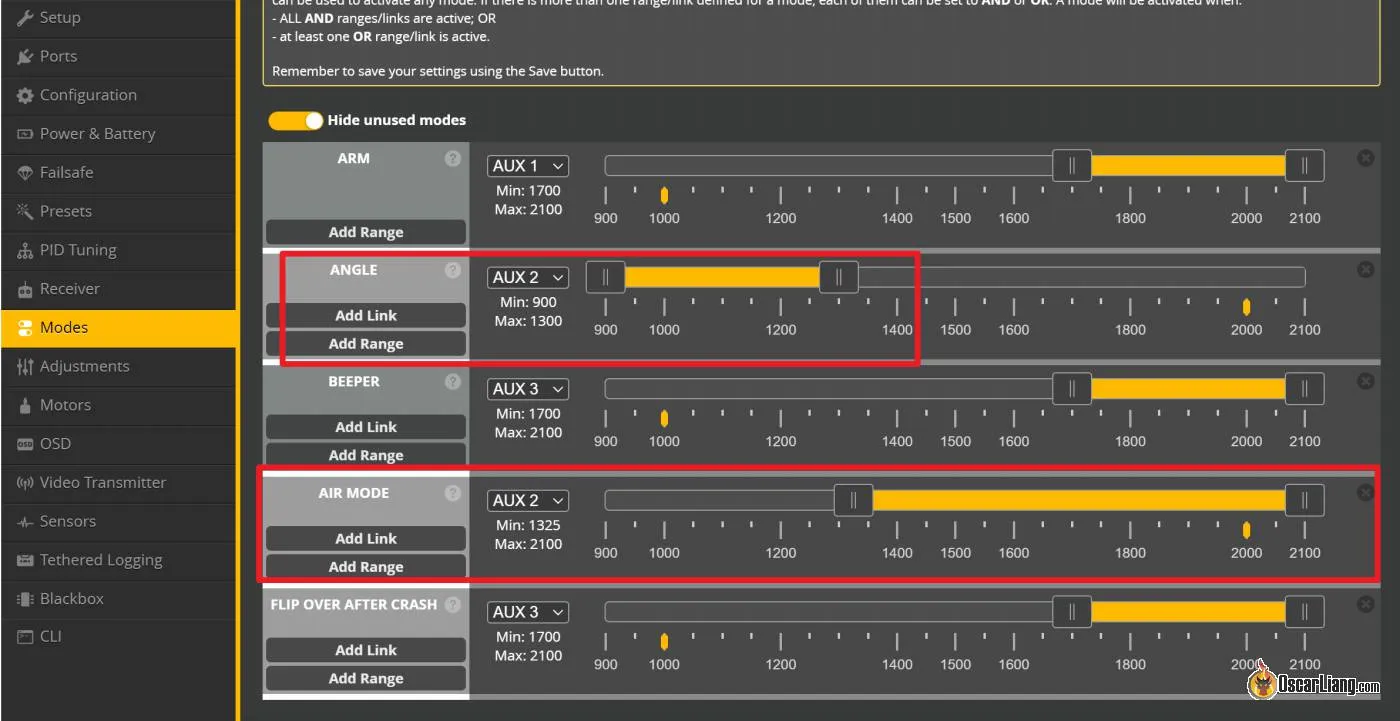
- Modes tab in Betaflight Configurator: Configure the switches for arming, angle mode, and turtle mode.
- Power tab in Betaflight Configurator: Set the minimum cell voltage to 3.2V and the warning to 3.4V (land before 3.2V).
- PID Tuning tab in Betaflight Configurator:
- Dynamic Idle: Set it to 75 (it was set to 30 for some reason, which is too low; 30 is for 5″ quads).
- Rates: disable Throttle expo by setting it to 0
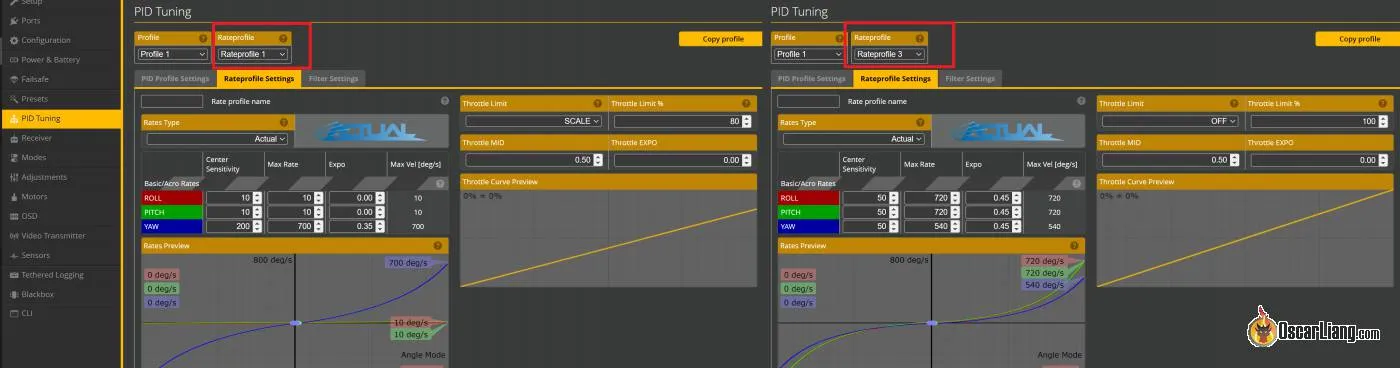
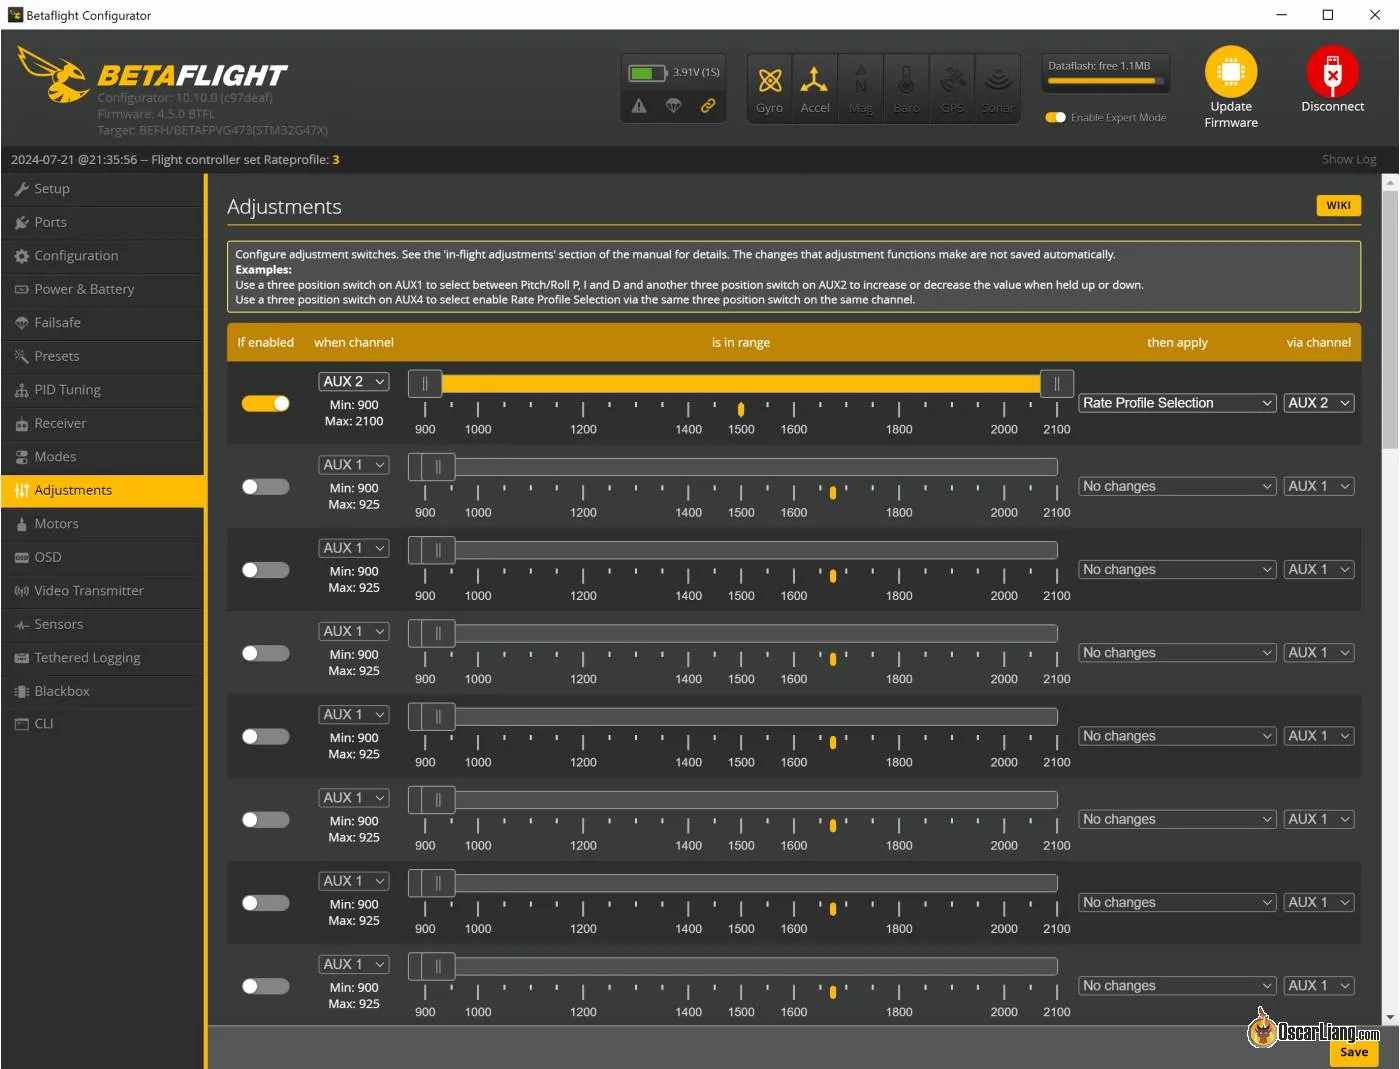
Here are my rates and how to set up rate selection based on your flight mode.
Specifications
- Wheelbase: 80.8mm
- Motors: 1102 22000KV
- Frame: Meteor75 Pro
- Propellers: Gemfan 45mm 3-Blade Propellers
- Camera/VTX: DJI O4 Air Unit (Lite)
- Canopy: Canopy for O4 Air Unit
- FC: Matrix 1S 3IN1 HD FC
- Receiver: ELRS 2.4G
- Recommended Battery: LAVA 1S 550mAh Battery
- Weight: 37.2g
Final Thoughts
When it comes to flying around the house, my overall impression of the BetaFPV Meteor75 Pro O4 is positive, though it does come with some quirks:
Pros:
- Compact and innovative design—from the canopy and soft mounting to the flight controller.
- Good indoor performance with potential for solid outdoor flights in calm conditions.
- Although my review unit works fine with stabilization, I have heard mixed results from other people, especially outdoors. BetaFPV might have fixed this issue in later batches, like the one I reviewed. We need more confirmations from other pilots.
Cons:
- DJI O4 durability concerns have been reported by some users, particularly with frequent crashes.
- Great image quality, but flight performance is certainly not comparable to lighter, analog tiny whoops.
Where to Buy the Meteor75 Pro O4 Whoop
- AliExpress: https://s.click.aliexpress.com/e/_oCD6EWm
- BetaFPV: https://oscarliang.com/product-kfb6
- GetFPV (PNP Only): https://oscarliang.com/product-ni9u
For enthusiasts looking to explore the world of FPV in HD, the Meteor75 Pro O4 is an interesting option with its blend of modern features and compact design. If you’re willing to spend a little time fine-tuning your setup, it could become a reliable tool in your FPV arsenal.
29 comments
Thanks for the excellent review.
Hi Oscar! UPDATE TO: I have been unable to get the BetaFPV Configurator to connect. Seems that the BetaAFP site has version 2 linked to this product where GitHUB has version 10. Version 10 works fine…
Hi Oscar! I have been unable to get the BetaFPV Configurator to connect. I have the DJI Goggles 3 and Remote Controller 3 but no other radios. The configurator comes up and seems to find a port but keeps warning about the radio being on. What am I doing wrong?
Hi Oscar! Do you know if is possible to install crossfire in one of these?
Thanks for your repply!
Of course, just connect Crossfire nano receiver to one of the free UART, and disable the onboard receiver in the ports tab.
Hi Oscar! Thank you very much for your fantastic reviews. As for Meteor75 pro – could you do some freestyle tricks indoors like loops, split-s, rolls, etc? Trying to learn freestyle indoors with great quality pics. Would you rather use 65 pro for those? Thank you!
Would love to know this as well.
Hello
I have a meteor 75 pro with elrs and an O4 unit. I’m pretty new to tiny whoops and flew my whoop just fine with the Dji controller. I recently bought a Radiomaster pocket and switched it over to that and went flying just fine the other day with my goggles, pocket, and meteor. After one flight I switched the battery and all of a sudden my goggles would not connect. I’ve been trying for days and can’t figure it out. The red and green bind light is stuck on and it won’t bind to the goggles. The controller still binds and I can fly, I just have no camera to look through. I’m so lost and going in circles. Plus, we have nice weather and all I wanna do is fly!
Please help!
Sounds like the O4 air unit overheats and shuts down. Just keep the drone unplugged for a couple of minutes to let the O4 cool down, and try again.
I have the same problem, now it just won’t turn on.
Can someone please test if the battery frame can be enlarged by a few mil to accept GNB 850mah 1s 60c? That’s 40% more flight time for 4g and a few milimeters in the plastic opening.
You NEWBIES are all about flight time when it should be all about performance and weight! DON’T USE HEAVIER LIPOS! It ruins the power to weight ratio and this whoop is already a BLOATED COW!
What are your pid profile settings?
I didn’t change PID or filter, all stock settings.
I am using my own rates though, you can find it here under Tiny Whoop: https://oscarliang.com/rates/#My-Rates
I figured it out, there doesn’t seem to be much information on how to configure this drone with the DJI RC3! I thought it would be plug and play, for the Meteor 65/75 Pro 04: Fire up betaflight configurator, backup current config just incase, connect the drone to it via the betafpv dongle, and use a fan to cool down the o4 air unit when connecting the drone to the PC.
In the Ports tab, first disable the switch under UART3 and instead enable it on UART1
In the Receiver tab: choose SBUS instead of CRSF.
Goto the CLI tab and type sbus_baud_fast = ON
Then finally go into the modes tab to configure the buttons.
Hi, I bought the 65mm version of this but I cant seem to arm it, it was pre-assembled with the o4 unit, updated googles V3 to latest firmware to support the 04 unit. I can get a video feed but it will not arm and it states “Air Unit in low-power state” in the bottom right. Have I bought a dead one or am I doing something wrong as its my first proper drone outside of DJI stuff?
Plug the drone into your computer, open Betaflight Configurator, and go to the Receiver tab, and see if the channels react when you move the sticks? Another thing is to check if there are any Arm Prevention flags.
I have a post about troubleshooting arming issues: https://oscarliang.com/quad-arming-issue-fix/#Arming-Prevention-Flags-Lookup-Table
I got the Meteor65 Pro 04 last week. I have been crashing the drone all over indoors flying acro, noob in this..
How do you adjust the camera angle on this drone, to raise it to max, which is 35 degrees, or lower it to the minimum?
Also, how did you get the audio of the propellers and the drone transmitting, or being recorded? I am using DJI Goggles 3, with DJI RC FPV 3 with the Meteor65.
[And thank you for the throttle adjustment settings you had on one of your articles, to smooth out the throttle].
At the beginning, set it as low as possible, then increase it about 2-3 degrees at a time until you feel comfortable. Over time you might want to increase it more when you get better at flying. I think I have it set at around 15 to 20 degrees. Audio was recorded on my phone, i just synced them together in post.
Good morning I am looking to find out if you have pictures or a video of setup using the rc3 in betaflight like the tabs page Etc. Meteor 75 pro 04
At the moment I don’t, but I might publish some info on how to using the RC3 in Betaflight. Stay tuned.
Hi Oscar, i have changed my props to HQprop 45mm, it solves my m75 jello/jitter issue. perhaps you can try out.
I’ve noticed the same thing on all of my o4 quads, seems HQProps solve the jello issue for a lot of people
Why do you use completely different rates than described in your rates tutorial for micro whoops?
You mean the rates in the screenshot?
Profile 1 is the rate I normally use for whoops when flying in Angle mode. Profile 3 is just the default rates that came with the whoop, you can replace it with your usual freestyle rates here.
Hey Oscar, the rates in the Angle mode, how you fly with them? the quad doesn’t move much with the pitch and roll at 10. you really able to fly with those rates?
Angle mode doesn’t use pitch/roll rates, it’s the Angle Strength that’s controlling the rates. I think it might be a bug in this particular of version of Betaflight, quite a few people have this issue.
As a work around, before takeoff, go to Rate settings in the Betaflight OSD, then go back and exit the OSD menu, you can control the drone again.
Due to regulations, my son wouldn’t be be allowed to fly outdoors with a camera.
Is it even possible tho fly meteor75 PNP (without the camera) using line of sight? Would it be weird to control since it was probably not optimieren for lower weight and lower center uid gravity?
I’m also considering purchasing a full vtx version and putting a duct tape on the camera when flying outdoors, but that alone probably wouldn’t please the authorities.
What tiny whoop without a camera would you recommend?
It’s possible to remove the camera and fly it line of sight, but it’s definitely not as fun as flying FPV. Or just put a piece of tape of the camera and fly it line of sight if you wish without removing it.
All tiny whoop pretty much come with FPV camera and VTX these days, that’s why they are called FPV drones.