Buzzer can help you locate your crashed drone, but typically it won’t work if the battery is disconnected in the crash. Here we will show you how to build a DIY lost model alarm with its own little built-in battery.

This tutorial is written by Jeremy Gilbert, edited by Oscar.
How does it works?
The DIY buzzer is connected to the flight controller like any normal buzzer. When 5V is present from the FC or PDB, alarm is off. If the LiPo battery gets ejected in a crash, it causes the 5V pad to go low and the buzzer kicks in, and is powered by the small 1s lipo built into the DIY beeper.
It’s not as fancy as some other expensive, ready-made options like the Hellgate buzzer that can cost you $30. This is just a cheap DIY solution.
Components
- Attiny85 MCU – The brain of our buzzer
- 5V buzzer – Normal buzzer you would normally use in your quads
- 3.3V to 5V boost voltage regulator
- 1x 10k ohm resistor
- 1S Lipo Battery – For powering the DIY buzzer, you can just use tiny whoop lipo’s
- Small surface mount on/off switch or leave 1s lipo lead long enough to unplug after flight
- Arduino board (Uno or Diecimila)
- 1x 10uF capacitor
Programming Attiny85
Setup Arduino as an ATTiny Programmer (ISP)
Follow this guide to setup your Arduino board to program ATTiny85 chip.
Loading Sketch to ATTiny from Arduino IDE
The sketch for the Attiny85 is basically just a modified “blink” sketch. Copy it to the Arduino IDE and upload it to your Attiny micro controller.
const int voltagePin = 1; const int buzzer = 0; int buttonState = 1; void setup() { pinMode(buzzer, OUTPUT); pinMode(voltagePin, INPUT); } void loop(){ buttonState = digitalRead(voltagePin); if (buttonState == LOW) { tone(buzzer, 100); delay(100); noTone(buzzer); delay(100); } else { noTone(buzzer); } } If you get an error that says something about PAGEL or something along those lines, just ignore.
Wire Connections and Soldering
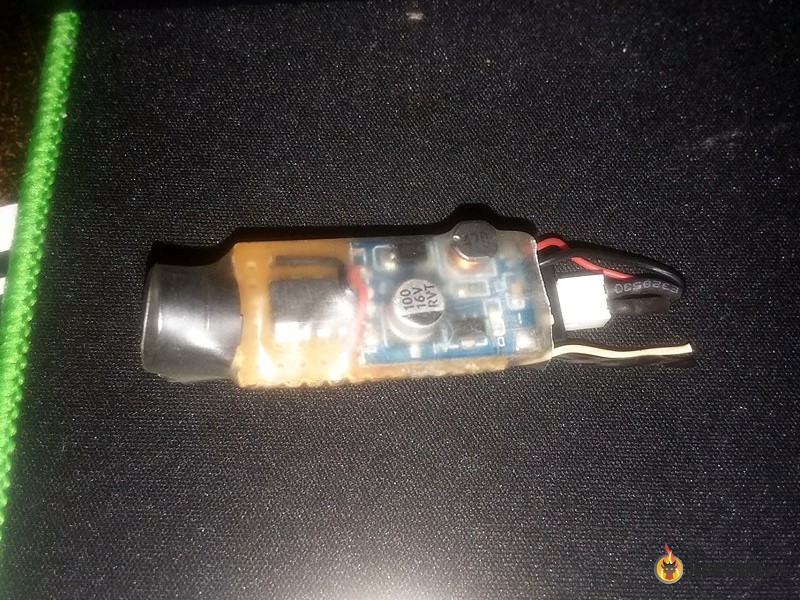
Ignore the huge USB port on the 3.3V to 5V boost regulator. There are smaller versions available without the USB port, but because I already had a handful of these on hand so I just cut the USB port off and soldered to the + and – leads.

I soldered everything to a small breadboard and then used heatshrink to secure the 1s lipo on the bottom side.
The black and white wires shown are connected to ground and PWM 1 of the Attiny85. Simply connect these to the 5V and ground on the flight controller or PDB.
As of right now, there is no sleep feature. So to turn the buzzer off, you can either use the on/off switch or simply unplug the 1s LiPo. But I will try to add more features in the future.
Credit: Jeremy Gilbert
17 comments
Nice project. I also developed a similar one recently, it has some extra features but it is also a bit more challenging to do: https://github.com/DavidMarzocca/NMLB/ . The code you can find there can also be adapted to the project described here, adding some things like a LED to show the status, various modes, and a timer for waiting some time (~minute) from when the battery is ejected to when it starts playing the buzzer.
“Longtime listener, first time caller”
Should the battery be charging off of the 5v boost converter? It has no charge circuitry for charging Lipos and subsequently would have no Over/under voltage protection. Wouldn’t something like the 134N3P be better since it is 5v boost converter and battery charger combined?
there is a plethora of lost kwad beepers right now on the market. the latest versions are $10. MUCH better than the $30.00 versions . would a capacitor store enough energy to run the buzzer for 5 or 10 minutes after a lipo ejection ? how difficult to build a flt controller with a lost beeper attached ??
I doubt it.. You need a pretty big cap to do so, a LiPo battery makes more sense for storing energy.
Hi,
I tried this with no success :(
I don’t have electronics background and it is the first time I mess with Arduino. I know that the Attiny85 programming is working because I can upload an example sketch (blink) with the Arduino UNO and it works, i.e., when connecting a Led to the Attiny85 it blinks. So I then uploaded the buzzer sketch (the one on this page) and wired everything according to the guide, but when I disconnect the power from the FC (PIN 1 PWM) nothing happens. Any idea what could be wrong?
Hi,
For some reason the TONE function doesn’t work with my buzzer, which is a NEW traditional quad active buzzer. After playing around with the code (no arduino skills, so basically trial and error), I replaced the TONE function with the digitalwrite function following the basic BLINK sketch and it is working now!
digitalWrite(buzzer, HIGH);
digitalWrite(buzzer, LOW);
This is the code that works for me, at least in the board:
const int voltagePin = 1;
const int buzzer = 0;
int buttonState = 1;
void setup() {
pinMode(buzzer, OUTPUT);
pinMode(voltagePin, INPUT);
}
void loop(){
buttonState = digitalRead(voltagePin);
if (buttonState == LOW) {
//tone(buzzer, 100);
digitalWrite(buzzer, HIGH);
delay(100);
//noTone(buzzer);
digitalWrite(buzzer,LOW);
delay(100);
}
else {
noTone(buzzer);
}
}
I will buy some small 1S lipos and solder everything.
If someone with more coding / arduino knowledge can explain me why I had those troubles I’d be very grateful.
I should have left it alone. Lol this was how I originally had the code but I seen the buzzer function and thought I’d clean it up a bit. I do know some buzzers have diff Hz rating. I think I set the one I used to 50hz and it works fine but some other buzzers may need it to be higher.
This is how I had the code set up originally, but I put the tone function in to “clean” it up a bit lol i guess i should’ve left it alone. the digital write funtion works just fine though. I think it depends on how many Hz the buzzer is rated for when using the tone funtion. The ones i’m using are from taydaelectronics.
Hi,
I tried this with no success :(
I don’t have electronics background and it is the first time I mess with Arduino. I know that the Attiny85 programming is working because I can upload an example sketch (blink) with the Arduino UNO and it works, i.e., when connecting a Led to the Attiny85 it blinks. So I then uploaded the buzzer sketch (the one on this page) and wired everything according to the guide, but when I disconnect the power from the FC (PIN 1 PWM) nothing happens. Any idea what could be wrong?
thanks
Hi
this will only work if the battery is ejected.
if you add one more analog pin, and monitor the buzzer for from the FC.
you can have it transparent also like a normal buzzer.
absolutely :)
too bad there is no analog pin on this MCU.
Thanks Jeremy Gilbert for posting this up.
Two questions. In the parts list you have a 10uF capacitor listed but no instruction as to where this should go? Also would i be right in assuming that the lipo battery would need to be removed for charging?
it’s used to flash the ATTINY using an Arduion board, which is covered on this article.
Thanks Oscar, building a few of these for sure! Needed this two days ago. Now I lost my quad forever, first time I just could not find it anymore, looked for at least 6 hours in really harsh terrain. My lipo went from 16.2 volt to 13 in like 3 seconds and just dropped from the sky. Would you perhaps have any idea what happened? It was really hot weather, could that have something to do with it?
Can i use polulu?
In advance ty.
A-ah! That’s what I really need! Many thanks Oscar!
Did you tried the Source code from the ” Screamy Lost Model Alarm ” ?
hobbymania.co.za/screamy-lost-model-alarm-with-battery-backup-and-low-voltage-alarm