If you over-discharge Lipo batteries, you can end up with dead cells that read zero volt and cannot be re-charged again. In this post I documented how I repaired/fixed a LiPo battery by removing the dead cell.


Over-discharged LiPo, first cell reads zero volt and can’t be re-charged
Disclaimer: I DO NOT recommend doing this, it’s very dangerous working on defective LiPo. The author and OscarLiang.com are not responsible for any fires or damage caused.
If you have a battery with dead cell, it’s best to just dispose of it, guide: how to dispose LiPo batteries.
Note that by removing a cell from LiPo battery, the nominal voltage also decreases – e.g. a 4S becomes 3S. It’s possible to make a good working LiPo using good cells from LiPo batteries of the same brand/specs in order to maintain the save cell count.
I don’t think it’s a good idea to mess with LiPo, but if you must, do this outdoor to avoid burning the house down, or filling your house with toxic gasses from LiPo fire.
Tools
- A multimeter to check battery cell voltages
- Wire cutter
- Stanley / Craft Knife
- Soldering iron (recommendations)
- Hot Glue or Liquid Tape
- Electrical tape
- 80mm PVC heatshrink tube/sleeve
- A big bucket of sand to put out fires (just in case!)
My recommendation for all sorts of tools for building quads.
Step 1 – Removing heatshrink and tapes
Remove the exterior plastic packaging from the LiPo battery. Make sure you are cutting on the side with the internal protective layer. This thicker flexible layer will help ensure that you do not puncture any of the cells with your knife.

Remove the tape wrapping around the cell terminals, then unsolder the balance wire and XT60.

Step 2 – Separating the bad cells from the good
Separate the good cells from the bad with a plastic tool, do not use metal to avoid puncturing the cells. When taking the cells apart, working in a warmer room help separating them more easily because the adhesive is less sticky when warmed up.
Use a multimeter to determine if the cell is bad or not.


If the cells next to each other are good, then you don’t need to separate them, just leave them bundled together.
I also mark the good cells with “OK” in case I forget which is which :)

Step 3 – Putting good cells together
Check with a multimeter which terminals are positive and negative, remember the cells must be wired back together like this: + to – to + to – to + to – to + to –
Then I solder the cells side to side in series: + to – to + to –

Step 4 – Soldering wires
When soldering on batteries terminals, you need to be extremely quick, and use lower temperature for soldering. Don’t overheat the battery, otherwise it might cause a fire if you are not careful.
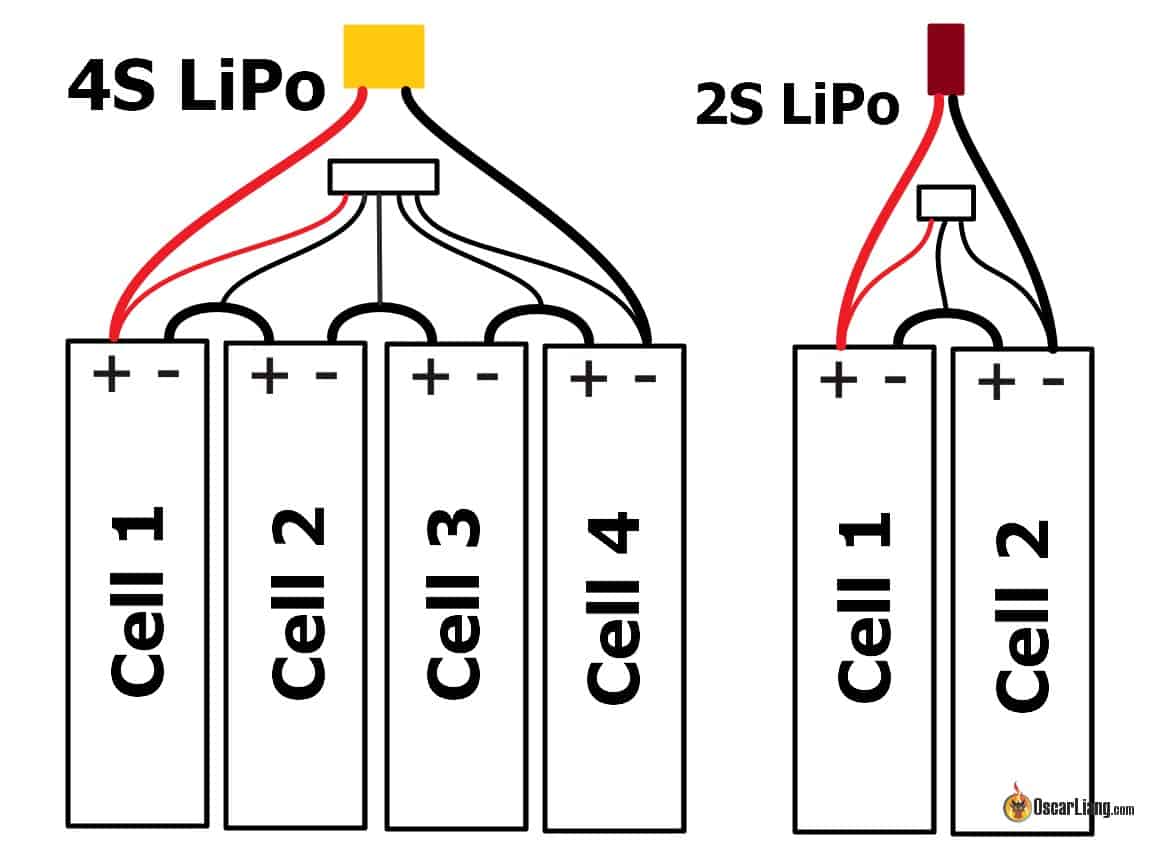
- Solder the main connector lead (XT60) to the Lipo cells, red to cell 1 positive, and black to cell 4 negative (as shown in Pic 1)
- Then the balancing lead following the wiring schematics diagram above. Starting with negative wire: first black balance lead connects to the negative of the 4th cell. (Pic 2)
- 2nd black lead goes to – of the 3rd cell, or the + of the 4th cell (Pic 3)
- 3rd black lead to – of the 2nd cell, or the + of the 3rd cell (Pic 4)
- 4th black lead to – of the 1st cell, or the + of the 2nd cell

Lastly, the red balance lead goes to the + of the 4th cell. Then secure the solder joints with some hot glue.

Step 5 – Final check and re-packaging
Check the voltage of the discharge connector, as well as the voltage of the balance plug, make sure each cell is reading the correct voltage.

If you are just removing a dead cell from a 4S LiPo like I did here, you can re-seat all the balance wires in a new 3S balance connector, or just remove the unused balance wire like so.

Now it’s a working 3S LiPo.

PVC heat shrink tube is great for re-packaging LiPo (80mm heat shrink is great).
You can remove and save connectors / balance lead from old or dead 2S or 3S LiPo’s. If you have a 4S with a dead cell or two, you can convert them to a 2S or 3S pack. They are great to be used with your FPV goggles and TX.
Edit History
- May 2016 – Article created
- July 2018 – Updated
- May 2021 – Added more pictures, updated post
Co-author: Hans Turpyn
21 comments
Lithium cells doesn’t like overheating. Soldering is possible, but definitely not recommended. Manufacturers use spot welding for cell joining into battery due to this very reason. If you want to build new DIY batteries from good cells in damaged batteries, definitely invest into even simple spot welder. It will be cheaper than have accidentally degraded battery cells due to soldering.
I’ve got 6x 3.7v 18650 lipos in series for total 22.2 volts for robot I am making (steppers need lots of voltage). 4 of the lipos were removed from a Dell laptop power pack, the two others were brand new. I charged them all before I installed them and all had close to 4.0 volts each. Suddenly, for UNKNOWN reasons, the two new batteries went to ZERO volts and my attempts to get a bit of charge in them with another battery/power supply did not work. They won’t charge in the charger. The USED 18650 batteries have no issues. All are at 3 volts requiring charge which they are taking. So WHY, in the middle of the series stream would the two new ones fail?
Do you rebuild lipos for customers
somehow i am not able to solder to the lipo contacts. (they may be spot-welded?)
however the idea to use 4S as 3S etc is a good alternative.
Separating the cells is often the trickiest thing by far when working with li-poly batteries. Pro-tip: keep a squeezy / spray bottle of isopropyl alcohol next you to at all times. It does not actually dissolve the glue, but it does magically neutralise all tacky adhesives I’ve ever encountered, but only very briefly until the alcohol has evaporated.
Without this, you *will* rip and deform pouches all the time. Ripped pouches are a write-off – once the electrolyte meets the air, the cell is fucked. Furthermore, all it takes to turn an A-grade cell into a C-grade cell is some twisting and deforming, so use this trick to avoid that.
How does the C rating factor into this kind of a mod? if I combine some cells from a 100C pack and some cells from a 60C pack, will it cause problems?
You are not supposed to mix cells from different brands or lipo of different specs.
When removing a cell does it change the MAH rating?
No, only minus 1S (cell count)
Would this process be okay for converting 3s lipos into 4s lipos?
I have a 6S1P 22.2V 3700mah Lipo battery w/one bad cell.
The balancer shows two rows of readings (3 over 3). It’s the bottom left reading that is low.
All the other cells are above 3V.
The bad cells shows 1.5V at the start of Nihm charging and gradually decreases while the others go up.
Which is the bad cell??
How do I revive it??
thanks for the article. I really want to turn two of my 3500mah 3S into one 4S pack. but the more I see what is going on inside these types of lipo packs .. I will just say no.
I also must disagree in „lower heat“ better use a big tip on a even bigger iron and as much heat it can give. Most can do 450 deg celsius what’s good cause time is more important. The shorter the better.
I use high heat when working with large volume of metal. The contacts on the battery are fairly easy to heat up so i don’t find high heat is necessary.
I would recommend a larger soldering iron than what we typically use. Your article on irons recommends ones like the Hakko 888, Weller 51, and TS-100. They are all great irons but even with large tips you will struggle to get the solder on the tabs to melt without overheating the battery. I would recommend using a soldering gun as it will be able to provide the heat necessary to quickly solder and desolder the tabs. Yes, it’s less convenient, but like I said, I’ve really struggled with my Hakko 888D and damaged a few cells while trying to put in enough heat to melt the solder, especially since most of it is lead-free.
I personally have no problem with the TS100 with the original pencil tip :) It definitely helps a bit when powered by a 6S lipo :)
Can you join cells from batteries of different brands? or different mAh?
Due to different cell characteristics for different manufacturer cells with same capacity you may end with a battery where one cell will discharge faster. This may and will cause overdischarge in weaker cell with obvious bad effects – degrading, puffing and possible sudden bonefire inside your drone. Mixing random capacity cells will end with same result even faster. Do not do that.
Loved this solution as it seems obvious but lacked the confidence before reading this.. I am currently working with a 4s that has a torn positive tab and cannot get balancer to read the 4th cell after resoldering but I’m fairly certain that this should be repairable except i can’t seem to get it on the right part of the tab… Thoughts?
Immediately after soldering one of the tabs I will pinch it with a gloved finger. It helps wick the heat away faster. Using a pair of needle nose pliers is also a good way to heatsink the tabs but it’s also tricky to keep from shorting to the other terminals.
Hi Oscar,
Soldering the tabs on LiPo cells can be difficult. The tabs don’t like to wet out with normal solder. I’ve had good luck using the Harris Al-Solder kit on a number of packs. The kit comes with flux and solder for joining aluminum and other metals. The downsides are that the kit is expensive and you basically need to dedicate a soldering tip for doing batteries.