
The lack of explanation of the settings in FPV cameras often leaves users wondering what they actually do, and how to achieve the desired camera performance. In this post I will try to explain the different settings in FPV cameras and how they affect image quality.

What’s the best FPV camera setting?
I often get asked “what’s the best settings for an FPV camera”. The thing is, there is no one single setting that will work for every situation and camera.
You need to adjust settings according to the environment and lighting condition: indoor, outdoor, sunny, cloudy, sunset, etc.
Luckily some cameras offer “preset settings” for different situations (for example, Runcam’s Micro Sparrow 2). You can quickly switch to different scenes without going through every single parameter.
If you don’t have this feature in your camera, or you are not happy with the presets, this guide is for you! You can learn about the different settings in your FPV camera so you can get the best performance out of it.
Check your lens!
It’s important to make sure your lens is in the best possible working conditions. Make sure it’s in perfect focus – this tutorial shows you how to focus your FPV camera lens. Lenses can often get scratched in crashes, replace it if it’s causing any noticeable issue.
Also check if your sharpness setting is set appropriately :) Sometimes I get a blurry image and turns out sharpness is too low :)
Accessing FPV Camera Setting Menu
There are two ways to access the setting menus on an FPV camera:
- Joystick (multi-position switch)
- Camera control from FC
Your FPV camera should come with a “joystick” style controller that allows you to plug into the camera. This is the primary way for most people to change settings on a camera.

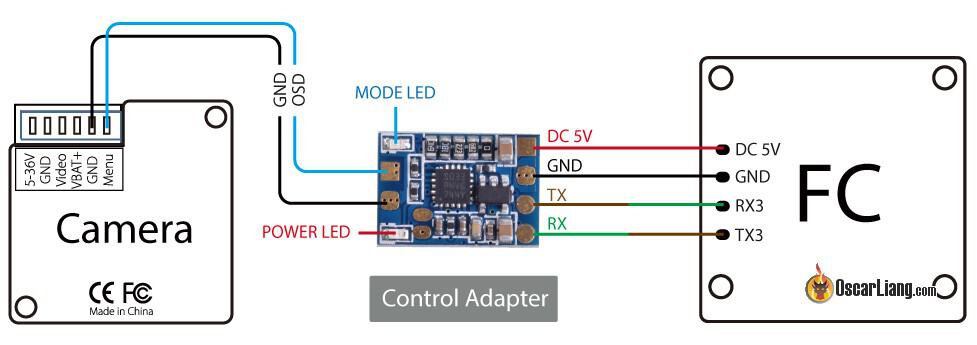
The latest technology called “camera control” even allows you to change camera settings using your radio transmitter, by connecting your camera to the flight controller. This tutorial shows you how to set up camera control. It can be very handy as you can now update your settings whenever you want without the joystick.
FPV Camera Settings Explained!
Here I will explain the common settings we see in FPV cameras. If you are looking for a specific setting just do a keyword search for the name. Let me know in the comment if there is any missing setting in this list, and which camera it is.
As you might know from my guide “how to choose FPV camera“, FPV cameras were originally just security cameras. They were adapted for FPV and many old settings related to security camera still remain, which are not useful for FPV. I’ve greyed them out in the list.
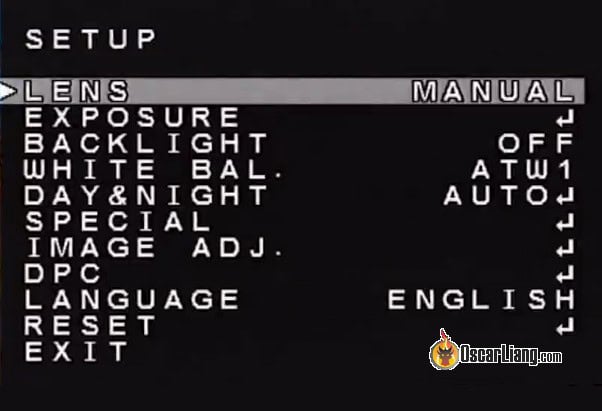
Table of Contents
Lens
It’s a security camera setting, just leave it at default, “Manual”.
There are three options, Manual, DC and Auto. It’s used to change the amount of light to let in when using some special lenses. Manual ensures we let in the maximum amount of light.
Exposure
The exposure option will give you access to several other related parameters, including shutter, brightness, DWDR (digital wide dynamic range) etc, which we will explain further later in this guide.
Backlight
This is another security camera setting, just leave it at default “OFF”.
There are three options, OFF, BLC (Backlight Compensations), and HLC (Highlight Compensation). When using BLC, the camera will brighten the foreground to match the brightness of the background, while HLC will do the opposite.
White Balance
It changes the color of your image. If you have experience with photography, you probably know that image taken in day light tends to be more blue-ish to neutral color, while under indoor lighting it can look warmer (kind of orange and red-ish). With White Balance you can manipulate the image color regardless the light source.
There are two preset settings for auto white balance you can try, ATW1 and ATW2. These generally work for most people and environment.
For advanced users, you can manually set White Balance on a slider between red and blue. Or even use the “WB Set function”.
The “WB Set function” allows you to use a particular color as a reference to decide what White Balance it should use. If you want a neutral looking image, you want to use a piece of white paper (or anything that look white) under the lighting you plan to fly under as the reference.
Day and Night
Day and Night option switches the camera between color mode and “black and white” mode. FPV Cameras in black and white tend to do better in low light. But sometimes you might want your camera to just stay in color mode regardless the lighting condition. It’s a personal preference.
There are 3 options, Color, B&W, and Auto.
The option Auto will switch the camera between color and black and white depends on the amount of light available. Color will keep it in color mode at all times, while B&W will just keep it in black and white at all times.
If you set it to Auto, you can even dig deeper and adjust light level and delay for it to switch.
Image Adjust
By entering this option takes you to another page, and gives you more parameters for adjustment. We will cover later in the article.
DPC (Dead Pixel Correction)
This function detects dead or faulty pixels in your image. Rarely you might have a single pixel that is fixed to a single color permanently and it can cause distraction. By running this function, it fills these faulty pixels with color around it.
Before doing the check, you need to put the lens cap on to ensure there is no light can get in (the image is completely black).
It’s not compulsory, but good to do it once a while.
Reset
You can reset your camera to the factory settings.
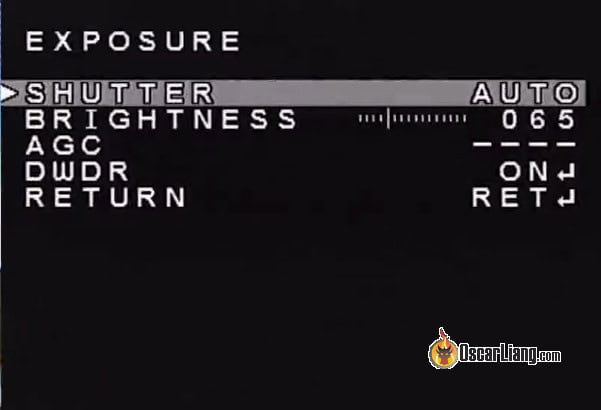
Shutter
The shutter speed option is useful for low light. I recommend leaving it at Auto.
If you set it manually to a fix number you might get an image that is over-exposed (blown out), or under exposed (too dark). However it’s useful for low light if there is not much change in light level.
Brightness
Brightness simply affects the overall brightness of the image.
AGC (Automatic Gain Control)
AGC is how much you want your camera to change “gain” to the different lighting conditions. It’s particularly useful for flying FPV in low light. There are four settings: Low, Medium, High, and Off. The high setting is supposed to work best in low light, but it will also introduce the most noise artifacts to the image.
If you only fly during the day, leave it at OFF or LOW.
DWDR (Digital Wide Dynamic Range)
DWDR or WDR is one of the most important settings in FPV camera. It allows you to see details in dark and bright areas better in the same image. Having good wide dynamic range performance is beneficial for FPV, so always turn this on.

Lens Shad.
I normally just turn this off. By turning this on and increasing level, improves visibility in shadow detail, at the cost of a noisier image.
2DNR
DNR stands for Digital Noise Reduction. This option can digitally blur out noise pixels. I don’t normally use this because I want the sharpest possible image at all times.
Mirror
It flips your image horizontally (left to right). Probably not a good idea for FPV.
Font Color
This can change the text color of the OSD menu.
Contrast
Another important setting.
By increasing Contrast, your image color will look more vibrant, but the image will also get darker. A lower contrast works better in low light and gives you more shadow detail, but your image will also look more washed out.
Sharpness
A sharper image mean you can see more obstacles better, but it can also introduce noise and digital artifacts.
For CCD cameras I can normally set it to maximum without any noticeable downside. However CMOS cameras tend to suffer from digital noise as you increase sharpness. Play around with it and see what works for you.
With sharpness being too low, your image can look blurry, almost like your lens is out of focus.
Display
Depending on what display equipment you use, choose accordingly for optimal performance. Available options are LCD, CRT and USER.
For most FPV goggles and LCD displays, “LCD” is the option you want to select.
Under this option there are a few more parameters: GAMMA, COLOR GAIN, and PED LEVEL.
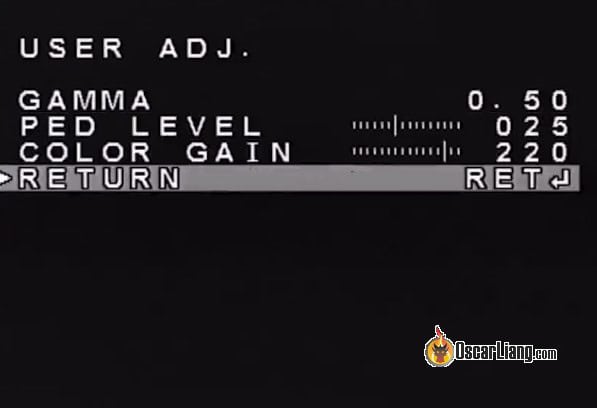
Gamma
GAMMA changes the brightness of the image. With this being too low your image can look “washed out”.
Neg. Image
This setting will reverse the colors of the image.
PED Level
PED LEVEL will adjust the level of what dark areas are considered black in your image.
The lower the settings, the more dark areas become black, and the higher the level, the more distinguished the different dark areas will be, however the image may appear lighter than real life.
Color Gain
Color gain changes the image saturation.
Share your FPV Camera Settings
Feel free to share your FPV camera settings in this thread on the forum. I have already posted some there for different lighting conditions and environment.