I will show you how to easily build a DIY LiPo Battery Discharger using halogen light bulbs. This discharger is capable of handling 2S, 3S, 4S, 5S, and 6S LiPo batteries. A halogen bulb discharger is an effective method for discharging LiPo batteries, either for storage or disposal.


There are other methods of discharging LiPo batteries, find out more here: https://oscarliang.com/dispose-lipo-battery-safely/.
Table of Contents
How to Use
Simply plug your battery into the light bulb discharger and place it in a fire-safe area.
If you are discharging for storage, monitor the battery voltage closely. When the voltage drops to around 3.85V per cell, unplug the battery. The cells may not be balanced and could require further balancing using a LiPo charger in storage mode.
Further Reading: how should LiPo batteries be handled properly: https://oscarliang.com/lipo-battery-guide/
If you are discharging for disposal, leave the battery plugged in until the light goes out, indicating that discharging has stopped. Note that halogen light bulbs have a cutoff voltage of around 1 to 2V, meaning they won’t completely discharge the battery. Confirm the final voltage using a multimeter set to voltage mode: https://oscarliang.com/multimeter-fpv/#How-to-Measure-DC-Voltage.
If there’s a little charge left, I simply connect it to a power resistor to bring the voltage to zero, which shouldn’t take long. Finally, finish it off by carefully shorting the positive and negative leads in the battery in a fire-safe place before disposing.
This method can completely discharge a fully charged 4S 1500mAh LiPo battery in less than an hour.
LiPo Discharger Circuit Diagram
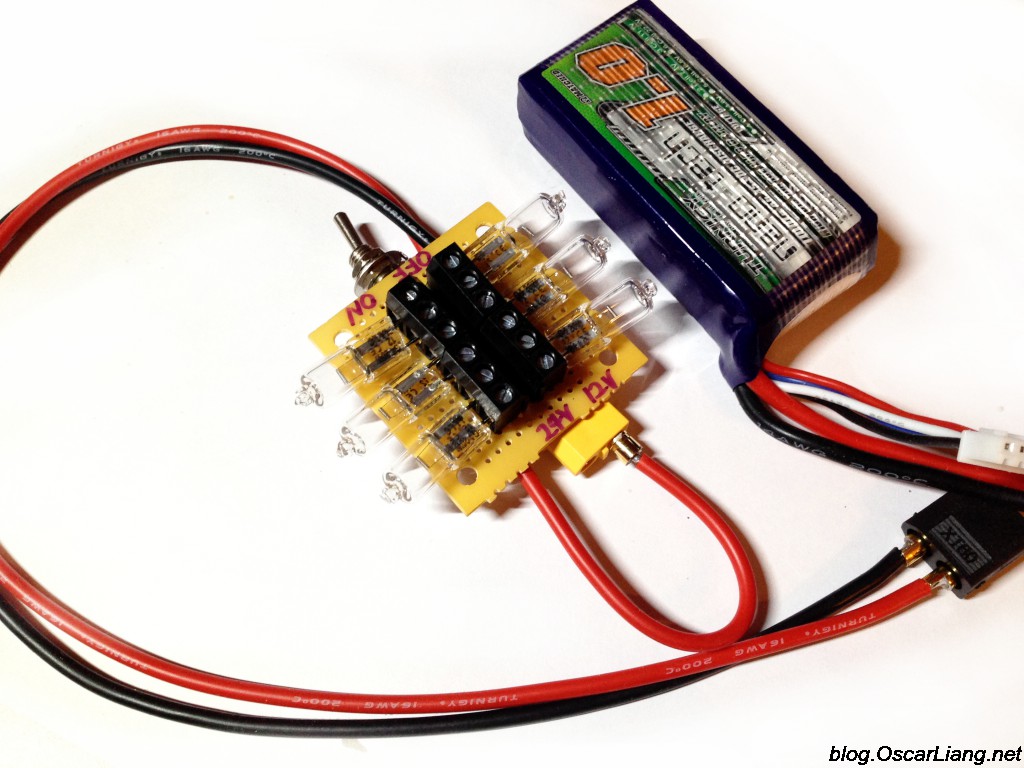
I use 6 light bulbs in this discharger, along with an on-off toggle switch.
There are options for 12V/24V discharging modes:
- 12V for 2S/3S LiPo
- 24V for 4S and 6S
The maximum voltage of a 6S LiPo is 25.2V, which is higher than 24V, but it should be fine for short periods, especially since you are often discharging half-empty batteries.
The halogen bulbs I am using are rated at 20W, so at 12V, each will draw 1.67A of current. With 3 bulbs in parallel, the total current draw will be around 5A, theoretically draining a 3S 2000mAh battery in just 24 minutes. However, as the voltage of the battery drops, the current draw decreases, and the discharge will take longer than 24 minutes.

Required Components
I’ve kept the design as simple as possible, all the parts are available on Amazon or AliExpress. The total cost should be less than $10.
12V 20W Halogen Bulbs x 6:
- Amazon: https://amzn.to/3TVXi0X
- AliExpress: https://s.click.aliexpress.com/e/_DlWVmqh
3-pin PCB screw terminals x 4:
- Amazon: https://amzn.to/48kWaIN
- AliExpress: https://s.click.aliexpress.com/e/_DdSt5Xr
Prototyping board x 1:
- Amazon: https://amzn.to/4aVJvhh
- AliExpress: https://s.click.aliexpress.com/e/_DBBFNxP
Two long electrical wires suitable for the discharging current (my max discharging current is 10A, so 20AWG should be enough. Check out this Wire AWG Chart for the suitable wire gauge):
- AliExpress: https://s.click.aliexpress.com/e/_Dk5DjAZ
- Amazon: https://amzn.to/3UoSSOH
Male & female XT60 connectors x 1:
- Amazon: https://amzn.to/3l6oonc
- Banggood: http://bit.ly/2AuxHnC
- AliExpress: https://s.click.aliexpress.com/e/_Ddy57H7
Male 3.5mm bullet connector x 1 (can be inserted into XT60 female connector):
- Amazon: https://amzn.to/3HhdT7W
- AliExpress: https://s.click.aliexpress.com/e/_DEsprD3
On-off toggle switch x 1 (optional):
- Amazon: https://amzn.to/41WTLS0
- AliExpress: https://s.click.aliexpress.com/e/_DeOQzh3


Building the LiPo Discharger
PCB Screw Terminals
You can solder the light bulbs directly to the PCB, but I prefer using screw PCB terminals for easier bulb replacement when needed (although I did not have to replace a single bulb in the 6 years I’d been using this discharger). They also potentially allow you to connect different types of electrical loads, such as high power resistors, making it a more flexible device.

Ensure you add plenty of solder to handle the high current.

12V/24V Discharging Mode Switch
The light bulbs are rated for 12V, so for discharging a 4S battery or higher, you need to put these bulbs in series, effectively doubling the voltage rating to 24V.
This is why I am using a 3.5mm bullet connector, acting as the “mode switch”. You can use it to connect either just the first array of bulbs for discharging 2S-3S LiPo (3 bulbs connected in series) , or to two arrays of bulbs connected in parallel for discharging 6S LiPo (3 bulbs per array, 6 bulbs in total).

On-Off Switch and Discharge Cables
The on-off switch is optional, as you can turn off the discharger by simply unplugging the battery (or the bullet connector). However, a toggle switch can be more convenient and safer, allowing for quick shutdown during an emergency.
I use extra long electrical wires to keep the battery as far from the light bulbs as possible during discharging in case of a fire.


Future Upgrades
These bulbs can get very warm! I’m considering adding a fan on top to aid in heat dissipation. A small fan typically requires 5V, which would require a step-down voltage regulator that gets power from the battery being discharged.
I also plan to apply liquid electrical tape over all soldered joints and connections to prevent short circuits.
Testing
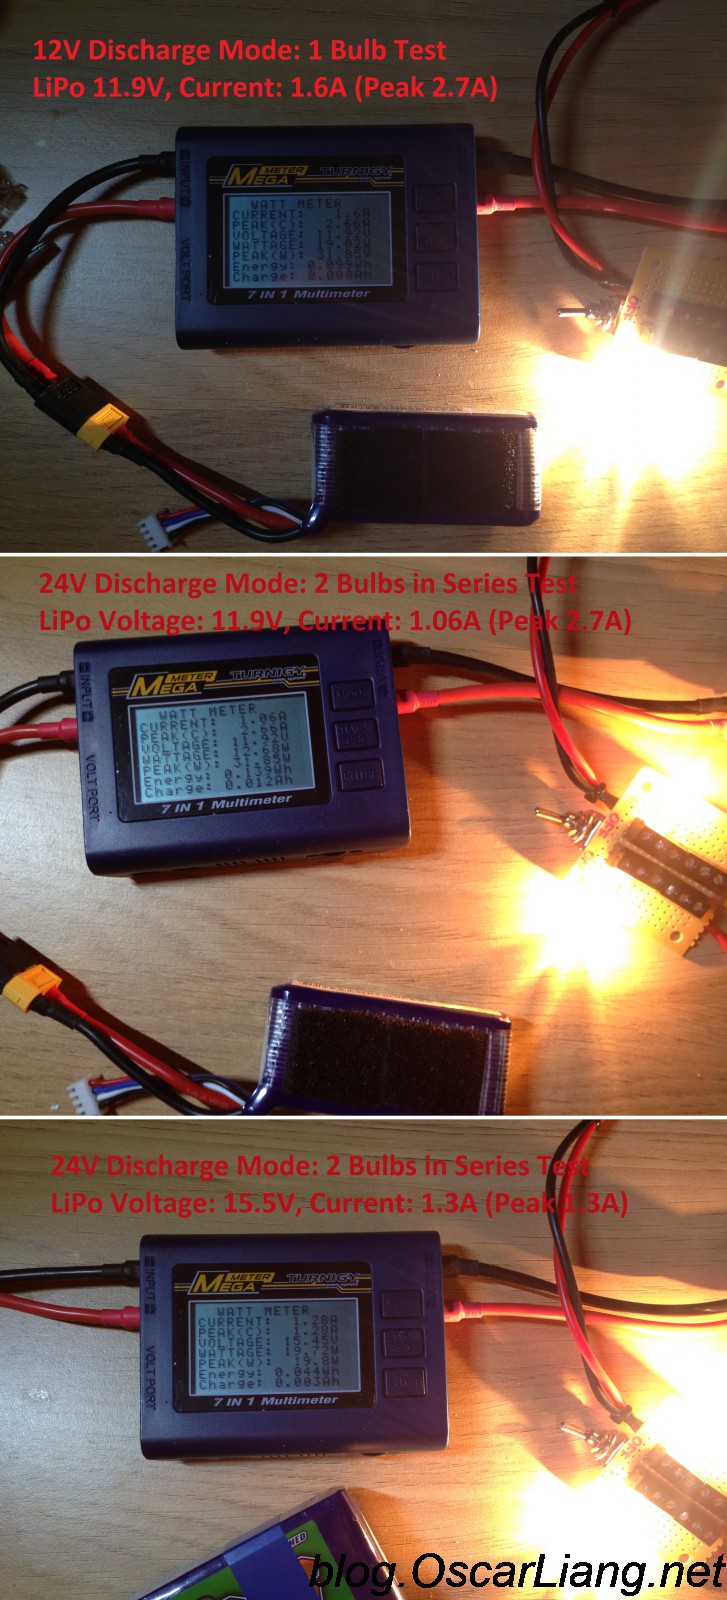
I tested the unit with just one bulb connected.
Upon turning on the light bulbs, I observed an initial current surge of 2.6A, which quickly stabilized at 1.6A. If I reconnect the bulb quickly, the surge doesn’t seem to occur again, which is an interesting observation, let me know in the comments in you know why.
These bulbs are rated at 20W. With a battery at 11.9V, the actual power draw is 19W, which is slightly lower than expected but ok.
In the 24V discharging mode (using two arrays of bulbs in parallel), the power consumption drops by nearly half as expected. Therefore, once you’ve partially discharged your 4S or 6S battery below 12V, it’s advisable to switch to the 12V discharge mode for more efficient discharging.
Edit History
- Oct 2015 – Article Created
- Jan 2018 – Updated article with a list of build components
- Jan 2024 – Updated instructions and product links
23 comments
Best way of discharging batteries is to rip your fuckin quad ✌🏻
In case anyone is still wondering, the higher initial current on the bulbs would happen because there’s more resistance when the bulbs heat up, and less resistance at the start, while they’re still cold.
So I thought I was having great success with this method. Then, I noticed that my solder was “migrating”. It started with one connection and I thought, “that is weird…I swear I finished all the soldering”. Then I noticed that after discharging two batteries the solder was “disappearing” or moving toward the wires. I have a picture. But is it possible there was so much current that it was just heating up the solder?
Not knowing much I soldered a single 75w halogenbulb to a pair of wires with an xt90 connector for the battery.
I tested the 3-in-1 discharger with resistors but on 6s they were too hot so I went simple with one
75w halogen bulb.
The bulb lights but goes out well before the battery is discharged to zero. Will it fully discharge with a 75w bulb? Will it take a long time compared to using 25w?
Is a single 75w halogen bulb too much? Should I have gone with 25w?
Hi Oscar,
why can’t be used the same method for single cell?
I splited up my 3S battery because one cell is bad and would like to safely dispose only that one…
Light bulbs have a cut off voltage, it stops discharging before voltage drops to zero. Use this for single cell DIY Resistor Discharger for Draining/Disposing Batteries
Question about odd behavior. I built the circuit as shown above and it works with the lights lighting up when connecting battery. However the discharge rate seemed extremely high (checking with multimeter via balance cable). I stopped the process and the. my multimeter showed the voltage climbing back up after disconnecting. The battery was already bad (puffed) but looked to have puffed a little more. Any ideas regarding this behavior?
Discharge current depends on the power rating of the bulbs you use, and how many do you use in parallel.
If you want slower rate, try power resistors so that you have more control to the discharge current by using higher resistance.
It’s normal voltage go back up after disconnecting, voltage drops when it’s under load.
Thanks for the quick reply. I have used 20w bulbs wired in Parellel. The voltage seems to drop a 1 volt per 10 – 15 seconds. I have also removed two bulbs and this still occurs. The voltage will drop 5 volts or so in a minute then climb back up to close to the original. It als seems to occur one my voltage drops below 9v or so. It seems to work as expected from 11v to 9v then drops rapidly.
Hi Oscar,
I dispose of old lippo batteries for our RC Club. Your article was exactly what I needed. I built your discharger (I had to learn how to solder first – not a techy!) with a few changes (gave up on the solder wire track, changed the XT60 for a toggle switch, and aligator clips on the discharge cables, as I deal with a wide variety of batteries and connectors). So far, I have dispose of 97 batteries with 15.6 hours of drain time. Discharger works perfectly and no bulb failures. Also built the ceramic resistor discharger as some batteries do not drain down to a low enough voltage to safely short out battery leads.
Thank you for a simple and effective design.
Jeff
that’s great to hear! thank you for taking the time giving me feedback.
Hello Oscar, thank you for this tutorial.
How did you fit the switch and the XT-60 to the prototyping board? (or are they just held on by the solder?)
XT60 is just held by solder :)
” The light bulbs also has a cut off voltage at about 1 to 2V, which means it won’t completely” quite the opposite, as these bulbs turn off (light wise), the filament gets lower ohms (couple ohms). For 4S, I just use a 1K quarter watt resistor (1 cent) and leave it on for a week outside.
What size PCB is that?
i think its about 10cm x 10cm.
What kind of watt meter are you using? And how to connect an alarm buzzer to that?
I’m very inexperienced but I’d like to build a gadget like that. MTIA !
this is the watt meter i was using.
This is just a simple discharger designed to be used for disposing LiPo batteries, so I wasn’t using a alarm buzzer.
You could just simply plug a voltage alarm in the balance lead, however these alarms normally only go off at 3.5V percell.
How low is it safe to discharge a lipo? I have a damaged one I need to dispose of
depends on why you want to discharge it… if for storage, best to discharge them to 3.8V per cell.. if you want to disposal them discharge them as close to 0V as possible.
Hi Oscar
that’s too simple!
Please add an Arduino / µc with auto voltage detection to the discharger which switch the bulbs with mosfets. ;-)
Thanks.
hehe… no need to overcomplicate a simple idea :D
Hi Oscar,
sure, it would be more a challenge for “because it is possible”.
I’m going to buy* an electronic load, so it will be useful for this too.
(to less time and knowledge to built it)