Let’s check out the NewBeeDrone AcroBee75 BLV5 BNF in this review, a 2S Tiny Whoop designed for both indoor and outdoor flying. This drone is built around the latest BLV5 flight controller, featuring the STM32G474 MCU and MPU6000 gyro. Notably, it integrates the first-ever built-in ExpressLRS diversity receiver in an AIO whoop flight controller, making it a standout in its class.

Learn more about Tiny Whoop in my buyer’s guide: https://oscarliang.com/best-tiny-whoop/
Table of Contents
Where to Buy
Get the Acrobee75 from NewBeeDrone: https://oscarliang.com/product-k69l

Accessories in the box:
- AcroBee75 BLV5 Drone
- NewBeeDrone Azi 40mm Tri-Blade Propellers
- Accessory Pack (spare screws and zip ties)
- Quick Start Guide
- Stickers
Batteries are not included, get them here: https://s.click.aliexpress.com/e/_DdND8Op
Get some spare propellers too: https://oscarliang.com/product-xi7f
Specifications
- Frame: NewBeeDrone 75mm Cockroach75
- Propeller: NewBeeDrone Azi 40mm (Tri-Blade) Micro
- Flight controller: BeeBrain BLV5
- Motors: Flow 0804 14000KV
- Camera Mount: Goober Canopy V2
- Camera: Runcam Nano 4
BLV5 Flight Controller Specifications:
- MCU: STM32G474
- Gyro: MPU6000
- 4in1 ESC: 18A, Firmware target Z-H-40, Preloaded with Bluejay 0.19.2 48kHz
- Receiver: TCXO ELRS 2.4GHz Diversity Receiver (UART)
- VTX: 25mW / 100mW / Smart-Max (400mW)
- Motor Plug: JST-1.0 3Pin
- Receiver: Built-in TCXO Crystal Oscillator ExpressLRS 2.4GHz Diversity Receiver (UART Base)
- Flight Control Weight: 5.8g
- Flight Control Size: 29x29x7.6mm / 25.5×25.5mm
- Battery Input: 1S-2S
- UART1: 0.84pin JST
- UART3: Free
- UART4: Free
Frame and Durability
Unlike most 75mm whoops that rely solely on plastic frames, the AcroBee75 incorporates a combination of carbon fiber and plastic. This design enhances the stiffness of the frame, reducing vibrations from the motors, which not only improves durability but also positively impacts flight performance. The carbon fiber, which is about 1mm thick, provides a solid backbone without significantly adding to the weight.

While the frame is fairly durable, after a few hard crashes, the plastic parts may bend out of shape. Fortunately, it’s easy to reshape them by hand. You can also use a hairdryer to gently heat the plastic, hold it in place while it cools, making it easier to restore its original shape. The carbon fiber, however, held up flawlessly throughout my test flights, which is a promising sign for the long-term durability of the drone.

Components
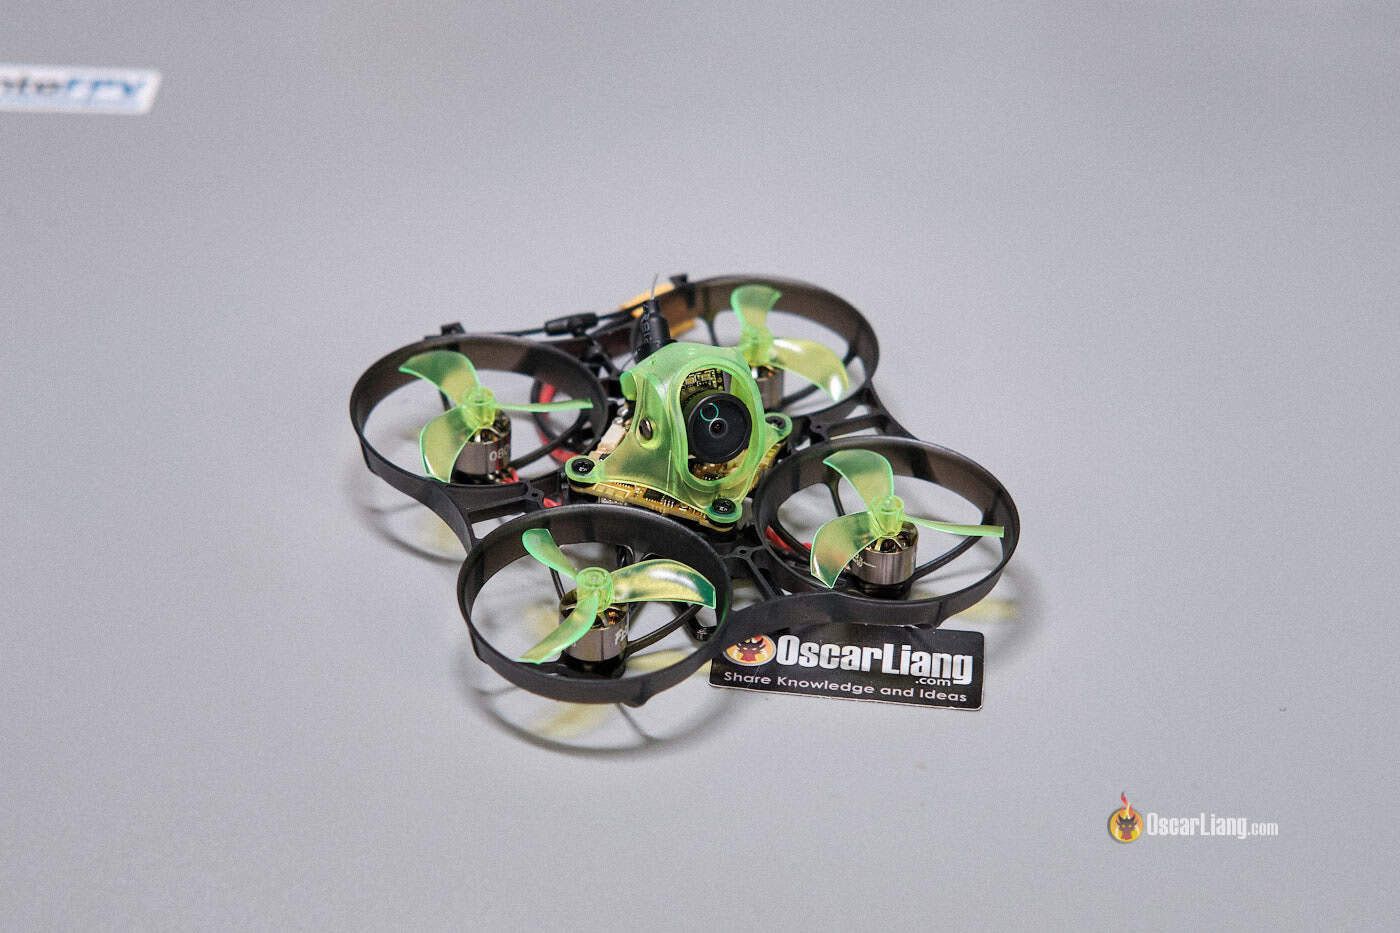
At first glance, the AcroBee75 looks similar to its predecessor, but it’s packed with new hardware and now supports 2S input, giving it more power.

The AcroBee75 BLV5 packs a lot of tech into a small form factor.

One of the standout features is the flight controller, which integrates a VTX with variable power levels. It offers 25mW for racing, 100mW for freestyle, and a Smart-Max mode that boosts output up to 400mW for long-range flying. Using the FPV range estimator (https://oscarliang.com/js/fpvrange.html), and with a 9dBi patch antenna, you could theoretically achieve a range of up to 2km at the 400mW setting under ideal conditions.

A surprising addition is the dual antenna setup on the flight controller, which I haven’t seen before on a whoop. This built-in ExpressLRS diversity receiver is likely the first of its kind on a whoop flight controller. One antenna is mounted horizontally, while the other is positioned vertically in the frame, ensuring optimal signal reception no matter the drone’s orientation.
However, having a diversity receiver on a tiny whoop might be overkill since we typically don’t fly these small drones long distances. ExpressLRS excels at long range, even a single antenna receiver would likely suffice for this purpose. I hope NewBeeDrone puts this flight controller to good use in the future, perhaps in a micro FPV drone designed specifically for long-range flights.

The FPV camera is the Runcam Nano4, housed in NewBeeDrone’s Goober Canopy V2, providing a durable and compact setup. The motors are Flow 0804 14,000KV, equipped with dual ball bearings, which should offer smoother and longer-lasting performance compared to bushings. The propellers are NewBeeDrone Azi 40mm tri-blades, and you get an extra set in the box, which is always a nice touch.

Battery and Weight
The AcroBee75 BLV5 uses a 2S LiPo/LiHV battery with an XT30 connector, and features a lightweight, flexible 3D-printed TPU battery holder. This mount is designed to securely hold various battery sizes in place, even during crashes, offering versatility for different flying styles.

However, the mount is designed for specific battery sizes. The stock holder is designed for 2S 450mAh batteries, while a spare mount included in the package fits a 2S 850mAh. The mount is attached with four screws, so if you want to switch to a different battery size, you’d have to swap out the mount, which can be a bit inconvenient in the field. Thankfully, I found the larger 850mAh mount is flexible enough to also hold smaller packs like 650mAh or 450mAh batteries without needing to switch mounts, adding some convenience.

The AcroBee75 weighs 36.6g without a battery. With a BetaFPV 2S 450mAh LiPo, the total weight is 64.5g, and with a Tattu 2S 850mAh, it weighs in at 76.2g.
Indoor and Outdoor Flights
While the AcroBee75 is technically capable of flying indoors, its 2S setup makes it quite powerful and fast, which can make indoor flights challenging in an average-sized house. Flying a 1S 75mm whoop indoor is pretty hard, the extra thrust from 2S means throttle management can even more tricky, especially for beginners. If you’re just starting out in FPV, I recommend getting comfortable flying outdoors before attempting indoor flights in tight spaces. If indoor flying is your primary goal, especially in smaller areas, you might want to consider a 1S whoop like the Air65 for better control and ease of use: https://oscarliang.com/betafpv-air65/
In my experience, the AcroBee75 is more suited in outdoor environments. The increased power from the 2S battery setup and the 14,000KV motors make it ideal for fast, aggressive flying. It handles larger maneuvers and quick moves with ease, making it a fun and versatile flyer. However, if you’re mainly flying outdoors, I would consider a ductless micro drone, like the 2S 3″ quad I previously built, which tends to be faster, more efficient, and better at handling wind due to the lack of duct weight. The AcroBee75’s main advantage lies in its propeller guards, which add a layer of protection, especially when flying around people or in tighter spaces.
Flight Performance
The AcroBee75 on 2S is a lot of fun to fly. The flight performance met my expectations—it’s exactly what you’d want from a 75mm whoop. With a 2S 850mAh battery, it hovers at around 35% throttle, it’s not not overly powerful and control feels manageable, making it more beginner-friendly compared to other, more powerful freestyle-oriented 2S FPV drones. The drone is pretty locked in and responding well to stick inputs. I didn’t notice any significant bounce-back or excessive propwash.
In terms of efficiency, I achieved over 8 minutes of flight time with a 2S 850mAh battery, mixing acro flying and cruising. Using a smaller 2S 450mAh battery reduced flight time to about 4 minutes, and I also noticed more voltage sag. I recommend sticking with larger packs like 850mAh for more balanced performance, especially in windy conditions, where the extra weight actually helps stability. For example, I flew this quad in 20MPH winds as shown in the video, and while not ideal, it remained manageable. In calm weather, the drone performs even better.
As for signal and range, they are impressive. Thanks to the diversity ExpressLRS receiver and the 400mW VTX, you could theoretically fly 1km to 2km without issue. However, I don’t recommend beginners attempt flying that far—finding this tiny quad in bushes after a crash could be a challenge!
What Can Be Improved
There are a few areas that could be improved with the Acrobee75.
One of the main issues I encountered was with the OSD (On-Screen Display). The OSD text would randomly disappear for a few seconds before reappearing. While not a deal-breaker, this can be distracting during flights.
The Betaflight configuration also needs some refinement. For example, the current sensor wasn’t properly calibrated and it was under-reporting, and the RSSI warning was set too high, triggering alerts prematurely. Adjusting these settings would improve the overall experience.
I found the FPV camera slightly too dark, even with the brightness on my goggles set to maximum. It could also be the lack of dynamic range, which made the shadows appear too dark, especially when flying on a sunny day.
Even though the AcroBee75 has prop guards, I lost a few propellers on my first day of testing due to crashes. The props are press-fitted onto thin motor shafts, which makes replacing them easy, but they can also come off just as easily. I recommend keeping extra props on hand.
The U.FL connector for the VTX antenna is well-secured but could benefit from a dab of glue for added security, especially for those prone to crashes. I suggest using a pliable glue like E6000 rather than hot glue, which tends to melt due to the heat from the VTX.
Additionally, the drone doesn’t stand flat when using a large battery mounted on the bottom, making takeoffs a bit tricky at times.
How to Setup
Setting up the AcroBee75 for your first flight is fairly straightforward. Here’s the included user manual.

The drone’s flight controller comes preloaded with Betaflight 4.5.0 firmware, and the board target is ARCOBEE_75. The ESC firmware is Bluejay 0.19 48KHz with the target Z-H-40.
Binding the Receiver:
- The built-in receiver uses ELRS 3.4.3 firmware with the target NewBeeDrone Diversity 2.4GHz RX.
- Plug in the flight controller USB cable to power the receiver. After a minute, the receiver will enter WiFi mode.
- Connect your phone to the ExpressLRS RX WiFi hotspot and open a browser. Go to the IP address 10.0.0.1 to access the ExpressLRS web interface, and enter your bind phrase there.
- You can also follow other binding methods provided in the instructions: https://oscarliang.com/bind-expresslrs-receivers/
Betaflight Configuration:
- Configuration: Enable DShot beacon and set the arming angle to 180°.
- PID Tuning: Adjust the rates to your personal preferences.
- Modes: Assign switches for arming, angle mode, beeper, and turtle mode.
- OSD: Set up the OSD to display RSSI_dBm and link quality. Remove the RSSI value, and adjust the RSSI warning threshold to a lower value, such as -90.
Conclusion: Is the AcroBee75 Worth It?
The NewBeeDrone AcroBee75 BLV5 is a great choice for pilots looking for a durable 2S analog Tiny Whoop. While it’s not the best option for tight indoor spaces, it’s more suited for outdoor environments and larger indoor areas, and the extra protection from the propeller guards is valuable. Its flight performance is smooth and efficient, durability is impressive, and the overall build quality is decent. My only minor concern is the occasional flickering OSD, not a deal breaker by any means, just a bit distracting.
- Get the Acrobee75 from NewBeeDrone: https://oscarliang.com/product-k69l
- Batteries are not included, get them here: https://s.click.aliexpress.com/e/_DdND8Op
- Get some spare propellers too: https://oscarliang.com/product-xi7f
3 comments
With original software, everything is ok.
After testing the latest version 4.5.1 oct21 Review b , arming not possible. ???
Maybe just use the original firmware?
If you insist on using the latest firmware, here’s a guide to help you troubleshoot the issue: https://oscarliang.com/quad-arming-issue-fix/
Thanks for the tip.
I am back to the original version. My guess is expressLRS.
That’s where the problems occur, even when binding.