The FPV market had been lacking in reliable yet affordable frames. Traditionally, the TBS Source One was the only good budget option, but the game is changing. Enter Speedybee’s Mario 5 Frame, a contender that caught my eye not just for its budget-friendly price of $33.99 but for its suite of promising features and upgradable options. Let’s dive into what makes the Mario 5 stand out, including its build quality and overall performance.

Table of Contents
Where to Buy?
You can get the Speedybee Mario 5 from these vendors:
- Speedybee: https://oscarliang.com/product-xwm1
- AliExpress: https://s.click.aliexpress.com/e/_Dl33F6N
The Mario 5 Frame comes in two distinct styles: the Dead Cat (DC) for cinematic enthusiasts keen on keeping propellers out of shot, and the Classic True-X (XH) for freestyle flyers and racers craving symmetry and balance. Curious about the different frame configurations? I found a great resource here: https://oscarliang.com/fpv-drone-frames/#Configuration

Specifications
| Mario 5 DC Wheelbase | 227mm |
| Mario 5 DC Weight | 129 ±5g (3D Printed Parts Excluded) |
| 170 ±5g (3D Printed Parts and Injection) | |
| Mario 5 XH Wheelbase | 226mm |
| Mario 5 XH Weight | 126 ±5g (3D Printed Parts Excluded) |
| 167±5g (3D Printed Parts and Injection) | |
| Top Plate Thickness | 2.5mm (T300 3K) |
| Middle Plate Thickness | 2.0mm (T300 3K) |
| Bottom Plate Thickness | 2.5mm (T300 3K) |
| Arm Thickness | 6mm (T300 3K) |
| Camera Mounting Screw | 7mm |
| 3D Printed Parts | Yellow TPU |
| Battery Anti-Slip Pad | Silicone 3mm |
| Motor Spring Hole Position | Φ8mm |
| Compatible Propeller Size | Max 5.1 Inch |
| Motor Mounting Hole Distance | 16-19mm |
| FC Mounting Hole | 30.5×30.5 (M3) |
| VTX Mounting Hole | 20×20 (M2) / 25.5×25.5 (M2) |
| Head Material | Aviation Aluminum Alloy |
| Aluminum Column Material | 7075 D5*23mm/D46*22mm |
| Internal Mounting Height | 23-31mm |
| Receiver Installation Space | 25*13*6mm |
| Suitable Capacitor Size | Φ10mm*20mm |
| GPS Installation Size | 18*18*7mm |
Different Versions
What genuinely sets the Mario 5 apart is its options and scalability depends on your budget and requirements. There are 3 versions: Mario Lite, Mario Advance, and Mario Pro.

Starting with the Mario Lite – the base model at $33.99, you can enter the game affordably and opt to upgrade as you go. It offers the bare minimum of parts, but slightly more than what you would normally get with the TBS SourceOne. The carbon fibre parts have much nicer finish too.
The Advance version adds aesthetic and functional enhancements, while the Pro version (though not yet available) promises even more. For those without a 3D printer, the Advance version is a no-brainer, offering significant value for a small additional cost of $6.
Personally I prioritize value and performance over how it looks, so I will be building the Pro version, maybe excluding some unnecessary parts to save weight.

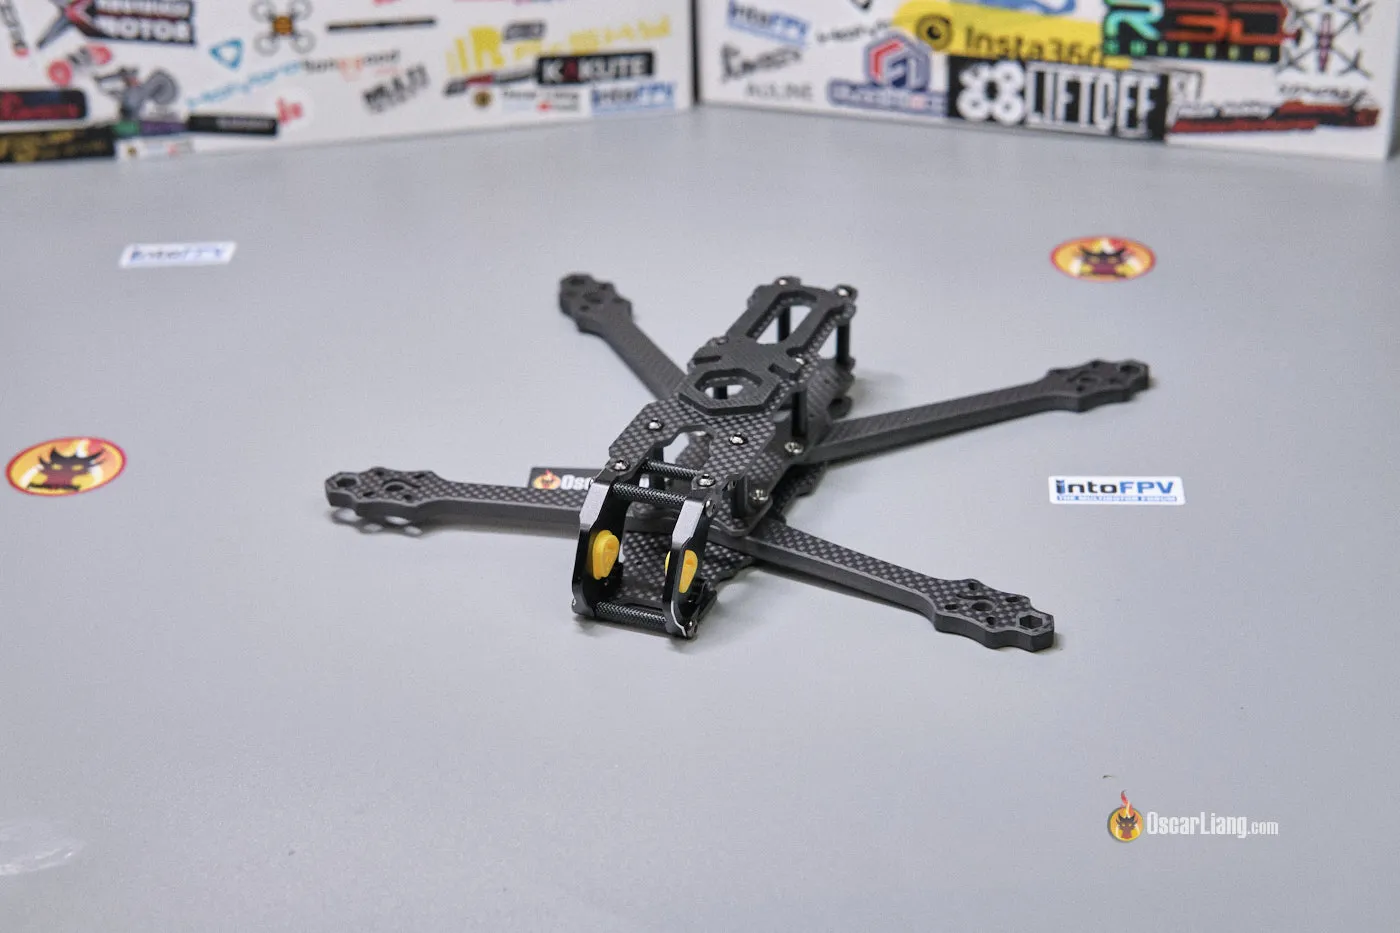
Build Quality and Design
At first glance, the Mario 5 frame impresses with its robust design and build quality, all for an appealing $34 price tag.
This frame includes a top plate, bottom plate, and a mid-plate, alongside specific front and rear arms, complemented by a variety of accessories like molded plastic parts, silicone mounts for the camera, aluminum standoffs, and an assortment of screws.

The carbon fiber plates are 2mm-2.5mm thick, while the arms boast a thickness of 6mm.
A notably clever feature is the 10x20mm bay for capacitor placement, a design choice that efficiently avoids clutter. This is something I’ve never seen before and is likely a first in FPV drone frames.

The Pro version is equipped with metal “gills” for the claimed “enhanced airflow”, which also adds a cool aesthetic touch. However, I plan not to install these in favor of saving weight, as I find them unnecessary for my build.
The mounting options for the XT60 connector have been thoughtfully designed, allowing for placement at the front or back of the frame. The inclusion of a metal bushing for VTX antenna installation is a welcome addition, offering an extra layer of protection.

Moreover, the frame supports both 19mm and 20mm FPV cameras, including any micro FPV cameras as well as the DJI O3, thanks to the included silicone dampers. This ensures compatibility with a wide range of camera options, marking an advantage over the Source One, which lacks native support for the O3 camera without custom-made 3D printed parts.

The rear of the frame is designed to house a video transmitter, providing enough space even for the bulky DJI O3 Air Unit.

The Assembly Experience
Thanks to the manual provided on the Speedybee website, assembling this frame is a relatively straightforward task for an experienced drone builder like myself. However, beginners might find the manual lacking in detailed, step-by-step instructions.
Yet, putting together the Mario 5 turned out to be more complex than anticipated. The frame’s unique design, such as the interlocking arms and vertical carbon fiber pieces intended for capacitor housing, felt a bit overengineered and perhaps slightly unnecessary.

It’s unclear whether the issue was due to the tight tolerances or if the carbon fiber parts were inaccurately cut, but I found it virtually impossible to install the small vertical pieces and the arms at the same time. I spent over 40 minutes attempting this to no avail, which was quite frustrating. Eventually, I decided not installing those small vertical pieces altogether. Despite this, the arms remained stiff. While the tight fit from the design’s precise tolerances undoubtedly contributes to the frame’s overall stiffness—enhancing its structural integrity—it could also complicate the process of replacing arms later on, potentially requiring disassembly of the frame’s bottom and mid plates.
Final Thoughts
As mentioned earlier, one significant challenge I encountered with the Speedybee Mario 5 frame was its assembly complexity. While this complexity showcases SpeedyBee’s commitment to detail, it may be perceived as overkill by pilots who value simplicity. Additionally, the tolerances are slightly too tight, complicating the assembly process further.
Another point to consider is the lack of native support for 20x20mm stacks. However, this issue can be readily addressed with the use of an adapter.
Despite these hurdles, the Mario 5’s price point is remarkably competitive, offering a cost-effective option without compromising on quality. The frame’s potential for customization and its sturdy design ultimately stand out. With the capacity to upgrade from the Mario Light version to the Mario Advance or Mario Pro, the frame provides both flexibility and scalability.
You can get the Speedybee Mario 5 from these vendors:
- Speedybee: https://oscarliang.com/product-xwm1
- AliExpress: https://s.click.aliexpress.com/e/_Dl33F6N
Let’s hope Speedybee will begin offering spare parts in the near future. Currently, I can’t find spare arms and plates on their website. This addition would greatly enhance the frame’s appeal and longevity in the competitive FPV market.
2 comments
I had to return mine on amazon. As it was a pain to put together, and just didn’t fly anywhere near as nice as my AMAX frame. This is just another cheap product by speedybee for new pilots to take advantage of. Also have a friend with one and he says all it does is break or something else in crashes. The arms might be 6mm but they are not designed for the average FPV crash.
Wish I never went with speedybee, but hopefully you have better luck….
I just finished my Mario 5 XH build. I can confirm that assembly of central part with those tiny vertical carbon fiber pieces is pain in the ass. Overall, this is a decent frame. But I ll stick to my good old SpeedyBee FS225 V2 which is way easier in assembly and maintenance, supports both 30×30 and 20×20 stacks and still has very good resonance characteristics