The Radiomaster TX16S is a great radio, but you can’t remove/swap/upgrade the antenna for the internal multiprotocol module. In this tutorial, I modified my TX16S with a SMA pigtail so it has a removable antenna.

My full review of the Radiomaster TX16S Transmitter.
If you don’t have a 3D printer, you can purchase this kit made by Radiomaster: https://s.click.aliexpress.com/e/_A9WJr7
Warning: This DIY hack has not been approved by the manufacturer. If you decide to follow the instructions in the post, do so at your own risk, I take no responsibility for any damage caused.

I want to be able to remove the antenna from the TX16S radio, so it fits better in my bag and doesn’t damage the antenna. This also allows a higher gain antenna to be used, but make sure to check your local regulations before doing so.
What You Need
- 1x 10cm (4inch) U.FL to SMA coax cable (or RP-SMA, depending on what antennas you are going to use)
- Amazon: https://amzn.to/2Nny4W4
- Banggood: https://bit.ly/3fRgOVs
- 2x 6mm-7mm screws, preferably M2.2, but M2.3 should also work. Don’t ask me why the odd screw size, ask Radiomaster :) eBay should have them
- 1x small zip tie
- Removable glue, such as hot glue or E6000 glue
- 3D printed holder (for the coax cable): https://www.thingiverse.com/thing:4493205


These are the screws I am using (black ones), it doesn’t have to be this type, I just happen to have these and they fit. The silver screw is from the TX16S housing, for comparison.

Optional
Anti-static wrist strap: https://amzn.to/2Z5D1IC
Not necessary but recommended, it helps protect sensitive electronics from static. If you don’t use this, make sure to “ground yourself” to discharge static electricity by touching grounded conductive surface.
SMA / RP-SMA Male to Female Adapter: https://amzn.to/318tym7
SMA connectors have finite mating cycles (about 500 times), RF performance will decrease over time the more you remove and install the antenna. Over-tightening the antenna can also reduce lifespan.
It’s not uncommon that some people get an SMA adapter between the antenna and pigtail, so it will only wear out the $2 adapter and not the pigtail. However the adapter will result in a slight signal loss, it’s no big deal if you don’t push your signal limit often, but that’s your call.
Antennas Options
- Cheap Antenna: https://bit.ly/2NyqFU1
- VAS Diamond Antenna (RP-SMA): https://bit.ly/2B38MKf
- VAS Shapeshifter (RP-SMA, Selectable Gain): https://bit.ly/2Yp2v4t
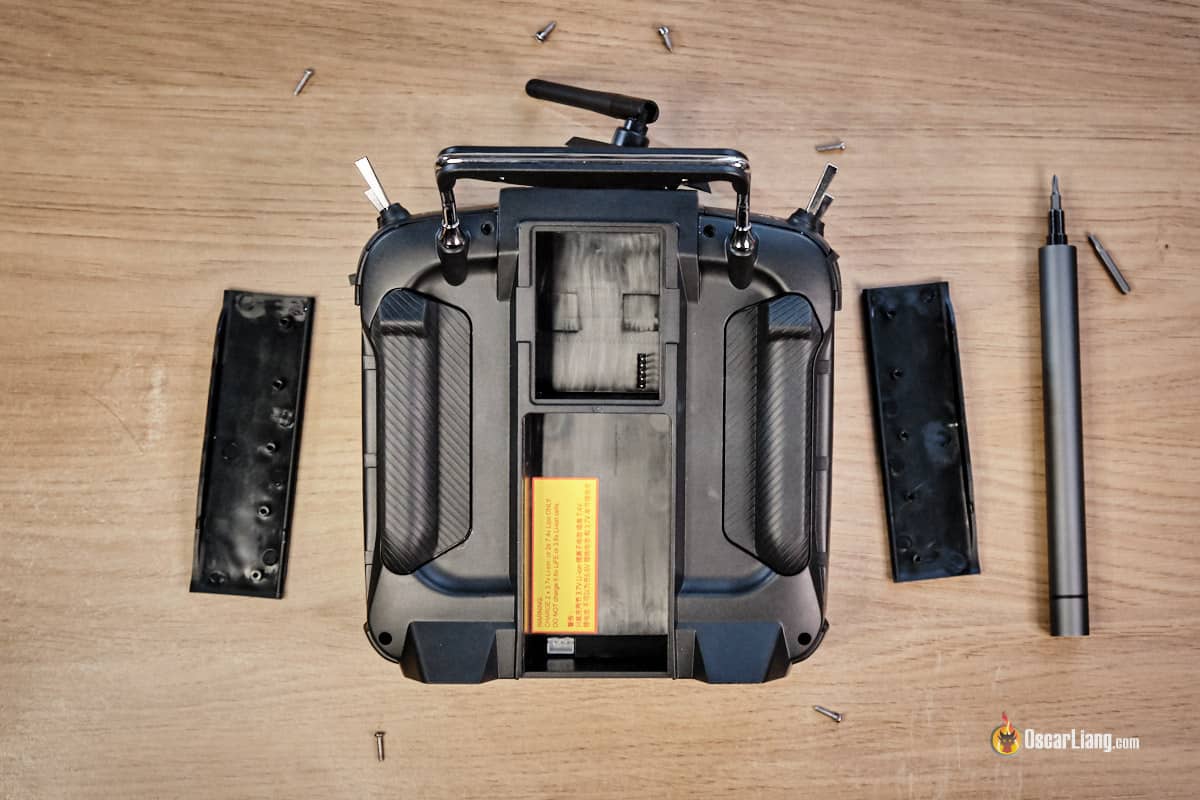
Steps
Take the TX16S apart by removing the 4 screws on the back, and two screws on the top. You also need to remove the two rubber plates on both sides.
This is how the original antenna is installed in the TX16S.

The antenna connector and coax wire are glued to the board, but this can be easily removed with a pair of wire cutters.

The coax wire is cable tied to the plastic strut.


Now, remove the antenna wire from the board. Antenna connector is U.FL (IPEX).

Squeeze the end of the antenna and push it out of the top plate.

By looking at the two unused screw holes, I have a feeling that the radio was originally designed to have removable antenna, but somehow it didn’t happen in production.

Insert the U.FL to SMA coax cable into the 3D printed holder. You should leave the wide washer in the SMA connector, it will help prevent the SMA connector from being pulled out of the antenna hole.

Install the holder on the top plate.

Connect the UFL cable on the PCB. Zip-tie the coax to the same strut.


Hot glue the exact same spots to secure the coax cable.

While we have the radio taken apart, why not adjust gimbal spring tension too? :)

Now we can put it all back together, and we have it :)

Make sure you put antenna on before powering up the radio, and that your antenna connector matches the one on your radio. Otherwise you could fry the transmitter module due to overheat.
Also you might want to fine tune the frequency for your internal RF module for maximum performance.
Broken IPEX Connector
If you have a damaged U.FL / IPEX antenna connector on the RF module, you can purchase a new RF module board here: https://oscarliang.com/product-7tl5
Or you can try to solder the antenna to the board directly as shown here (image credit to Jeremy Fidler). The coax wire has shielding that should be soldered to ground.

28 comments
Great workaround. You could just buy an additional SMA 50 Ohm Load to put on the female so you dont need an antenna connected if you use external transmitters.
uk.rs-online.com/web/p/rf-terminators/1440920
They are cheap and are designed for usage like that.
Hello. is it possible to connect the antenna from the 2.4Ghz receiver inside instead and hide it inside?
Yes you can
Possible but not recommended as it will limit range.
I tried the mod, my library printed the SMA holder for me, but the SMA isn’t tight, the whole antenna flops around, I gave up, and just ordered one from RadioMaster, they offer them direct from the manufacturer, the SMA support has a recess to support the SMA much better.
What you need in conjunction with this part/mod is a holder for the adapter too.
https://www.thingiverse.com/thing:4671876
I replaced my antenna with a new Radiomaster upgrade version, literally says radiomaster on the package with a part number. Well after doing so and making sure all work was done with the battery removed it now loads with an error of bad radio data. All of my models are gone and there is only a Spektrum Internal option. I am lost, it says to calibrate, I do so and after powering off it all has to be done again upon powering on. Nothing seems to work, no stick control at all, all my models are gone. I chose to upgrade the antenna hoping to get some range. This radio literally only had a range of 400′ in direct line of sight before any upgrade attempt. It was unusable with such a short range, this was the case with multiple brands of receivers to include Flysky, Radiomaster, Spektrum, Futaba and Orange. The Radiomaster receiver had the worst range on all at only 300′. This is my second TX16s, first one screen died on second power up just after getting airborne and it drove my plane into the ground. What the heck is going on here? I miss the days of the old 72mhz systems lol! At least then you had a range that was somewhat consistent and omnidirectional. All I want is this radio to be capable of a range of 2000′ just in case, while normal flying will never be more than 1000′ away from the field. By the way I fly giant scale, so it is easy to see at 500-1000′. Any advice anyone???
thank you for all you do for the hobby!
Radiomaster has launched this mod
If the board side of the antenna connector somehow became damaged, replacing it is also an option.
I believe the part number is either a Murata MM5829 or MM4829 for the surface mount RF connector. I have soldered them by hand before and its very straightforward with a set of tweezers and a soldering iron. If someone were to replace it, just order both the 5829 and 4829 and one will probably be the right footprint.
I figure if you’re going to solder, at least do it right! Might want to add this into the article!
If you do the removable antenna mod, it is a good idea to look into potentially buying a “terminator” or “load” cap. Basically just a brass little cap to put on it that would prevent frying the module if you accidently turned it on without an antenna. So for instance if you want to run crossfire/tracer/ghost, you could put the little terminator on there. If you happen to create a model for simming or something and accidently turn on the internal RF module, the terminator would save it from overheating.
Hi Oscar, I have just attempted this mod but backed out when I couldnt see any way of securing the SMA connector in the printed holder. I can see how it prevents the connector from being pushed down into the case, but cannot see what stops it from either rotaing, or being pulled up out of the case. I thought about gluing the coax into the holder, but that seemed too much of a bodge, so I reverted to the stock aerial. Perhaps Im missing something here, and was looking forward to fitting my diamond aerial, but ….. ??
Is there a way for me to post a picture here on my comment ?
Thanks
there’s a zip tie holding it in place
Hi TIM, I have found a solution it is a propeller adapter rings. I put it from inside and a screw outside. It is working very well !
Thank you for the guide Oscar!
Actually I don’t use the internal transmitter of the TX16S at all, i only use the external crossfire module. So my question is, after having modded the antenna, is there something to plug on the SMA in order to avoid any damage on the internal TX board ? I mean something like a “fake load”, like a SMA plug. I don’t need an antenna, I just want to close the SMA connector avoiding any possible damage.
Thanks!
Bye
Yea it’s best to have an antenna attached when you use the TX, just in case somehow the internal TX module is activated. You can put a “dummy load” on it, these can be bought on sites like Banggood. They are small and you can just leave them on like a cap.
Hey Oscar, thanks for the guide.
I couldn’t find out the dBi of the stock antenna. Do you know how much it is?
Otherwise its hard to tell which other antenna to put to actually increase the range.
I did measure the original antenna and the efficiency is better than I expected. Around -18dB at 2.4 – 2.5 GHz .
I hope you can help
Thanks
Also about the 3D print holder, I had to increase the size of the hole. For the holder screw I used servo screws, it is just the right size.
Hi Oscar,
I did manage to power up the tx16 pro hall gimbal version without antenna. After, I think, 30sec to 60 sec I saw my mistake. How can I be sure that the transmitter module is still reliable? Should I replace it? Stupid me!!
I think it’s probably still okay. Just test the range in a safe area and see if RSSI is normal.
You can find UFL to RP-SMA (and probably SMA) adapters with the wide base, so you don’t need an adapter for that. The non-removable antenna is a CE requirement I believe, that’s why the micro crossfire v2 unit has been designed the way it is now, with “non-removable” antenna which you ofc can replace with relative ease. I’m in the process of doing this to my radio too, I’m just waiting for the parts. The original antenna is pretty bad, even the cheapest wlan stations have at a metal pin keeping the joint together, this one is just pure plastic and breaks like glass.
Thanks for the tute! Just got the parts I needed and am going to try this out once it arrives. :)
Hello
thanks for the very detailed procedure but does this really help the range of the radio?
thank you
If you use a higher gain antenna, yes
Hi there Oscar, thanks for the guide. Sadly I don’t have a 3d printer so cant seem to acquire the SMA holder that you printed. Is there anywhere I could get one from? Ive been looking for a RPSMA *panel mount* to ufl /ipex but all the ones available don’t seem to be long enough.
Any ideas?
Cheers
You can download the STL file from thingiverse (link in article), and use a local 3D printing service – you can upload the file and they will print and ship it to you. Just google 3D printing service in your local area.
Thanks, Oscar! That was so detailed and carefully documented.
Very helpful! Keep up the good work!
I have several of these printed. If you want I can send one to you.