By adding a LED On/Off switch power button to your Fatshark FPV Goggles, you no longer need to unplug your battery to turn if off :) The LED switch looks awesome and you also know immediately if your goggles is powered on to avoid over-discharging your battery.

Many thanks to FFun FPV for sharing this DIY mod with us!

Warning: By doing this mod you will void the goggles’ warranty, do this at your own risk, FFun FPV and OscarLiang.com are not responsible for any damage caused.
Hardware Requirement
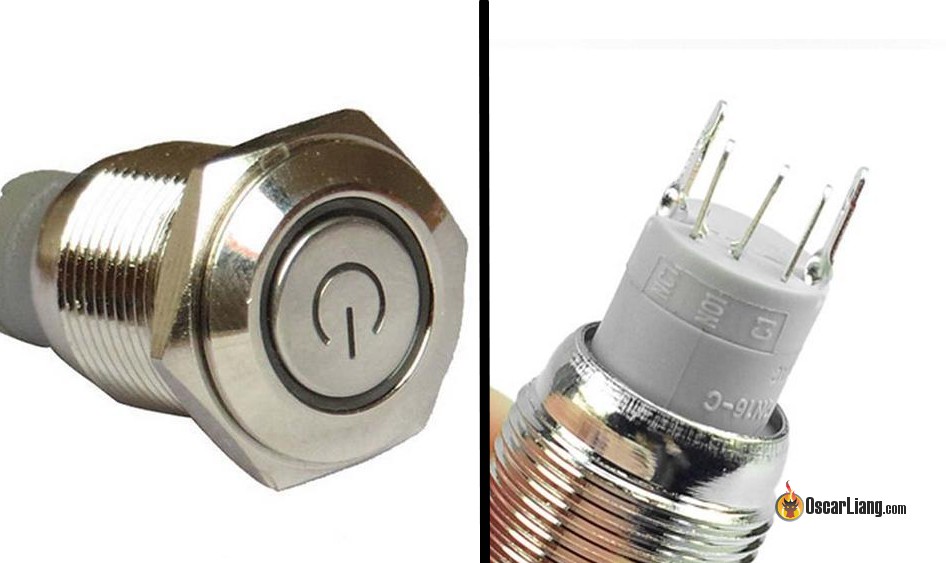
It really doesn’t matter which type of LED on/off switch or button you use, as long as it fits your purpose and you know what you are doing. We have chosen the 12V 2A button with 5 terminals. The Dominator with True-D module draws about 650mA of current, so 1A or 2A rating should be more than enough. But you should confirm with yours just in case.
I think this mod should work on many different FPV Goggles out there, but difficulty might vary especially when it comes to drilling hole on the goggle. We are doing this mod on a Fatshark dominator Goggles as an example.
Understanding the Terminals and Connection
The battery connector mount in Fatshark goggles has 3 “tab” terminals (soldering points, marked with green crosses). You will need to cut the tab at the very bottom, marked with yellow line.

The type of LED on/off switch we used here has 5 terminals. Depending on how you want the LED to work, you have 2 options:
- LED is always on regardless switch position
- LED is only on when switch is turned “ON”
We personally prefer the 2nd option, that’s how you can tell if the Goggles is running, right? With the 1st way, it drains the battery when the goggles is off, which means you still need to unplug the battery…

NOTE: The terminals might be different on another LED on/off switch, please make sure you read the manual and understand what these terminals are exactly before connecting.
DIY Process
Once you know how you are going to connect everything up, we can now finally begin the mod! It’s relatively straightforward, we only need to get to the battery connector mount in the Goggles. In the case of Fatshark Dominator, it’s located in the head-tracking module bay, there are only 2 screws to remove.
Note: With Laforge diversity module installed, you might not be able to do this mod because the head-tracking bay is occupied. We are using True-D in this goggles.

Then you need to drill a hole on the goggle to mount the On/Off switch. We are not going to show/teach you how, there are more than one way to skin a cat. (just a saying, we love cats lol)


Now just connect and solder the switch and battery connector mount together.


And you have it :)

Thanks again to FFun FPV for this great DIY mod… I really think Fatshark should consider this idea in their future FPV Goggles, it’s very practical and just looks great.
19 comments
I have reached out to Fatshark with no luck. Please help,, I have a pair of hd3 in mint condition, but the barrel connector where the battery plugs in is going out. If u simply move our touch it black screen. It’s not the battery the connector inside the goggles is going out. I’m very good at soldering and taking them apart, but I can’t seem to find the part. Do u know were I might find it?
This is a really nice mod. Just, the icon on the button is for stand-by. Not power on /off :) :) :)
Hi, thanks a lot! Great article. I was wondering was is the thinner wire I can use to do this mod? Which AWG? Thanks in advance.
You can use any AWG suited to 1A and higher. AWG20 for example.
The goggles draw about 0.5A only, so you can use 28AWG or larger wires safely.
It would be also nice to add to this guide a mod that would power the fan directly from the board.
Thank you so much! I did this mod last night, using your guide in combination with this guide: fpv-flightclub.com/fatshark-power-switch
Ended up looking great! Great mod!!!
Thanks a lot for the mod !!!
Did it and it worked out great :D
I had the long switch, but cutting the connectors short gave me just enough room to fit it.
https://goo.gl/photos/jBNW4wBzn551GzLh6
And the finished result
https://goo.gl/photos/gjUyGnXdJxex9yrP7
fantastic :) thanks for the update!
I started to do the mod and… went backward!
First, taking the 2 screws and… taking out he plate is absolutly NOT easy.
Second : the hole! Switch is looooong. I cut the pins to gain a little bit of lenght but, it is absolutly not easy to find exactly where the switch will end in the googles and You make a mistake, you’ll can’t close the cap with you beautiful switch.
Then after half an hour, I decided to turn back.
The 36mm long LED switch from the supplied ebay or BG link is too long.
It’s a PITA to fit this thing and you have to cut down the connectors.
Better to go for the shorter variant. I only found it on AliExpress…
aliexpress.com/store/product/16mm-short-body-LED-push-button-Switches-Latching-Power-Illuminated/130470_32714340074.html
Hi there,
I’m not sure if this would work here, but this one is 21mm long :
fr.aliexpress.com/store/product/16mm-12V-LED-Illuminated-Momentary-Push-Button-Switch-Short-Body-total-length-21mm/130470_32440604575.html
Cheers
This one is the one we need 35mm is too long and you have to be lucky when making the hole.
With this one, everything is simple.
Great looking mod. Thanks for sharing.
This is a Momentary Push Button Switch so no good unless you hold it on :)
16mm 12V LED Illuminated Momentary Push Button Switch,Short Body,total length 21mm
Great idea! Just ordered the e-bay version and hope I’ll get it to work, whenever the delivery happens! :)
What about if you have diversity in that area, like laForge? Where would you put the switch?
good point, I use True-D and never thought about Laforge. I guess you can’t do this with the Laforge…
Such a missed opportunity… TrueD and Laforge should have added a power button.
Plug the battery into the receiver module and let it power the goggles.