Winter is coming! And if you are sick of flying FPV simulators, then you should consider building an indoor FPV micro quadcopter!
Before we start, I have to give Multirotor Superstore a big shout out for supplying some of the parts in this build. Without their help I don’t think this build would be this easy!
Previous FPV Micro Quad
My last micro quad build was a great success: running cleanflight on the cheap CJMCU board, and flying acro mode. It was good fun but flight time was some what limited (only around 2-3 mins). And due to the lack of power you can’t do flips and rolls with the heavy FPV gear.
So in this new build, I am going for a more powerful setup, that is able to lift a bigger LiPo battery for longer flight time (I am aiming at 8 minutes!), and allows to do basic acrobatics such as flips and rolls.
I will be using 8.5mm brushed motors (more power than previous 7mm brushed motors). I don’t think the transistors (FET) on CJMCU board would supply enough current for 8.5mm motors, so I will be using a better flight controller board, with higher current rated FETs.
Index
- Parts List
- Frame
- Flight Controller
- Radio Receiver
- Motors and Propellers
- Batteries
- FPV Gear
- Cleanflight Configuration
- Building Tips and Updates
Videos!
Practicing with micro Air gate :) Second day session!
Parts List
I have to warn you, some of these parts go very quickly. If you see them in stock, go and get it as fast as you can before you regret it and waste weeks waiting.
- Custom 3D printed Micro Quad Frame (Oskie V1)
- 8.5mm 0820 Brushed Motors (Multirotor SuperStore | Banggood)
- Beef Brushed Flight Controller Board (Multirotor SuperStore)
- Micro FrX Receiver (Multirotor SuperStore)
- Mini Wide Angle FPV Camera (Banggood | Surveilzone)
- AltitudeRC 25mW Video Transmiter (Hobbyking)
- Propellers (Links in table)
- Turnigy Nano Tech LiPo Batteries (Links in table)
Micro Quad Flight Controllers – Beef Brushed Board
I looked around for alternative brushed flight controller boards than the CJMCU.
| Brushed Boards | MCU | FET | Weight | Price | Receiver | Note |
| AlienWii | ATmega | 4.2A | 3.4g | $60 | External DSM2/DSMX | Only runs Multiwii Integrated FTDI Progrommer Usually out of stock |
| Beef’s Brushed Board | STM32 | 4.2A | 4.0g | $60 | External Spektrum/SBUS/SUMD or PPM | Runs Cleanflight/Baseflight |
| CJMCU | STM32 | ? (7mm motor) | 8.5g | $20 | External PWM/PPM | Runs Cleanflight Flight controller integrated into the frame |
| Lulfro | STM32 | 6.3A | ? | $60 | External Spektrum/SBUS/SUMD or PPM | Doesn’t come with any cables/leads |
| Micro MWC | ATmega | 2A | 1.8g | $35 | Integrated 6ch DSM2 | Apparently is a pain to program, sometimes come with dead FETs |
| Micro Scisky | STM32 | 5A | 2.5g | $33 | Integrated 7ch DSM2 | New board, not sure… |
Beef Brushed Board and Lulfro seem to be the way to go from the spec, being able to run Cleanflight, even the latest Betaflight is a big bonus! The large FET rating allows you to run 8.5mm motors.
I got my Beef flight controller board from Multirotor Superstore, they also sell Lulfro, but it’s been out of stock for a while now.
However to connect the board to the computer, you will need a FTDI converter (USB to Serial adapter), get one from banggood for $3, it’s a very useful tool in this hobby!
The instructions and setup video were a great help.
Table of Contents
Connect to Computer, Cleanflight
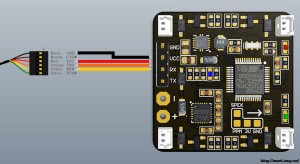
To connect the board to Cleanflight configurator, only 4 wires are required between USB-Serial Adapter and Beef board, VCC (3.3V or 5V), GND, TX and RX.
The board came pre-flashed with Baseflight, first thing I did was to flash the latest Cleanflight on it.
This board runs the same firmware as the Naze32 board, so when you flash firmware, you just need to load the latest firmware for Naze32 (online), and flash the same way as a Naze32 board.
I also want to try flash Betaflight on it just to see if it makes any difference :) Will come back and update when I have a chance to test that out.
Frame
Unlike the CJMCU, the Beef board is a standalone flight controller, and is not integrated into a frame. But that’s a good thing actually, motor vibration is worse on those FC integrated frames. Vibration can be isolated/reduced when you mount the FC on the frame with double sided tape.
The micro quadcopter frame was printed by my good friend Dan, so a HUGE thank you to him! He’s also an expert in building/flying micro quads and 3D printing. There are some awesome micro quad videos on his Youtube channel you should go check out and subscribe to.
Originally I sent him a design I found on thingiverse (UMQ – The Ultimate Micro Quad), but he also kindly offered his own design for me to choose from. Although the UMQ frame looks larger (nearly 120mm motor to motor) and more crash resistant, in the end I chose to use Dan’s frame, because it’s much more rigid, and nearly 25% lighter (the UMQ design weights 10g, Dan’s design weigths only 7.6g). Motor to motor distance is 110mm. I am sure there are many designs on the internet would work just fine, you just need to get it printed.
If you are also interested in Dan’s frame, please drop him or me a message. With enough interest I think he might consider selling them :)
Update (21/05/2016) – Good news! I am now making/selling my own micro quad frame here: https://oscarliang.com/oskie-micro-frame-v1/
Another clever thing about Dan’s frame is that the coloured plate is removable, so when the frame is broken, you can just transfer the plate on to a new frame, without the need to remove any thing that is already mounted on it, such as FPV gear and flight controller.
Radio Receiver – Micro FrX
The Beef Brushed Board doesn’t accept PWM but only PPM or Spektrum/SBUS/SUMD, so we cannot use Frsky VD5M. That’s why I went for this micro size Frsky Receiver that outputs 8 channel PPM.
The Micro FrX receiver is made by the same guy who designed the Beef Brushed Board. It weights only 0.8 gram, and it’s really tiny.
The Micro FrX Receiver has been tested with the Frsky Taranis TX and DJT JR. It accepts only 3.3V, 5V will destroy this RX. There are only 3 connections on the RX, 3.3V, GND and Signal. It’s extremely simple to connect this RX with the Beef board as the pins are in the same order. Check out the manual here.
The RX comes with some 32 AWG light weight wires. I just needed a short bit as I will be mounting the RX on top of the FC with some double sided tape.
Binding is also easy: Enter “Bind” mode on your Transmitter, short the two pins labled “BIND” on the RX , then power the board up with the Lipo.
Update (19/10/2015) – default stick Mid points at 1540! This seems to be a common problem for many people using this RX. You can fix this by putting trim on your TX to make it 1500. You can do this while watching the Receiver tab on Cleanflight.
Motors and Propellers
The 8.5mm 0820-17 Motors I got were also from Multirotor Superstore, they work perfectly for me! Banggood also sells similar size motors, but not sure how they perform. I will be testing them in a couple of weeks time and report back.
0820 is the indicator of dimension of the motor, which is 8.5mm in diameter, and 20mm in length.
Be very careful about motor rotations, make sure you know which motor is CW and which is CCW. I followed the official instructions, and only realized the motors rotate opposite direction. Maybe solder just one motor first and test it before soldering the rest.
Also make sure you connect the motors with correct polarity: White and Red are positive (+), Black and Blue are negative (-).
With the motors from Multirotor Superstore, black/white motors are CCW, and red/blue motors are CW.
After all the motors are installed, I tested the quad and make sure it’s flying fine :) So far so good!
Propellers Contest
As for propellers, there are 3 main choices for the 8.5mm motors.
These props are all tested under the same condition and battery (1S 300mah 45C), with FPV gear on (AUW 60g).
| Props | Thrust/Punch | Flight Time | Price of 4 props | Comment |
| LadyBird | 8/10 | 3:10 | $2 | Good balance between thrust and flight time Cheap and durable |
| Hubsan | 7/10 | 3:20 | $3 | Just Vibrations and buzzing sound Props get loosed every crash, and break easy |
| Parrot | 10/10 | 3:25 | $10 | Has great lift, and very efficient The quad feels more stable Battery does get very warm |
The Parrot props are truly amazing propellers, great thrust and gives surprisingly good flight time (probably because of better efficiency). The quad feels so much more powerful and responsive with them, almost too powerful for indoor flying. Maybe more suited for outdoor, or a big sports hall.
They are also quite pricey, and only seem to be available on eBay or Amazon.
A great choice for bedroom or living room indoor FPV would be the Ladybird props, dirt cheap and seems to be indestructible, good power but yet still controllable.
I don’t recommend the Hubsan props, at all! Just not good.
Batteries
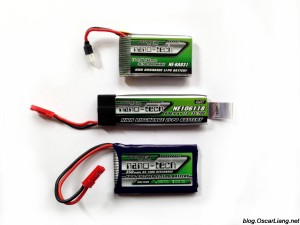
The best 1S LiPo batteries I found are all Turnigy Nano-tech from Hobbyking.
The tests were carried out all in the same condition with Ladybird props. “Flight Time” is the time from Full charged take off, until the quad is unable to stay in the air anymore. “Actual mA used” is taken from the LiPo charger, how many mA are pumped back into the battery to bring it back to full charge.
| Battery | Weight | Flight Time | Punch | Price | Actual mA used |
| 300mAh 45C | 9.0g | 3:10 | 8/10 | $2.7 | 260 |
| 350mAh 65C | 15.7g | 4:25 | 7/10 | $4.2 | 377 |
| 600mAh 35C | 16.3g | 5:50 | 5/10 | $2.8 | 553 |
| 750mAh 35C | 18.7g | 7:40 | 6/10 | $3.0 | 707 |
They all perform very well, and as expected, more capacity gives more flight time, the result is kind of linear.
I probably prefer the 300mAh 45C for some fast flying, acrobatic flights, the quad feels so punchy and responsive.
For long flight time, 750mAh 35C absolutely killed it! I would never expect such good durability from a micro quad. It’s not as agile as the smaller LiPo, but it’s not bad at all. With the Parrot props it stays in the air for over 8 minutes! However the motors do get hot after at landing.
Be aware that the 750mAh 35C battery (as well as the 300mAh 30C) has a reverse polarity, you need to swap the pins first before connecting it to your flight controller or charging!!! Remember to check polarity first before you do anything!
The 600mAh 35C is in an odd, long shape, it’s harder to get a good CoG when mounting this battery on the quad. I would probably avoid those.
Also note that the 350mAh 65C and 600mAh 35C come with long discharge leads with JST connectors. Depends on what connector you plan to use on your micro quad, you might want to replace it (and buy extra connectors). Just something to bear in mind.
FPV Gear
I am using the same FPV setup as my last build (DIY Light Weight Micro FPV Setup). I love it because it just works flawlessly, simple to put together, and cheaper than the Spectrum SPMVA1100 FPV combo.
The camera is from SurveilZone, but you can also get a cheaper one from Banggood. The wide angle is really important to FPV. These cameras come with a mini microphone, and a audio output. No need for those so I just unsolder them.
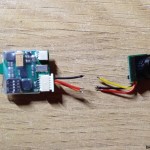
VTX is the AltitudeRC 25mW 5.8Ghz VTX. It’s compatible with Fatshark RX and Goggles, takes 3.3V (1S) input, and only weights 3g.
Cut the wires short, and solder them together.
I hot-glued the camera on the VTX.
And here we have it! :D
The micro quad AUW is 45.4g, with batteries weights around 64g – 74g.
Cleanflight Configuration
For the latest Cleanflight (1.10), I used the following settings on mine micro quad.
First of all, calibrate your ACC.
Essential Settings
feature MOTOR_STOP feature RX_PPM set min_throttle = 1000 set motor_pwm_rate = 32000
Basic Performance Settings
set looptime = 2000 set acc_lpf_factor = 100 set deadband = 6 set yaw_deadband = 6
Extreme Acro Settings (100% flying in rate mode)
set looptime = 1000 set emf_avoidance = 1 set acc_hardware = 1 set gyro_lpf = 188
And here is my PID and Rates. They works pretty well with all the battery (of different weights) and propellers I have. If you are not planning to do flips and roll, I would recommend bring the rates down and reduce expo to get more precise control.
Building Tips and Updates
Landing Gear
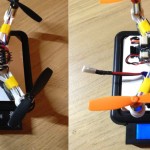
I added landing gear as well to protect the LiPo mounted underneath the frame. They are just package foams,
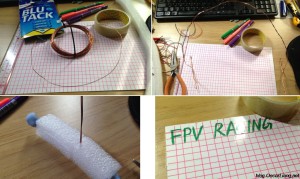
Making Micro Air Gates
As soon as I know Hoverspeed is developing micro air gates for micro quads, I couldn’t resist to make my own!
I used some copper wire (the one I used to make cloverleaf antenna), paper, cello-tape, foam, and blue tack.
The wire I used are too thin (0.8mm) they don’t hold the shape well enough, and they wobbles as you touch them. I would have used 1.2mm or larger wire.
I put tape on both sides of the paper, so it doesn’t get tore up by propellers. I guess you could also use cloth, or laminated paper.
Finally I put foam and blue tack on the legs to make it stand up to crashes a bit better. I probably made it too small, it’s extremely difficult to get through it :D Maybe I just need to practice!.
Extra LED
There are a few places you can solder more LEDs to if you want. For example you can connect standard LEDs to the 3v and GND used by the RX or the pads on the bottom. If you want even brighter LED’s you could hook it up directly to the spot where your Lipo connects for a higher voltage 3.8 – 4.2v.













67 comments
Hi Oscar or anyone that sees this. I have Lemon DSMX Satellite Receivers, 3DFLY Kits, and FSFLY transmitters but they don’t seem to want to bind or work. IDK if its in the software since I can’t access it and I can’t find a FrSky Micro FRX receiver anywhere at all.
Great build and info ??
Do you think I could repurpose a cheerson fx10 control board with these 8.5×20 motors and 300mah battery?
Thanks
Hello dear I have a micro camera FPV I will put it on my Hubsan H107D . I have a technical question: the camera comes with 4 wires ( red,black, yellow and white)
I don’t know what I need to do with the yellow and white? Solder it together? Thank you for your help.
The yellow one is probably video and white is audio, just a guess :)
Check manual if possible.
hi there does any one have a copy of the Beef’s fc and the Micro FrX manual?
looks like the site is is not longer available
Fissel RC – fisselrc.com
Hello Oscar,
I was wondering where I could get a relatively cheap controller for this? I really don’t want to spend $200 on the Taranis, but I don’t know what to look for for a cheaper one.
I’m a few months late but here’s a cheap controller and receiver combo if you’re starting from scratch:
Tx: FlySky FS-i6 2.4G 6CH AFHDS RC Transmitter With FS-iA6B Receiver (search Banggood for ‘983537’)
Rx: DasMikro Flysky 8CH 2.4Ghz Micro PPM Receiver (search Banggood for ‘1087238’)
Thanks for the build info, Oscar. Great page, great site! Cheers from Oz.
Hiya Oscar.
Just asking for any advise on using the new EU LBT D16 Taranis transmitter and finding a suitable rx… Most seem D8.
Thanks In advance
Lee
Hi Oscar!
Thank you so much for sharing valuable information always!
Regarding CLI command for micro quadcopter, I tried to follow your method but when I type “set acc_lpf_factor = 100”, I got an error from the configurator which is saying its a wrong command.
I suppose, the command has been updated and changed through firmware updates, but can you tell me what would be the replacement for “set acc_lpf_factor = 100” in cleanflight ver 1.13, please?
I believe they have changed the naming and scale of this parameter in the latest version of Betaflight to
acc_cut_hz
the point is you want to increase it as much as you can to reduce lag, yet filtering majority of the noise in ACC.
Is this trim still an issue?
i have not received any new version of this RX so i don’t know. but it wasn’t too big of an issue anyway
Hi Oscar, is there any transmitter that suitable for this Beefs Brushed Board other than Spektrum?
I am not sure about Spektrum system as I am using Frsky at the moment (Taranis), and I am using micro Frsky RX.
Hi Oscar,
I love your blog! You are a godsend for those of us just learning about FPV and getting into the hobby.
I am trying to build a micro like yours, and I’m having issues flashing clean flight. I received the following error:
“STM32 Communication failed, wrong response, expected 121 (0x79) received: 240 (0xf0)”
Any idea what is going on or how I can solve this issue? I’m using the same FTDI converter as you and a Beefs Brushed Board. Any help would be greatly appreciated!
What are your thoughts about the Hobbyking 0820 motors? I just ordered them….
Hi Oscar,
will Dan’s frame design be also available to the community on thingiverse.com? That would be appreciated.
Thats a Damn tiny beast there. ; ) Would you mind in making a step by step Video for beginners like me ? Im confused in choosing this n that to make a better Mini Quad. I would like to contact you for further more advice. ( Id love to have a trainer )
I have over eight hours attempting to get a Beef’s Brushed Board to connect with BaseFlight. I have 3.4volts running between the VCC on the board and the FTDI, ground connected between them and RX to TX, TX to RX. I’ve been able to get the FTDI red light to pulse at the same time the BBB has a green light pulsing. I never get a connection to the BBB in clean flight. It times out after ten seconds, every time.
I’ve read where you have to jump out the bind pads when you plug the board in, in order to get it to connect. I’ve heard that it takes 5volts, I heard that it takes only 3.3 volts, I’ve heard you can just connect the RX to TX, TX to RX and ground to ground, while supplying battery power to the board… None of this is working for me. I can find no helpful documentation from the seller or from Curtis regarding this.
This is a very frustrating situation. I’ve built out numerous multi rotors over the years and I’ve never run into a situation quite like this. I’ve also, luckily, never had to deal with an FTDI up until now. I’m using a tiny CRIUS FTDI if that makes any difference in this equation…
Thank you so much for any light you might be able to shed…
-Gil
sorry to hear that, it could just be a bad unit… mine works flawlessly though…
Hi Oscar,
I’m getting into micros, I already have a charger for my multiple cell batteries but it doesn’t handle 1s batteries, what charger would you suggest for 1s batteries? I’m going for the 750mah ones if that makes any difference.
I just use my Accurel-6 charger… or you can buy a dedicated 1S lipo charger?
Hi Oscar,
Could you plz explain more about how to do the mid point trimming? I am a newbie in RC hobby.
One more. I set up exactly same micro quad like this except frame. I flashed the latest cleanflight firmware to the FC and configured as you suggests in this post. My problem is when I hook the board to battery after the binding/configuration, the board’s green led doesn’t come back after flashing. Haven’t you had a similar problem like me? Do you think this is my configuration problem or is this board DOA?
Self answer for my second question: rcgroups.com/forums/showthread.php?t=2544355&highlight=beef+brushed+board#post33218045
Hi Oscar,
Do you know of a microcontroller that can be flashed with cleanflight/baseflight? so I can make my own fc. have a couple teensy 3.1’s from an old project and would like to make a pair of micro fpv’s with a laser tag setup to dog fight.
cleanflight/betaflight currently has target for STM32f1 and f3 processors. but i don’t know if it would work if you built your own board.
Hi Oscar,
I’m Max. I think I’ve contacted you before. This time I’m looking to use basically these same parts to make an FPV quad. I have two questions: what transmitter/screen do I need and what video receiver do I need? I have an old Hubsan X4 H107D transmitter, so can I use at least that screen? It’s just that all of the screens I see are $100+. I hear you can use something like a small TV screen. How does that work? Could I use a laptop? Or a phone? Please help me find the cheapest way out of this maze of FPV and camera gear! Sorry about all of the questions.
Thanks a lot in advance!
Max
Hi Oscar, as announced on Facebook I got excited by your blog and I’m building pretty much the exact same micro as we speak. :) Many thanks for this build report, as well as all the other valuable information on your blog. It’s been a great resource for me getting into this hobby. Small question, I read that the Beef board is supposed to provide me with filtered power for FPV gear. I just do not know where to get this power from the board. Should I use the 3v pad on the bottom of the board?
Keep up the great work.
Best, Martijn
not sure about the filtered power, but there is a 3.3V output pin on board. However it’s still quite noisy according to some other uses of the board.
I connect my VTX directo to the lipo connector, and it’s fine for my FPV setup. My vTX has built-in LC filter so the noise doesn’t affect me.
Thanks for this article Oscar. I had been thinking about building an indoor (winter) micro ‘copter for a while. Glad I saw your table on brushed controllers as I was thinking of getting a Micro MWC board, but the Beef’s BB looks like a better buy. Cheers
Hi Oscar
loved reading this, i’ve recently got into fpv and i feel like as a rite of passage i should build a quadcopter. I’m pretty sure I’m going to try out this build very shortly. So the use of a custom 3d printed frame got me to thinking. Would it be possible to custom print a frame to mount a diy Laser tag setup onto a micro frame, or any frame for that matter. it would have a laser on the front and a sensor on the rear and would ding with a hit (or possibly light an led scoreboard that disables the quad after so many hits if you wanna get hardcore). Anyways thanks for making this build i have it bookmarked and will refer back to it once i’ve gathered the parts.
Hi,
I’m using EMAX mini Skyline32 Naze32 32 Bit Flight Controller to build a micro quad, need your help. I tried using configurator, accelerometer and compass are working but Im not able to get the motors working. Im using husban brushed motors. Please advice.
Just received my beefs board and find a problem the board only has three FETs. So the board can run the motor in one direction? No real acro mode(inverted fly)?
no Acro mode is not 3D flying. This board cannot do 3D flying (as far as i know)
Do u know any brushed board can do 3d flying? I want a micro quad to fly indoor as a cp heli. Does naze32 with brushless motor support 3d flying? How small can I build a quad with naze32 and brushless motor?
i am not sure, but your best bet would be a brushless motor quad, the smallest you can build is 120mm i think.
120mm is not bad:) Thank u very much for your information
Dunno if anyone can make a naze32 compatible FC which has same brushed esc on Nano QX 3d ?
Hi Oscar, any updates on the frame?
sorry still no news from Dan. Maybe drop him a comment or message on his youtube?
Hi Oscar, I read these little brushed motors only have a life span of about 5-6 hours. Can you replace them despite them being glued into the frame?
Yes the hot glue is very easy to peel off.
But I would probably replace the frame too… 3D printed frame isn’t the toughest, and the arms starts to bend with enough crashes :)
Hi Oscar, these brushed FCs seem rather expensive. Wouldn’t it make sense to build a Naze32 compatible brushed motor controller?
@ Fox… They are crazy expensive because they are new… Only game in town. I was able to find the adapter you were wondering about.
readytoflyquads.com/catalogsearch/result/?q=Brushed
I have never tested mine, and I hear there are drawbacks… Mainly power related.
That’s a really cool find Steele. Exactly what I had in mind. If that little driver board works well, it would seem like a superior solution to me. Now we just need Oscar to test one. :)
I heard these board only supports 7mm motors not 8.5mm… as the FET are not powerful enough… I want to test them when I have a chance!
I am sure you can. but there will be extra weight and extra wiring. For the extra price you are paying for the compactness, lightweight, and ease to setup.
HI Oscar,
Have you already tried readytoflyquads.com/brushed-motor-driver with STM32-based FC?
Thx!!
no i haven’t done it myself, but i think it’s doable with a nano FC like the Naze Nano.
however it could be a bit heavier than a dedicated brushed board.
Hi Oscar,
I would also be interested in Dan’s frame.
Regards,
Pakamon
Hi Oscar,
Nice, i have to build a second micro fpv quad, but I didn’t start with the first one. -.-
Thanks to your blog, I got always an answer to my multirotor questions .
So I will collect more multirotors and I can blame you for it. Thanks! :-)
Hi Oscar,
great write up as usual so thanks a lot. I also was going the suggest the multiFlite nano-B-FC Flight Controller, but I see Jim beat me to it. Just by way of clarification the Alienwii Classic Narrow board has been discontinued. The other minor thing s that the Last of the Aliewii’s has 6.3 A FETS not 4.2 A as quoted in your FC Chart at the beginning of your thread.
multiFlite nano-B-FC Flight Controller seems a good option, but is out of stock now.
Hi Oscar
Im interested in Dans frame any availability on these
Thanks James
Hi Oscar
I would be interested in one of Dan’s frames as well, if this is a possibility please let me know. Thanks.
Charles
Hi Oscar
First of all, thank you so much for your efforts in this blog, not a day goes by without me checking in for updates or information. You have made my fpv drone hobby so much easier and hassle-free!
Im very interested in Dan’s design and building a micro quad as Im moving soon and flying space will become restricted. As I got access to a 3D printer Im curious what Dan charge for the files for this drone.
Best of regards and happy flying!
Eirik
(Norway)
Great little quad and really nice build guide, thanks!!
Did you have any problems with the video quality? Did you use a LC filter?
thanks Sebastian, no i don’t use LC filter and no problem at all.
Hi Oscar! Thanks for that great build-log! I’ve been messing around with an afro-mini FC and a brushed motor driver. When I test motors, they spin up just fine, but – from the sound they make – they have their max power at around 1600 throttle and get slower after that point to I’d say half power at full throttle. Do you have an idea what that could be?
Hi Sirhanlec, could you send me a link to the brushed motor driver you use?
sounds like your driver isn’t capable of handling the current draw?
Hi Oscar, that’s it readytoflyquads.com/brushed-motor-driver
thanks for checking :)
best regards, Hannes
thank you Hannes!
Hi Oscar, for the motors you might wanna check out this “Dark Edition” CL-0820-17 from micro motors warehouse. They are notably more powerful than the standard 0820-17 motors.
micro-motor-warehouse.com/collections/all-motors/products/cl-0820-17
Regards,
Joseph
HI Joseph,
I am sure that’s a great product, but I don’t think I am looking for more power on my build, it’s already very powerful, and the flight time is amazing on those standard motors!
Even with the parrot props, this quad is just too fast :) Maybe a bigger indoor space would be nice, but my living room is only so small! LOL
If I am looking for a more powerful outdoor machine I would probably go for a 120 brushless :)
Hi Oscar, great report again! I just build something similar with a carbon frame. Some pics (and a build report in Dutch): fpv-racing.nl/bouwverslagen/office-racer-micro-h-quad/
Great fun these machines.
I only had my midpoints coming in at 1540 with the MicroFrx. ‘Fixed’ it with trimming them to 1500. Yours just gave you 1500 midpoints?
Cheers!
Dirk
Hi Dirk,
Yes I have the same mid point problem with mine, have to manually trim it on TX :) I thought it it was just me… i have put a note up about this RX issue :)
Curtis is aware of the issue with the centering on the microFRX. Unfortunately, it’s baked into the hardware at this point, and will probably be changed in later revisions. Originally it was set a bit high because of the FrSky external DHT modules. Most folks are using the internal Taranis radio now, so Curtis says he will likely be setting it lower in future revisions of the rx. For now, trimming out the difference seems to work fine.