The Radiomaster Zorro is a gamepad style RC transmitter. It comes with EdgeTX firmware installed, offers multiple versions of different RF systems and bundles. It’s a compact and powerful radio that can meet all your FPV needs. In this review I will compare it to the Jumper T-Pro which is also a hot radio in the same category.
Some of the links on this page are affiliate links. I receive a commission (at no extra cost to you) if you make a purchase after clicking on one of these affiliate links. This helps support the free content for the community on this website. Please read our Affiliate Link Policy for more information.
If you don’t know what to get between ELRS and 4in1, I’d probably go for the ELRS version.
The CC2500 is a good choice if you want to mainly use other protocols such as Frsky D8/D16, but these are kind of obsolete and slowly phasing out. Or if you are buying an external ELRS module for the radio, then it makes sense to get the CC2500 as you don’t want to have another ELRS module onboard doing nothing. An external ELRS module has the advantage of higher maximum output power of up to 1W. Check out all the ELRS module options here (you need the smaller “Lite Module” for the Zorro, not the full size JR module).
The 4in1 costs $20 extra but it supports extra RC protocols including Spektrum and Flysky, which is nice. However, to be honest I have never needed to use any of those additional protocols… Ever!
If you know you are never going to need to use Frsky D8/D16 or any other RC protocols, just ExpressLRS, then just get the ELRS version. The ELRS Starter Set comes with 3 extra receivers which is not a bad deal. It’s going to be the major RC protocol in the near future as it’s so powerful and affordable, with a wide range of inexpensive ELRS receivers available. See my article explaing why ExpressLRS is so good. And honestly the internal module’s 250mW is plenty for FPV pilots, giving you miles of range in ideal conditions.
The ELRS receivers are tiny!
18350 Li-ion batteries are not included and needs to be purchased separately, you need two of them:
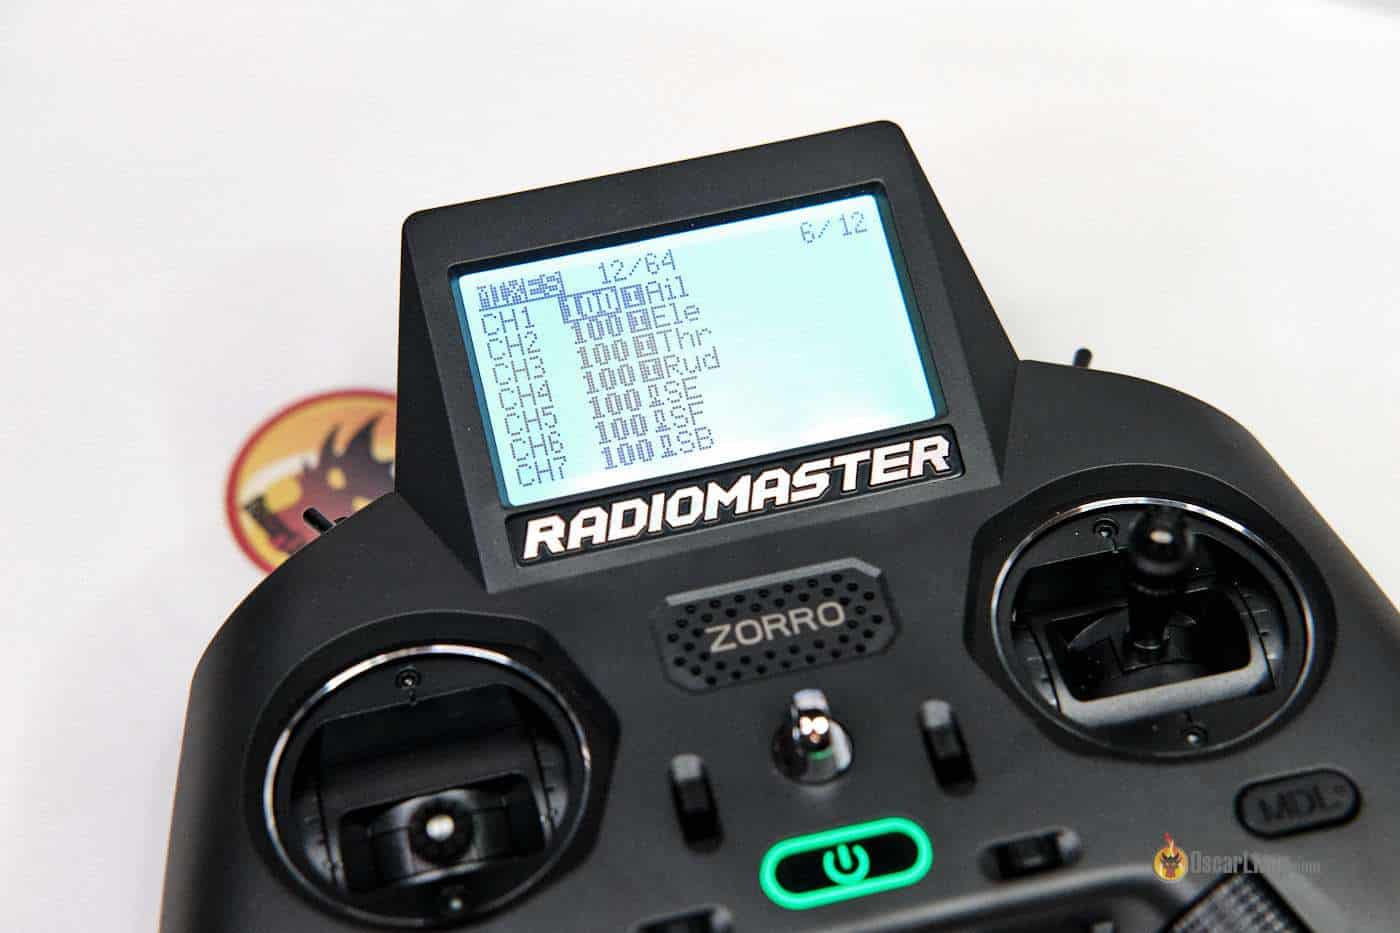
The Radiomaster Zorro has a much larger and brighter screen than the Jumper T-Pro. It’s much easier to read especially under sun light. But it also takes up more physical space and some people might actually prefer the T-Pro due to size.
Screen for ExpressLRS settings:
The menu buttons and layout mimics the full size TX16S radio, which are user friendly and easy to use.
Gimbals
The gimbals on the Zorro feels decent, nothing fancy, but good enough for most ordinary pilots.
Those are Hall Gimbals, which will feel smoother and last longer than cheaper potentiometer gimbals. In fact Radiomaster will release AG01 upgrade gimbals for the Zorro in the near future.
On the front of the gimbals, there are two screws which allows you to adjust the travel/throw of the sticks.
On the back of the radio, you will find two screws for each gimbal, which allows you to adjust the tension of the gimbals without disassembling the radio. It also allows you to switch the radio from mode 1 to mode 2 (swapping the throttle stick to the other gimbal) using those screws.
It has traditional trim switches, which are really useful if you fly fixed wings and planes. Otherwise they are pretty irrelevant.
Switches and Buttons
The Zorro doesn’t have the 6 flight mode buttons like the T-Pro (on the front of the radio), but there are way more switches and controls on the Zorro to make up for that.
These controls feel more traditional and familiar too because they are similar to what we normally use on a larger full size radio.
2x 3-position switches
2x 2-position switches
2x sliders
4x momentary switches
On top of the radio, starting from the front, we have two 3-position switches. In the middle we have 2 sliders, but they don’t have centre detent for some reason. On the back we have two 2-position switches.
There are also two momentary switches next to the 2-position switches. And on the back of the radio, there are two additional momentary switches as well.
One thing that I noticed is how big the gap is between the slider and the housing, maybe dust and debris can build up inside the radio over time?
Ergonomics
To be honest, I prefer the ergonomics of the Zorro to the T-Pro. First, the stick length of the Zorro feels about right, on the T-Pro they are just slightly too long even at their shortest configuration. And the switch positions are also better on the Zorro, they are easy to reach and there are just so many more switches available than the T-Pro.
Just like the T-Pro, I feel like the Zorro is for thumbers only, it really doesn’t feel good when you try to pinch.
The Zorro has slightly wider and thicker handles, which feels noticeably different than the Jumper T-Pro. It depends on how big your hands are I guess, but for me the Zorro gives me a more solid grip.
There are a couple of screw holes on the left and right sides of the radio, which are supposedly for mounting accessories that will be released in the future, or perhaps DIY 3D printed parts created by the community, the possibilities are endless.
External Module Bay
On the back of the radio, there is an external module bay (for Lite modules, NOT standard JR module). It supports all the popular modules, like Crossfire, Tracer, ExpressLRS and ImmersionRC Ghost.
Battery
The Radiomaster Zorro takes two 18350 Li-ion batteries, the ones that are sold by Radiomaster are rated for 900mAh. The internal batteries can be re-charged via the USB-C connector.
I would love to see they use 18650 Li-ion batteries instead, because they have a lot more capacity (2 to 3 times more mAh than the 18350). But I guess they want to make the radio as small as possible, but that just means you have to charge the radio more often.
Run time of the 4in1 version is about 5 to 6 hours on a full charge, while the ELRS version (on 250mW) is only about 1 hour 30 minutes to 2 hours. So yea, there’s a big chance you will be charging your radio in the field. But Radiomaster has taken that into consideration and offers a solution, keep reading…
Ports and Connectors
On the bottom of the radio, there is the USB-C connector for charging the internal battery.
There is also a 3-pin connector (a 2S balance port) for plugging in a 2S LiPo battery. As mentioned, the run time is under two hours (ELRS version), so if your battery is low and you want to keep flying, you can power the Zorro with an external 2S battery. There are buckles under the bottom of the radio, for strapping the battery there (straps are provided).
If the battery is too big to strap under the radio, you can also buy a special cable from Radiomaster, it has the XT30 on the other end, and you can keep the battery in your pocket.
On the top, under the rubber cover, you have the SD card slot, another USB-C connector for FPV simulators (as well as OpenTX companion and accessing the SD card), Trainer port, and headphone jack. My radio is shipped with an SD card.
Folding Antenna
The antenna is for the internal RF module on the Zorro, and it’s extremely compact. It barely takes up any space when folded, and it’s flexible as it can go from 0 to 180 degrees. Play around with the angle to find out what works best for your model.
However, the antenna seems to be one of those generic dipole antennas that doesn’t really have the best performance. With a proper antenna it will definitely give you better range. With that said, if you got the ELRS version, it will still give you kilometres of range, so I wouldn’t worry about it too much really.
I will be using the 4in1 version Zorro and bind it to the TinyHawk 3 – my favourite beginner drone currently.
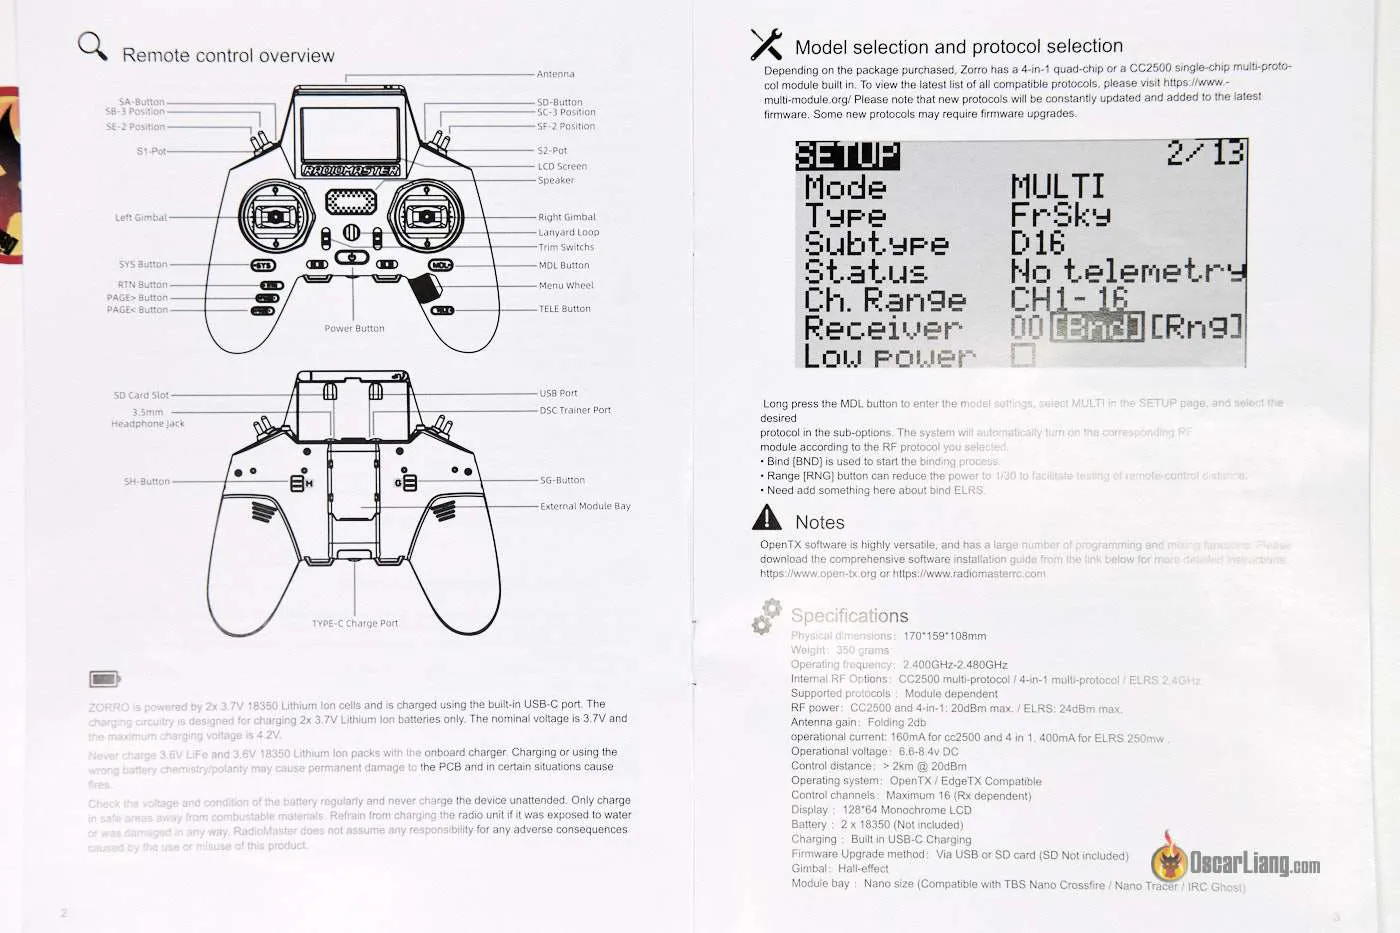
First thign to do is to set failsafe – If you don’t, you will get a warning every time you power on the radio. Go to Model Settings by pressing the MDL button, and PAGE> button. Scroll down to Internal RF, and find Failsafe, set it to No pulse.
Here’s how to bind the Zorro to the TinyHawk 3.
In Model Setup, scroll down to External RF, make sure it’s switched off.
In Internal RF, select “Multi” for Mode, and “Frsky D” for Type, “D8” for subtype.
Then you can click the “Bind” option to begin binding to the drone. (you also need to put the drone in bind mode, simply go to Betaflight, enter “Bind_RX” in CLI).
That’s it! Now go to the Receiver tab in Betaflight, and check if the channels are responding correctly to your sticks. You might need to change Channel Map to AETR if the channel order is wrong.
Out of the box, they already assigned switches to channel 5 – 12, these are the switches we can use to arm the drone, and for different functions and flight modes. To do that, you can follow my tutorial.
For example, they assigned the SE switch to CH5, which is AUX1 in Betaflight. Go to the Modes tab in Betaflight Configurator, and assign AUX1 to Arm, and you will be able to arm the quad with the SE switch on the radio.
Summary: Radiomaster Zorro vs. Jumper T-Pro
Just comparing the 4in1 versions, the Zorro is $20 cheaper, but the T-Pro comes with a really nice carry case
Zorro has EdgeTX flashed, comes with SD card and is fully functional out of the box
Zorro has way more switches
Zorro has a much larger and brighter screen which is much easier to read
Personally I find the Zorro has better ergonomics, switches are easier to access and the gimbal sticks on the T-Pro are just a bit too long
Run time / battery life of the Zorro is a little disappointing compared to the T-Lite, but Radiomaster thought about it and offers a work-around which is not a deal breaker, just slightly annoying
Manuals
For the radio:
For the ELRS receivers:
How to Adjust Gimbal Stick Spring Tension?
It’s not the easiest job to take apart the Zorro, but it’s doable with a little patience. Here I will walk you through the process.
First of all, take the screws out on the back of the radio. There are 8 screws as circled in the following picture.
Gently remove the back housing, beware the two ribbon cables connected to the PCB, you need to unplug them first.
After taking the back housing off, take some pictures of how the cables are connected to the PCB, because you will have to unplug all of them.
One trick I used was to mark all of them with words like “Top Left”, “Bottom Right” etc according to which connector they were connected to.
Then unplug all the ribbon cables, there are 14 of them. And you also need to remove the four screws on the PCB before you can pull the PCB away from the radio. There’s an extra ribbon cable on the back of the PCB that needs unplugging as you lift it up.
Here you have access to the gimbals.
Carry Case
The carry case is sold separately which is fantastic for keeping your radio safe while travelling. I wish this case was provided with the radio when you buy it, but the case alone is $20 so I doubt they will include it in order to keep the radio affordable. It’s a very spacious case, with extra space for the 18350.
Following JayBanane’s 18650 mod I am able to add two extra 18650 Li-ion cell (3400mAh) to the Zorro (in parallel to the existing 18350 cells), that brings the total capacity from 900mAh to 4300mAh!
You do NOT need to remove the main board to adjust the gimbals! The four adjustment screws are visible and accessible with the board and all the plugs in place.
Hi Oscar, do you know if there is a way (thinking of LUA scripts..) to auto-disable internal RF if an external module is connected on the nano bay (and viceversa, disable external if is not) on radio start up? It would be more convenient than having to switch manually every time.
The radio has 250mw rf power in the elrs version (internal module) if you want to get 1W power you will need to buy a lite size Ranger module from radiomaster seperately.
I was asking myself it there is a change to do a mod to make the display foldable. i think the only disadvantage is the size of the radio. it could be much smaller without that huge display. what do you think?
Have followed your easy to follow recommendation downloading Firmware to the SD Card using Build and got the Message” Success” but with footnote ” Note Build Notice ..Firmware binary file was opened in file explorer”. can you suggest how I can find and copy the file to SD card. It does not show under Recent Files… was downloading latest version as still have 2..6 as supplied.. Need to bind to ELRS Micro RX this is all new to me. (Have internal ELRS)
I am a noob to RC flying, your review has lots of good information. I have just bought a Microaces kit, and it comes with a Microaces All In One (AIO) 5CH Micro Receiver DSM2/X protocol (Spektrum) receiver. I believe the Zorro will work if I buy the 4-in-1 version, correct? Thank you for your help.
Just use two 18650 Li-ion cells. Get a 18650 holder, solder some appropriate wires/connector to the holder, and you have yourself a good 2S battery for this remote for under $20.
What version should I get if I am using the radiomaster receivers? Like the R161 these are D8 and D16, I believe I have the CC2500 version, most people won’t know ELRS, 4n1, or CC2500, should have just made it one version like the Tx16.
Hi Oscar, I am very proud to see that my 18650 battery mod made it into your blog :) It also looks like you built that mod on your Zorro? Which makes me even more proud :) Would it be ok for you to also share the link to my youtube video about it in your article? That would be great :)
If you go to radiomasterrc.com, you can get external antenna for zorro. Since it’s using SMA, you can always change the anntena later to Moxon or other suitable antenna.
I got one of these a little while ago and its not bad. Feels a little flimsy (like the plastic body is too thin?) and I dont love the battery covers (they just dont go on well). But what blew me away was the fact that it was missing one of the internal screws. I finally had a reason for using for using the sliders and S2 disappeared into the body, took it apart and one its screws was missing (like you could tell the hole never had a screw in it) so with only one screw in it, it just levered into the body… bizare…
Es gibt ja verschiedene Arten des Radiomaster Zorro (cc2500, cc2500 tbs nano crossfire, elrs, jp4in1, 4in1 ELnano crossfire). Und meine Frage ist welche Variante ich brauche um den Radiomaster Zorro mit der Drohne GEPRC Smart 35 zu verbinden.
So the Zorro doesn’t come with batteries and if you forgot to order them (like I did) you can use the battery tray from the TX16S with two 18650’s and it plugs right in. I velcroed mine to the module bay on the back of the radio until mine get here. It’s an inelegant solution but hey, it works and I may just leave it that way for grins until my CRSF nano TX gets here.
Thanks for your review! Just starting in model aircraft, but also fly little helis and (hopefully) drones and on that basis I bought a 4-in-1 equipped unit to be my “do everything” main controller. Quality of unit looks good esp. for the price and controls fall nicely to hand.
A word or warning about protected 18350 batteries though: Protected 18350 cells may not fit and the ones I tested didn’t (Master Instruments 1200mAh TB-18350IC12-BP1 with a listed cell length (height) of 38.8 mm). So check your cell length before purchase- probably 1 mm shorter and they would have been fine.
Thank you for the review, I have bought the Jumper and the zorro. The jumper t pro I returned immediately, the quality on the zorro is so much better from the gimbals to the plastic casing.
This is super helpful – thank you! My Zorro just arrived and the left gimbal (mode 2) has tension left and right but no altitude tension at all. Is this a defect?
R-XSR is a popular option, but you might need to flash it with the older ACCST V1 firmware if you have trouble binding. Some of the new R-XSR comes with ACCST V2 firmware which isn’t supported by the CC2500 Zorro.
Hello. Thank you for all of the helpful info for our hobby. I just received a Zorro with ELRS and I need to bind with whoops like the NBD Hummingbird F4 Pro in D8 made so I got an XJT Lite module, but the module does not seem to work at all. It briefly flashes the red light when you first plug it in, but never turns the light on again after that. There is an XJT option in external module options in the radio, but no XJT Lite option like in some other radios. Could that be the problem? Could the module come with ACCST 2.0 and would that possibly cause the problem? Are you able to test this? Thanks.
If the XJT module is new, then it’s possible that it has the new ACCST 2.0 firmware. I don’t know if Frsky still provides the older firmware (ACCST 1.0) for users to download, but try google it see if you can find it.
like i said, it could have the mismatched firmware version on the Tx module. You will have to try to flash it with the older firmware (ACCST 1.0) and see if that fixes it.
Not sure about firmware problems in this case. When module only flashes LED and nothing else, more likely can be problem in low power voltage, or defect in module. Can this module work in another transmitter?
This radio really doesnt support Frsky ACCST 2.0?
Colin13th February 2022 - 2:54 pm
Try flipping a switch before turning the tx on, so you get a switch warning on startup. Wait until after the warning, then flip the switch off.
I need to do this to get my ELRS module to power up on my X-Lite Pro.
How does the Zorro ELRS version compared to the Tango 2? I like the larger screen on the Zorro cause I’m old. How does the gimble compare to the Tango 2?
I’m answering my own questions now I guess, I have the Tango2 and just received the Zorro 4-1, and I am a pincher, my new go to will be the Zorro, I really like the larger easy to read screen and I personally feel as though the Zorros gimbals feel just fine when pinching, but I can see why a thumber would love the Zorro, another plus was as Oscar wrote, the positioning of the switches on the Zorro are placed in a great position to get your fingers in there as to not interfere with each other. No, imo, Radio Master hit a home run with the Zorro.
I only tried the tango 2 for a couple of flights (from my friend), they feel better for pinching, but when you are a thumber they are not too different.
The Tango 2 is significantly better for pinchers. The shape of the Tango2 allows a pincher to ge a better hold of the radio and the middle fingers to rest perfectly on top of the radio and operate the switches if needed. I really wanted the Zorro to be ok for pinchers but the combination of the shape and the smaller more sensitive gimbals just didn’t sit right with me. The screen is small yes , but you use it once or twice and then never look at it again really.
We use cookies on our website to give you the most relevant experience by remembering your preferences and repeat visits. By clicking “Accept”, you consent to the use of ALL the cookies.
This website uses cookies to improve your experience while you navigate through the website. Out of these, the cookies that are categorized as necessary are stored on your browser as they are essential for the working of basic functionalities of the website. We also use third-party cookies that help us analyze and understand how you use this website. These cookies will be stored in your browser only with your consent. You also have the option to opt-out of these cookies. But opting out of some of these cookies may affect your browsing experience.
Necessary cookies are absolutely essential for the website to function properly. These cookies ensure basic functionalities and security features of the website, anonymously.
Cookie
Duration
Description
cookielawinfo-checkbox-analytics
11 months
This cookie is set by GDPR Cookie Consent plugin. The cookie is used to store the user consent for the cookies in the category "Analytics".
cookielawinfo-checkbox-functional
11 months
The cookie is set by GDPR cookie consent to record the user consent for the cookies in the category "Functional".
cookielawinfo-checkbox-necessary
11 months
This cookie is set by GDPR Cookie Consent plugin. The cookies is used to store the user consent for the cookies in the category "Necessary".
cookielawinfo-checkbox-others
11 months
This cookie is set by GDPR Cookie Consent plugin. The cookie is used to store the user consent for the cookies in the category "Other.
cookielawinfo-checkbox-performance
11 months
This cookie is set by GDPR Cookie Consent plugin. The cookie is used to store the user consent for the cookies in the category "Performance".
viewed_cookie_policy
11 months
The cookie is set by the GDPR Cookie Consent plugin and is used to store whether or not user has consented to the use of cookies. It does not store any personal data.
Functional cookies help to perform certain functionalities like sharing the content of the website on social media platforms, collect feedbacks, and other third-party features.
Performance cookies are used to understand and analyze the key performance indexes of the website which helps in delivering a better user experience for the visitors.
Analytical cookies are used to understand how visitors interact with the website. These cookies help provide information on metrics the number of visitors, bounce rate, traffic source, etc.
Advertisement cookies are used to provide visitors with relevant ads and marketing campaigns. These cookies track visitors across websites and collect information to provide customized ads.


49 comments
You do NOT need to remove the main board to adjust the gimbals! The four adjustment screws are visible and accessible with the board and all the plugs in place.
Typo alert: “ExperessLRS” -> “ExpressLRS”
What processor is fitted in the Zorro ?.
Hi Oscar, do you know if there is a way (thinking of LUA scripts..) to auto-disable internal RF if an external module is connected on the nano bay (and viceversa, disable external if is not) on radio start up?
It would be more convenient than having to switch manually every time.
Hiw come you didn’t talk about pluging and unplugging the battery three times to bind it?
3 Ways to Bind ExpressLRS Receivers – Step by Step Guide for Beginners
Hi Oscar, I have the 4in1 version with an elrs module in the bay, I was wondering if there is a way of adding bluetooth to the radio for headtracking?
Hi Oscar. Are you going to review the RadioMaster Zorro Max Radio Controller – 4-in-1 Multi / ELRS 2.4GHz?
Is it just a fancier version of last year’s version? I just saw it available on GetFPV’s website. Link: https://www.getfpv.com/new-arrivals-1/radiomaster-zorro-max-radio-controller-4-in-1-multi-elrs-2-4ghz.html
Thanks!
-Dave
It’s the exact same radio with better looking skin and the AG01 gimbals.
There’s no important upgrades in my opinion.
Pls help, how do you set up the slider switches to operate, I want to use S2 FOR FLAPS. I cannot get it to work’
Regards Keith in OZ
Thank for reviewing the radio.
I’m a little bit confused. In one point of the review you say the module Bay got a maximum output of 1 watt.
Which zorro radio got that power?
I’m about to buy one of these radio.
Thanks 🙏
The radio has 250mw rf power in the elrs version (internal module) if you want to get 1W power you will need to buy a lite size Ranger module from radiomaster seperately.
Zorro or Beta LR 3 Pro?
I was asking myself it there is a change to do a mod to make the display foldable. i think the only disadvantage is the size of the radio. it could be much smaller without that huge display. what do you think?
Have followed your easy to follow recommendation downloading Firmware to the SD Card using Build and got the Message” Success” but with footnote ” Note Build Notice ..Firmware binary file was opened in file explorer”. can you suggest how I can find and copy the file to SD card. It does not show under Recent Files… was downloading latest version as still have 2..6 as supplied.. Need to bind to ELRS Micro RX this is all new to me. (Have internal ELRS)
I am a noob to RC flying, your review has lots of good information. I have just bought a Microaces kit, and it comes with a Microaces All In One (AIO) 5CH Micro Receiver DSM2/X protocol (Spektrum) receiver. I believe the Zorro will work if I buy the 4-in-1 version, correct? Thank you for your help.
JP4in1 should support DSM2/X protocol
what kind of 2s battery do u recommend to use as external power?
I’m new in to this fpv hobby and almost all 2s battery that i find in my local stores are for rc cars and are huge
Just use two 18650 Li-ion cells.
Get a 18650 holder, solder some appropriate wires/connector to the holder, and you have yourself a good 2S battery for this remote for under $20.
What version should I get if I am using the radiomaster receivers? Like the R161 these are D8 and D16, I believe I have the CC2500 version, most people won’t know ELRS, 4n1, or CC2500, should have just made it one version like the Tx16.
CC2500 works with Frsky D8/D16 protocols.
Hi Oscar,
I am very proud to see that my 18650 battery mod made it into your blog :)
It also looks like you built that mod on your Zorro? Which makes me even more proud :)
Would it be ok for you to also share the link to my youtube video about it in your article?
That would be great :)
https://youtu.be/DCNDWkaYJaI
And please keep on going the great work on your blog, I love reading your articles!
Best greetings from Germany!
hey oscar, i recently got zorro elrs version, i was wondering is there any way we can upgrade the antenna with current one, to get better results?
If you go to radiomasterrc.com, you can get external antenna for zorro. Since it’s using SMA, you can always change the anntena later to Moxon or other suitable antenna.
I got one of these a little while ago and its not bad. Feels a little flimsy (like the plastic body is too thin?) and I dont love the battery covers (they just dont go on well). But what blew me away was the fact that it was missing one of the internal screws. I finally had a reason for using for using the sliders and S2 disappeared into the body, took it apart and one its screws was missing (like you could tell the hole never had a screw in it) so with only one screw in it, it just levered into the body… bizare…
Hello.The review is amazing. I have a question can I make the back momentary switches to toggle and make them like a 2 position switch? Thank you
Es gibt ja verschiedene Arten des Radiomaster Zorro (cc2500, cc2500 tbs nano crossfire, elrs, jp4in1, 4in1 ELnano crossfire). Und meine Frage ist welche Variante ich brauche um den Radiomaster Zorro mit der Drohne GEPRC Smart 35 zu verbinden.
So the Zorro doesn’t come with batteries and if you forgot to order them (like I did) you can use the battery tray from the TX16S with two 18650’s and it plugs right in. I velcroed mine to the module bay on the back of the radio until mine get here. It’s an inelegant solution but hey, it works and I may just leave it that way for grins until my CRSF nano TX gets here.
Thanks for your review! Just starting in model aircraft, but also fly little helis and (hopefully) drones and on that basis I bought a 4-in-1 equipped unit to be my “do everything” main controller. Quality of unit looks good esp. for the price and controls fall nicely to hand.
A word or warning about protected 18350 batteries though: Protected 18350 cells may not fit and the ones I tested didn’t (Master Instruments 1200mAh TB-18350IC12-BP1 with a listed cell length (height) of 38.8 mm). So check your cell length before purchase- probably 1 mm shorter and they would have been fine.
Thank you :) One thing about the FPV hobby, never buy protected Li-ion cells… almost all equipment in FPV are designed for unprotected cells :)
Thank you for the review, I have bought the Jumper and the zorro. The jumper t pro I returned immediately, the quality on the zorro is so much better from the gimbals to the plastic casing.
This is super helpful – thank you! My Zorro just arrived and the left gimbal (mode 2) has tension left and right but no altitude tension at all. Is this a defect?
it’s normal, throttle (up down) has no tension. It’s different from gaming controllers.
Thank you!
Are the gimbals much smaller than the TX16s?
If i want to looking for suitable receiver for my radiomaster cc2500, what kind rx should i bought?
R-XSR is a popular option, but you might need to flash it with the older ACCST V1 firmware if you have trouble binding. Some of the new R-XSR comes with ACCST V2 firmware which isn’t supported by the CC2500 Zorro.
Because of the dazzling reviews, i pre-ordered the T-Pro… still waiting on it and regretting the purchase !!!!!!
Hello. Thank you for all of the helpful info for our hobby. I just received a Zorro with ELRS and I need to bind with whoops like the NBD Hummingbird F4 Pro in D8 made so I got an XJT Lite module, but the module does not seem to work at all. It briefly flashes the red light when you first plug it in, but never turns the light on again after that. There is an XJT option in external module options in the radio, but no XJT Lite option like in some other radios. Could that be the problem? Could the module come with ACCST 2.0 and would that possibly cause the problem? Are you able to test this? Thanks.
If the XJT module is new, then it’s possible that it has the new ACCST 2.0 firmware. I don’t know if Frsky still provides the older firmware (ACCST 1.0) for users to download, but try google it see if you can find it.
Any idea why the module does not seem to be communicating with the transmitter and why I cannot get it to bind?
like i said, it could have the mismatched firmware version on the Tx module.
You will have to try to flash it with the older firmware (ACCST 1.0) and see if that fixes it.
Not sure about firmware problems in this case. When module only flashes LED and nothing else, more likely can be problem in low power voltage, or defect in module.
Can this module work in another transmitter?
This radio really doesnt support Frsky ACCST 2.0?
Try flipping a switch before turning the tx on, so you get a switch warning on startup. Wait until after the warning, then flip the switch off.
I need to do this to get my ELRS module to power up on my X-Lite Pro.
How does the Zorro ELRS version compared to the Tango 2? I like the larger screen on the Zorro cause I’m old. How does the gimble compare to the Tango 2?
Thanks!
I’d like to know the same thing, I’m 58 and my eyes aren’t as good as they used to be.
I’m answering my own questions now I guess, I have the Tango2 and just received the Zorro 4-1, and I am a pincher, my new go to will be the Zorro, I really like the larger easy to read screen and I personally feel as though the Zorros gimbals feel just fine when pinching, but I can see why a thumber would love the Zorro, another plus was as Oscar wrote, the positioning of the switches on the Zorro are placed in a great position to get your fingers in there as to not interfere with each other. No, imo, Radio Master hit a home run with the Zorro.
I only tried the tango 2 for a couple of flights (from my friend), they feel better for pinching, but when you are a thumber they are not too different.
The Tango 2 is significantly better for pinchers. The shape of the Tango2 allows a pincher to ge a better hold of the radio and the middle fingers to rest perfectly on top of the radio and operate the switches if needed. I really wanted the Zorro to be ok for pinchers but the combination of the shape and the smaller more sensitive gimbals just didn’t sit right with me. The screen is small yes , but you use it once or twice and then never look at it again really.