I will show you how to set up your Frsky Taranis X9D to play custom sound track using a switch, how to generate this sound track file (mp3 file), using text to speech online services. Finally, how to change the Taranis greeting message when you turn it on.

One great feature of the Taranis is the voice feedback, and ability of playing sound tracks or even songs. You can have it talking to you, to report current flight information such as telemetry data, which is great especially when you are busy looking at the FPV goggle or screen.
Also check out this Taranis Telemetry Tutorial.
But did you know that you can also configure it to play custom sound tracks? Use it to play a funny or naughty greeting as you switch on the radio transmitter just before the flight, or play a message to a stranger who is trying to ask you questions while your quadcopter is still in the air.
i think it’s relatively straight forward, so I will keep it simple and brief. If you have any questions please commend down below.
Generate Custom Voice message (Text to Speech Conversion)
You can record your own voice message and convert it into a sound track. But most people would rather want a voice of a sexy lady. :) So here is a common way on how to do it.
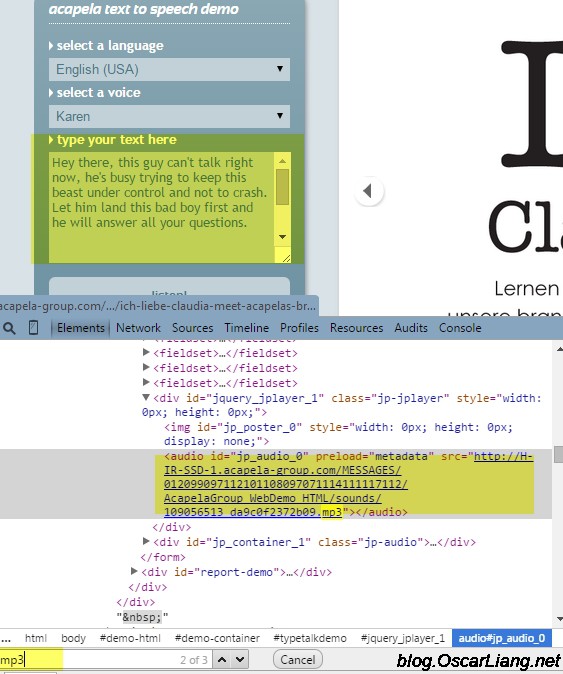
Go to http://www.acapela-group.com, type in the message you want and click “Listen”. However you are not given any option to download the sound file. Here is a trick to do so.
After pressing “listen”, the sound file is generated and stored on their website. You can find the link to the file in the Browser Developer mode, where you can see the HTML code of the website. In Google Chrome:
- press F12
- click on the HTML code
- press Ctrl + F
- type in “.mp3” and hit enter
Once you find the link to the mp3 file, open it in a new tab, right click on the page and choose “Save as” to save the file locally on your computer.
Converting MP3 File Format to WAV Format that Taranis Supports
Taranis does not support MP3 file format, only WAV format, therefore you need to convert it first. There is a free open source tool called Audacity, which works on Windows, Linux and Mac.

It also allows you to trim, cut, edit the sound track. If you are happy with the result, simply select the part of sound track you want, and click on “Export selected sound track” option in the File tab.
Default output settings works just fine on the Taranis.
Putting Sound Track Files on Taranis
Two ways to do it, pick one.
1. Take your SD card out of the Taranis, and insert it into your computer.
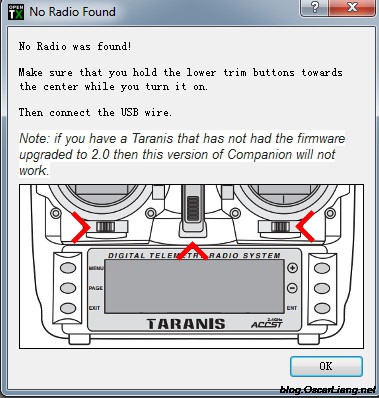
2. Access the SD card on the Taranis, by connecting the Taranis to the computer with a Mini USB cable. But you need to turn on the Taranis first by holding both trim buttons towards the centre as instructed below.
The sounds files are all in the “SOUNDS\en” directory on the SD card. Once you place the file there, the Taranis will pick it up and it should be available as an option in the next step.
Note: It’s best to keep the file name short, and try to avoid having symbols in the name, otherwise your file might not be detected.
Configure Switch on Taranis to Play Sound Track File
Final Step! And it’s simple.
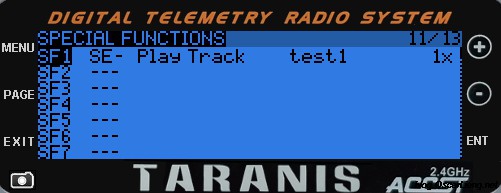
On your Taranis, go to the Special Functions page, add a new function, assign a spare switch for playing the sound track, Second option should be “Play Track”, and third option is the file you want to play. Forth option is how many times you want to play it.
Changing Switch-On Greeting Message on Taranis
As you turn on the Taranis, you hear: “Welcome to OpenTX”.
Isn’t that boring? Let’s change it.
You only need to replace the original greeting sound file with a new one. The original greeting is located in “SOUNDS\en\system\hello.wav“.
Rename it to “hello_old.wav”, and put yours custom sound track in there and name it “hello.wav”.
There you have it! Let me know if you come up with any funny or creative ideas on how to use custom voice message on your Taranis.
Want to learn more about the Taranis D9X transmitter? Have a look at this review.
Edit History
- May 2018 – Article created
- Oct 2018 – OpenTX changed the name of the opening sound track from “tada” to “hello”
23 comments
the hello.wav seems to have stopped working after the updgrade to latest 2.2.14-otx on the Taranis x9d+
any idea?
hello oscar
is there a command to allow a voice to say goodbye. i have one bendadict he says see u later !!!! is there a function to prompt it on shut down please
thanks andy
You ever figure this out? I’d like to do something similar.
Thanks
Was trying for over an hour to setup play track on a switch global function from within Opentx Companion, thinking I was missing something as no tracks were in the list.
I could do it on the radio, but that meant painfully scrolling through hundreds of tracks. Who wants to do that…
I think I figured it out though and it was I’d missed a setup step in Opentx Companion, needed to setup a local (computer) copy of the SDCard and point Companion to its location. Without doing that you can’t select or play any tracks in companion it seems.
I had incorrectly assumed that companion just interfaced with the radio allowing us to use keyboard and mouse for setup instead of buttons on the radio…what a noob
Now Acapela put an annoying sound in the background.
I have used the opentx speaker which worked great for me, super simple.
open-tx.org/2014/03/15/opentx-speaker
*UPDATE*
I tried for over an hour trying to replace the startup sound ( tada.wav ) on SD Card. Nothing would work and it kept playing the default startup sound no matter how many times I replaced ( tada.wav ) in Dir – ” G:\SOUNDS\en\SYSTEM ” on Taranis X9D Plus SD Card . I thought that if it kept playing the default startup sound then it had to be another file / wav it was reading. I searched through – G:\SOUNDS\en\SYSTEM and found that ( hello.wav ) was what it was defaulting to. Once I replaced ( hello.wav ) it would play the custom sound . So it seems like the new file to change would be ( hello.wav ) instead of ( tada.wav ) .
FW: ( opentx – x9d+ )
VERS: (2.2.0 ) (85863358)
EEPR: ( 218 )
Hope this can help others.
This is EXACTLY what I needed. Thank you.
Thank you, I thought I was nuts.
Thanks for this, it helped a lot! I made some custom sounds for m’self, and a script to generate the system sounds. It’s here if anyone wants to play! github.com/jameswood/Taranis-Voicebot/
I struggled getting some Star Wars effects to play,you need to have them at the correct settings ,use Audacity and these settings :
In Audacity:
– Open your file
– Tracks -> Stereo track to mono
– Set Project Rate to 32000Hz at the bottom left of the window
– File -> Export, Wav Signed 16 bit PCM
– Click “clear” on the metadata screen that appears
Note: It’s best to keep the file name short, and try to avoid having symbols in the name, otherwise your file might not be detected.
Perhaps you can add “max 8 characters” to this line.
Nice tut BTW
On the QX7 the max characters is 6.
Does this still work? I tried on 12/29/2016 and there is no .mp3 file in the code.
Thank you for your guides! These are always fantastic!
Do you know if there a way to have the Taranis greeting change each time it powers up?
Please see section “Changing Switch-on Greeting”
Hi Oscar, Thanks for the tip… my video here;
youtube.com/watch?v=OCrwhfql4oI&feature=youtu.be
Just to say, in Audacity we need to convert in 32hz frequency or will not work ;) default in my audacity was 44…
Best
This is a great little tutorial Oscar, thanks for this. You may want to mention the Amber sound pack that can be found at http://www.rcgroups.com/forums/showthread.php?t=2151914, it’s a really nice upgrade from the default OpenTX voice pack.
thanks Fubecka, i will check it out :)
Hi,you say I have to click on the html code,I am doing that but nothing is happening, html lang=”en-US “>,this is what I’m pushing but I think I’m wrong,can you help,cheers
it doesn’t matter where you click in the html code window, all it does is to make that window active, so when you press “Ctrl+F” you can actually search through the HTML code.
Cusom sound?
Check the spelling of the title, noneed to post this comment.
P_
thanks for pointing out :)