There are many Taranis Upgrades you can do. In this project I changed the shell of the Taranis X9D TX transmitter, the stickends, switch nuts and added switch sleeves. All these upgrades hugely improve the aesthetics and handling of the radio.

The four Taranis Upgrades are:
- New custom shell (carbon fibre case)
- Upgrade stick ends (stick heads)
- Switch sheath (sleeves)
- Colour switch nuts (FAILED)
Because it was the first time I did it so it took me slightly longer than expected to complete, about 3 hours. But I am really happy with the result and it was totally worth it! After the modifications, my Taranis no longer looks like some cheap plastic toy :)
If you haven’t done the M9 Gimbals Upgrade, I strongly recommend doing it too.
The original Taranis TX with stock housing:

The upgraded Taranis X9D Plus :)
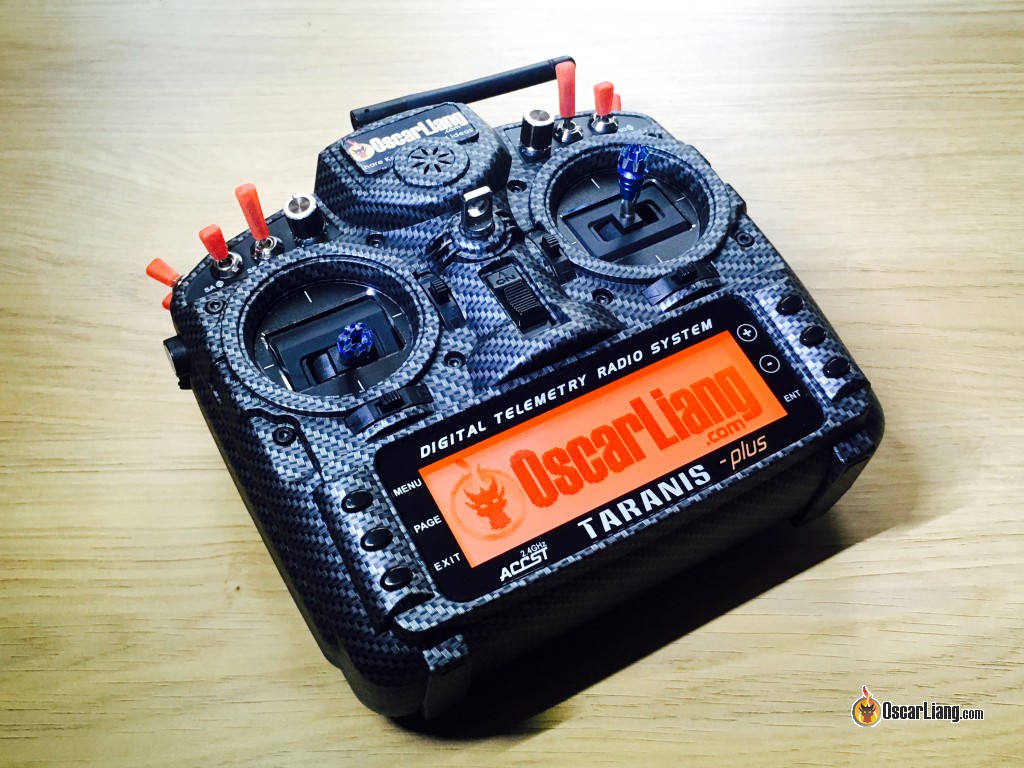
It looks awesome! :D

Let’s start with the easiest Taranis mods first.
Upgrade Stick Ends (Stick Heads) for Taranis X9D

I got these stick-ends from http://bit.ly/taranis-stick-head (no longer available)
For M9 Gimbals, get the 4mm version. For the original gimbals you need to get the 3mm ones.
As a “hybrid pincher” (a way of holding the gimbal sticks), I found these new stick ends much better than the ones come with the M9 Gimbals. The stock ones feel a bit slimmer and more “slippery” while these anti slip stick heads are more grippy. These should work great for “thumber” as well!
The stick ends are very easy to install, just remove the stock stickends (you might need to use a pair of pliers because they are quite tight), and put these new ones on.
Frsky also released their own stick ends upgrades, there are 2 types:
- Umbrella & Lotus stickends: http://bit.ly/2BoTQo1

Switch Sheaths – Sleeves

TX Switch Sheaths are available here: http://bit.ly/tx-switch-sleeves
The main advantage of these switch sleeves is the rubbery feel and larger surface area, makes them much easier to grip. And of course they do look very nice too!
To install, simply slide them into the switch sticks. SB and SC switches are a bit too thin for these sleeves, and I found they could sometimes slide out or change position. What I did was to put a heatshrink tube on them first to thicken the sticks before installing the sleeves.
Colourful Switch Nuts for TX
![]()
I got them from http://bit.ly/switch-nut
But unfortunately, they didn’t fit the switches on my Taranis X9D plus. They seem to be 1mm too small. Although they showed a picture of the Taranis with colourful Switch Nuts installed, it could be the wrong ones. I will continue to look for suitable colour switch nuts for the Taranis X9D and update here when I found it.
It comes with 2 different heights, 6 of each size, and a installation tool.
Update 03 May 2017: some people actually told me that these same nuts fit their Taranis X9D plus perfectly. I am puzzled since we should have the same TX and switches. Maybe I was just sent the wrong nuts?
Update 05 May 2017: Banggood confirmed these nuts can be used on ordinary X9D plus. However Frsky has a batch of the X9D plus with slightly larger switch screw threads. Maybe that’s why it didn’t fit mine.
Taranis X9D Custom Shell
Taranis X9D Plus Custom Case (Housing) are available from http://bit.ly/taranis-x9d-shell.
I love this “carbon fibre” version. The custom shell is not made of real carbon fibre, but plastic with CF pattern painted on it, the texture and appearance are very realistic.


The case comes with all the switch labels, as well as a brand new screen panel protector and buttons.


Replacing the Taranis case took about 99% of the total time for this project. Especially when it was my first time doing it, I had to be really careful not to mess it up. But if I had to do this again, I think I could do it under 45 mins.
All you need to do is to remove the “guts” (components) from the old case, and install them in the new one. The hardest part is removing the antenna. It wasn’t impossible, just requires a bit of patience and good soldering skills. I’ve heard some people damaged their Taranis when doing the antenna mod so I was a bit nervous.

Here are the steps I took to transfer everything over. There are also lots of Youtube videos showing you how to do this, make sure to do your research.
First of all, remove the battery, SD card and external TX module (if you have it). Remove the 6 screws in the back, and gently taking Taranis apart from the top, it has 2 ribbons connected in the bottom.
Front Shell Disassembly and Install

- Firstly, take a picture of the whole thing for reference, see how everything is connected
- Label all switches with a marker so you know what switches they are (such as SA, SB…), and which side is front, so you can reinstall them later the same way
- Remove ribbon from sockets (push retainers to release the ribbons)
- Remove the throttle and pitch trim boards
- Remove switches and pots (don’t lose the spacers! The thin ones are for S1/S2, thick ones are for SB/SC)
- Remove the plastic bar that holds the speaker in place, and unplug and remove speaker
- Remove the speaker board and the on/off cover
- Remove all the screws on the main board and lift the board gently
- Now remove the roll and yaw trim boards and the 4 trim buttons
- Remove the gimbals (4 screws on the front)
- Lastly remove the Balance Bar (for the neck strap)
Now you can install everything in the new front shell, in the exact reversed order. With the speak bar, you need to drop a tiny bit of glue to hold it in place.
Back Shell Disassembly and Install

- Remove SF and SH switches (with a thick square spacer), but no need to unplug the connectors
- Remove rotary from the sides (they just slide out of the slots!)
- Now move on to the the charger plug. With the LED, push from the other side while grabbing on the LED, don’t pull the wires too hard
- Unsolder antenna from the PCB, pinch the base of the antenna tube and push it out of the housing
- Remove the board (6 screws)
- Remove back handle
Now you can install everything to the new back case in the reversed order. Add a tiny bit of glue to hold LED in place. The antenna also needs hot glue to protect the soldering joint, and some in the middle part to hold it in place.
Put everything back to how it was…
Feed the ribbon cables through the connector slots, and push retainers to secure it. Close the case and put the screws back on.
Put the SD card back and battery back in…. and That’s it!


13 comments
I have a non plus, that I can’t find colored nuts for that fit. well except for on the one switch I once broke and replaced…
HAs anyone found anywhere that sells nuts compatible with the older non plus models and what I assume are the earlier plus models ?
do you know anywhere that does the different allen screws on the front of the transmitter ive seen a few with different colours just cant find them online thanks
Nice, you have confirmed that I am in the same boat as you. I have bought two different versions of switch nuts claiming to work for the Taranis x9d plus and none of them fit. If you find a fix before me please post it up or let me know haha. I though I was going nutz!!
Are you aware of a similar case/shell for the Turnigy 9XR Pro? My preliminary searches have not turned one up.
Thanks.
I don’t think so, however you can try hydrodip the case.
I bought the same Switch Nuts for my Taranis and they also didnt fit. I think the switches changed on the Taranis over time.
Yea they had a batch that used switches with larger threads… very strange decision :)
I also bought these switch nuts and they are too small for my Taranis X9D non-plus version!
Mine fit, but the switches hit the nut and so the transmitter doesn’t register the switch throw. What the! X9d plus.
Hi Oscar,
I love to customize my Taranis too, the only thing I do not know how to do is to turn the blue display screen to an orange screen like yours.
It would be grateful if you could help me on that with a link that I can follow the instructions.
Thank you so much.
Stanley,
You will have to purchase a new screen or buy a radio with the orange screen
some taranis comes with blue screen, some with amber…
The plus is supposed to be able to change between blue and amber, it was one of the upgrades from the Nonplus, along with “haptic” and the simpler internal cabling.