
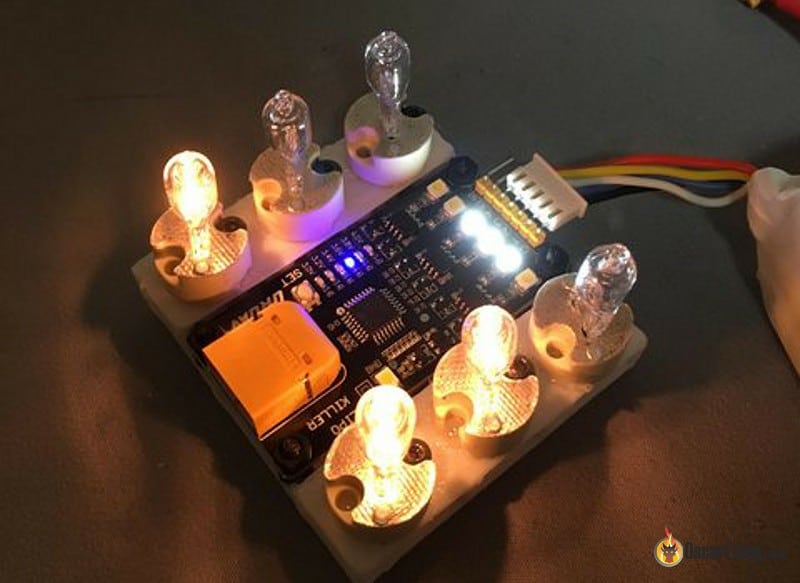
I built several LiPo dischargers in the past but all are designed to fully discharge batteries, and none have the ability to stop at a certain voltage. The URUAV LiPo Killer is a cheap and smart battery discharger which can do that.

Here are the DIY dischargers I built in the past:
Where to Buy LiPo Killer?
- Banggood: http://bit.ly/2R9ukbB
- Amazon: https://amzn.to/31mGUZQ
You can use it for 1S, 2S, 3S, 4S, 5S and 6S LiPo batteries.


How to Use URUAV LiPo Killer?
To completely drain a Lipo battery, connect the battery to the XT60 connector on the LiPo Killer. A single LED will light up to indicate the discharging is ongoing. It will turn off when it finishes.
For example, for an 4S 1300mah battery, to discharge it completely from 4.2V/cell will take slightly over 24 hours.
Why discharge LiPo battery completely? This is the first step to disposing LiPo safely.

To discharge a LiPo down to a certain voltage, you simply connect the battery balance lead to the LiPo Killer. You can select the voltage you want it to stop by pressing the button and it’s shown by the LED panel. Available voltages are: 3.0V, 3.2V, 3.4V, 3.6V, 3.8V and 4.0V.
To discharge a 4S 1300mAh from full charge to 3.8V (storage charge) takes about 5 hours.
Why discharge LiPo to 3.8V per cell? 3.8V is the storage voltage for a LiPo battery cell. Leaving your battery fully charged or empty for too long can accelerate performance degradation. When you are not using the LiPo over a long period of time (i.e. a month) you should put it in storage voltage (i.e. 3.8V per cell).

Beware that it can get very hot during discharging, do not touch the board to avoid burning your fingers. Luckily the LiPo Killer comes with a plastic shield you can install (not shown in this review).
Discharging Takes Time
As you can see, the URUAV LiPo Killer uses LED and tiny little resistors to drain the battery, which is extremely slow.
There are two 150 ohm resistors in series (total 300 ohm) and an LED for discharging a single cell, or two 471 ohm resistors in parallel (total 235.5 ohm) and an LED for a whole battery. The discharge current depends on the voltage, the lower the voltage the lower the current – hence the discharge will slow down towards the end too.
While it’s not a problem because you can just leave it outdoor somewhere fireproof, there are ways to speed up the discharge by adding additional loads.
DOES NOT Discharge Completely
There are some downside to this thing though, when you connect the XT60 lead wanting to discharge it completely, it doesn’t hit 0V. In fact, the discharge stops at around 1V to 2V. It’s not really a huge problem for me, because the voltage is low enough and safe to just short the positive and negative leads, this will discharge the battery completely. But this is just me, do this at your own risk at somewhere won’t cause a fire :)
The LED turns off before 0V too, because it needs a minimal voltage to work (somewhere around 0.7V). So it’s not the ideal indicator for indicating complete battery discharge.
How to Speed Up Discharging
You can add extra loads to the LiPo Killer to make it discharge faster. Simply connect extra loads in parallel to the resistors, such as power resistors or halogen light bulbs.
Here is how to add extra load to the XT60 side. The resistor shown in the image is good for 16V and lower voltage. For 25V (6S) you should use 125 ohm or higher to be safe. Higher resistance is safer (lower current thus less heat) but takes longer to discharge.

Here is how to add extra loads to the balance lead side. The loads should be identical so the cells are discharged at the same pace.

Similarly you can use light bulb instead of resistors. Here is a tutorial how to add light bulbs to the balance lead discharger: https://intofpv.com/t-the-perfect-lipo-discharge-tool-uruav-lipo-discharger-how-to-hack-diy
This is truly a cool gadget to have. It saves you a lot of time putting each fully charged batteries back to storage from a cancelled flight.
Hope this review helps!
7 comments
Great article as always Oscar, but you made a mistake with SMD resistor values: with 3 digit markings, first 2 digits are value, last digit is multiplier, so:
“150” = 15 x 10^0 Ohm = 15 Ohm
“471” = 47 x 10^1 Ohm = 470 Ohm
Per-cell discharge resistance is 30 Ohm (not 300), so you get ~100 mA discharge current (as specified by Uruav), so a full 1300 mAh battery will get to storage charge in 5-8 or hours.
With 300 Ohm per-cell resistance discharge current would be only a bit more than 10 mA, so it would take days to discharge a 1000+ mAh battery :-)
Adding the 47 Ohm resistor in parallel to 30 Ohm gets you 18.3 Ohm or discharge current ~200 mA, about 2x faster.
The 5 W rated resistors are a bit of an overkill – they will dissipate less than 0.4 W, so cheaper 0.5 or 1 W can be used safely.
Battery killer resistance is 235 Ohm. A full 4S will discharge at ~70 mA. the current will then drop toward zero as the battery discharges. It would take more than one day to kill a 1300 mAh 4S.
Adding the 47 Ohm in parallel gets you ~40 Ohm or 400 mA discharge current for a 4S, killing it much faster – about 6 hours for a 1300 mAh.
Hi,
I tried to use it to kill my old 3s lipo,
But after more than 24 hours, the led still on and tje lipo got more bloated then it was.
Now I’m concern,
Why thats happened?
it’s normal the battery get bloated when it’s dischargine below it’s working voltage. Just let it get discharged down to 0V, as long as it’s not overheating it should be fine. Make sure you do this outdoor
How I handle unused flight batteries:
I have a few field charging LiPos (4S 10.000mAh) and a fire resistant box to store them in.
I procede to charge two/three flight packs before flying and enough field charging lipos to get me through a raceday. Typically that results in one or two still charged flight packs and almost completely dry field charging ones.
I then just use the flight packs as fuel to charge the field charge LiPos and set the charger so it stops at 14.5V on the supply side (for 4S). With 6A that results in fastly discharged flight packs that have around 14.8Vto 15V left.
If the field charge lipos then are stored with 3.85 or 3.9V per cell that is not as bad regarding danger of fires as they don’t get abused mechanically as much as the little ones.
yes it will be balanced because every lead has his own resistor!
“You can use 4ohm 5W resistors”, the picture shows 47ohms, 4ohm is quite low I think
Does discharging by the balance lead also balance? Seems like a neat feature that they’re not advertising.