My favourite 1S LiPo charger, the VIFLY WhoopStor 2, has recently received an upgrade with the release of the V3 model. The question on everyone’s mind is, does this update improve on its predecessor? Let’s dive in and find out in this review.

For those unfamiliar with the WhoopStor 2, it is a compact charger specifically designed for 1S batteries for more info: https://oscarliang.com/vifly-whoopstor-v2/
Wondering how to handle LiPo batteries properly? Check out my beginner’s guide: https://oscarliang.com/lipo-battery-guide/
Table of Contents
Where to buy?
The WhoopStor V3 is available here:
- AliExpress: https://s.click.aliexpress.com/e/_DeZwHol
- GetFPV: https://oscarliang.com/product-pcpx
- RDQ: https://oscarliang.com/product-4ies
- Newbeedrone: https://oscarliang.com/product-modw
- Banggood: https://oscarliang.com/product-gjv5
- Amazon: https://amzn.to/3Yut9GB
If you want a compact setup you can get a PD charger to power the Whoopstor 3 via USB-C, such as the Anker 65W: https://amzn.to/3VE3yro.
In the box, it comes with the charger, a detailed user manual, a USB-C power cable, and six PH2.0 extension leads.

Why I Like Whoopstor
Two reasons why I like the Whoopstor chargers. Firstly, they are easy to use: you can plug in or unplug your whoop batteries any time, you don’t need to press any button it will just start charging.
Secondly, the Whoopstor is currently the only 1S charger that offers “storage charge” function. This helps bring your empty or fully charge batteries to the storage voltage at the end of a session to prolong the lifespan of your batteries.
What’s New in the V3 Compared to the V2?
For those who just got their hands on the WhoopStor V2, particularly with the recent sales, the question that might be looming is: what fresh features does the WhoopStor V3 bring to the table, and is it worth an upgrade?

Vifly Whoopstor V2
The V3, at first glance, flaunts a more streamlined and professional looking housing, a significant departure from the open design of the previous.

Vifly Whoopstor V3
It’s more refined, better build quality and just feels overall more durable. It also includes a cooling fan for more effective discharging, a feature not present in its predecessor.

It now features a vibrant OLED screen that displays the status of each charging slot, providing precise insight into your charging progress. In terms of power supply, you now have the option between an XT60 connector (either power supply or battery which can support up to 6S) and a USB-C socket for 9-20V PD3.0. There’s also a 5521 barrel connector for DC input (6-26V).
Notably, the maximum charge current has increased from 0.9A to 1.3A. 0.9A would be plenty for small packs like 300mAh, because you might not want to charge it too fast to risk overheating or faster performance degrade over time. However it allows for quicker charging of larger capacity 1S batteries. Just like its predecessor, the V3 still possesses the ability to storage charge LiPo batteries—a highlight that contributes significantly to its appeal.
One impressive feature of the Whoopstor 3 is the memory function. It remembers settings, saving you the trouble of setting up every time you unplug and plug in a battery. This is a great improvement from the original version.
Specifications
Here are the specifications for the WhoopStor 3 Battery Charger:
- Input connectors: XT60, DC(5.5×2.1mm), USB-C(PD3.0)
- Input voltage range: 6V-26V (XT60 2S-6S Battery, DC), 9V-20V (USB-C)
- Input power: 40W
- Maximum charging current: 1.3A/port
- Battery connection: PH2.0 & BT2.0
- Battery type compatibility: LiPO 4.20V(±0.05V) / LiHV 4.35V (±0.05V)
- Storage voltage: 3.80V (±0.05V) / 3.85V (±0.05V)
- Maximum discharge power: 1.1W/port
- Dimensions: 108x55x30mm
- Weight: 140g
Highlighted Features
The VIFLY WhoopStor V3 is packed with features designed to provide a flexible, efficient, and user-friendly 1S LiPo battery charging experience. Let’s take a closer look:
- Enhanced Charging Capacity: The V3’s maximum charging current has increased from 0.9A to 1.3A, making it more accommodating for larger capacity batteries, such as an 850mAh.
- Upgraded Design: The device boasts a new case with no exposed parts for added safety and durability.
- Colorful LED Screen: An improved colorful LED screen provides clearer visuals of each cell’s current, offering better monitoring capabilities.
- Efficient Heat Dissipation: The addition of a fan and larger heat sink significantly improves heat dissipation, enhancing the charger’s discharging efficiency.
- Audible Notifications: A new buzzer feature alerts you when the charging cycle is complete, ensuring no overcharging and better battery health.
- Memory for Settings: The V3 remembers your last current setting, saving you from setting it each time you use the charger.
- Support for 6S Battery Input: An added feature in the V3 is its compatibility with 6S battery input.
- Simplified Operations: The V3 eliminates switches, instead utilizing two buttons for all operations, simplifying user interaction.
- Storage Charger and Discharger: As the first 1S LiPo charger with a storage function, the WhoopStor 3 can automatically reach your target voltage, both when charging and discharging.
- Adjustable Charging Curent: The device offers a charge current range of 0.3A to 1.3A, allowing for different charge currents based on your battery size.
- Six Independent Ports: With six independent charging channels, you don’t need to ensure all batteries have the same voltage or size.
- Multiple Power Input: The V3 supports Type-C, XT60, and DC power input, however, it doesn’t support regular 5V USB charge.
A Close Look at the Whoopstor 3
Battery Connectors

The VIFLY WhoopStor 3 is a combination of a charger and discharger, basically a compact smart charger dedicated for 1S batteries.

The Whoopstor 3 has the same PH2.0 and BT2.0 connectors like its predecessor, the BT2.0 on the charger are also compatible with A30 batteries. Power can be provided via a DC barrel connector, an XT60 connector, or a USB connector.
Diverse Power Input Options

The WhoopStor 3 supports Type-C, XT60, and 5521 barrel inputs. The Type-C uses PD and QC protocols, supporting fast charging at 9V and 12V. However, please note, it doesn’t support regular 5V USB charging.
Controls
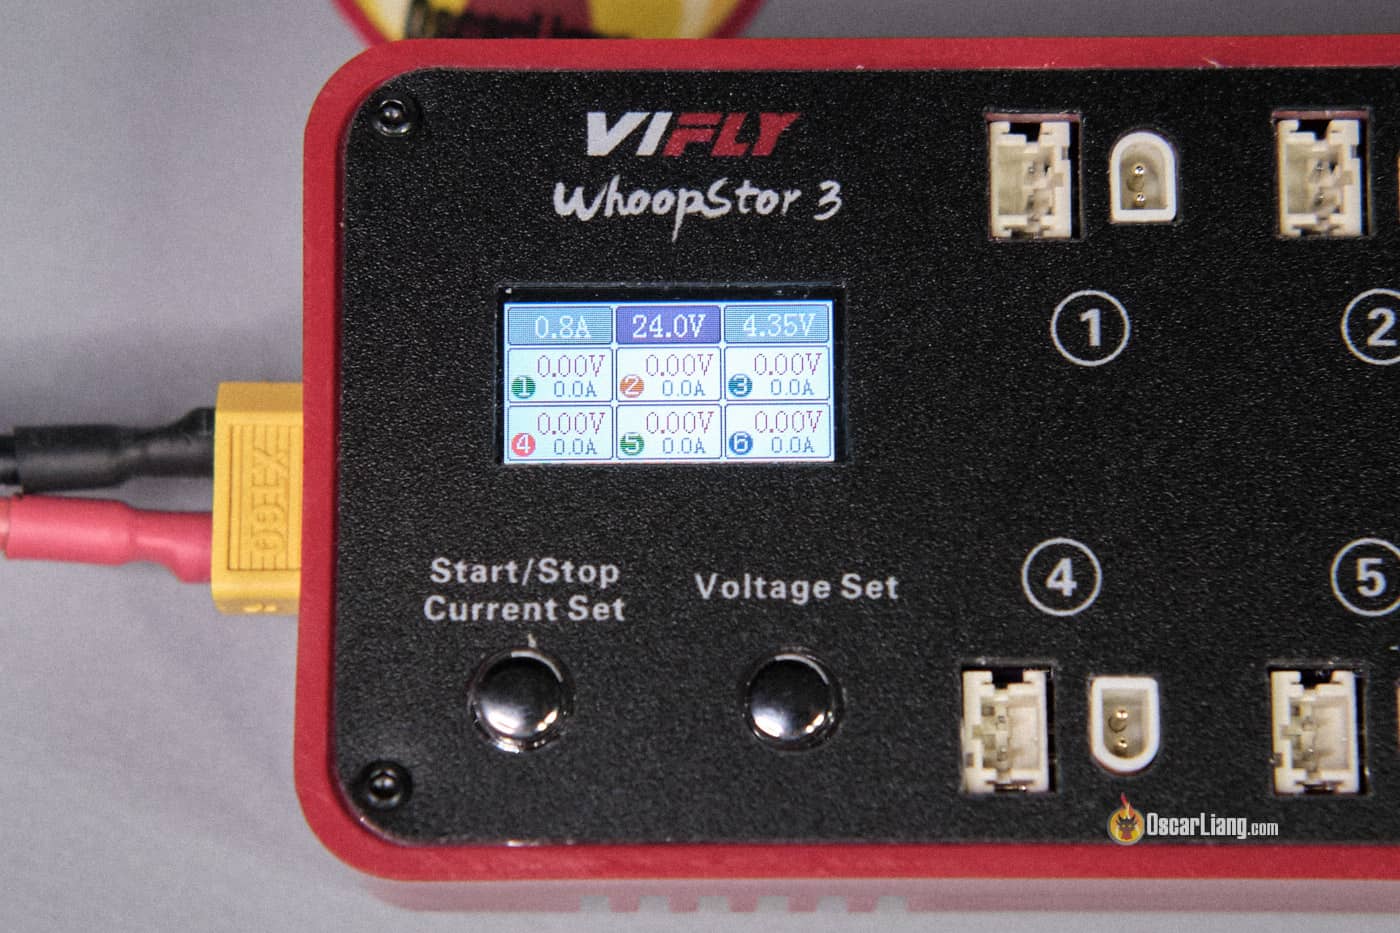
The Whoopstor 3 has two separate buttons, the left button is for setting current and start/stop, while the right button is for setting voltage. The connectors have been conveniently placed on top, making it easier to plug everything in. It also includes a color screen for more accessible and more precise monitoring.

Voltage Testing
To confirm the voltage accuracy of the ViFly Whoopstor V3 charger, I checked the voltage measurements using a calibrated DMM (digital multimeter). The results were spot on.
| Charger | DMM | |
| Input Voltage | 24.0 | 24.0 |
| Port 1 | 3.90 | 3.904 |
| Port 2 | 3.90 | 3.904 |
| Port 3 | 3.90 | 3.904 |
| Port 4 | 3.90 | 3.904 |
| Port 5 | 3.90 | 3.904 |
| Port 6 | 3.90 | 3.904 |
While my tests showed consistent measurements, I recommend checking yours when you get it to ensure it functions properly. Unfortunately, voltage calibration isn’t available, so if you encounter any issues, you might have to reaching out to ViFly for support.
How to Use
Using the Vifly WhoopStor 3 cannot be easier. When the charger powers up, you will see the input voltage.
When you plug in a battery, the WhoopStor 3 displays its voltage, and the charging process is initiated by a simple long press of the left button. While charging, you can see the amperage and battery voltage for each channel.

Before charging, you can set your target voltage, and the device automatically starts charging (or discharging).
With a short press of the right button, you can adjust the end voltage between 3.80V, 3.85V, 4.20V (normal LiPo) or 4.35V (LiHV), depending on your requirements.
You can also change the charging current from 0.3A to 1.3A by pressing the left button, with an increment of 0.1A per press. This flexibility ensures that you’re always charging your batteries at the right rate depending on battery size, maximizing their lifespan. I generally charge my 1S batteries at around 0.5A.
Unfortunately the current and voltage settings applies to all channels and they cannot be set individually.
One of the stand-out features of the WhoopStor 3 is its memory function. Once you’ve set your current and voltage, the device remembers it, freeing you from the need to adjust it every time you power on.
To start or stop charging, simply hold down the left button, or disconnect the battery from the charger. It cannot get more straight-forward.
The charger also supports silent mode (disabling the beeper), activated by a long press on the right button.
Here’s the user manual.

Final Thoughts

Overall, the Whoopstor 3 is a worthwhile investment for those who fly tiny whoops and need an efficient and user-friendly charging solution. The VIFLY WhoopStor V3 is a remarkable improvement from its predecessor, bringing noteworthy enhancements that facilitate a more versatile and user-friendly battery charging and storage experience. The charger’s combination of faster charging speeds, a sleeker design, improved thermal handling, and intuitive controls make it a highly compelling tool for those who regularly fly 1S micro drones such as tiny whoops.
The WhoopStor V3 is available here:
-
- AliExpress: https://s.click.aliexpress.com/e/_DeZwHol
- GetFPV: https://oscarliang.com/product-pcpx
- RDQ: https://oscarliang.com/product-4ies
- Newbeedrone: https://oscarliang.com/product-modw
- Banggood: https://oscarliang.com/product-gjv5
- Amazon: https://amzn.to/3Yut9GB
Get a PD charger to power the Whoopstor 3 via USB-C (Anker 65W): https://amzn.to/3VE3yro.
However, if you already own the original Whoopstor, the upgrade may not be necessary unless you require these new features. But for those starting, the Whoopstor 3 is a brilliant choice.
How to Update Whoopstor V3 Charger Firmware
- Power on the charger. On the startup splash screen, which displays the ViFly logo, note the version of the firmware currently installed on the charger. Remember this for reference.
- Download the firmware update program from the following link: https://viflydrone.com/pages/download-center
- Run the downloaded app and take note of the available COM ports.
- Go back to the charger. Hold down the “Start/Stop” button while connecting the charger to your computer using a USB-C cable plugged into the voltage input port.
- A new COM port labeled “STC USB Writer (HID1)” should appear in the app. If you don’t see this COM port, try unplugging the cable and waiting for a moment before trying again. It may take a few attempts.
- In the app, click the “Download” button. The firmware update will begin automatically. At this point, all you need to do is wait for the update to finish.
- Once the update is complete, disconnect the charger from computer, power on the charger and check to ensure that the latest firmware has been successfully installed.
19 comments
Hello
My son also bought now a Whoopstor V3. We realised now that we need another device for the power supply/input. We want to charge at once 6 Lipo 300mAh or 6 550mAh HV Lipos. Now I ask myself what ist better. A PD Charger as you reccomend with 65W or should I get a a notebook power supply (5521 barrel) 96 W with 24 Volt. To me it seems a PD charger opperates at a lower voltage and therefore is less efficient than a notebook power supply with 24 Volt.
Ok this may be a dumb question, but…does it stop charging at the set voltage?
The review states:
“Audible Notifications: A new buzzer feature alerts you when the charging cycle is complete, ensuring no overcharging and better battery health.”
Does this mean I need to stop it manually after I hear the buzzer?
I wouldn’t think so but just want to be sure I didn’t misunderstand that.
it stops automatically when reaches the set end-voltage.
My favorite feature is that you can have all six batteries go to storage, no matter what the starting voltage. I often have cases where some of my batteries are fully charged (because I didn’t use them that session) and some are discharged. I love being able to load up all six for “storage” and it does what it needs to do. It’s also neat that you can power it from a 2-6S LIPO. I did find, however, that none of the USB sources I have are powerful enough to power it by USB, so that’s a bit unfortunate. Really nice little charger though.
Mine seems to have an annoying “feature” where it asks to select the power input between DC or Lipo every time I plug it in.
Might be because my power supply is 13.8V and it can’t auto detect it or something.
It’s pretty annoying though. Is there a way to disable it?
I’ve found that when I power it with a certain power supply it does the same thing. If I use my other power supply it’s fine. It must be an autodetect issue.
Am I the only 1 who thought you could set voltage of every single port seperately after reading that charger has “six independent charging channels, so you don’t need to ensure all batteries have the same voltage or size”.
Review does state that current and voltage settings can’t be set up individually, but also includes vifly product info mentioned above which made me think I could mix/match Lv and Hv lipo’s.
Getting the feeling I should’ve gotten 2 serial boards for the price of 1 charger. But maybe I’m the only 1 and should have read this review entirely before ordering v3.
Nice little charger with the disadvantage that the amount of charged current is not displayed.
Undocumented Feature Found?!?!?
I often charge my batteries in the car. However that poses a problem for this charger. Car voltages fluctuate with the engine rpm and load, in my case swinging anywhere between 12-14.5v, This can cause the charger to think I am using a 4S lipo, which then cuts the charger off when the voltages swing towards the lower end of the range.
However, this morning I somehow unlocked a hidden menu! The charger cut off in the car and when rapidly disconnecting/reconnecting power it asked me to choose between DC/LiPo power. I don’t see this mentioned in the manual anywhere. Annoyingly though, I don’t see any way to make this change persistent, it seems you have to wait for it to error first.
I think Oscar made rare error. I purchased a Vifly Series Balance Board which has BT2 connector that Oscar claims are compatible with A30 connectors. This in not true. The male prongs of the A30 are much thicker than those of the BT2. Therefore the A30 does not connect solidly to BT2 connector chargers and they won’t work without modification. Currently trying to bend the prongs so that they can make decent contact. But far from ideal and at worst potentially dangerous.
Take a look at the schematics of both A30 and BT2.0 connectors, the pin diameters and the distance between the two pins are the same. But we don’t have control over how manufacturers make them in the end products.
Now having used A30 to BT2 board connection I can verify your recommendation is good. In my case the BT2 pin diameter was too small and very loose. But by slightly spreading the pins apart slightly it has holds well works great for charging. I personally do not think this would be a good situation for a connection to power a quad but fine for the charger. My experience is based on Flywoo 750mah 1S A30 batteries plugging into the BT2 connectors of a VIFly Whoop Series Board. As you point out, given that the pin specifications should be the same perhaps this was a problem in manufacture and other brands may have better out to the box compatibility.
Your review says;
Maximum input power: 40W
Maximum charging current: 1.3A/port
Their website says;
Minimum input power 40W
Max charging current1.3A/port
Which is true?
It just means to use this charger to its maximum you will need a 40W capable power supply. But it won’t use any more power than 40W. You can use a power supply lower than 40W but then the output will be lower.
Hello. I have just buy one, and I am using it for charge and discharge, but I never seen it’s fan works… So…. I don’t know if it works.
Fan must work all time or it only works sometimes.?
Thanks. Fermin from Spain.
Is the completed charge voltage accurate?
Can it be charged to exactly 4.35V?
My unit is pretty accurate as you can see in my test data, but you should check yours to verify its accuracy.
Yes, you can charge to exactly 4.35V.
I preordered the V3. The V2 was great but the V3 added : remember last charge rate setting. and got rid of mechanical switches.
HOWEVER, The V3 moved the PH2.0 connectors from side to top, and while doing that, moved them to being embedded below the surface of the charger. This means many PH2.0 batteries that don’t have a cable at all will NOT plug into the charger making the PH2.0 connection useless without extensions.
The PH2.0 connectors should be flush with the surface of the charger, not embedded below.
+1
For ph2.0 the same situation. The ones without wire/pigtail do not reach the connectors well, so not all are charged stably. Today I had to re-solder them to bt2.0 (upgrade I planned anyway) with pigtails (that I have not planned for).