
So, you’ve got yourself a Radiomaster Pocket? Great choice! Now, let’s ensure you get the most out of it. I’ll guide you step-by-step through the setup process for the EdgeTX-equipped Radiomaster Pocket radio, sprinkling in some handy tips and tricks along the way.


Still wondering if the Pocket is suitable for you? Check out my in-depth review of the Radiomaster Pocket here: https://oscarliang.com/radiomaster-pocket/
Table of Contents
Understanding the Controls and Switches
Here’s a diagram of all the available controls, buttons and switches on the Radiomaster Pocket. Familiarise yourself with it so you don’t get lost :)

Battery Installation
To power up your Radiomaster Pocket, you’ll need two 18650 Li-ion cells. Simply remove the back rubber handles, and pop them into the battery slots. Both flat top and button top types fit well inside the Pocket.
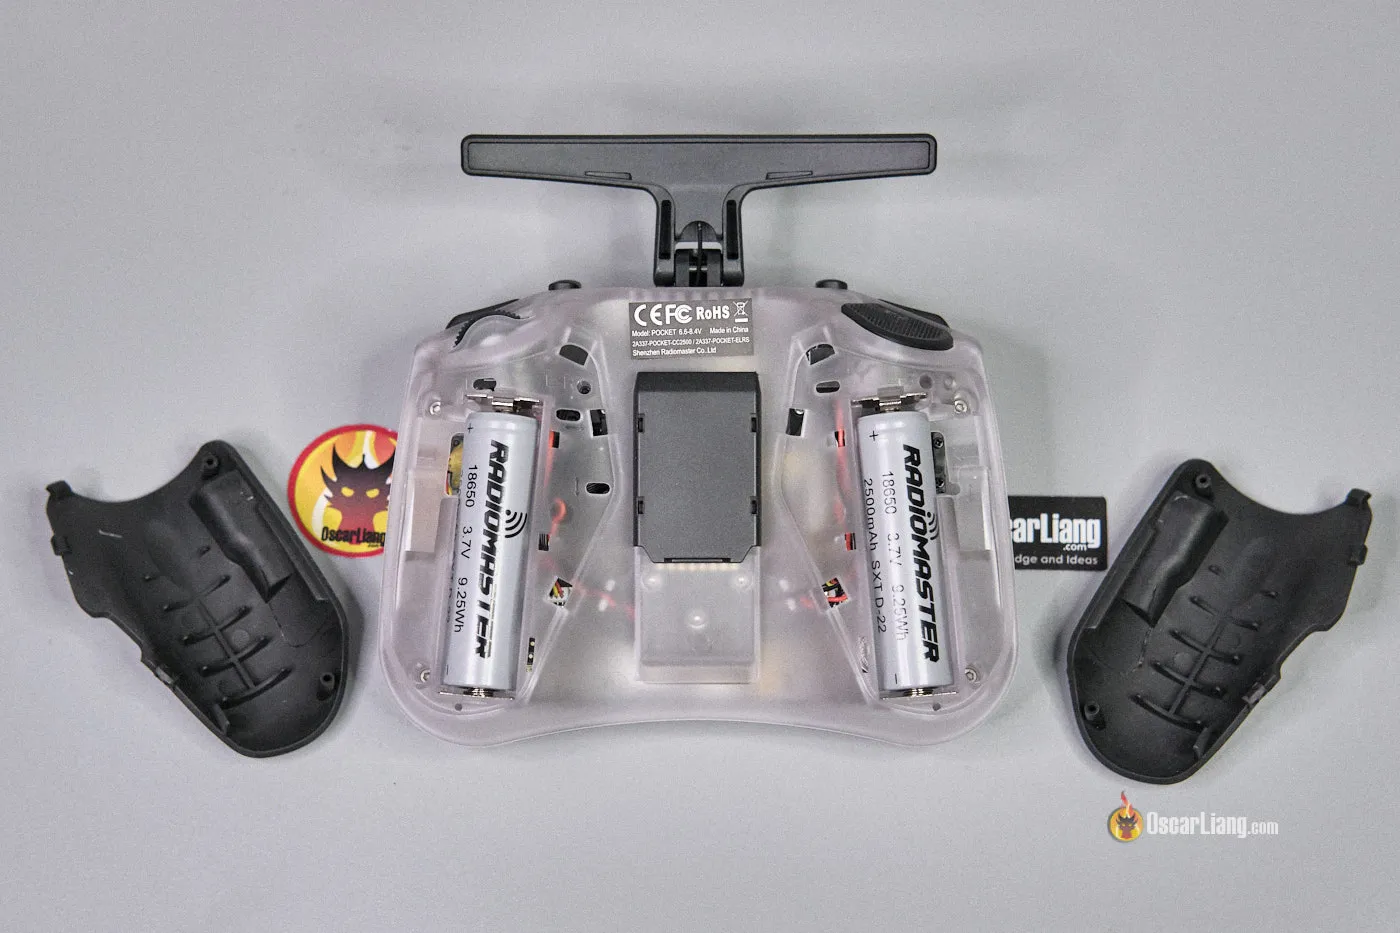
Unfortunately, the batteries are not included, but you can get them here. Higher capacity cells will give you longer flight time, but they might cost more. Here are my battery recommendations:
- RadioMaster 3200mah:
- RadioMaster : https://oscarliang.com/product-ykiv
- AliExpress: https://s.click.aliexpress.com/e/_DdrOSo1
- Sanyo NCR18650GA:
- Molicel M35A:
- AliExpress: https://s.click.aliexpress.com/e/_DcGMxEh
- VTC6:
- AliExpress: https://s.click.aliexpress.com/e/_DdTpbXb
- GETFPV: https://oscarliang.com/product-0owd
Potential Start-up Warnings
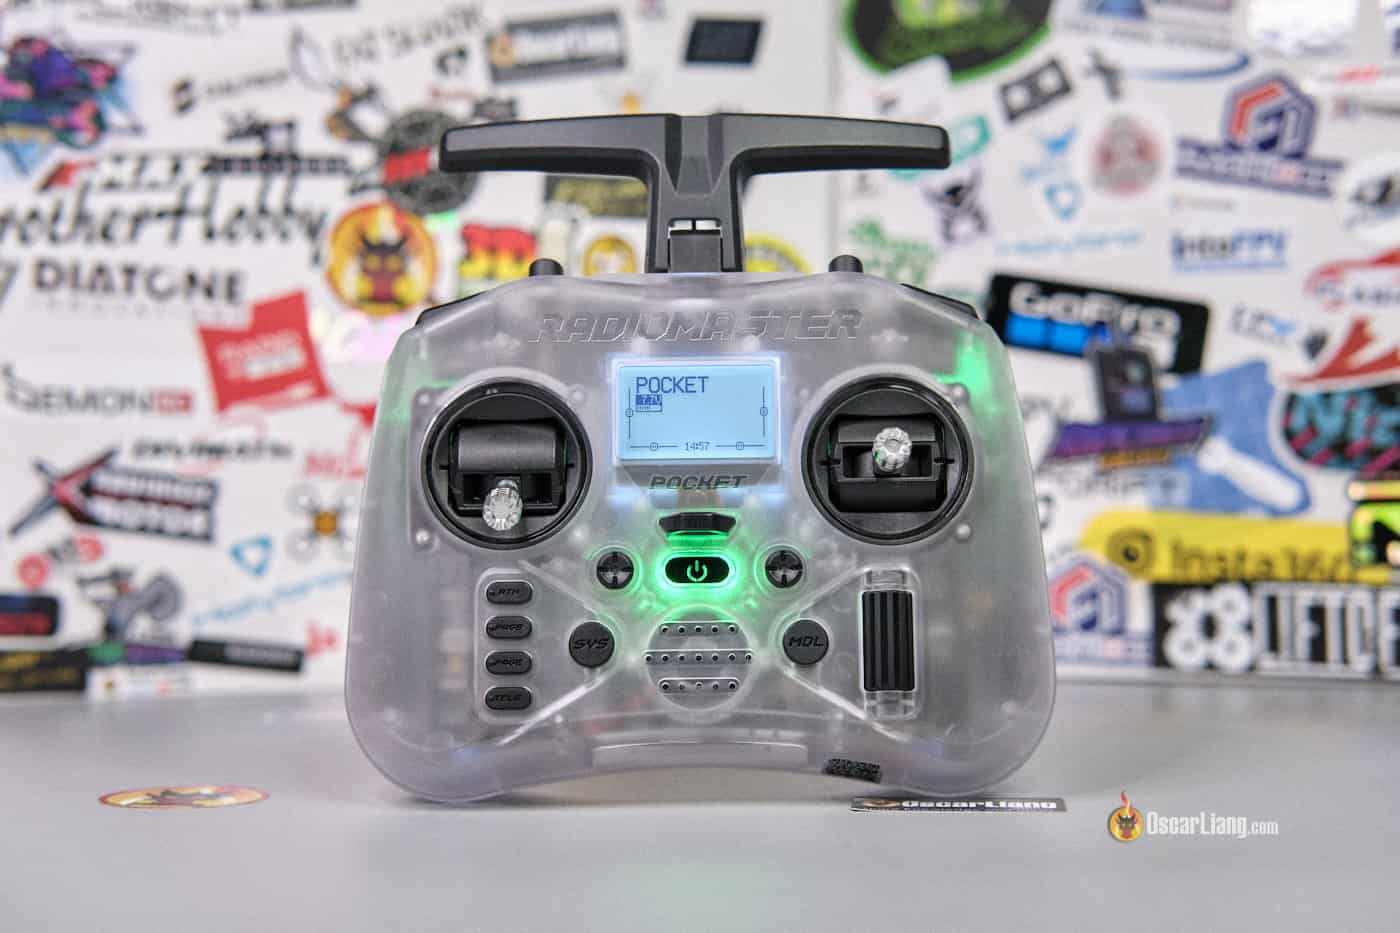
To power on, press and hold the radio’s power button for a couple of seconds.
Ideally, a brand new radio should fire up without any fuss. However, if your screen flashes a warning, don’t panic. Here’s a breakdown of potential alerts and their quick fixes:
- Throttle Warning: This pops up if your throttle stick (the left one for Mode 2 radios) isn’t at its lowest position when powered on. Pushing it all the way down will get rid of this warning.
- Switch Warning (also known as Control Warning): This signals that some switches aren’t in their default positions. To clear this, ensure all switches are in their HIGH position
- Alarms Warning: This appears if the Sound mode is set to mute. If you configure this on purpose, you can press the Enter button (scroll wheel) to safely skip this warning.
- SD Card Warning: This indicates a version mismatch between the SD card content and firmware.
- If you get this warning, follow this guide to fix it
If everything goes well, you should be greeted by the radio’s default home page.
Radio Settings
The Radio Settings are where you’ll adjust your display, audio, system related parameters, and so forth.
Kick things off by pressing and holding the SYS button; this will take you to the TOOLS page. From there, hit the PAGE> button twice to scroll to the Radio Setup page.

I’ll walk you through the initial changes you might want to consider. Anything I skip over can be left default.
1. Set Date & Time.
2. Battery Range:
- For Li-ion battery: 6.4V – 8.2V
- For Lipo battery: 7.4V – 8.2V
Why these ranges? This setting defines the battery indicator on-screen, specifically when it displays as full or empty. You might wonder about the minimum 6.4V for a 2S Li-ion, which can indeed be discharged even more. Yes, you can set it to 6.0V. However, having it a tad higher offers an earlier visual cue. As for the 8.2V max (instead of 8.4V), it’s due to voltage sag. The moment you power up, the battery’s voltage drops slightly. You will never see 8.4V on screen, so think of 8.2V as “fully charged.”
Sound:
- Mode: Opt for “All” to hear “beeps” when navigating the menu. Alternatively, go with “Nokey” if you prefer more silent operation.
Contrast (backlight brightness): 15
Why? It offers sharp text clarity without that pesky “black ink” background effect.
Alarms:
-
- Battery low (threshold for audio and haptic warning, if you fly long range you might want to set this higher so you have enough battery to make your way home.)
- For Li-ion: 6.4V
- For Lipo: 7.4V
- Inactivity: 10 minutes (if the radio is left untouched for this duration, you will hear the “inactivity alarm” audio reminder)
- Battery low (threshold for audio and haptic warning, if you fly long range you might want to set this higher so you have enough battery to make your way home.)
Backlight
- Mode: “Keys”
- Duration: 15 seconds (backlight stays lit for this duration)
- Brightness: Keep it minimal to conserve battery life.
- Alarm: Enabled (so the backlight turns on with any radio warning)
Why Keys Mode? By default, both the sticks and buttons can activate the backlight, which is a touch excessive. You aren’t really looking at the screen when flying so it’s just wasting battery. By setting it to “Keys,” only the menu buttons will activate the backlight, conserving energy.
Pwr On delay: 1s
This is the time it takes to hold down the power button to turn on the radio.
Pwr Off delay: 1s
This is the time it takes to hold down the power button to switch off the radio, this is a safety feature to avoid accidentally turning off the radio. I personally set it to 1s for faster shut down, but if you want to play safe you can set it longer.
USB mode: “Ask”.
Head over to the Hardware page by pressing the PAGE>, scroll down to Int. Module. If you’ve got an internal ELRS module, set it to CRSF with a Baudrate of 5.25M. If you have the internal multiprotocol module, set this to Multi. It’s generally configured correctly by default, but always double-check.
According to ExpressLRS Wiki, Radiomaster Internal ELRS module can handle 5.25M baudrate. But just because you can set the Baudrate higher, doesn’t mean you should. If you’re experiencing constant Telemetry Lost/Recovered even with the receiver nearby and/or if the Lua Script fails to load properly, then it’s a sign your radio and/or module cannot work on the selected Baud Rate. Lower it down a notch and test again. Or settle with a 400K baud rate.
Lastly, within the Hardware page, ensure the ADC Filter is turned off (unticked). Why? see this section.
Adjusting Gimbal Tension
To customize your control experience, the Pocket allows you to adjust gimbal spring tension from the back of the radio (through the holes in the back housing). However, I found that the process can be a bit challenging since the screws for adjustment are deep inside the radio.
I’d recommend taking off the back housing (there are only 4 screws). This grants direct access to the gimbal spring screws, making the process a breeze. And the best part? Once it’s set, you likely won’t have to fiddle with it again.

A heads-up, though: for these adjustments, you’ll need a 1.5mm hex tool. It’s a slight shift from the Philips screws common in older gimbals.
Here’s a breakdown of where the gimbal tension screws are for roll, pitch, yaw and throttle.

Gimbal Calibration
Before flying with your brand new radio, you should always calibrate those gimbals. You might also want to do this if you’ve recently updated your EdgeTX/OpenTX firmware.
Navigate to the Radio Setup page, then hit the “PAGE>” button a few times till you land on the “HARDWARE” page. From there, select the “Calibration” option. This will initiate the calibration process for both the sticks and sliders. The on-screen instructions are clear, so just follow along.

Make sure you only move the sticks as shown in the following image. For best result, avoid moving the sticks in circle. Be as gentle as possible when pushing the sticks, so the radio reads the end points correctly.

While you’re at it, don’t forget to calibrate the slider too (top right rotary control – S1).
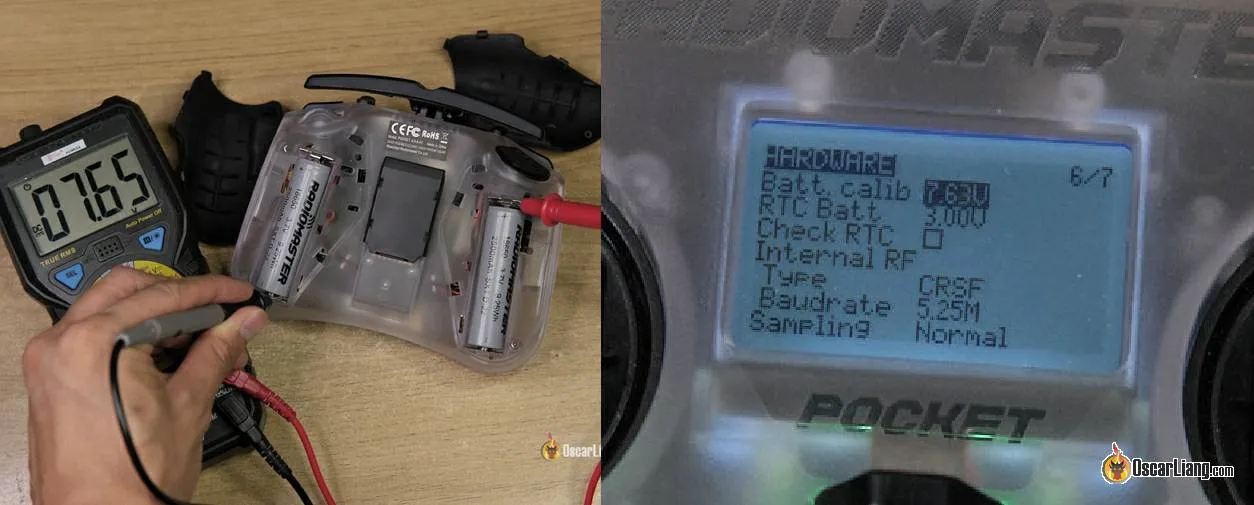
Battery Voltage Calibration
To ensure you’re getting the most precise battery reading possible, take a moment to calibrate your radio’s battery voltage.
With a digital multimeter in hand, measure the voltage of the Li-ion batteries inside your radio. Given that the cells are connected in series, you should expect a reading between 6V to 8.4V. The goal is to make sure the measurement on your multimeter matches the one displayed on your radio.
Navigate to the “HARDWARE” page. Once there, scroll down until you find the “Batt. calib” (Battery Calibration) option. Get the reading here as close to your earlier measurement as possible using the radio’s wheel button.
Model Profile
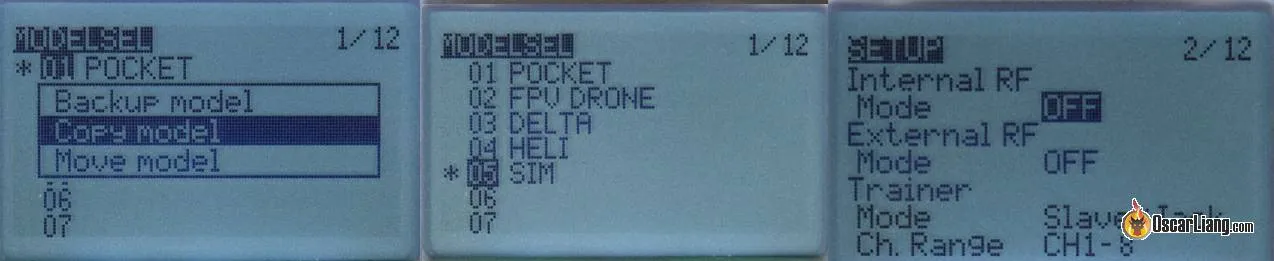
The Pocket comes with 4 pre-created Model profiles that cater to different types of models. All you need to do is pick one that suits your needs. To see what models profiles are available, you can go there by holding down the MDL button.

For FPV drones, you can use the “Pocket” profile. It has everything you need setup out of the box – internal RF module (ExpressLRS) enabled and all controls and switches mapped to the right channels in MIXES. You may not even have to tweak a thing. Just bind the receiver in your drone to the radio, and you’re good to go.
- For ExpressLRS receiver binding, follow this guider: https://oscarliang.com/bind-expresslrs-receivers/.
- If you’re using the multiprotocol CC2500 version, find setup details here: https://oscarliang.com/setup-tx16s-t16-radio/#model-settings
Creating a Profile for FPV Sims
Planning on immersing yourself in an FPV simulator? Consider creating a dedicated model profile for this purpose.
To do this, start with copying the existing Pocket profile and make a duplicate. Go to Model Setup and rename it to something else such as “FPV Sim”.
In Model Setup, scroll down and switch both “Internal RF” and “External RF” to OFF. This will save battery life when you are playing FPV sim and prevents the internal RF modules from getting hot.
Backup and Restore Radio
I recommend backing up your radio settings regularly (e.g. before firmware updates and whenever you make big changes). Fortunately, with EdgeTX, backing up and restoring your Radiomaster Pocket’s settings is simple and hassle-free.
Follow instructions here to backup and restore your radio SD Card Content: https://oscarliang.com/backup-restore-models-radio-settings-edgetx/
Easy Backlight Control
Your Radiomaster Pocket is equipped with a rotary control in the top right (S1), which is not used for most people. We can turn it into a backlight control. The trick is to create a function in the radio. You can either do this in “Special Functions” in the Model Profile, or “Global Functions” in the System menu. I prefer to do this in Global functions because it works across all model profiles, saving you the need to set them up individually for each profile.

- Navigating to Global Function: Hold down the SYS button, then a few taps of the “PAGE” button will take you to the “Global function” page.
- Creating Function: Find a empty slot and select “ON”.
- Setting Up Backlight Control: In the 2nd parameter, select Backlight, in the 3rd parameter, select the rotary control by moving it with your finger, and enable it.
You can also use it to control audio volume by selecting “Volume” instead of “Backlight”,
Updating EdgeTX
Backup your SD card first before updating EdgeTX.
1. Checking Firmware Version: Navigate to the system menu by heading to Radio settings => Versions. This step helps identify the version currently running on your Pocket and whether you need to update.
2. Using EdgeTX Buddy: This online tool is the most user-friendly method for updating the EdgeTX firmware. For a detailed step-by-step guide on using it, refer to: https://oscarliang.com/flash-edgetx/.
3. Restore to Original State: Mistakes happen. But, fear not! If anything goes wrong, the stock EdgeTX firmware for the Pocket is available in the FIRMWARE folder. You can always revert to this original state by re-flashing the radio.
Updating Internal ExpressLRS Module
If you have the ExpressLRS (ELRS) version, updating the internal module is easy. The procedure is identical to the Zorro: https://oscarliang.com/update-zorro-elrs-firmware/. Here’s a summary:
- Connect the Pocket to your computer using the top USB-C port. Opt for the “USB Serials (VCP)” mode.
- Run ExpressLRS Configurator, in the progrom, choose Radiomaster as the device category and select Zorro as the device.
- Build Options:
- Go with EdgeTXPassthrough as your flashing method.
- Set your regulatory domain. For instance, use ISM_2400 for FCC users.
- Input your unique binding phrase
- If flashing via USB, click “Build & Flash”. If flashing via Wi-Fi, click “Build” and follow the Wi-Fi flashing steps.
If your Pocket uses a CC2500 multiprotocol module, then you need to follow these instructions to update it: https://oscarliang.com/flash-edgetx/#update-internal-multi-protocol-module
Tips and Tricks
Custom Sound Pack
Bored of the default voice prompts? Try custom sound packs. Amber Sound Pack, for instance, stands out with its superior sound quality.
Download: http://open-txu.org/home/version-2/v2-2-resources-2/
After downloading, extract the files and replace the originals in the SOUND/en folder on your SD card.
Playing Custom Sounds
Did you know you can play custom sound files, even your favorite tunes, on any EdgeTX radios? If you’re new to this, here’s a tutorial to create custom sound files for OpenTX radios, the same steps apply for EdgeTX: https://oscarliang.com/taranis-play-sound-track-mp3-files/
Filename limits: Ensure the filename is no more than 6 characters, with the file extension capped at 3 characters. Also, dodge any special symbols in the name. The ideal file format: 32000kHz Mono Wav.
Exploring the Tools Page
The Tools page on your Radiomaster Pocket is a collection of useful LUA scripts. One frequently used LUA script is ExpressLRS, which allows you to configure your ExpressLRS module.

Button Cell Battery Replacement

If your Pocket is constantly forgetting the date and time settings, it likely points to a dying button cell battery. Look for a Lithium 3V CR1220 battery. Conveniently, you can get them online, for instance on Amazon (affiliate link): https://amzn.to/3yDyDBe
Conclusion
We hope this guide has been helpful in setting up your Radiomaster Pocket radio. I will be updating this guide if there are other useful mods and upgrades to the Pocket.
84 comments
Thanks for great tutorial. It was pleasure to read all important things about Radiomaster Pocket.
Hi, thanks for this great overview and summary!
I just got my 2nd hand Pocket, with EdgeTX v2.10.6 installed.
I was wondering if it is recommended to install the newest 2.12.1. I couldn’t find any info about other Pocket users that are running newer versions than 2.10.6
Also on the official Radiomaster website, the latest firmware for download is 2.10.5…
Thanks im advance!
Johannes
Is there any reason you want to update? If no, then just leave it as it is :)
Go through the firmware release log and see if any bug fixes or new features interest you.
I am so glad I stumbled across your tutorials. It was extremely helpful. I was so confused, but you made it all so simple. So….thankyou very much. Much appreciated.
I have no tools in the tools menu. I have done the fat format on two different sd cards, followed your flash instructions, downloaded the lua scripts from two different locations, etc. and the tools menu still stays empty. Any advice would be much appreciated!
After many hours of troubleshooting, I finally figured out the problem! I returned the faulty unit and bought another exact one which worked correctly out of the box.
HI Oscar, I’m very into being a good FPV pilot and super new to FPV world. every thing have been so confusing. lots of information about every aspect of it, till I found you website. god bless you brother. you covered every thing in the best way. learnt a lot and keep learning. got my radio master pocket recently. 1 year later will you keep you guys posted about how much better I got. thank you so much again.
Hi Oscar, your blog is very interesting and useful, thank you for that. I have a problem and I hope you can help me. When I start my Pocket, I get an alert that the accelerator is on at maximum. I’ve already tried calibrating it and searching for the cause, but the same thing keeps happening. What can I do to fix it? I can’t even use the emulator because it says the accelerator is at maximum. Could you please help me? I’ve tried everything and nothing solves the problem.
Try to create a new model profile and see if that fixes your problem: https://oscarliang.com/create-new-model-profile-edgetx/
Thank you so much for this tutorial. I was really struggling and getting both lost and frustrated till I found this.
Hey man, thanks for this awesome setup guide, as an absolute fpv drone/rc beginner it helps a lot understanding what to start with and how to get ready to fly at least in the sim.
So I noticed a weird issue with my brand new one, once I start it up, the roll axis didn’t work immediately, sometimes it’s a bit offcentered, sometimes the axis start working a few minutes after sometimes i have to restart the controller.
Does anybody know this issue and how to solve it?
That’s strange, sounds more like a faulty unit? Have you contacted Radiomaster support? Get some advice from them.
Thanks for your reply, at least i learnd the behave isn’t normal. I opened a ticket an will see if they can help.
In case of, the remote is just a week old and we have consumer oriented return policy so maybe i will contact the vendor too.
Maybe i can make deal to upgrade to the boxer… x)
Soo after nearly a month of tinkering, trying and debugging i want to keep you up to date.
We detected a faulty gimbal, they send me a new one, this time from a distribution partner from europe and everything works like charm now.
A few words about the radiomaster customer service, it is so far one of the best experiences i ever made.
Short response time, no excuses, target oriented ideas how to solve the problem. It took time but it looks like they realy want to solve the problem and make me happy. And now I also know how to completely disasemble a pocket. ¯\_(ツ)_/¯
It may be different if a unit doesn’t work completely and you can’t fly or train at all, but in my case I am totally enthusiastic about Radiomaster. :’D
Hello, first of all, thank you very much for the information; it’s very useful, simple, and easy to understand. I’m new to FPV flying and I don’t know how to calibrate my sticks. When I try to start practicing in a simulator, it tells me to set the throttle to 0% and press the arming switch (AXIS 4) to ARM the drone. However, I have the left stick all the way down, and I don’t know why it shows THRL is 47% and also says ALTERNATE 5. Could someone help me please?
This was very helpful! I noticed in your tuning tutorial that the EdgeTX ADC filter should be turned off, and checking this seems widely recommended. My pocket shipped with ADC on, so maybe mention on this page to disable it!
Turning off ADC filter is there, maybe you missed it :)
I’ve been using this radio just fine when connected to my whoop, but when I connect the radio to Liftoff my stick’s inputs keep cutting out. It feels like I can make this happen by moving the sticks quickly. Does anyone know what this might be?
is there a way to hard reset this radio? I may have done screwy things with it, and wouldn’t mind using your step by step guide here, starting from the beginning again
yes long press the scroll wheel, you will see reset option
Just got myself into FPV Sim with 0 knowledge except my experience in flight and space sims and i purchased a Pocket. I just wanted you to know that your blog has been of great help.
Thank you.
I notice your pocket like mine only has 7 tabs to page through after hitting SYS. On YouTube I’ve seen other tabs such as Telemetry 10/11 and Display 11/11. Any ideas how to get these screens displayed? Hitting TELE shows ‘ No Telemetry Screens’ but it does display RSSI : 99
The radio setup has 7 tabs (Press the SYS button), the model setup has 11 tabs (press the MDL button).
that worked – thankyou.
Thanks. it is very helpful
Hi there and thanks for very informative info. Please advise how do I disable failsafe in edge Tx ? My application is for rc sailboat, where throttle drives a rotatary winch.
I want to ensure that in case of any battery failure, that the winch does not rotate,
Using Radiomaster pocket, and rs4 receiver (the very smallest one)
Buenos días.
Lo primero te agradezco toda la información, me ha parecido muy interesante. Acabo de comprar la radiomaster pocket, soy nueva en el FPV y la quería para practicar en el simulador. Quería saber si sabes cómo puedo conectarla a la ps4, no me la reconoce al enchufarla.
A la espera de una respuesta
Un saludo y gracias
Hi,
Any idea why i can’t get my mac to recognise the new radiomaster pocket i just bought?
Admittedly my mac is old -macbook pro 2012 running high sierra. i have already purchased velocidrone and have it installed but when i plug the usb in, although the radiomaster recognises something has happened and i am offered to choose between joystick, sd card and another option (ive been picking joystick) i cant find the controller anywhere in controller setup in velocidrone or within the mac in system report.
thanks
Probably you got it working already (really late to party here) but what threw me of – the rotary swich – you choose joystick and click ok with this rotary swich – I used rtn and could not figure out for the life of me why ddevice was not recognized. Hitting rotary as “ok” works.
I’ve tried to flash my RM Pocket (ELRS) using the passthrough technique. All seems fine until I get an error that :
“raise Exception(‘No valid serial port detected or port already open’)
Exception: No valid serial port detected or port already open”
Also, the firmware on the SD card shows as being for CC2500…this doesn’t seem right?
Any help would be appreciated.
Thank you Oscar!
Any way to debounce or replace the sd and sa switches, they give false positive with a light touch, it’s sketchy.
Doesn’t look like it’s an easy repair as the switches are soldered to the main board. Maybe see if you can open the radio and check the buttons if it’s mechanical issue you can easily fix? Otherwise I would suggest reaching out to both the seller you bought the radio from as well as Radiomaster and see if they can sort something out (like getting a replacement board maybe?)
The more I use it the less of a problem it is, I tend to keep my fingers clear of the buttons now. I think it’s the type of button used, they make contact before they latch. I think a 2 way rocker would be better but I just use them for turtle mode and launch control, neither do much if activated by accident. Very happy with the TX overall and your site has been very handy in helping me get set up. Thank you.
Charlie, my man, I got the same problem. Slightest touch and disarm.
Thanks for the guide! Is there any way to reset the Pocket to factory settings without reflashing?
Hello!
After do the configurations, when trying to connect to Mac and play liftoff, the simulator don’t detect the radiomaster pocket.
Better to say, that detected, but don’t work the sticks…
Could you help me?
Thanks!
Julie
Can you go to Model Setup, and ensure USB mode is set to “Ask”?
https://oscarliang.com/opentx-usb-joystick-mass-storage/
Then you must select joystick when prompted on the radio.
If computer sees the radio but no stick movement, can you try a different profile on your radio? Or create a new one.
Also try to recalibrate the radio.
The article needs a counterpart section to “Updating Internal ExpressLRS Module” for updating CC2500 version, especially with the finicky FrSky Archer reveivers that have a narrowed band of frequency tuning.
Just brought a Radiomaster Pocket. Along with it got 2 Molicel 3.6V 18650 cells as 3.7V was not available. One of the battery in your suggested list is 3.6V. But in the manual it says “POCKET is powered by 2x 3.7V 18650 Lithium Ion cells. Never charge 3.6V LiFe and 3.6V 18650 Lithium Ion packs with the onboard charger.” Is this really a concern?
Both should work fine with the pocket and shouldn’t be a concern.
It was a very useful explanation, thank you for your efforts, Oscar. I found most of the items that I could not find in this article.
my telemetry button just says syntax error, i cant see a fix for it, any help ?
I have a Pocket cc2500 version. I’d like to bind to the meteor 65 frsky version. I can’t bind it, because by the type of frsky x I can’t find the d16 subtype.
What can I do?
For Frsky d8 or d16, you must bind from the betaflight screen. If you are looking for frsky D16 via the remote control, it will be written as frskyX.
Hi, what protocol do I need for d8?
Oscar buenas tardes, espero te encuentres bien, podrias decirme si radiomaster pocket tiene puerto Uart? en caso de que tenga, podrias indicarme donde esta?
Do you got it the uart pin? Can you telling to me?
Hi, thanks for information about this product. Very useful. I want to know if I can install OpenTX on this device ? Best regards !
OpenTX has not been updated since Apr 2022 and it doesn’t support this radio currently. Just use EdgeTX, it’s a better and more modern firmware.
I screwed up the radio settings. How do I factory reset my Radiomaster Pocket?
Very frustrating.
You could try resetting the radio (but that will take all settings back to EdgeTX default so best to backup your radio first before doing it):
Switch on your transmitter.
Long press the MENU button.
Keep pressing the PAGE button until you get to the Version page.
Scroll down to the very bottom where you should find a [Factory reset] option.
Select that option and then confirm you want to continue.
Hi Oscar, where is the Menu button?
Under the left gimbal
Hi Oscar! Can we change this to mode 4? If so, how? How about sa lite v2, can we change it to mode 4?
Can the Pocket be converted to mode 1 like my TX16s ?
The pocket is switchable between Mode 1 and Mode 2. Go to this page (https://www.radiomasterrc.com/products/pocket-radio-controller-m2?sca_ref=1640957.8JiFIIBnBe), scroll down to “Gimbal adjustment” and see where the screw is for this mode switch.
Hi Oscar, thanks for the tutorial! I have a question, before of performe calibration the radio was showing 100 for each direction of gimbal. After calibration in the throttle and pitch now is showing max of 97. Is it normal? I performed some times calibration again and the number 97 keeps. Thank you!
Where do you see 97?
hi,
i have a similar issue.
the left gimbral (left/right axis) shows that its resting central position is at -24 and when pushed fully to the right only reaches a maximum of 74.
I have recalibrated quite a few times and this doesn’t change.
any ideas?
thanks
Can you try creating a model profile from scratch just in case it’s some model configurations that is messing with your gimbal outputs? If that doesn’t help then it could just be faulty gimbals i suppose.
ah but after dowloading open tx this radio is not on the list, only the zoro and boxer so how do I uodate firmware for it beacus e it wont connect anymore to my speedybee v2,?
thanks
Pocket ELRS firmware and sdcard contents: drive.google.com/file/d/1Lno7aI-CM7pDek4a9K6ePXaZI5yJNUQP/view?pli=1
You legend.
Hello Oscar. Is it possible to change LBT version to FCC?
Yes, you just need to select the right build options and flash your TX module again, see Regulatory Domains option here: https://oscarliang.com/setup-expresslrs-2-4ghz/#Building-ELRS-TX-Firmware
I bought mine from AliExpress and EdgeTX wasn’t installed properly, these folders fixed my problem
Good day, Sir Oscar. I hope you and yours are well.
Question (wrt EdgeTX for Pocket): I am not able to find a FW on the EdgeTX buddy tool that says it is for the Pocket. Is this because it is so new and one just needs to be patient, or is it there and I am simply looking in the right place?
Also, I don’t see the pocket listed here at this time: https://edgetx.org/supportedradios , and am interested in updating to 2.9.0. Please advise if you know how one might get EdgeTX v2.9.0 for the RM Pocket. TIA.
-t
I could be wrong but I think Pocket will be added in 2.10. For now you can just stay on the stock firmware.
Yeah, I too had this issue. Not due to my following any recommendations herein, but rather hunting out good Samsung 35E 18650 3500mAh 8A -Protected Button Top batteries and then realizing they wouldn’t fit. Who knew 18650 batteries purchased from the venerable 18650batterystore.com weren’t actually 18mm x 65.0mm.?. lol!
Anyways, daily operational capacity trumped one-time install convenience, so I modified the battery compartments (hacked down the positive tab, cut down the negative spring, and removed the dogs on the negative side of the battery) to receive these bigger batteries. Am glad I took the time to do so. Pic: https://i.imgur.com/EwAbVrt.jpeg
1st off fantastic setup and explanation of the RM Pocket! After following the setup instructions everything went fine until I turned off the controller and turned it back on, now I receive a low power mode alarm no matter the chrage level. Any suggestions? Thanks in advance!
In model setup, under RF Module, there’s a low power mode option, maybe you enabled it by accident?
The 18650 batteries you list as working in this radio don’t fit. You need a lower capacity in the range of 1500-1800 mha. All your listed are 2600 and up. Size is too big!
18650 batteries are all the same size. In fact the number 18650 is the dimensions of the battery.
I bought these. VERY tight fit but work fine so far… amazon.com/gp/aw/d/B0CBPK51RP
Those are fake cells. Get some legit and tested cells here: https://oscarliang.com/best-18650-li-ion-battery/#Results-and-Recommendations
Hi Oscar! One hint: SD-card for the Pocket should be formatted as FAT, not FAT32. I have tried to replace the original SD with a copy on a 16GB SD wich can only be formatted as FAT32. But this does not work properly.
Thanks for your fantastic work.
I was able to replace my SD card on my Pocket with an 8GB card formatted in FAT32. There were no issues. I simply copied my files from the original card, pasted them into my new SD card, and once inserted the controller looks/acts no different from before. One of the only things I can think of that would prevent you is that the overall volume of your 16GB card might be too large for the pocket to handle, but 8GB is not.
Are the gimbals replaceable for hall sensor versions?
Hi Oscar, Would you be able to share the factory “radio.yml” file in the radio folder of the original SD card as I managed to overwrite settings with companion software but unfortunately from a different radio.
many thanks for all your fantastic work.
Luca
The Tools page on your Radiomaster Boxer is a collection of useful LUA scripts.
Do you mean pocket?
Ah yes :) I meant the Pocket! thanks for the correction.
hey hi Oscar or others , Can I use the Pocket radiomaster CC 2500 with the Dji O4 pro module? And Goggles 3? I would like to use FPV with that module. Or do I need ELRS? And if possible how does that work with bindings..
Yes you can but you will need to buy an external ELRS module for your Pocket radio.