The Radiomaster Pocket is one of the smallest and cheapest radios that packs many powerful features FPV drone pilots desire. Its portability makes it a great radio for traveling, and its super low price makes it one of the best budget radios for beginners. In this review, I’ll delve into the impressive strengths of the Radiomaster Pocket while also shedding light on a few shortcomings you should be aware of before making your purchase.


You can learn more about FPV drone radio transmitters in this buyer’s guide: https://oscarliang.com/radio-transmitter/
Table of Contents
Where to Buy?
You can purchase the Pocket Radio from these vendors:
- Radiomaster: https://oscarliang.com/product-wym1
- AliExpress: https://s.click.aliexpress.com/e/_DkxckYF
- GetFPV: https://oscarliang.com/product-8o4u
- RDQ: https://oscarliang.com/product-sv1a
- Banggood: https://oscarliang.com/product-n656

Apart from the Pocket radio, you also get the following accessories in the package:
- Custom Carry Pouch
- USB-C Cable
- Screen Protector
- Stickers
- Manual
The Radiomaster Pocket is available in two versions:
- ExpressLRS Version ($65): This option is my recommendation as it offers the best radio link for FPV pilots, providing the best performance, reliability and value (See this post to explore all the reasons why I like ExpressLRS)
- MPM CC2500 Version ($55 – multi-protocol module): If you primarily use older receivers and protocols, such as Frsky ACCST V1, Futaba SFHSS, Hitec, Radiolink, Esky, or Corona, this version might be a suitable choice due to its compatibility, but I’d steer away as a new pilot.
Color Options:
The Pocket Radio comes in two classic colors – Charcoal and Transparent – which you can choose from on the product page. Additionally, Radiomaster offers a range of vibrant color cases in blue, pink, green, and orange, allowing you to personalize the radio to match your unique style. Optional cases are available here: https://oscarliang.com/product-p9i2

LBT and FCC Versions:
If you are located in the European Union (EU), the LBT version is recommended. For other regions, the FCC version is suitable. However, for the ExpressLRS version, you can easily switch between LBT and FCC versions by re-flashing the firmware with the appropriate build option selected.
Specifications
- Internal RF Module Options: ExpressLRS 2.4GHz or CC2500 Multi-protocol
- Operating Frequency: 2.400GHz-2.480GHz
- RF Power: CC2500 20dBm max / ELRS FCC: 24dBm max / ELRS EU-LBT: 20dBm max
- Operating System: EdgeTX
- Operational Voltage: 6.6V – 8.4V DC
- Battery: Requires 2x Li-ion 18650 batteries (not included)
- Hall Effect Gimbals
- Supports External Module Bay, compatible with Nano-size modules (e.g., RadioMaster Nano-size modules, TBS Nano Crossfire / Nano Tracer)
- Range: > 2km @ 20dBm (100mW)
- Channels: Maximum 16 (Dependent on the receiver)
- Display: 128*64 Monochrome LCD
- Battery Charging: Built-in USB-C QC3 Charging
- Dimensions (folded size): 156.6*65.1*125.3mm
- Dimensions (unfolded Size): 156.6*73.1*154.8mm
- Weight (Without Battery): 288g
- Weight (With 2 18650 Batteries): 380g

Design and Form Factor
The Radiomaster Pocket features a compact design, making it even smaller than the Zorro and roughly similar in size to the Jumper T-Lite V2. Its portability is a standout feature, and it fits snugly in your hands, ensuring a comfortable grip during use.

One impressive design element is the removable sticks, which can be conveniently stored in the back handles. This feature enhances the radio’s portability, making it easy to transport and store without the sticks protruding and risking damage.


To give you an idea of its dimensions, let’s compare the Pocket with the T-Lite V2 and Zorro in the following pictures.

Left: Jumper T-Lite V2; Right: Radiomaster Pocket
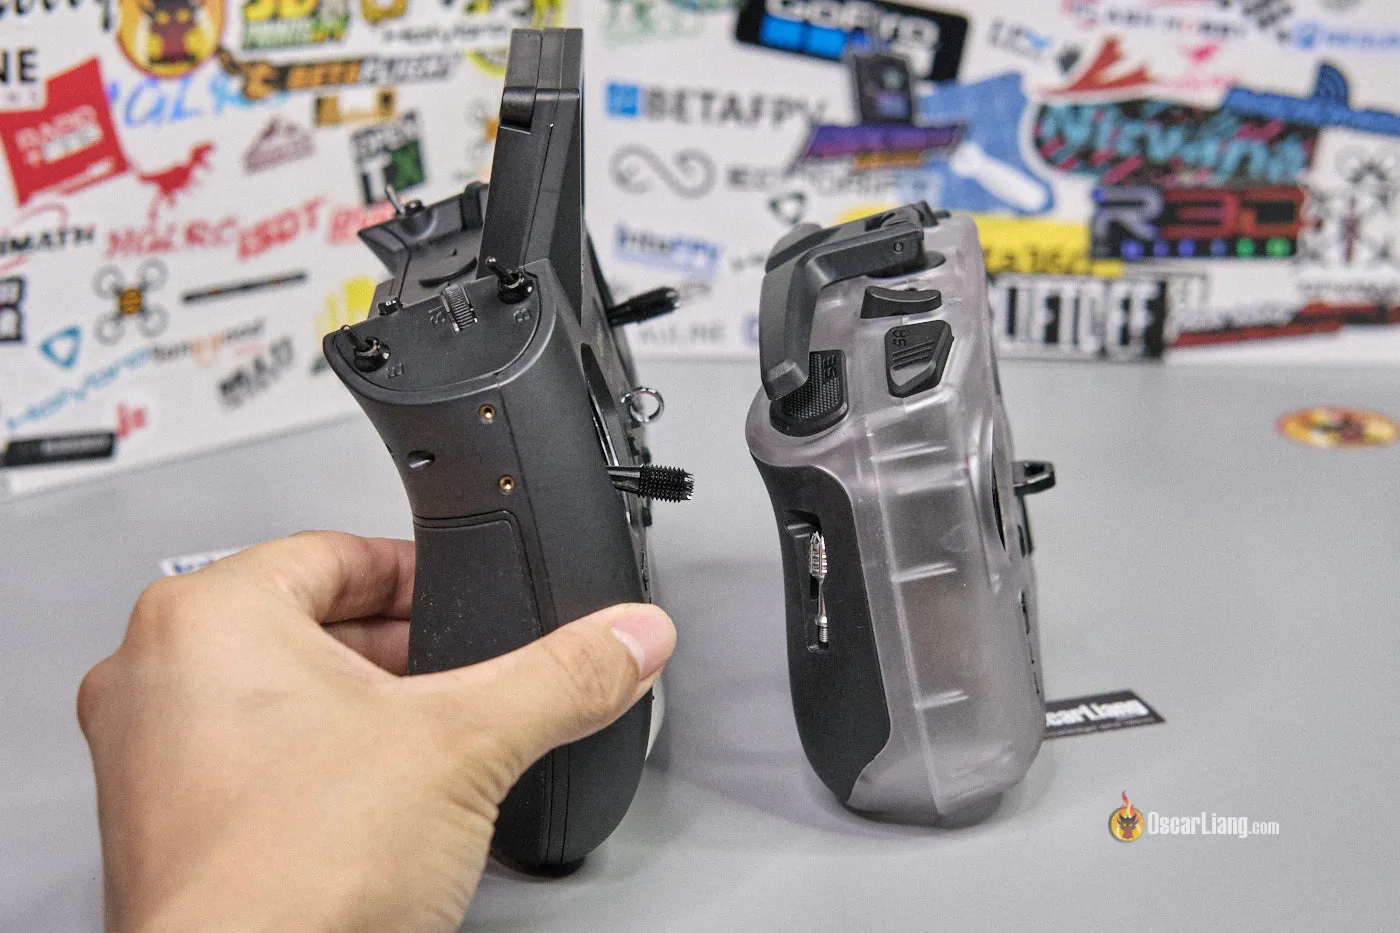
Left: Radiomaster Zorro; Right: Radiomaster Pocket
The Radiomaster Pocket weighs about 390g including two 18650 cells, which is heavier than both the Zorro (350g), and the T-Lite V2 (250g).
The Pocket is equipped with a well-thought-out layout, offering a wide range of controls, switches, buttons, and connectors. To provide a clear understanding of the interface, here is a diagram highlighting all the essential elements:

Gimbals
The Radiomaster Pocket comes with hall effect gimbals, which offer several advantages over traditional potentiometer gimbals. Hall effect gimbals are renowned for their exceptional smoothness and increased durability, ensuring a more precise and reliable control experience. Although hall effect gimbals typically come at a higher cost, they have become standard in both high-end and lower-end radios due to their superior performance.

Considering the compact design of the Pocket, it’s worth noting that the gimbals are relatively tiny. This compact size, unfortunately, means the Pocket is not compatible with the premium AG01 Mini gimbals, as they simply won’t fit inside the small radio.
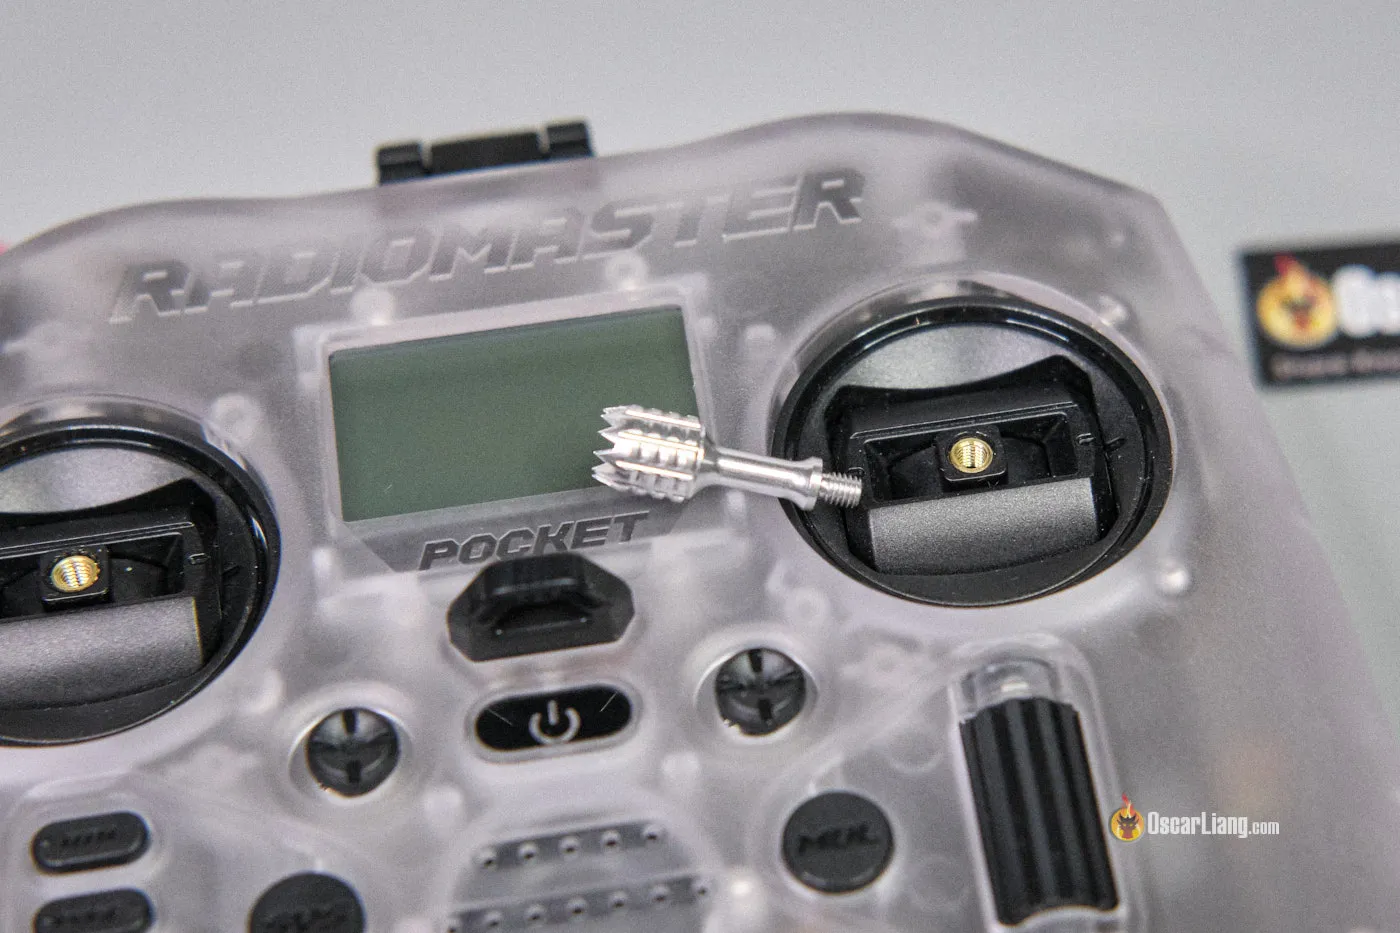
To customize your control experience, the Pocket allows you to adjust gimbal tension from the back of the radio (through the holes in the back housing). However, I found that the process can be a bit challenging since the screws for adjustment are deep inside the radio. In the end I had to remove the back housing to reach those screws more easily.
Additionally, the Pocket is equipped with trim buttons, which are 5-way joysticks. While they may not be used in multirotors, they prove valuable for easy channel trimming when flying fixed-wing aircraft. Furthermore, you have the flexibility to configure these trim buttons as additional switches in EdgeTX, offering enhanced customization possibilities. If there is enough interest, I’d be more than happy to write a how-to tutorial on configuring these trim buttons.
Ergonomics
The Radiomaster Pocket, like most gamepad-style radios, is primarily designed for “thumbers,” where users hold the sticks using only their thumbs.

However, after spending some time experimenting, I found that it also works well for “pinchers” – holding the sticks with both thumbs and index fingers, which I personally prefer for higher precision. The small size of the gimbals and the shorter sticks do take some getting used to, but it’s manageable.
See this post for the pros and cons between “thumbing” and “pinching”: https://oscarliang.com/pinch-thumb-stick/

Typically, I have my sticks set to around 26-28mm in length (from the tip to the base of the stick). However, the Pocket’s sticks are fixed at approximately 21mm, meaning the stick travel feels noticeably shorter when pinching. Unfortunately, there are currently no alternatives to sticks of different length, so it’s something to keep in mind if you prefer longer stick travel.
In terms of design improvements, I believe the gimbals could be slightly more recessed into the radio with slightly longer sticks. This could potentially increase stick travel and offer better precision, something that the T-Lite V2 does slightly better. Nonetheless, the gimbals in the Pocket still provide similar quality and smoothness on par with the T-Lite V2.
Regardless of your preferred grip style, accessing the switches on top of the Pocket is easy and convenient.

Unlike some other gamepad-style radios, the Pocket lacks a back handle. However, this is not a big deal as it is quite easy to pick up and hold the radio with just one hand. Moreover, the radio stands upright without any problem, thanks to its flat bottom.
Another notable positive aspect of the Pocket’s design is the location of the neck strap hook. It is well-placed, balancing the radio perfectly level. However, some users might find that the hole for the neck strap is a bit too small for certain straps, which could be a minor inconvenience.
The back of the Pocket is made of a rubber-like material. While it serves its purpose, it might feel slightly cheaper compared to the Zorro and lacks the same stickiness and solid grip. Considering the Pocket’s affordable price point of around $60, this is a reasonable trade-off for the overall value it provides.


Switches
There’s a total of 5 switches and a slider on the top of the remote.

Starting from the outer edges, you have two 2-position latching switches: SA on the left and SD on the right. Moving towards the center, you’ll find two 3-position switches: SB and SC. Additionally, on the top left, there is a single press button switch, SE.

When you toggle the top left and top right 2-position switches, it turns the LEDs next to them on and off, effectively visualizing your switch input. This is especially cool because the case of the Pocket is transparent, allowing you to see the LED illumination clearly.

On the top of the Pocket, you’ll also find some essential connectors and ports. This includes the trainer port (DSC), a USB-C connector for FPV simulators, accessing the SD card for storage and firmware updates.
Screen, Menu Buttons, and Speaker
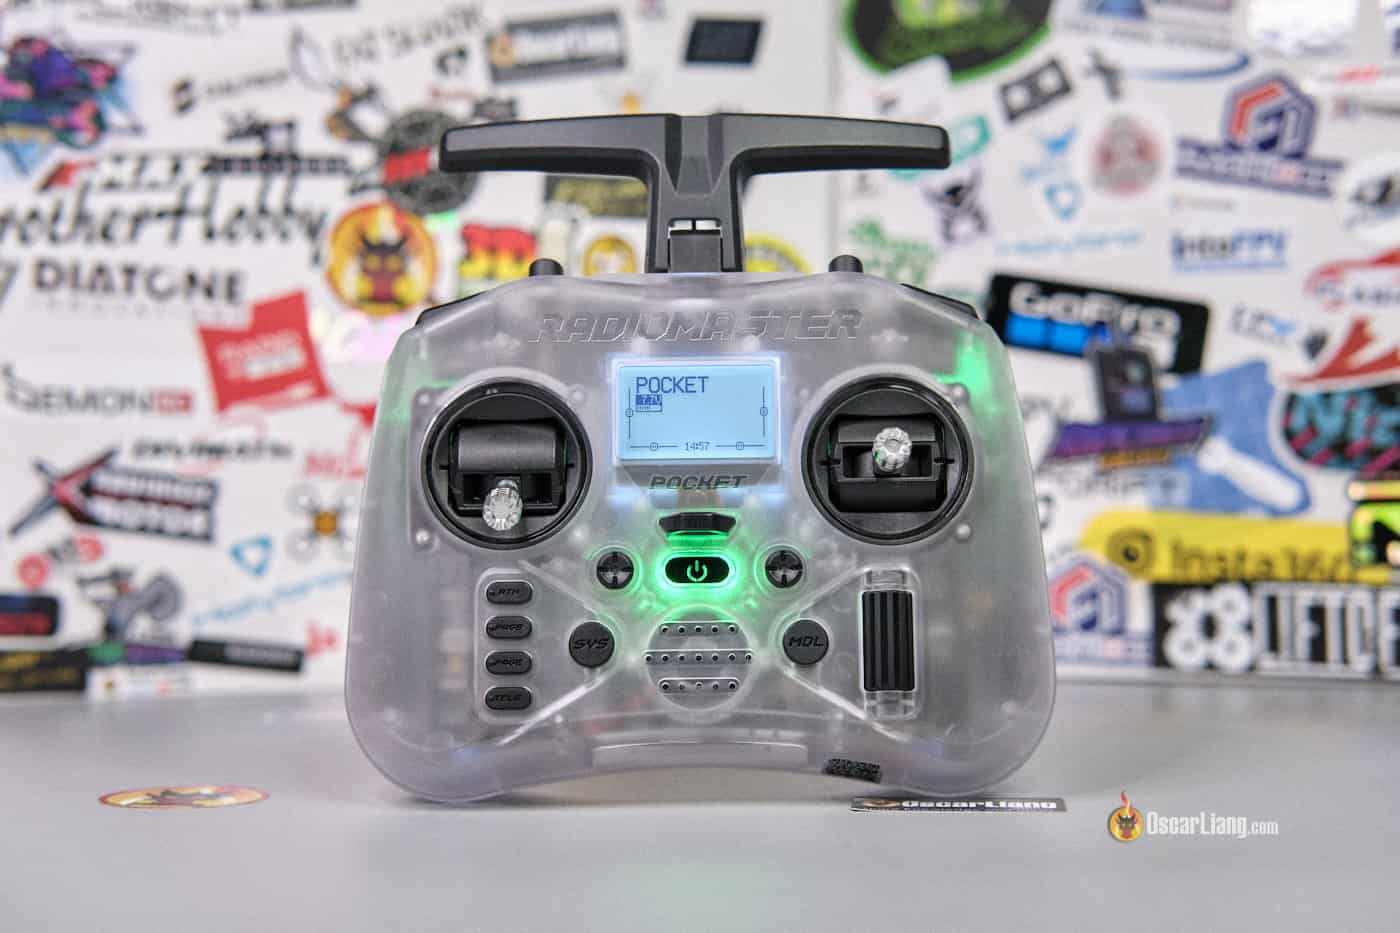
The Radiomaster Pocket is equipped with a small backlit 1.6″ LCD screen that offers decent visibility even under direct sunlight. Despite its compact size, the screen provides clear and legible information, ensuring a seamless user experience.

The menu buttons and scroll wheel on the Pocket resemble those found on larger radios like the Boxer and TX16S. Surprisingly, they are well-located and easily accessible for such a tiny remote, making navigation through the menu system intuitive and user-friendly.

Inside the radio, there is a speaker that delivers a reasonably loud output, comparable to the volume levels of the Zorro. However, it’s worth mentioning that there is some minor electrical buzzing noise at the end of every audio or beeping sound, regardless of the volume level. Although this noise is only noticeable when you listen closely, it is not significantly bothersome. Additionally, the Pocket offers haptic feedback, providing a tactile response to certain interactions, enhancing the overall user experience.
Radio Firmware
The Radiomaster Pocket comes preinstalled with the popular EdgeTX firmware, regardless of the radio link version you choose. EdgeTX is currently one of the most widely used and appreciated radio firmware in the FPV community.
While the specific version of EdgeTX isn’t explicitly shown in the system menu, the firmware date is listed as 2023-05-29, suggesting that it’s likely based on EdgeTX 2.8 or newer. This indicates that you’ll have access to the latest features and improvements in the firmware.
The Pocket includes a 512MB SD card, which means you won’t need to purchase one separately. This SD card slot is conveniently located at the bottom of the radio, along with the audio port and the USB-C connector for charging.

The EdgeTX firmware is upgradable via two methods: either using the USB connector located on the top of the radio or utilizing the included SD card. To upgrade your firmware, you can refer to a helpful tutorial on how to flash EdgeTX: https://oscarliang.com/flash-edgetx/
ExpressLRS
If you purchase the Radiomaster Pocket with ELRS internal module, it’d come preinstalled with ExpressLRS 3.0.1 firmware Interestingly, it seems to share the same firmware target as the Radiomaster Zorro, as indicated in the LUA script, showcasing the similarity in functionality and performance of the internal RF module between the two radios.
While the Pocket’s antenna is not removable, it has a foldable design, making it convenient for transportation and storage. The antenna is directly connected to the Internal RF module via a UFL connector that is secured by glue.

To ensure optimal signal reception, you can rotate the antenna up to 180 degrees to align it properly with the receiver antenna on your FPV drone. For the best performance, it is essential that the two antennas are aligned to achieve the optimal signal strength. You can refer to my tutorial on antenna placement for more insights: https://oscarliang.com/antenna-positioning/
To update the internal ELRS module, follow my tutorial here (coming soon xxx).
External Module Bay
The Radiomaster Pocket comes with a nano-size (aka lite size) external module bay located on the back, offering plug-and-play compatibility with compatible RF modules. For example, if you bought the ELRS version, you could get an 4in1 multiprotocol external module to fly drones with older protocols such as Frsky D8/D16.

However, it’s important to note that the module bay might not fit every module out there. For instance, the Jumper AION module doesn’t seem to fit due to misaligned pins, although bending the pins might make it work. On the other hand, it fits the Radiomaster Ranger Nano, and Radiomaster confirms that popular modules such as the TBS Tracer and Crossfire Nano modules should also fit.

Battery
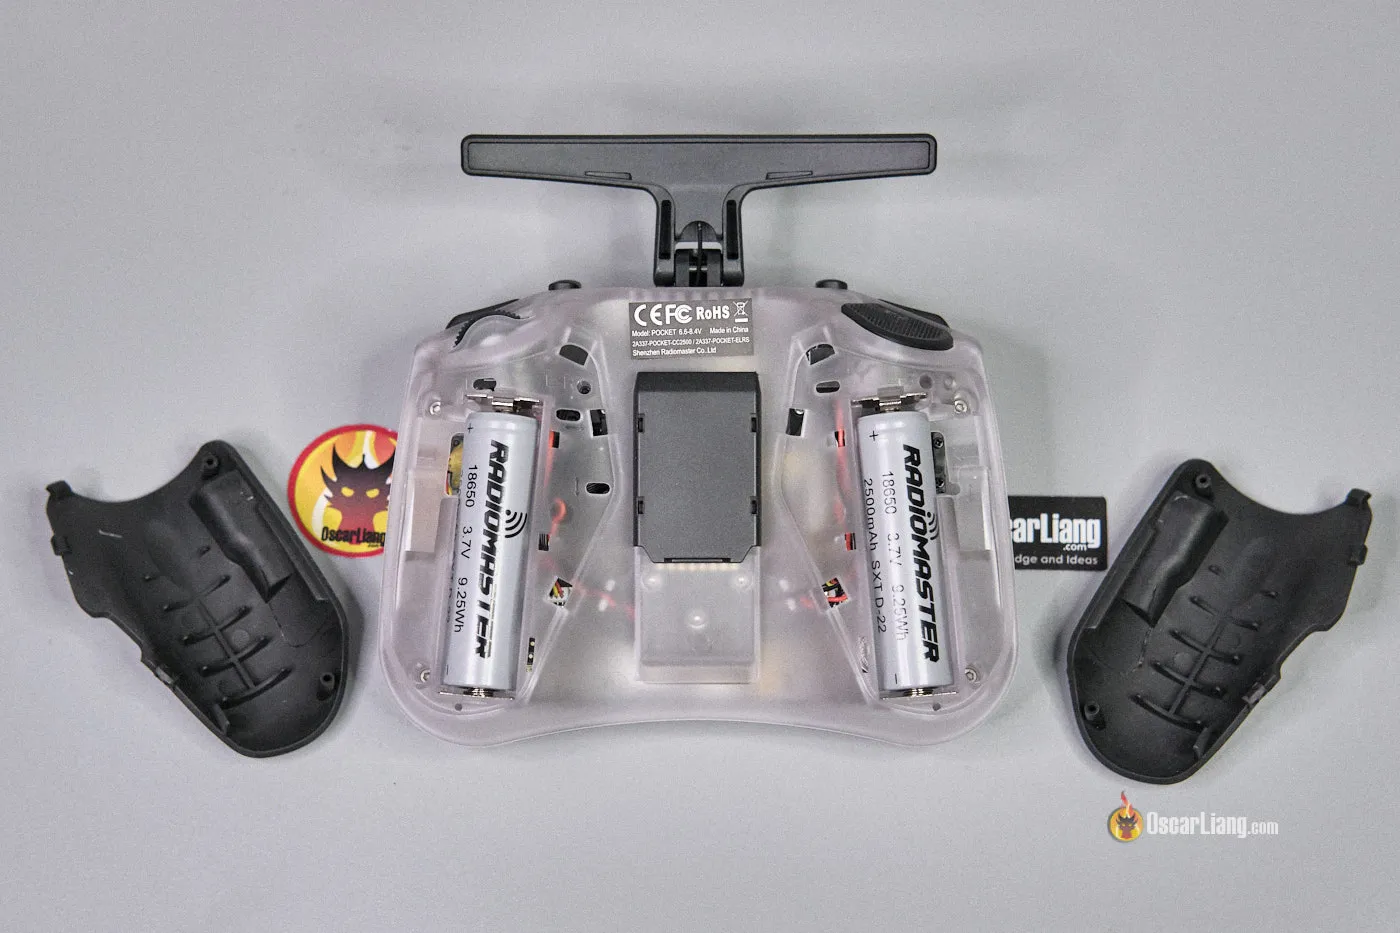
The Pocket requires two 18650 Li-ion cells to work, but these batteries are not included with the radio. To access the battery compartments, you simply need to remove the back grips, revealing the slots for the batteries.
Here are some great options for 18650, both flat top and bottom top should fit well inside the Pocket:
Radiomaster Li-ion 18650 2500mah:
- Radiomaster: https://oscarliang.com/product-0239
Panasonic NCR18650B 3400mAh:
- Amazon: https://amzn.to/2W93Uwp
- GetFPV: https://oscarliang.com/product-h1sg
Molicel P26A/P28A 18650:
- RDQ: https://oscarliang.com/product-1np7
- GetFPV: https://oscarliang.com/product-ghz0
- Amazon: https://amzn.to/3A99ocl
Sony VTC6 18650:
- Amazon: https://amzn.to/3zMZfSm
- GetFPV: https://oscarliang.com/product-rlio
The current draw of the ELRS version varies depending on the RF power setting and screen backlight status, here’s the measurements from my testing (with backlight turned off):
- 0.24A at 10mW
- 0.30A at 250mW
With 2500mAh cells, you can expect approximately 10 hours of runtime at 10mW or around 8 hours at 250mW. With 3400mAh cells, the runtime increases to over 14 hours at 10mW and about 11 hours at 250mW. To optimize battery life, it’s recommended to set the screen backlight duration as short as possible.
To further enhance battery life, you can utilize the ExpressLRS Dynamic Power option available in the ExpressLRS LUA script. With Dynamic Power, the mW output adapts to the model’s range and receiver installation, minimizing power consumption. This feature allows for as little as 10-25mW usage during unobstructed line-of-sight flights.
With the CC2500 version, the RF output power is fixed at 100mW, providing approximately 9 hours of runtime according to the manufacturer.
The radio features a built-in charging circuit, enabling you to charge the batteries directly inside the radio by connecting a USB cable. The maximum charging power the radio can handle is 10W (2.0A at 5V), provided your charging adapter supports QC3.0.
Charging times are as follows:
- 2500mAh batteries: Approximately 2 hours
- 3400mAh batteries: Just under 3 hours
Playing Simulators
The Radiomaster Pocket is plug and play with popular FPV simulators like Tryp and Liftoff. When connected, it shows up as TX16S, but this doesn’t affect usage, and the setup remains the same.
Tear Down
Disassembling the Radiomaster Pocket is relatively straightforward, as there are only 4 screws holding the front and back housing together. However, be cautious of a ribbon cable connecting the front and back housing, which needs to be disconnected before pulling it apart.


If you wish to change the case, you can unscrew all the boards and migrate them to the new case.

Output Power Testing
Here are the power measurements of the Radiomaster Pocket’s internal module at different output power levels.
| Power Levels | 10mW | 25mW | 50mW | 100mW | 250mW |
| Pocket Internal Module | 7.3mW | 25mW | 60mW | 113mW | 270mW |
These measurements were taken using the ImmersionRC Power meter V2 and demonstrate the accuracy of the factory calibration and whether the maximum output power meets expectations. It’s important to note that these measurements do not reflect the hardware quality, but rather the consistency and performance of the internal module.
After running the Pocket at its maximum 250mW output power for 20 minutes, it settled around 235mW, slightly lower than the rated power. Nonetheless, this level of consistency is not bad for an internal module without active cooling.

Conclusion: Pocket vs. T-Lite V2
The Jumper T-Lite V2 has been my go-to compact budget radio ever since its release. So how does it compare to the new Pocket?
The Radiomaster Pocket offers many advantages that the T-Lite V2 lacks. These advantages include higher 250mW output power, longer battery life (due to using two 18650 batteries instead of one), a compact foldable antenna, and improved user-friendly menu buttons, trim buttons, and switches.
While both radios have a compact design, the Pocket has an edge in most aspects, except one area – control feel for pinchers.
Despite both radios offering similar gimbal smoothness and quality, the T-Lite V2 has a slight advantage in control feel. This is due to its lighter weight of about 140g, slightly more ergonomic shape for pinching, and gimbals that offer longer stick travel, providing better precision and control feel.
For users seeking optimal ergonomics, larger radios like the Boxer or TX16S might be more suitable. However, for those looking for an affordable, compact radio with modern features, both the Radiomaster Pocket and the T-Lite V2 are compelling options. The Pocket stands out as a more refined and streamlined choice, offering powerful features and improvements over the T-Lite V2.
You can purchase the Pocket Radio from these vendors:
- Radiomaster: https://oscarliang.com/product-wym1
- AliExpress: https://s.click.aliexpress.com/e/_DkxckYF
- GetFPV: https://oscarliang.com/product-8o4u
- RDQ: https://oscarliang.com/product-sv1a
- Banggood: https://oscarliang.com/product-n656
Optional cases of other colours are available here: https://oscarliang.com/product-p9i2
Batteries can be purchased here.
Radiomaster Li-ion 18650 2500mah:
- Radiomaster: https://oscarliang.com/product-0239
Panasonic NCR18650B 3400mAh:
- Amazon: https://amzn.to/2W93Uwp
- GetFPV: https://oscarliang.com/product-h1sg
How about the Zorro? Well, it’s quite a bit larger than the T-Lite and Pocket. In fact, it takes up almost as much room as the Boxer, and it costs about the same. So, I’d probably choose the Boxer over the Zorro if size isn’t a priority. The Boxer offers better battery life, ergonomics, and 1W output. However, if you’re looking for something smaller and more affordable, I’d definitely consider the Pocket.
How to setup?
For those interested in setting up the Radiomaster Pocket, here is a step-by-step tutorial: How to Setup Radiomaster Pocket Radio | Upgrades, Tips and Tricks
34 comments
Hi Oscar
I have a strange issue when I use the sensor configurator in Lua menu, if I hit “enter” on one of the sensor parameter I get nothing so I can’t set the RPM pole, is that a FW issue ? by the way the other sensors work fine but I can st no one.
How to tell my pocket which version? Seller said ELRS, but i’m stuck at loading when selecting ELRS
Dude, you are AWESOME! Thank you!
Hi Oscar,
Thanks for a very informative review.
I wonder how to make the throttle friction ‘smoothier’. The throttle stick of my Pocket seems to have differect friction levels across the total range of movement.
For example, at the 0-20% range, it isn’t as smooth as the rest. This might result from an imperfect round shape of the friction wheel.
I wonder whether putting some lube would be helpful.
It’s assumed that Hall Effect gimbal sticks are superior to Potentiometers, but are they.
Pot’s offer a simple Ratiometric circuit design that Hall effect circuits don’t. Has anyone tested the drift on Hall Effect sticks.
What are trim mid switches for? Moving to sides – clear, but just a normal click?
Oscar, I Must say, I think I’ve found new home. I’ve been on this awesome site, lol since well, my big ‘ol boxer dog just told me it’s time for her dinner, again!! All my parts a meteor 75 and Radiomaster pocket came in last night. I don’t have a bunch but what Extra I do have gets spent on toys. With the vast amount of information and opportunity for every reputable business I’ve ever purchased from. Damn dude! Lol I’ll be back.
Great review thank you !
Having read this and other reviews, I admittedly was swayed to get the Pocket. However the quality is a mixed bag. Gimbals are fine. But the constantly sticking SA switch is dangerous when set to Arm.
This sounds like a fault with your particular unit, maybe speak to the resller or Radiomaster directly and see if they could arrange something. Mine didn’t have a sticking SA switch.
Thanks for the article! You mentioned 5 programmable switches but didn’t mention the “S1 pot” dial on the back top right side of the remote (directly behind the SD switch). Is it useable and programmable in betaflight? I would like to use it to control a servo motor. I currently have a DJI fpv remote 2, and it also has this dial, but it doesn’t show up as an option to program in betaflight either. Thanks for your insight!
I call it a slider in the review, to me it’s not really a switch. But yea, you should be able to use it to control a servo.
Hi Oscar, I appreciate your reviews and found this one very useful to help my decision to purchase. I very much would love to see a tutorial on how to configure the trim buttons for more useful things.
You have written that the Pocket’s internal antenna is not removable. I got the CC2500 version to use with an external module and the antenna was easy to remove, you just have to do it with the radio opened. The top left screw on the module in my radio has a cable holder instead of that sticky stuff visible in your photo. I just unclipped the antenna from the module and worked off the mount antenna from the radio.
Nice review as always ;)
I was wondering, does it also have an backpack in the expresslrs version to talk to my goggles for example?
Can I connect the big Radiomaster Ranger to Radiomaster Pocket? Does it fit? Can internal 18650s power 2W output, or does it need external power?
Hi Oscar, great review. I have tlite v1 and radiomaster ranger nano elrs. Does the pocket support 1watt for the rm nano? Thank you. That way I’ll confirm whether I’ll buy the ccm coz I already have the module.
Yes it does support it.
Thank you for another excellent comprehensive review. I have ordered one to replace my T-Lite V1 which was my goto radio. The main reasons are ergonomics when in my backpack (the antenna and switches on the T-Lite are an issue) and build quality. Both are cheap radios but I’m on my second T-Lite. The T-Lite has always felt flimsy and I’ve not been convinced of it’s electronic robustness (plus you can insert the battery the wrong way and damage the radio). The areas that I am sacrificing (for me) are proper switches (I can’t have it both ways :-) and weight. Fingers crossed that I will not regret my decision.
I like your article very much
Hi Oscar,
I’m building a drone with a F4 flight controller, a 4in1 esc, and a flysky ct6b controller, could you share some insights on how i can connect the flight controller to the FS-R6B receiver?
Thanks
Via the included wires and the solder points on the FC.
Can we charge at the same time as playing sim? On the zorro it’s a no go.
I do.
But better still is the TBS Mambo (same with Ethix) that connects and charges at the same time, on the same wire.
So which button you use for what? I’m used to switches and not to latching buttons.
Would you arm with SA? No momentary switch for arming security?
I’ve always just used a 2-position switch to arm, so latching button is fine for me. But you can also setup pre-arm with this setup, just need to get creative with it.
The Boxer 1w module has the same mounting pattern and pinout as the Zorro/pocket 250mw board. I’m incredibly interested to see if that’s a viable swap to increase the internal output power. It should work perfectly, the only concern is clearing the protruding gimbal part. Any chance you have an interested in taking a look into that before the general public gets our hands on this radio? This radio is almost perfect for a large group of pilots, with the RF board output power and gimbals being the only “downsides.” Would be amazing if the former could be natively addressed.
Would it be possible to connect a frsky bluetooth module in that conector down on the left?
@ASK By “Top LCD” i guess you meant top mounted.
Strangely enough on youtube, I found a person that fits a larger, hinged OLED to small radio !.
Radio Master are throwing out new designs without much consideration IMO. Yes there probably is a void left by FrSky moving to EthOS.
Is the TX16S really a Dinosaur. If it is then it doesn’t imply it was a future proofed design. I don’t have a TX16S BTW. IMO there are only three radio types.
High End, Mid Range and compact.
@OSCAR … surely every TX design is a compromise.
“The Compact Budget FPV Radio Transmitter Without Compromise”
I dunno, I’ve had high end radios from WAY back to now and the TX16s is pretty nice. It’s upper mid to low premium in my opinion. The feature set alone qualifies. I have radios from Futaba and Hitech that cost me 3 times as much that didn’t do a quarter of what the TX16s can. So far I can’t really find anything bad to say about the TX16s aside from the non-removable antenna – and that was a quick and cheap fix. True, the case is plastic, but that’s a plus in my book because it also weighs a fraction of what my more expensive radios do. So far, it’s my favorite, hands down.
Another cheap plastic radio for drone flyers thank you RM everybody in the RC hobby was waiting for this! What about something premium to replace TX16 dinosaur 🦖? Sadly currently there is no option for better quality radio running edgetx, only plastic toys. Waiting for someone to make something like tandem or jeti with premium feel and top LCD.
TX16s is still very relavant. What features specifically are you looking for? Oscar literally just broke down in this review how this is a radio designed to be portable and still be full of great features. It’s not trying to be the next itereration of the TX16s at all; If that were the case it would have full size gimbals and a larger form factor. So what you want and what RM intended here are totally different. How bout you share your genius designs for your dream radio than misplace your complaints here lol
Hello, you have the Futaba radios with leather and titanium price ,not plastic price….
Hi,
thanks for writing such nice articles! (instead of long bla bla bla videos)