Today, I am building a 3.5-inch FPV drone with DJI O3 Air Unit. While 5-inch drones offer power and excitement, they can be quite heavy and a bit intimidating to fly in smaller parks. That’s why a 3.5inch quad has the advantage over 5-inch in these situations. Our goal is to build a lightweight freestyle micro quad that can comfortably carry the DJI O3, yet without compromising on performance. Let’s get started.

Table of Contents
Parts List
Frame: FlyfishRC Volador VX3.5
Purchase links:
- AliExpress: https://s.click.aliexpress.com/e/_Dkub2KZ
- Amazon: https://amzn.to/3D1zA9V
- RDQ: https://oscarliang.com/product-p1nh

FC/ESC Stack: HGLRC Zeus F7 Mini + 45A 4in1 ESC
Purchase links:
- AliExpress: https://s.click.aliexpress.com/e/_DF0ePt7
- Amazon: https://amzn.to/3JMcXKu
- GetFPV: https://oscarliang.com/product-bbjt

Motors: Flash 1804 2450KV
With 3.5inch propellers, these can be used with 6S, for 4S setups, consider the 3500KV version.
Purchase Links:

FPV Setup: DJI O3 Air Unit
See my review of the O3 here: https://oscarliang.com/dji-o3-air-unit-fpv-goggles-2/
Purchase Links:
- RDQ: https://oscarliang.com/product-sadl
- GetFPV: https://oscarliang.com/product-4blv
- AliExpress: https://s.click.aliexpress.com/e/_DdQYArv
- Amazon: https://amzn.to/3RtWfm1
VTX Antenna: FlyfishRC Dual-Band antenna
These aftermarket antennas are slightly lighter and smaller than the original O3 antenna, but the weight saving is marginal (less than 1 gram). Plus, 3.5″ quads aren’t designed for long-range flying, so the original antenna is perfectly adequate to be honest. Anyway if you value 1-gram weight saving, get them here:

Radio Receiver: Ghost Atto
Flashed with ExpressLRS. I’m using this RX because I happen to have spare, you can use any ExpressLRS receiver, see my recommendations here: https://oscarliang.com/setup-expresslrs-2-4ghz/#Receivers
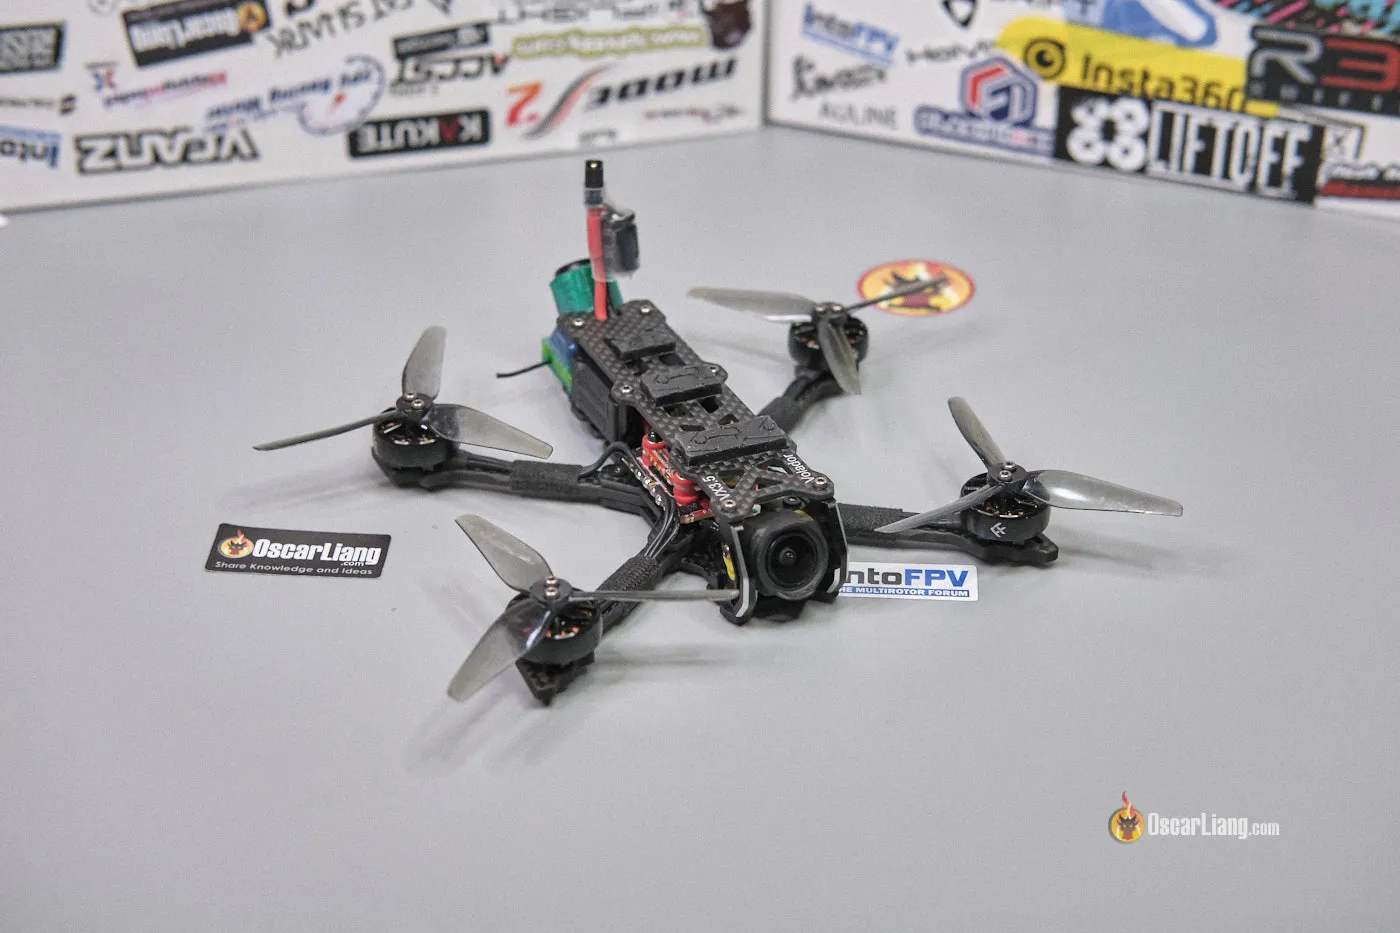
Frame Assembly
For around $30, the FlyfishRC VX3.5 frame is an excellent value for money. With its top-notch design and build quality, it comes with all the necessary accessories and TPU 3D printed parts.
The screws and accessories are neatly sorted in labeled bags. With the help of the assembly guide, available on Flyfish’s website, you can see where each piece fits into the puzzle, simplifying assembly.

The design follows the “split deck” bottom plates concept, just like the Source One V5.

It’s a spacious frame, compatible with both DJI O3 and Caddx Vista Air Units. The camera holder accommodates both 20x20mm and 19x19mm cameras, with different spacers provided. The camera is soft-mounted to minimize jello, especially needed for the O3 camera. Handy TPU parts are available for antenna housing, accommodating either the Vista or O3.
The arms are constructed from 3.5mm thick, 9.5mm wide carbon fiber, enhancing durability. The top and bottom plates measure 2mm in thickness. The camera mount is aluminum.

One feature I appreciate is the TPU holder for the radio receiver located at the bottom. Pressed nuts are provided for mounting, creating a clean and effective solution.

However, it shares issues I identified in the larger 5-inch Volador frames I recently reviewed. First of all, they are using a bit too many screws, and there are so many different sizes, which complicate both initial assembly and subsequent repairs.
Its generous space for components and robust arms contribute to its weight, making it heavier than I’d prefer. When building this quad, I tried leaving out as many parts as possible to reduce weight. I even removed the two standoffs behind the camera, as I believe the frame is sturdy enough without them, and replaced the original battery pad with lighter, stickier Ummagrip pads. Still, the final weight of the frame came to 63g, which is lighter than the original, but still on the heavy side for a 3.5inch frame.

The holes for the hex standoffs were slightly too small, requiring me to enlarge them with a small file, which took around 15 minutes.

Below is the assembled frame.
Build
We’ll begin by installing all the motors and the DJI O3 unit.

FlyfishRC thoughtfully includes spacers and M1.6 screws for mounting the O3.

Next, solder the XT30 pigtail to the 4in1 ESC. I used the HGLRC RC 2 soldering iron for the job, and it worked beautifully.
Given the space constraints within the frame, I soldered the low ESR capacitor to the XT30 connector. Although not as effective as soldering it directly to the ESC power pads, it’s better than nothing. This is a typical workaround in micro quads with limited space. The capacitor I used is a 35V 470uF, compatible with 6S LiPo.
Proceed by soldering the motors to the ESC.

Here’s a top view of the ESC and the soldering work.

Next, solder the radio receiver to the FC.

Afterward, connect the ESC and DJI O3 AU to the FC and secure them with lock nuts.

The RX can then be mounted inside the holder at the bottom.

And with that, the assembly is complete.


With a 6S 550mah LiPo included, the weight rounds up to about 300g. While it’s not sub-250, we’ve used bigger and more powerful 1804 motors instead of the typical small 1404 or 1604 ones, coupled with the tanky frame, the heavy weight was to be expected. However, the powerful motors will balance that out.
How to Setup
Update DJI O3 AU firmware as explained here.
Update BLHeli_32 to latest version. Apply the recommended settings as explained here. I use 48KHz fixed PWM frequency for smooth motors.
Update Betaflight to latest version (4.4.2 at the time of writing) as explained here.
Update ExpressLRS firmware on your receiver with your binding phrase as explained here.
To Configure Betaflight, you can follow my beginner’s guide here which also explains the reasons for the settings. In the following I will summarize the changes I made to this specific quad:
- Configuration Tab:
- Board and sensor alighnment, First Gyro, set it to default
- Set PID to 8K,
- set Arming angle to 180
- Under Features, enable OSD and Air Mode
- Enable DShot Beacon, RX_Set
- In Setup tab, make sure the 3D model is responding to the quad’s movement.
- In Preset tab, load “ExpressLRS 500Hz” and “OSD for FPV.WTF, DJI O3”
- In OSD tab, Video Format, select HD, and enable your preferred elements
- Ports tab:
- For UART1, enabled Serial RX for the receiver to work
- For UART 4, select VTX (MSP + Displayport) for DJI O3 OSD to work
- Save
- Now go to Receiver tab to make sure receiver is working (enabled Telemetry), power on the quad and goggles and make sure OSD is showing
- Motor Tab: Select DShot600, check motor direction and order, enable bi-directional dshot
- Setup Modes tab, assign switches for Arming, Angle mode, Turtle mode etc.
Finally, give your setup a test flight.
Wrapping Up
While this 3.5″ build is on the heavier side, it packs a punch, offering closer performance to a 5″ model. This is mainly due to the powerful motors and a sturdy and rigid frame. The added weight actually provides more ‘fling-ability’ and makes the drone behave more like a 5″ model. If you’re into sbang-style flying, this build could be just the ticket.
However, if your aim is to build a lighter 3.5″ model under 250g, here are some changes I would suggest:
- Choose a lighter frame, ideally around 45g. Just bear in mind that this might compromise on durability and rigidity.
- Opt for smaller motors, 1606 motors would be a good choice.
- Use a lighter ESC. The one used in this build is rated for 45A, which is more than adequate for even 5″ quads. For a lighter 3.5″ quad, a 30A or even 25A would suffice.
- A previous 3.5″ build I assembled: https://oscarliang.com/roninuav-sohei-mk2/
- Other 3.5″ BNF models I’ve reviewed:
- Darwin Baby Ape II: https://oscarliang.com/darwinfpv-babyape-ii/
- GepRC Smart 35: https://oscarliang.com/geprc-smart-35/
Regardless of your chosen path, the joy of building and flying your own FPV drone is the journey itself. Enjoy the build process and happy flying!
29 comments
Hi,
I have Flywoo NIN 1404 4850kv motors. I was planning to use this frame (3.5inch) with 3016 style props so that less prop will be in the O3 view. Can you please suggest more on this will work?
I am having the Flywoo F745 and 13A 4in1 ESC. I guess 13A should be enough for that motor with this quad.
Or just get a frame that doesn’t have props in view?
For example the Sub250 Oasisfly30.
Hi, Oscar would it be possible to buy a babyape ii and move it over to this frame? I want to do this because I’m looking for a 3.5/3 inch with the DJI O3 and there isn’t any BNF I could find
I think I would just end up building something with this frame, I was thinking an AIO like the JHEMCU GHF722AIO-HD 40A and 1604 motors
I think so, but the motor wires are need extending as I am not sure if they have the right length.
How did you lead the O3 antenna wires? The O3 unit UFL connectors are just a tad to closs to the antenna mount, putting a lot of pressure on the antenna wires and connector
https://oscarliang.com/wp-content/uploads/2023/07/flyfish-Volador-VX3.5-fpv-drone-build-dji-o3-zeus-mini-f7-expresslrs-solder-receiver-rx.jpg
Hello! Very nice build! I”m using the VX3 frame and I have a question. I”m using 1404 motors and the circlip on them seems to touch the midle hole of the mounts. Have you met this issue before? Would you recommend smoothening/ enlarging the hole with a file?
I didn’t have this problem, but yea you should be able to fix it with a file.
Hey,
Is it possible to use the Speedybee f405 mini 35A stack? Or is the amp rating too low?
And is it a must to use a xt30 connector or is an xt60 also possible (I have some 1100mAh lipos at home and wanted to try my future build with them). Thank you
Absolute! The amp rating is more than enough for this build.
You can use either XT30 or XT60 as long as you don’t mind the size.
Thanks for the very detailed entry as always Oscar. I’m still having a question: No props in the footage with this frame? I’m planning to use this frame with the o3 too. Thank you
No props in view with O3. I have some footage here flying this quad with the O3 system: https://www.youtube.com/watch?v=MyI07T8odfM&ab_channel=OscarLiang
I can see the props in the DJI 03 video.
I’m having quite a lot of props in view on my build too when running Gemfan 3520.Not sure if it’s an error in the way we are mounting it.
Awesome build!
I love 3.5″ but people make it synonomus with sub 250g which I don’t care about weight.
would this build work with a vista instead of an o3?
Or anything you would need to change?
Vista? Absolutely.
Nothing needs to change except the camera mount spacer, and potentially the antenna mount.
Thanks man I’m a new builder and have only previously had BNF.
I apprecaite you taking the time to reply <3
great review
could you share you betafligth setting? it will help me a lot
Hello Oscar I’m interested in doing a build with that frame. I looked all over but can’t seem to find out what size motor holes it has. Is it 12×12 or 16×16? Was thinking about going with a little bigger motor like 2203
12x12mm
Hey Oscar!
I’m very much inclined to try this as my first build.
Just a doubt: I have read that the O3 tends to heat up. Could running power cables over it make it worse?
Is it possible to turn the FC 180 degrees? That way I would pass the power cable through the front (like the SpeedyBee Master frame) and maybe even have space to solder the capacitor directly to the pad.
Sorry if I’m talking nonsense, I’m new to this :)
I ended up going w/ the 3″ version of this frame, o3 air unit, and the guts of an off the shelf 4s Cinebot30 (I bought duplicates when building my first Cinebot30). The frame should be here mid-week and it should be built before the weekend. Thanks for pointing me to this frame.
That sounds like a convenient build, 3″ might be a good choice for your hardware, 3.5″ has longer arms and it might be a stretch for the existing motor wires and requires laborious wire extension. Hope the build goes well :)
Hey Oscar. Did you tune beyond betaflight defaulta? What did your final PIDs look like?
no reply from him..i think he is too busy. it s so pitty he didn t share his setting file on his great review
You got a typo; these motors are 1804 not 1806. I guess they are in the same cruiser class as the RCINPower GTS-V3 1804s.
Any experience with 1606 with 3,5” props?
Any alternative frame you suggest compatible with DJI O3?