When I was flying outdoor with my mini quadcopter, there were a lot of vibrations in the video. The quadcopter was relatively light weight and it was easily blew away by the wind. When it was trying to compensate the change of angle and position by the wind, it wobbled and caused lots of vibrations.

Situation was largely improved in the FPV tricopter which has much longer arms, and much heavier body, it was very stable under reasonably windy condition. By just mounting the camera directly on the frame, it had very little jello. But to make it even better, I decided to build a proper camera mounting system for it, which uses steel wire (metal robe) to isolate the vibrations.
Here is a test flight with this camera mount.
FPV Tricopter – Piano Wire Camera Mount Test – Play with Dog from Oscar on Vimeo.

Why are we getting Vibrations in Video?
Vibrations that affects our FPV video quality mainly comes from 1) vibrations from the motor and propellers; 2) quadcopter self movements when PID value is set too high, or when it’s too windy. For 1, we can try balancing the motors and propellers. For 2 we can solve it by simply turning down PID settings. But if none of these could help us reduce jello effects in our video, we will have to come up with a better camera mount. Inspired by David, I will be building this vibration dampening camera mount using piano wires, sometimes refers to musical wires. This is an example of what David’s design looks like.
What Benefits does the Piano Wire Camera Mount give us?
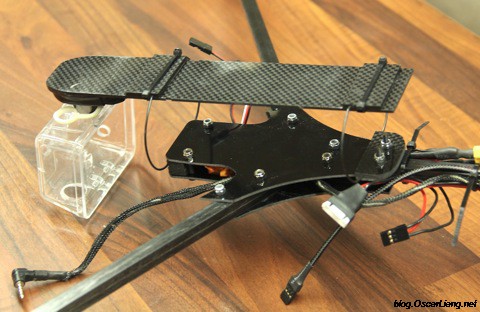
In this solid wire dampener system, the camera plate is separated from the frame body, and the only connections are the four metal wires. This could help reduce jello effect in the video by weakening the vibrations.
The reason lies behind the fact that, the vibrations created by the motors and propellers have to travel through the piano wires, to get down to the camera plate. Since the camera plate is rigid, in order to make the camera vibrate, the whole plate would have to vibrate. With the heavy battery plus camera mounted on the camera plate, a lot of energy is needed to get it moving.
In another word, the weight of the battery and camera absorb some of the vibrations. Also the piano wires have a relatively high resonance frequency which means it suppresses vibrations that travel down to the camera plate.
How to Build this FPV Camera Mount?
I used 1.56 mm piano wires bent in a circle and then at a 90 degree angle, like an “5” shape. I bought these wires from eBay. David used 1.2 mm wires, and a lot of people complains about those being too soft. 1.5 mm and thicker wires might take us more effort to bend to the shape we want, but it is very sturdy and holds the camera mount plate very well.

For the mounting plate, it has to be really stiff and rigid. I can’t find any carbon fibre plates, even I could I don’t have the tools to cut them or drill holes on them anyway, so I was thinking to use some 3mm plywood board. However the careless seller cut this board in the wrong direction, the board became extremely easy to break. I had to sandwich this board with some thick styrene sheet to strengthen it at the end.

I cut out the tracks on some smaller styrene pieces to hold the end piano wires in place. I run out of screws and nuts, so I was also using zip ties as a replacement.

