This is a mini quadcopter that I built a while back. I tried to build a frame myself using polystyrene and fibre glass rods, but it didn’t work as good as I expected. Later I replace it with a Hobbyking Micro quadcopter frame, which made a huge difference in stability.

After some PID fine tuning in the KK2.0 flight controller, it flies really well. I will attempt to rebuild the frame using more rigid material, and use my own made Arduino flight controller with Multiwii 2.2 loaded.
I recently built a upgrade version of the mini quad, check it out.
Electronics Assembly
Finally received all the parts from Hobbyking which took almost a month!. I guess they must be getting so many orders in their International warehouse because they usually have most items in stock (since it’s in Hongkong and right next to mainland China), and it would take them so long to dispatch orders. I live in the UK, and ordering from their UK warehouse usually is much quicker (dispatch within 1 or 2 days). So try to avoid ordering from their international warehouse whenever is possible. Anyway Hobbyking is a great online shope because their products are so cheap and I should not complain really.
Micro Quadcopter Components List I used:
- Flight controller: Arduino Nano + GY80 (sometimes KK2.0 (buy from here, KK2.1 has been released, buy from here)
- RC transmitter: Turnigy 9X (buy from here)
- Prop: 5030 3 blades propellers (clockwise and counter-clockwise)
- Motor: Turnigy 18-11 2900kv Micro Brushless Outrunner (buy from here)
- ESC: TURNIGY Plush 6A /.8bec/6g Speed Controller
- Battery: Turnigy nano-tech 950mah 2S 25~50C Lipo Pack
Additional:
- 2mm Gold Connectors 10 pairs (20pc)
- Turnigy 2mm Heat Shrink Tube – BLACK (1mtr)
- JST to 4 X 2mm Bullet Multistar ESC Quadcopter Power Breakout Cable
I first assemble and solder all the parts.

Soldering the 2mm connector to the ESCs and brushless motors is much simpler than I first thought. You first heat up the connector with the solder iron, fill 70% up the hole with solder and put the cable into the hole. Remove solder iron from it and hold the cable in place until it’s firmly sticked to the connector as the solder cools down.

And then put the head sinks on the solder joints.


I was a little confuse about the wire connections of the ESC to the motors as they are all the same color. It doesn’t matter which wire connects to which. Because the motors are 3 phase device, by swapping two of them could reverse the direction of the rotation. So just wire them up randomly and see which way it turns, swap two of them if it’s turning the wrong way.

Self Made DIY Mini Quadcopter Frame
The fibreglass is a spare part from the 949 beetle mini quadcopter, and the motor mount pieces are cut from styrene sheets. To be honest Styrene are too soft to be used for motor mount as motors tend to generate a lot of vibration. More rigid material should be used such as wood or metal, or thinker harder plastic.
The whole frame weights about 50g. I should remove the landing gear to reduce weight, since mini quadcopter can land and take off from the pilot’s hand anyway. :-)


Here is a failed flight video:
HK Micro Quadcopter Frame
This Fiberglass Micro Quadcopter Frame is from Hobbyking. Although it’s a little heavy and expensive, the rigidity is very good and not easy to break. But I would insist if you have a little spare time and patience, try and make a frame yourself as for mini quadcopter, light weight is important! And that’s what I am going to do.
Also on these frames the motor holder has only got 3 holes, i think that’s some turnigy motors. It’s doesn’t fit the 2000KV 10g motors I am going to use unless using some sort of motor mount adapter, which is going to add more weight to the build.
The whole thing weights 275g (including battery), which too much for a micro quad. Although it flies, flight time is not very good. For 950mah battery it only lasts about 6 to 7 minutes.
I use a knife to make 2 holes on the quadcopter arm, which does the job nicely.


Here is two successful flight videos:
https://www.youtube.com/watch?v=N0uKnJcBovc
Improvement Ideas
I should try the 6030 or 6045 prop to get more thrust for these motors when using 2S. There are people using 3S battery on the 2000kv 10g outrunners motors to get more thrust out of them, but I don’t want to risk it.
Also I can reduce more weight on the frame.
And FPV! :-) it should be able to carry a key chain camera FPV system.
use prop adapters, the original prop savers that came with the motors generate a lot vibration I found. Maybe it’s the size of the prop savers are too big and not tight enough to hold the prop in place.
DIY Quadcupter Frame Attempt #2
This time I will make sure the places where the motors are mounted are very rigid, and use as little material as possible to reduce weight. I used 3mm fibre glass rod as the bone of the frame. These rod look much larger that i thought they would be, and because they are solid they are quite heavy. I could have used 2mm rods, or even better, 3mm or 4mm fibre glass tubes (which is hollow and lighter).


Materials are put together using hot glue. Hot glue isn’t a very good material either, because they are quite soft and doesn’t hold very strong. I learnt from my friend that you can use some kind of string/wire to tie the material together first if possible, then apply the hot glue to protect the string and cover the gaps.

The DIY frame is about half of the weight of the HK fibre glass frame.


Here is a video showing the performance.
Building Process (fast forward)
Improved Versino Mini Quadcopter
I have been trying to improve the stability and flight endurance of this micro quadcopter. I have made these changes and it flies incredibly awesome. It weights less (about 170gram excl. Lipo) and the flight time is now around 15-17 mins with 1600mah battery (used to be around 9 mins with 950mah), and it hovers at 50% throttle (used to be 70%), which gives me more room for a light FPV system later on.


- re-made the frame, shorter arms and stronger material (reduced about 5 grams)
- less wires and electrical connectors – solder motors directly to the ESC and replaced power distribution cable with 2 little PCB pieces – weight reduced greatly (reduced about 20 grams)
- upgraded to turnigy 1811 2900KV motors, more thrust
- using 3 blades propellers intead of the 2 blads ones, more thrust.
- using propeller adapters instead of prop savers, which reduces vibrations.
- vibration damper installed between motors and motor mounts. (moongel)
- upgraded to larger capacity Lipo, which gives longer flight time – about 16 mins with 2S 1600mah, and 12 mins with 2S 950mah.
I also tried using 3S Lipo with these 1811 motors as well, it flies very good, it can stay in the air at around 30% throttle, and it’s very agile. For the first 3 mins, the motors gets warm, but after that, the motors and ESC gets very hot. Not that it’s too hot to touch, or like some people have been describing, it could get so hot it melts the soldering, but I don’t like taking the risk of damaging the ESCs or motors, so I might just stay with the 2S lipo.
http://www.youtube.com/watch?v=2kn5INbrHXE
As a DIY indoor flying mini quad, I would say this is a very successful result. I have yet tested this quad outdoor, see how good it is against the wind. I don’t expect good performance because of the light weight.
The next improvement could be using even stronger motors that can be coupled with the 3S lipo, such as the Turnigy 2211. I will leave it for now because I will be busy flying with this beautiful quad for a while ;-p
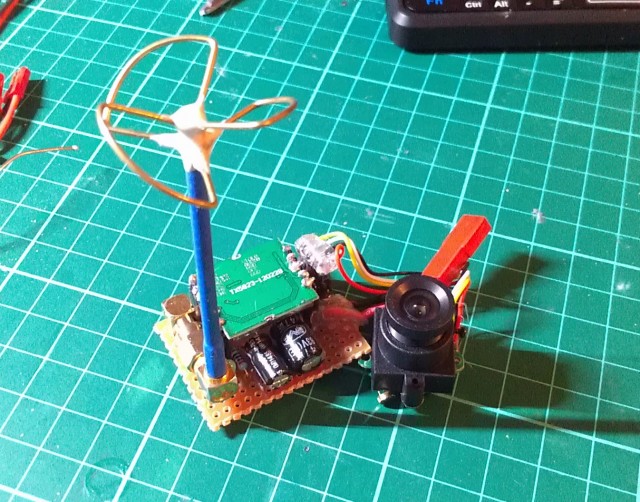
Light weight FPV system
I finally built a light weight FPV system on the mini quadcopter, which only weights 27 grams including the antenna. I have yet tested the range of this FPV system, but I have been flying this mini quadcopter indoor within 20 meters and the video quality seems very good.


I should soon upload some FPV fly videos :-)
Outdoor FPV Flight!
Finally after weeks of waiting, we had a sunny day here on a weekend, and I went out and tested the FPV system on the mini quadcopter outdoor. Unfortunately, it was quite windy, the wind was about 12mph (according to BBC weather), and the quad couldn’t stay in position at all and requires frequent manual control just to keep it away from drifiting.
The strong wind introduced large amount of jello effect to the video, but it’s still better than many videos I have seen on youtube, taken by larger multicopters in a no-wind condition, so I am very happy about this.
I used the 808 #16 keychain camera to record the flight, which is not bad at all!
I am really looking forward to another sunny day with calmer wind, so I can fly further and higher.
1
19 comments
Hi Oscar,
Just one question, i build a quad similar to yours. but total weight 325g. i programmed the ESC using the KK2.1.5 board by pass-through method.
However, my motors are cutting off if i power more than 50%. Is that a sign of too heavy a quadrotor? sometimes I can fly the quad smoothly but sometimes the motor jsut went irregular.
Hi Rusty, do you have a video showing the problem?
Hi Oscar, I have solved that problem since then. Now I just flashed the 1.19S2 firmware onto the KK2.1.5 board. Seems like the stability is getting worse. still trying to figure out. Any recommended firmware to flash onto the KK2.1.5 board?
sorry I don’t have any recommendation. I have moved onto Naze32 since mid 2014.
Hello, I would like to build this quad (first one) but cannot find the instructions on how to set up the flight controller, ESCs, and receiver. Any help is appreciated, thanks.
tried google?
Greetings! Very helpful advice within this article! It’s the
little changes which will make the largest changes. Thanks a lot for sharing!
Awesome blog man! Consider sharing your builds over at the first forum dedicated to mini multirotors:
Most of the blogs/website say we need minimum of Four channels for a quadcopter (pitch, roll, throttle, yaw):
1. One channel for throttle
2. second channel for turning right and left.
3. third channel for pitching forward and backward.
4. fourth one for rolling left and right.
[Radio Transmitter Image](https://oscarliang.com/wp-content/uploads/2013/10/5-channel-transmitter-diagram.gif)
But looking at the RC transmitter , i see that at a time you can change a maximum of two sets data ( left and right joy stick) . Even if you want to send Rudder and Throttle information at the same , can it not be sent in the same packet ?
My understanding is two channels should be sufficient to control quad copter. Please provide more clarity on this.
that’s the reason you have so many channels, each channel is independent of each other, so in theory you can change all 4 channels at the same time.
Hi,
Just to share my experiences. I build a similar quad with mostly the same parts as you. Beeing an unexperienced pilot I struggeled with the quad being to responsive. This is the setup which finally worked for me:
KK2.1 setup (FW 1.5):
PI Editor
Roll (ailleron)
P Gain: 25
P Limit: 100
I Gain: 25
I Limit: 20
Pitch (elevator)
P Gain: 25
P Limit: 100
I Gain: 25
I Limit: 20
Yaw (rudder):
P Gain: 25
P Limit: 100
I Gain: 25
I Limit: 20
Mode settings
Self level: AUX
Link Roll Pitch: Yes
Auto disarm: Yes
CPPM Enabled: no
Stick Scaling:
Roll (Ail): 30
Pitch (ele): 30
Yaw (rud) : 50
Throttle: 80
Misc settings:
Minimum throttle: 10
Height dampening: 0
Height d. limit: 100
Alarm 1/10 volt: 100
Servo filter: 50
Self level setting:
P gain: 90
P limit 20
ACC Trim roll: 0
ACC Trim pitch: 0
X configuration
Controller: KK2.1 FW 1.5
Motor: Turnigy 1811 brushless Outrunner 2900kv
ESC: TURNIGY Plush 6A /.8bec/6g Speed Controller
Battery: Turnigy nano-tech 950mah 3S 25~50C Lipo Pack
Propeller: 5030 and 5030R
Futuba Rx and Tx
Lego landing gear (not retractable)
great! thanks for sharing your experience.
also try flash the KK2 firmware to 1.6, it also makes a difference especially to the auto level mode.
Hi Oscar,
I have KKv5.5 multicopter controller with me. How different is the whole setup from v2.1 and can we use that instead of 2.1 with the arduino uno(i use the uno) to build my own flight controller like u have used the nano and k2.1?.
i haven’t used the KK5.5, so I can’t answer that question.
Sorry, why are you using the Arduino when you have the KK flight controller?
KK boards are also micro controller like the Arduino, but they are designed only for RC drones. So you can just use the KK flight controller (no arduino needed), or build a flight controller using the Arduino.
what i mean there is, I sometimes use Arduino nano + GY80 as the flight controller, and sometimes use the KK2.0 (KK2.1 is a newer version of KK2.0) as flight controller, they are two different flight controllers.
The “Arduino nano + GY80” flight controller is a custom build, which uses the Multiwii firmware.
Hi Oscar,
Thank you for your blog.
I bought 2900kv motor from HK but i didn’t had any mount screw with product. What screw size / cap are you using to mount the motor on styrene sheet holes? or did u just glue it?
I used M2x5mm screws + nuts.
On the final homemade frame, what are those white parts for the motor mounts and controller platform? Plastic? Where/how did you get/make them?
they are just pieces of styrene sheet. Same material i used in the first DIY frame.