More than a year ago, I made an attempt to build a DIY light weight FPV combo, consists of a FPV camera, video transmitter and antenna. I had comments saying it could have been lighter if there weren’t so many extra components. They were right, and as part of the FPV micro quadcopter project, I decided to re-build this mini video transmitter camera combo, and really try hard to keep the weight and size down.


Parts for DIY Micro FPV 5.8GHz combo
Let’s get straight into this build. Here are the bits I will using.
- Video Transmitter 5.8Ghz 200mW TX5823
1g Mini FPV CameraBanggood micro camera- Recycled Dipole Antenna
- Capacitor
- Power Connector

TX5823
In this light weight micro FPV combo, I will be using the same video transmitter TX5823, along with the nano FPV camera. This small 5.8Ghz video transmitter only weights 2.3g, but with amazing 200mW power. With circular polarized antenna, I was able to achieve 300+ meters in range in the last build. The TX5823 has the same number as TS5823 I reviewed a while ago, not sure if they uses the same components or something.


1g FPV Camera
This CMOS camera is also known as the 1g camera, as it only weights about 1g. (in fact 2.1g including the original lead and connector). It’s worth to mention that this camera only has 55 degree FOV. It should be flyable in FPV, but I would definitely get a wide angle lens if I can for this camera. Here is a guide on how to choose a good FPV camera.
I am not 100% happy with this camera, because of the narrow FOV. I am currently testing out a couple of other options. I will recommend the best one I can find in the next week or two. Stay tuned! :D But this is where I got this one from if you are interested.

NOTE: I found a better alternative camera on Banggood. It’s slightly heavier (2.7g), probably because of the Mic, long cable and 170 degree wide angle lens it comes with. I used it in my second build.
Recycled Whip Antenna
This cable is taken out from a 5.8Ghz whip antenna., and this is what’s inside the antenna. (I bet many people don’t actually know how it looks like :) )


It’s basically just a RG316 Coaxial Cable. The cable needs to be cut to certain length and let the centre wire exposed (without the shielding). I think the length should be fine around 0.47 inch to 0.51 inch (11.9mm – 12.9mm), this post show you the calculation and how to make whip antenna. This length affects the signal frequency it receives, so It has to be very precise otherwise you will have weaker signal. This is the measurement I took off my antenna, it’s a bit shorter than I expected.


You can easily DIY a light weight whip antenna using RG316 Coaxial Cable (widely available on eBay), or simply just using a wire without connecting the ground.

Building and Assembling
The fun starts here. First off I simplified the circuit diagram schematic from the previous version, by removing a capacitor and a diode. Also there is no need of an audio connection.

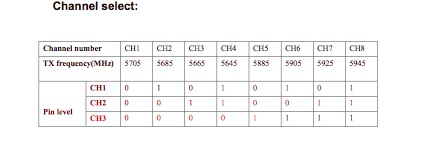
Here are the available channel on this video transmitter. I could just solder a 3 way dip switch on it, so I can use whatever channel I want. But as I wanted to save weight, I decided to pick one channel and stick with it. I chose channel 1 as it’s the closest to 5.8Ghz. By following this chart, I had to ground all three channel pins by connecting them to the heatsink shield.

Then soldering the camera and power connector to the TX5823 video transmitter. As I will be powering this FPV combo from the main battery, the power supply will be noisy. To filter out noise you usually need something like LC filter, but they can be quite chunky and heavy.
So I only added a 200uF capacitor which smooth out voltage power supply, and jumping white lines and static snow in the picture (voltage fluctuation noise caused by motor drawing lots of current). Might not be as effective as a proper power filter, but it should help. You could totally build it without the capacitor, this is just my precaution.

And finally soldered the antenna on it (the centre wire goes to ANT pin and the shielding bits goes to the two GND pins next to ANT). And hot glue all the components, so they don’t move about.

Comparing to my 3S battery, this FPV combo is tiny!

And it only weights amazing 5.6g!

I tested it which works great. Although the vtx gets quite warm after a while.

By the way this is my simple ground station with the cheap LCD screen :D.
I will put using this small video transmitter and fpv camera combo on my micro quadcopter. Stay tuned :D
Current draw – Power rating
1g Camera: 75mA @ 5V (~65mA @ 3.3V)
TX5823: 170mA @ 5V (~150mA @ 3.3V)
Total: around 220mA.
New Version!
This build is affected so bad by noise when sharing the main battery with the motors on my micro quad, the picture basically just goes away when throttle is up. Tried building a micro LC filter without much success (detail in my micro build log). So I decided to get a dedicated separate Lipo for this FPV setup.

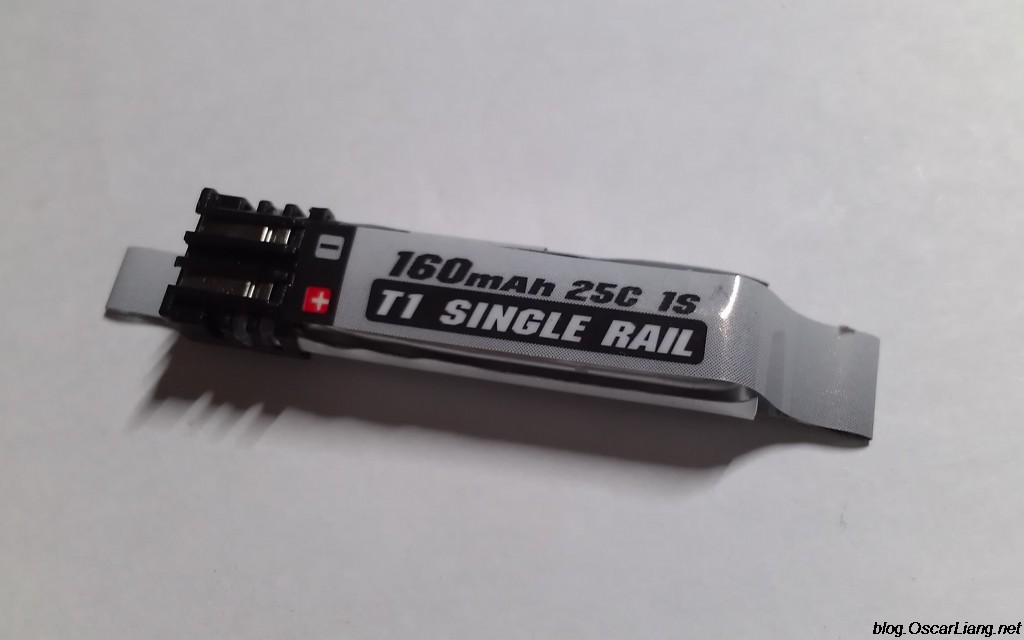

The battery I went with is the TURNIGY NANO-TECH 160mah 1S 25C, it only weights 4g (5g with connector I soldered on)
However the whole setup is now almost 12g! Although it works beautifully now, I am not happy with the weight and having 2 lipos running on the quad is not ideal. As I often forget to replace the FPV battery, when it runs low I just suddenly lost video without warning.
So here I started a second build, aiming to fix the noise issue, and be able to share the main LiPo with the Motors.
21 comments
Hey , good tutorial here ! I have one question not realted to the transmitter , but the receptor : is there some way to build a DIY 5.7Ghz receptor ? The documentation is pretty weak on the subject , and I’m trying to limit the size of the receptor for a personal project .
Sorry for the poor english !
When a person see’s the flashing light on the dogs collar, they embrace the animal, and when they do they see the small 1″ H X 2″ W X 1/2″ Thick plastic box on the dogs collar that reads , push button, the person then pushes the button and when they do this, the audio chip says “My name is Duke, I’m lost, call 610-563-0585, for your reward for finding me.”
As described above , can i DIY it with 5.8GHz transmitter and receiver ?
Hi Oscar,
Any idea if a 5V input would fry the TX5823?
Caleb Burke
Thank you very much this perfect description.
I would like to build an 5.8 GHz FPV and I want to use it with my SJ4000 action cam. Is this version can transmit the SJ4000 HD resolution?
Thanks!
Hi Oscar,
For the noise issue, could you have used a 3.3v voltage regulator to help smooth out the voltage coming from the 1S? Also, unless I’m mistaken, this will drop the voltage from the 3.7v coming from the 1S battery to the more appropriate 3.3v required by the TX. I just ordered my parts for this FPV today and I am hoping to build this next week. Thanks for sharing you’re builds, they have been very helpful!
Hey!
Thanks for your great tutorial about FPV but could be nice if you can give us where do you buy all on the net?
Thanks!
PL
Hi Oscar!
thanks again for your very helpful tips! I’ve tried to build a brushed micro fpv quad, but was really really disappointed by the HUGE amount of noise in the video feed. powering the backpack from a small lipo (I use a 100mah) is a good idea and helped a lot!
best regards!
Glad it helped you Hannes!
Hi Oscar I am new to building this transmitter when you say ground all three pins to heat sink, will it not work if that is not done, could you send photo of how you did this please,thank you.
you could just leave them, that means you will be on channel 8 on the VTX (1, 1, 1).
Hello Oscar
Love your site!
What kind of reciver will i use with this build and what kind of range will i get?
Regards from Scotland
Any VRX that supports Boscam frequency bands, or any 32 channel VRX should also work.
Range of this VTX is about 80 to 100 meters.
Hi Oscar,
I know that this maybe a silly question but (please take into consideration that i am totally new to all of this) would it be possible to use a hd camera from a mobile phone for example being the tiny physical size/weight?
I would love to make this project however i would love to make it high Def.
Also I need to find out a way to use my phone/ipad to display the streaming video… any ideas/help would be very very muchly appreciated. :)
I don’t think it would be possible down to a hobbyist level. Even if you can pull it off, the transmitted video will not be HD, the image quality is limited by the video transmission.
You can use a mobile phone camera.But you have to use a Parallel camera interface to NTSC/PAL converter.OR use a transmitter chip with parallel camera support. Assuming that you have a good micro electronic knowledge and a good CS knowledge you can write a Digital modulation algorithm instead of wide band FM modulation to get a HD link(For example you can stream HD via class 12 WiFi).Thats how most of hd links Like DJI phantom works but the physical size would be not so micro.
Peace.
V_MAN
This is a great article. I basically built the same setup. I used an additional 3.3v voltage regulator I bought of of ebay and didn’t use the LC filter. My configuration has some snowy picture (probably because of the lack of a filter on the camera) but the OSD is clear. Its important to note that when the battery gets low you get no warning and it just cuts out. I built a loaded coil dipole antenna pointed 90 degrees downward after my feed line and have gone 500 meters out with my very basic fpv setup.
what OSD are you using? I am curious!
I don’t need an OSD for voltage monitoring, because the quad won’t be able to take off when voltage drops below 3.3V anyway.
Hi Oscar,
I have just started in quadcopters world but I do love electronic gadjets such as this one!
I have a simple question. Is it possible to use any camera sold in ebay or aliexpress? or it has to be an specific FPV camera?
I found this cheap one. Would it works?
es.aliexpress.com/item/New-1-4-HD-Sensor-600TVL-CCTV-Camera-Video-CMOS-micro-security-Camera-4-3mm-Focus/32276724157.html
Regards and thanks for your shared experiences and tips!
Antonio
Hi Antonio,
no, because they need 9 to 12V power supply.
you should be looking for 3.3V to 5V ones, which you can power by 1S lipo.
The one I am using, I am not happy about it, it doesn’t have wide angle, and it’s expensive.
I am going to test a couple more in 1 or 2 weeks, and I will recommend the best one I find :D
stay tuned!
thanks
Oscar
Hi Oscar,
Recently found your website and must say it’s great. Lots of good information.
You did this DIY fpv Tx, have you tried a DIY fpv Rx?
Take a look at this: code.google.com/p/rx5808-pro/
Interesting project!
that looks like a cool project! :D
will look into detail when i have time!