The Insta360 GO is a compact 1080p HD camera that has impressive image stabilization feature. It only weighs 18g, which is perfect for our micro FPV drones, it’s a fun camera to have!

It uses similar technology in the 360 cameras like the Insta360 ONE R, but instead of two imaging sensors, the Insta360 only has one.
Where to Buy Insta360 GO
Update (Mar 2021): they released a new version, the Insta360 GO 2!
- Banggood: https://bit.ly/insta360-go-cam (promotion only $169.99)
- Amazon: https://amzn.to/2UXFDqr
- GetFPV: https://bit.ly/2Ybpccg
- RDQ: https://bit.ly/2UXFPWH
- NewBeeDrone: https://bit.ly/37F8DZr
It comes with the following accessories in the box:

Drone Footage
The Pros and Cons
My first impression of the Insta360 GO – it’s absolutely tiny! It weighs a mere 18g, measuring just 49mm in length.

It’s so light and small, even 2″ micro quads could carry it. I am testing the Insta360 GO on the 2″ Rocket Lite.

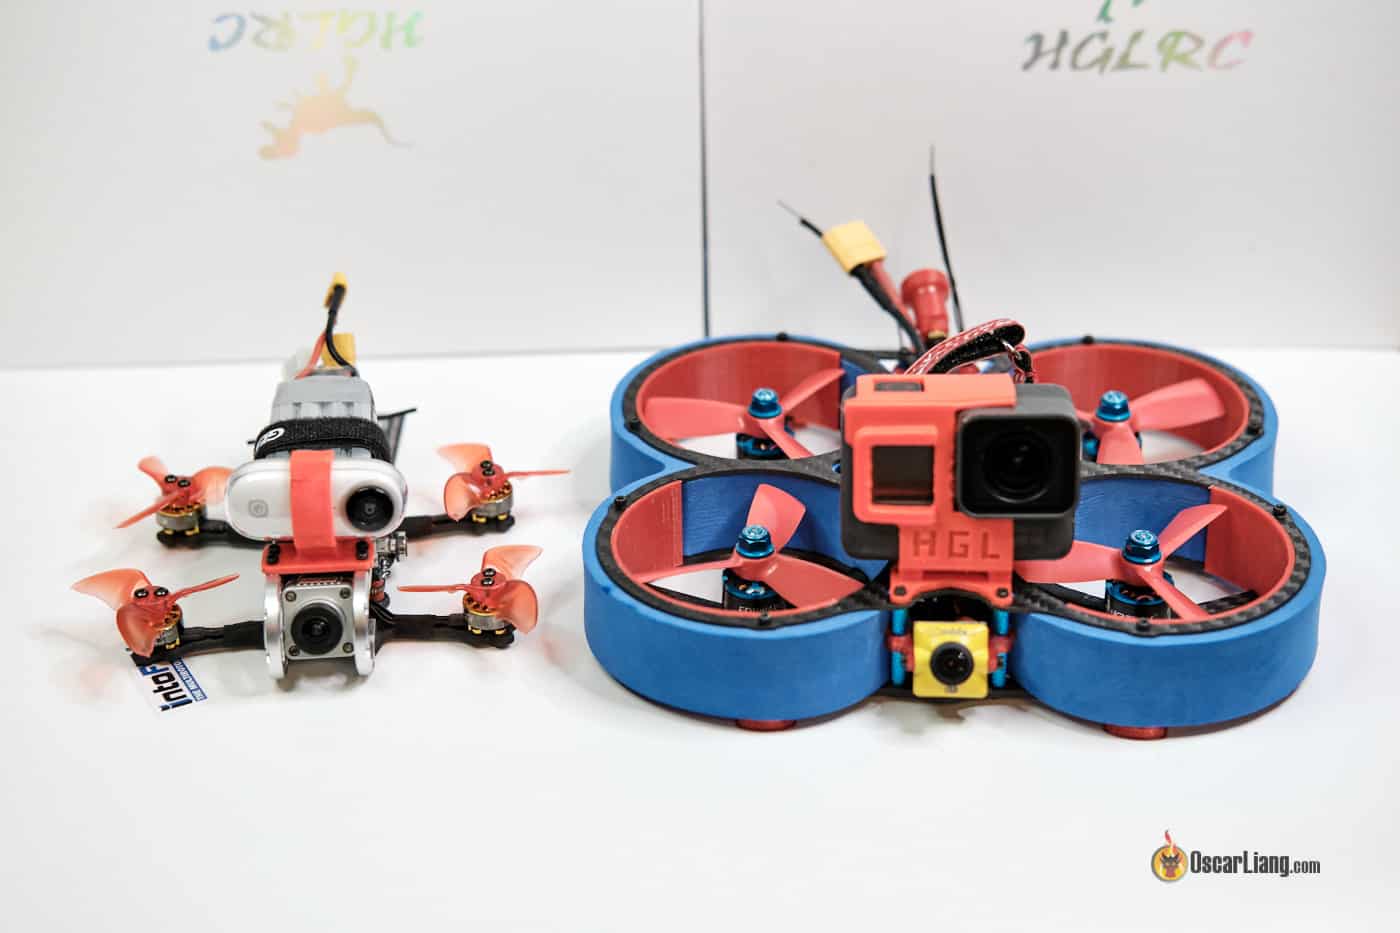
Size comparison to a 3″ cinewhoop carrying a GoPro.
Originally the Insta360 GO was designed to record short 1-minute-only videos, but later they added “FPV mode” which extended the limit to 5 minutes, at a resolution of 1080p 25FPS (30FPS only available to Hyperlapse videos).
The limited resolution and recording time could be deal-breakers for some, but to most people this might be enough for simple, everyday flying, where you are just zipping around the garden, or having a good time cursing through local parks.

The best part about the Insta360 GO in my opinion, is video stabilisation which works absolutely brilliantly. You can enable stabilization in the Insta360 video editor.
There are two types of stabilization available in this camera: Flowstate and FPV.
Flowstate is used mostly for non-FPV footage, or maybe certain cinewhoop footage as it always keeps the horizon level (exactly like the Horizon Lock option in Reelsteady). FPV mode allows tilting so the footage feels more like flying. I prefer “FPV stabilization” as it keeps the props out of view as well.

The camera comes with a charging case, which resembles the Apple AirPods. The charging case also acts as the USB adapter, and It has its own battery so you can charge your camera at the field without connecting it to another device, again, just like the Airpods.

Interestingly, the Insta360 GO doesn’t have an SD card slot, but it has 8GB built-in memory. I quite enjoy this feature as you don’t have to spend extra on SD cards, or worry if the card is fast enough. However, it’s only 8GB, so I find myself having to constantly download video files to free up space.
Based on my experience, 8GB of memory can hold around 25-30mins of flight footage. That’s actually more than the battery life which is around 50 mins. Make sure to bring your phone or laptop with you so you can download the footage on the go.

And it has a really nice phone APP which is available on both Andriod and iOS, you can use it to download the footage, do basic editing and export videos in MP4 format for uploading straight to Youtube, or for further editing in another video editor.
The camera can be connected to your smartphone via Bluetooth, or USB cable (with the camera in the charging case).
The charging case already has a built-in lightning port that goes straight into the iPhone.

Phone app vs Computer app
You cannot play or edit the videos directly from the camera, because they are in a unique “.insv” file format. You have to use Insta360’s software to export them in MP4 first.
Software on smartphone or PC platforms are quite different, and each have their own downsides.
I find the phone app easier to use, and surprisingly it actually has more features than the PC app. However with the PC app you can export videos with much higher bitrate (up to 200Mbps), on the phone app , bitrate is limited to 30Mbps, though that’s is pretty decent to be honest. 200Mbps is an absolute overkill for Youtube anyway as it will compress 1080p 30FPS videos and limit bitrate down to 8Mbps.
It’s best to upscale your video to 2.7K and set bitrate to 30Mbps, I found that gives me very good results. (or even 4K 60Mbps if you have the time and resources).
So anyway, using the Android/iOS app is absolutely fine for Youtube.

The other disadvantages of the current version PC app is the missing ability to change viewpoint and rotate/flip image (as well as creating key frames). These features are currently only available in the phone app.
Exporting clips from the app is quite fast, takes about half a minute to export a 3-min video on my 6-year-old PC.
Mounting Insta360 GO in FPV Drone
Because you can’t rotate image in the PC app, you should only mount the camera vertically. Only mount it horizontally (like the below photo) if you have access to the phone app .

And of course, thanks to the huge FOV, it makes really fun “3rd person view” videos by mounting the camera at the back of the drone. It’s like watching video games.

Issues with Insta360 GO
Not sure if these are common issues with the Insta360 GO, or just a bad unit I have.
Bluetooth never worked, can’t connect to my Android phone or iPhone. I can see the camera in the list of discovered Bluetooth devices on my phone, but it just kept failing to connect. Only using USB OTG connection for now.
For downloading video files to computer, I have to use the Micro USB cable provided in the box, my own cable just won’t work (which I use for almost everything and never had any problem with).
Recording randomly stops – sometimes it stops in half a minute, sometimes a couple of minutes, completely random. Very frustrating as it has lost me a lot of great shots. Someone on Facebook suggested a workaround that seems to work by putting the camera in the charging case between flights to “top it up”.
Conclusion
The form factor and stabilization of the Insta360 GO is truly impressive.
This compact camera really excels in those micro drones that up until now have been limited to the “Split” style cameras. Whilst some of these alternatives may be able to offer a similar, or even better resolution and image quality, it could be argued that they don’t offer the ease of use from Intsa360’s mobile app, also lacking in any image stabilization that this camera can offer straight out of the box.

Whilst this could be used on larger FPV drones, the video quality doesn’t seem as appealing when you could yield a much better image with a refurnished GoPro Hero 6 at even lower price. If you are willing to take it apart you can get the weight down to 17g which is similar to that of the Insta360 GO. And you can also use Reelsteady GO for stabilization.

But the Insta360 GO is definitely a more robust solution that you can just pick up and film. I can only suggest the Naked GoPro solution to advanced users and it’s not as reliable, it will probably cost you more in the long run due to the lack of physical protection and delicate electronics.
I really like the Insta360 GO camera, however the app still needs work – especially the ability to rotate video in the PC app. For now I only use it to export the videos so I can edit them in other more advanced video editors such as Davinci Resolve or Adobe Premiere.

Here is an incomplete summary of the pros and cons (I might have missed some points, please read whole reviews)
Pros
- Really small and light weight
- Stabilization works well
- Pretty robust
- Built-in memory, no need to worry about SD card
- Great phone app, you don’t need a computer to do basic video editing and rendering
- Has a charging case, it charges the camera on the go
Cons
- A few annoying issues as mentioned above, but when it works correctly, it’s great
- Limited to 1080p 25fps for FPV footage
- Only records up to 5 minutes
- Only 8GB memory, you’d have to constantly downloading footage
- It can get really hot, it could overheat on hot summer days
- Image quality isn’t quite as good as GoPro (Hero 6, same price level currently)
- Videos can’t be played or edited directly from the camera, has to go through Insta360’s app first
4 comments
Need a huge warning on this page. There is a MAGNET in the GO so if you place it near your compass, or even close, you’re in for a fun ride. I forgot this when taping it to a larger drone and the death spiral was not fun, luckily I found it as it had to be returned the next day (lol) and I learned my lesson about really thinking even simple seeming things over. Got luckily it clipped a tree as it was headed right towards a large window on the front of a home or into traffic. It is a strong magnet too and sadly this drone gives no warning on compass interference. Went up fine, acted a little funny, then liftoff before spiraling downward. Found it as I modded the controller with a direcitonal antenna which gave me a general area, then i was able to see and connect to the AP on the camera and see grass, not much of a clue but it was getting dark so luckily the blinky lights and a few spin ups of the props to both find it and scare people off helped me hear it was close.
Fun times. You can also change the view after the fact, the One X or One R is much more impressive, though the company behind it is crap.
Ah, oks. Thanks!
Hi Oscar!
I trying to set usa(60hz) in flicker menu, but the recording still 25fps.
(The ios app and the GO firmware is the latest.)
What i making wrong? :).
Thank you!
Regards,
Laszlo Voros
kepkezelo.com/images/fx4lfb1wkuptbb11m06a.jpeg
kepkezelo.com/images/nc6lceblhngwk50jp62f.jpeg
My mistake, the camera actually can’t do 30fps in FPV mode, only 25fps.
30fps is only available in hyperlapse mode.