
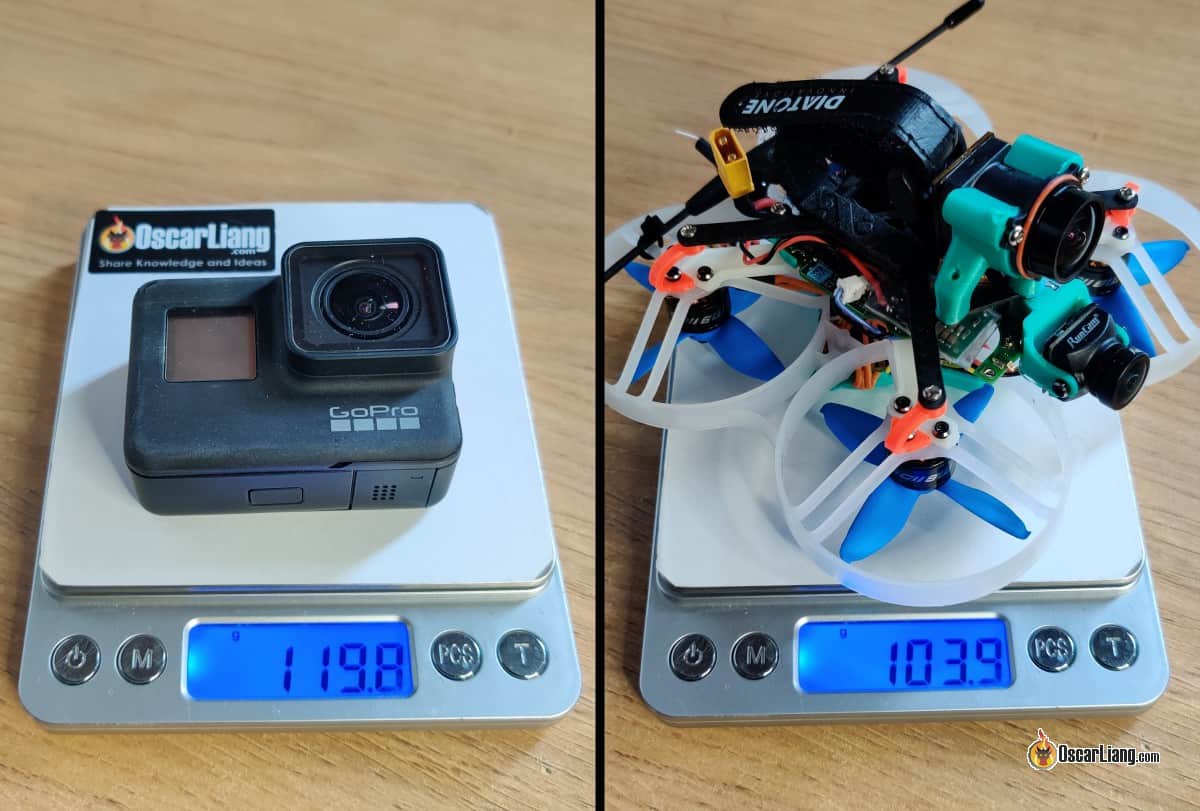
By stripping down the GoPro Hero 6 and removing all the unnecessary parts you can reduce the weight drastically from 117g to 17g. This enables a cinewhoop, or even smaller FPV drone to carry the decased GoPro with ease.

This guide will be focusing on the GoPro Hero 6. I have another post just for the Hero 8, the GoPro Hero 9, and Naked GoPro Hero 10 (officially made by GoPro)
Warning: This project is for advanced users only, if you choose to follow instructions in this post, do so at your own risk.
Table of Contents
Why Naked GoPro?
A small 3″ or even 2″ FPV drone, like the Beta85X, can easily carry a decase GoPro, with AUW (all up weight) well under 250g – the legal weight limit for registration in many countries.
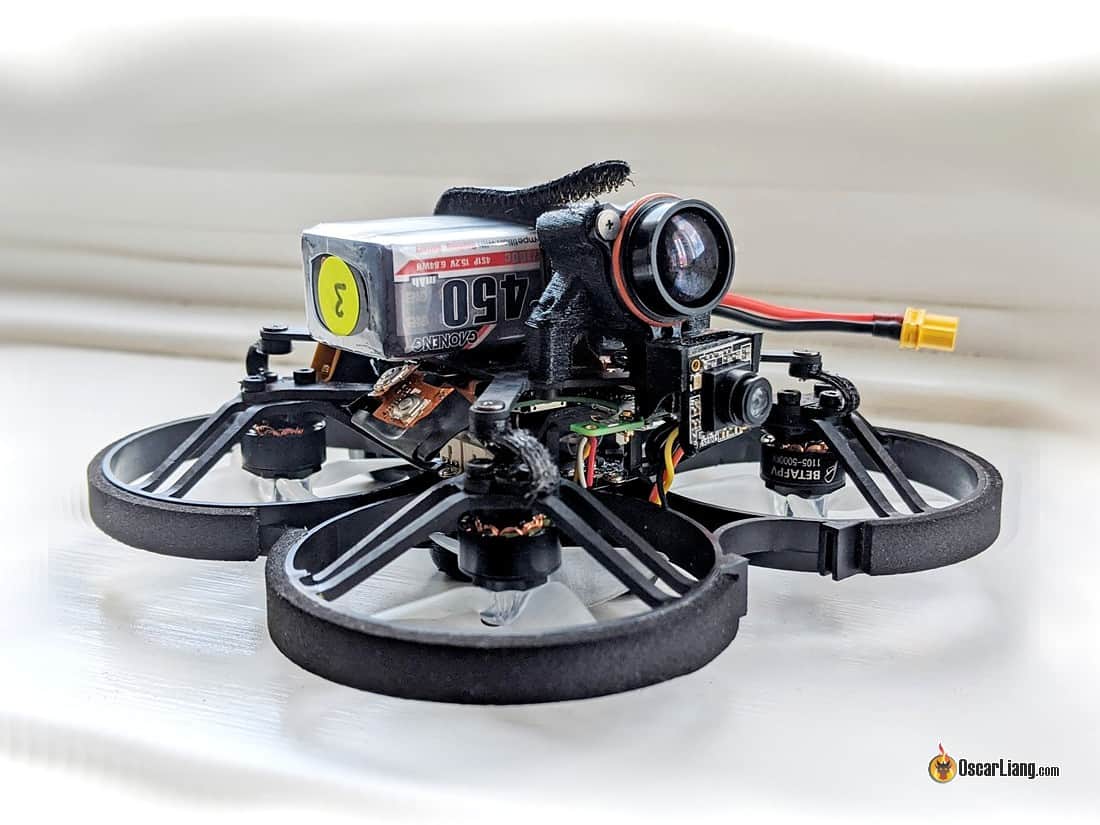
The resulting weight of the FPV drone including the naked GoPro can be lighter than the original GoPro, which is pretty amazing :)
With the magic from Reelsteady GO, you can get some very stunning and stable video:
Which GoPro is Best to Go Naked?
GoPro Hero 6 is by far the most popular model for naked GoPro, because
- It’s the most reliable when working with Reelsteady stabilization
- It’s an old model, therefore is cheaper
- Motherboard can be mounted flat for better aerodynamics
- It’s not the latest GoPro camera, but it’s still capable of recording 4K and offers high quality image, good enough for what most hobbyists do
You can get the GoPro Hero 6 here: https://amzn.to/31fvN56
Here is the naked Hero 6:


However there is one disadvantage, because GoPro is no longer making the Hero 6, second hand cameras and spare parts are running out by the day.
Therefore GoPro Hero 8 is another great option. In fact it’s better in terms of image quality and stabilization options – you can use either Reelsteady or the built-in Hypersmooth. However it is a bit more expensive than the 6 as it’s a newer camera.
There are also the less popular options like the Session 5 and Hero 7. However these two cameras require extremely good dampening in order to work with ReelSteady due to the more sensitive gyro, so it’s more hassle and less reliable than the 6 and 8. However the Hero 7 has built-in Hypersmooth, so you don’t have to use Reelsteady.
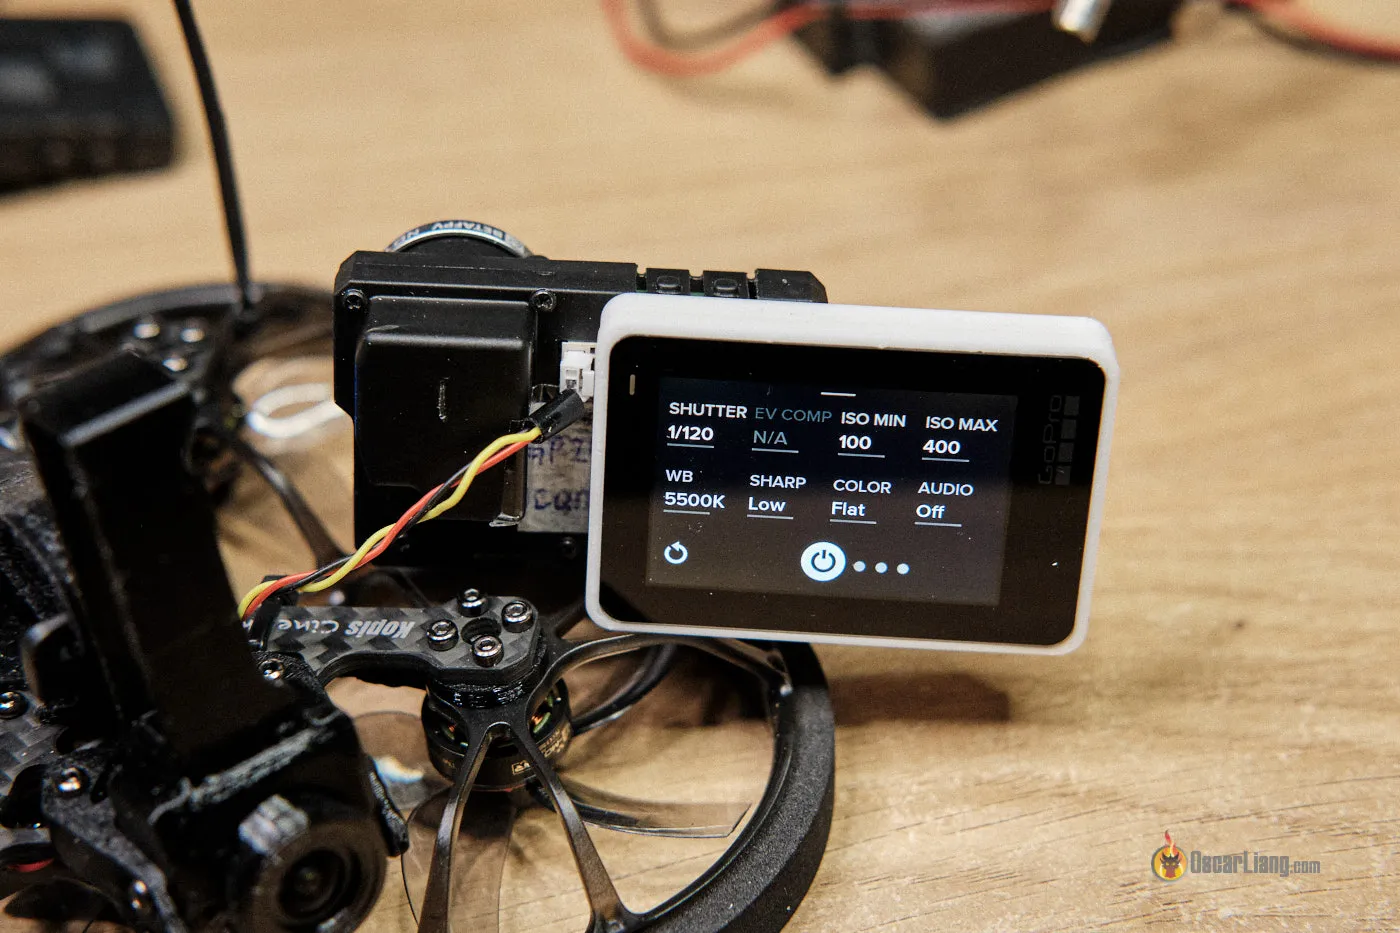
GoPro Camera Settings
See tutorial for the best settings for GoPro, and what each setting means.
Here are screenshots of my Hero 6 settings.


GoPro Hero 6 Disassembling Tutorials
Update (July 2020): You don’t have to decase GoPro, you can make a naked GoPro from spare parts, but the problem is spare parts are not always available.
- PDF Guide by JONAH BLAESER: https://drive.google.com/file/d/1_c4cd7SEur8U4LQd1I4wZcdU6wjaEPDH/
- Youtube Video by FPV Whoop: https://youtu.be/_LfcCYBOqAo
- A few tips from me after my GoPro 6 tear-down
Before taking the GoPro Hero 6 apart, you should do the following:
- Downgrade firmware to V1.6, it works best with ReelSteady Go as it has the highest tolerance with vibrations, tutorial here
- Pair GoPro to the app on your phone over WiFi (so you can change settings later)
- Write down WiFi password
- Change WiFi band to 2.4GHz, if you leave it on 5.8Ghz it might interfere with your video signal
- Change camera settings to your preference
- To avoid further problems, I also turned off the following settings:
- In-camera stabilization OFF (Hypersmooth)
- GPS OFF
- Auto-rotation UP
Once you finished the tear down, you should test it by connecting USB module, buttons and touch screen to the logic board:
- connect USB module to logic board, then connect USB cable, hold down power button to see if the GoPro powers on, is there image showing on the screen?
- try recording to see if it functions normally
If these are working, then it means you haven’t’ damaged your Gopro :) Congrats!
Hero 6 Pin-out Diagram
Pin out and connectors:

Hero 6 Logic Board Connector Part Numbers:

Image by Jonah Blaeser
- I sensor: JAE WP21-S046VA1-R8000
- II USB: JAE WP25D-P028VA1-R8000
- III buttons / GPS: Hirose DF37NB-30DS-0.4V
- IV touchscreen: Hirose DF37NB-16DS-0.4V + DF37NB-10DS-0.4V
- V front LCD: Hirose BM20B(0.6)-10DS-0.4V
- VI battery: Hirose DF57H-4P-1.2V
How To Power Naked GoPro 6
The GoPro logic board takes 5V only, the best way is to use a BEC (aka voltage regulator, it takes the high voltage from LiPo and convert it down to 5V).
Make sure the BEC is rated at 1A as a minimum just to be safe. The Hero 4 for example is estimated to operate at 2.8W during recording without the display and WiFi, which takes 700mA at 4V.
It’s more reliable to have a dedicated BEC. You might be able to power it from your flight controller, but I don’t recommend it because the lack of current may cause the gopro to reboot or stop recording randomly.
Using USB-C Port
The easiest/safest way is to power the GoPro via the USB-C Port.
You can buy a USB-C male connector (https://amzn.to/2Uaqoua) with solder pads.

And plug it straight into the USB-C port of the GoPro, then connect it to the logic board.

On the same USB-C connector part, you could also scrap the PCB or ribbon cable to expose the copper traces for 5V and GND. You could even cut the ribbon cable and solder directly to it.
These ways can save a bit of weight, but they are quite risky, only for advanced users.

Diagrams by FPVWhoop
5V Pin
Thanks to Kim Tang for this idea, you could solder the 5V wire to this capacitor shown in the following image. Make sure you double check with your multimeter to confirm you have the right location before soldering.

This allows very clean wiring, no need for the USB-C connector at all, but the solder point is quite tiny so do this at your own risk.

BetaFPV BEC Board
With the BEC board from BetaFPV, you can power your GoPro directly from a LiPo battery (2S to 4S) as it has a built-in 5V BEC. It sits directly on top on the main board and have a small profile. It breaks out the buttons and LED and solder pads, making it super convenient to use. You can use this on the GoPro Hero 6 and 7 Logic board.
For more detail see my review.

Some people don’t like the 5V BEC on those BEC boards, and prefer to use external ones which is more robust.

Extra Power Filtering For BEC Board
Some people prefer to run an extra BEC, or even capacitor and shock absorber before the BEC board as extra buffer.
Filtered power to the GoPro is never a bad idea. However, the common issue with most of these BEC boards is that it allows a much higher voltage spike to make it through, while it’s only supposed to provide 5V.
Yes you can use all the methods we mentioned, but the easiest way to mitigate this is to add a capacitor to the 5v output of the BEC. Even a small 10v 220uF capacitor in the right place can soak up part of that spike. Bigger low ESR caps are of course welcomed!
Power GoPro via the Battery Connector on the Logic Board
To use the battery connector on the main board to power the GoPro, you’d have to destroy the original battery and get the PCB inside to wire the + and -, and it’s not always reliable therefore we do not recommend it.
If you still want to do so, make sure the voltage does not exceed 4.4V. You also need to use the PCB inside the original battery because one wire is for 1wire comm for the gopro to detect a valid battery. Also it seems the battery connector uses red as GROUND and blue as POWER, this should be double checked.
“Auto Power On” Hack
Connect PWR pad to GND. See Yellow line at top right corner of the pinout diagram. As soon as you give it power, the GoPro will turn on. This emulates the power button being pressed permanently.

How to Start and Stop Recording?
There are 3 ways to control recording:
1. Connect the REC pad on the GoPro to your flight controller, and configure it in Betaflight, so you can start and stop recording with a switch on the radio; However I’ve found this to be unreliable, sometimes it works great, sometimes it doesn’t. According to Jaro Meyer, PinIO in Betaflight initializes in high state and causing the GoPro into DFU mode, and you will get a solid red LED, and the GoPro doesn’t respond to anything. Restarting the GoPro usually fixes it, but with the Hero 7, it might stuck in DFU mode so avoid using this hack.
2. You can connect the original shutter button, the benefit is you will also get Audio, because the microphone is located on the same part
3. Using the record button on BetaFPV BEC Board. Probably the most reliable and headache-free method, recommend
Note: Some people believe connecting the GoPro to the FC is unsafe, while some don’t trust the BetaFPV BEC board either. I’ve personally tested all these methods and all seem to work. Anyway use whatever you want, and do so at your own risk.
Here is how Method 1 works.
First of all, you need an FC with a Buzzer- pad (buzzer negative pad). Connect the record button pad (REC in pinout diagram) to the Buzzer- pad on your FC.
In Betaflight CLI, enter “resource” to find out the pin number of “BEEPER 1”.

In my case it’s B02, but this could be different on your FC. Enter these lines in CLI (remember to change pin number!)
Resource beeper 1 none
Resource pinio 1 B02
set pinio_box = 40,41,42,43
Save
Finally, assign a momentary switch to the new USER1 mode in the Modes tab.

How it works:
- toggle switch to high = pressing record button
- toggle switch to low = released button
- Now it’s recording
- repeat 1 & 2 to stop recording
- give the gopro a few seconds to save the video before powering off, otherwise you could lose/corrupt the video
We are using the radio switch to simulate the record button, but sometimes if you leave the switch HIGH for too long, or not long enough, it might stop the recording unexpectedly, and that leaves you with a 2 or 3 seconds clip. Practice with your timing with controlling the switch, until you get it working every time.
Adding LED Indicator and Buttons
I highly recommend adding LED indicator to your naked GoPro, so you know whether you are recording or not. There are a few easy ways to do this.
0. BEC Board Buttons
There are buttons (Shutter and Mode) on BEC boards, so that’s handy. Some people don’t like the 5V BEC on the BEC boards and prefer to use their own 5V BEC, so they cut them and only keep the buttons, you can keep the connector so it’s plug and play, or solder the buttons directly to t he logic board.

1. Original LED at USB Port
Insert the small original LED back to the USB port. This LED circuit is attached to the USB port plastic holder with weak adhesive, which we removed during teardown, so many people forget about this part.

2. Solder LED to USB Port
Solder LED to USB-C Port solder pads, credits to Hirotoshi Adachi. Be extremely careful with placement, you should secure the LED in place. Any pressure on the LED might rip the copper pads as they are very tiny! (speaking from experience!)
Consider using wires between the pad and LED, instead of direct soldering just in case! (same for other pads on the logic board) There is no fix once the pad is damaged, you can’t scrape the PCB to expose the copper trace because it’s extremely tiny!

You can use normal 3mm LED’s, or surface mount LED such as oshr1608.

3. Original Button/LED Ribbon
Use the original buttons and LED circuit. Bonus is you also get access to audio because the microphones are located on the same part. However it’s quite big so not easy to mount.

You could wrap the ribbon around the logic board like this, which is what I did in my Umma85 build (after the build log).


WiFi Related Hacks
Solder WiFi Antenna
Take a piece of wire and solder it to the wifi antenna pad. This should improve wifi range, and possibly help reduce the heat built up in the main board.
Since we are using 2.4GHz, the length of the antenna should be around 31mm (see article for reason). If you use coax wire which has a shielding, you should solder the shielding to a ground pad on the board.

Turn On WiFi Through SD Card
If you don’t see the GoPro WiFi network, it’s possibly not switched on. Here is how to turn on the GoPro Hero 6 WiFi automatically upon power-up. It’s only tested on GoPro 6 (FW 1.6).
You will need the wifi password in order to do this. You can get the Wifi password by attaching the touch screen to the GoPro, under Connectivity menu. You might also be able to find it on your phone’s saved network if you connected to the GoPro before.
Create a file called “gpauto” without any file extension in the root directory of your SD card. Open it as text file and add two lines inside:
your_gopro_wifi_password (replace this line with yours)
gpsend WM%01;
Save, power on the gopro, wait 10/20 seconds, reboot.
To turn this feature off, change the second line to gpsend WM%00;
Change WiFi Password/Network Name
Same method as above (how to turn on wifi through SD card).
your_gopro_wifi_password (replace this line with yours)
EVssidprimary,newGoproName
EVpassphrase,newGoProPassword
Lens Protector
Make sure you use some sort of protection on the lens, if you scratch it that’s irreversible. Here is a 3D printed lens protector: https://www.thingiverse.com/thing:4035039
ND Filter / Lens Protector
An ND filter also acts as lens protector. This article explains why you might need an ND filter.
ND Filter for Mavic 2 Zoom
You can use the ND filter designed fro the Mavic Zoom on the naked GoPro Hero 6. The form factor makes more sense for both aerodynamics and weight, and it doesn’t come off easily in crashes.

I ordered this on Banggood, it seems to be the cheapest option I can find: https://bit.ly/2MCAY8O. There are more on Amazon: https://amzn.to/3cLmsq5, I got a set of 3 (ND4/8/16) for $20 which is not bad either.
The filter plastic might show a tiny bit at the corners when shooting 4:3, but it’s not visible after ReelSteady and barely noticeable when shooting in 16:9 Superview.
You will also need this adapter to use Mavic Zoom filter: https://www.thingiverse.com/thing:4383549/files
Other ND Filter Options
Here is a different option: https://cults3d.com/en/3d-model/gadget/stripped-naked-gopro-hero-6-lens-bayonet-and-attachments-hulabaloo
Which ND Value?
You can’t just slap the ND filter on and hope it works. You have to play around with ND value and shutter speed combination on the day of filming to get the best result.
Just to give you some ideas, on a sunny day, I usually record in 2.7K 60FPV, with 1/120 shutter speed and use ND16 ND filter. For sunset and early morning I normally use ND8. If you only have ND32, you could try 30FPS and 1/60 shutter speed. However I prefer a little faster shutter speed because I actually don’t want too much motion blur, as I’ve been told, Reelsteady handles it better that way.
Make sure you check in the GoPro App preview to ensure the image is not over-exposed (or use computer to check footage if you don’t have GoPro App). By the way, I think it’s better to be under exposed than over-exposed, as it’s more likely to recover the detail, and also it’s less likely to get oscillations in your footage.
Touch Screen Case
This mod is awesome, by putting the back LCD in this 3D printed case, it becomes a detachable touch screen for the naked GoPro. It’s designed to be used with the BetaFPV GoPro Lite Case V2.

It’s super convenient, you can check and change camera settings anytime and anywhere, it doesn’t depend on the “hit and miss” WIFI and phone app. It can be shared between multiple cameras too.
The challenging part is removing all the plastic around the touch screen. I basically use this case and follow its instruction to do this mod: https://www.thingiverse.com/thing:4791475

Using GPS
Don’t throw away the GPS module from the GoPro, you can actually use it on your FPV drone! Works with Betaflight and iNav. See here for how to setup.
Here’s the pin out:

Drone Setups for Naked GoPro
By using something like the BetaFPV BEC board and case, you can use the Naked GoPro on almost any drone with the right TPU mount.

I’d recommend getting a drone that’s designed to carry the GoPro rather than building it from scratch. It’s way harder, and repair is a nightmare speaking from experience :)
Currently (Mar 2021): I’d recommend the BetaFPV 95X V3 and Holybro Kopis Cinewhoop.
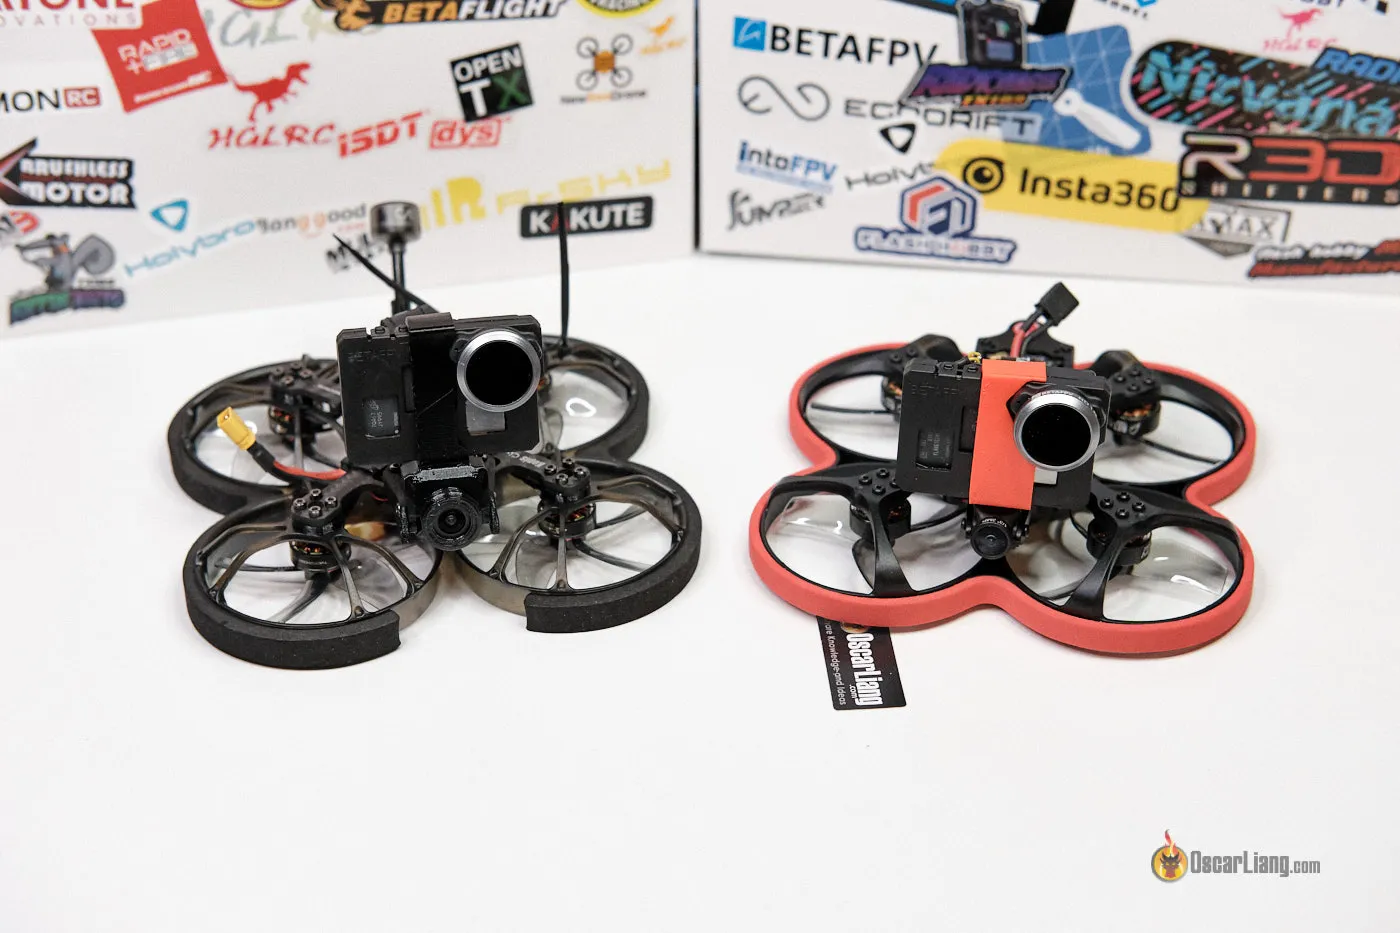
Two Popular Frame Sizes: 85mm and 95mm
If you decide to build it by yourself, there are two popular frame sizes you can pick.
The Beta85X (85mm) and Beta95X (95mm) frames are probably the most popular frames for naked GoPro builds. The Beta85X supports 2″ propellers, while the Beta95X supports slightly larger 2.5″. The number 85 and 95 are the distance between the diagonal motors.

Frame choice: the Beta95x can run larger 2.5″ props, hence is more powerful and more stable in the wind, but it’s also slightly louder. The Beta85x is overall smaller and can go through tighter gaps, also it makes slightly less noise which might work better indoor. However it’s not meant for fast flying and acrobatic moves.
There are two types of builds based on how you mount the GoPro logic board:
Normal mount (vertical):

Flat mount:

Flat mount has a lower profile with better aerodynamics. But as you are mounting the lens and mother board separately, perhaps it’s a little riskier and more work when it comes to building and maintenance.
Normal mount usually uses a light weight protective case (either in TPU or carbon fibre) to house the whole camera.
Popular options for flat mount are the Umma85 and Umma95 designed by Ummagawd. Here are my build logs:
Parts List
Instead of getting all the individual parts, you might find it easier to just get the pre-built model:
- Beta85X RTF: https://bit.ly/2YnAh99
- Beta95X RTF: https://bit.ly/2UkKKkf
There is still some DIY to do though, but you are getting most of the components needed in one package, which is handy.
You can also get the components individually and build it from scratch. It gives you more control what parts you want to use and how to put it together. Here are just some suggestions.
85X Setup:
- Beta85X Frame: GetFPV | Amazon | RDQ | BetaFPV
- BetaFPV F4 12A AIO FC: GetFPV | BetaFPV
- BetaFPV 1105 5000KV: RDQ | Amazon | GetFPV | BetaFPV
- Emax AVAN 2″ Micro Props: Banggood | GetFPV | Amazon | RDQ
95X Setup:
- Beta95X Frame: https://bit.ly/2XJkB0R
- BetaFPV F4 16A AIO FC: https://bit.ly/3gVdSbs
- BetaFPV 1106 4500KV: https://bit.ly/37c6cgK
- Gemfan 2540×3 Props: http://bit.ly/2HIqcxJ
Other Parts (works for both 85/95)
- Nano FPV Cameras
- VTX
- Upgrade VTX Antennas
- Radio Receivers
- Battery Strap (10mm x 130+mm): BetaFPV | Banggood | Amazon
- Battery Pad (3+mm thick): RDQ | GetFPV | Amazon
For Batteries, see my LiPo recommendations, 4S 450mAh and 3S 450-550mah are good sizes.
3″
3″ is not as popular but it’s picking up in popularity as it’s larger and more stable, works better in windy condition too. I will share info when I have more experience with this setup.
BF Settings for Cinematic flying
Betaflight 4.2
There is a CLI snippet for cinematic flying, If you have not tried it yet, give it a shot, it’s awesome and suits the flying style of our little naked tools very nicely.
https://github.com/betaflight/betaflight/wiki/4.2-Tuning-Notes#Quick-settings
Tips and Friendly Reminder
Naked GoPro is cool, but not without problems. Here are some tips and things you should be aware of.
Limitations
There will be no audio as the microphone is located on the button module – not a biggie for FPV as we normally put sound effects and music over the video anyway; however you can retrieve the button module and connect it to the logic board if you want audio desperately.
There is no LED indicator, so you won’t know whether you are recording or not. It could be annoying to only find out you didn’t record anything after an epic flight. It’s best if you put an LED on your naked GoPro as we explained here.
Durability
Naked GoPro’s are fragile due to the lack of housing. The ribbon cables can tear, therefore take good care when attaching/unplugging connectors. For those connectors that don’t need to be disconnected you may want to use some kind of removable glue (E6000?).
You might also want to use silicon conformal coating on the exposed PCB to improve water resistance. It also help protect the tiny surface mount components from falling off as it’s basically like glue. However, do not coat the connectors or you could break it!

Overheating
Covering the front chip entirely could lead to overheating, it’s a good idea to use thermal paste and a mini heatsink.
Mounting
You can mount the GoPro flat and bend the camera ribbon cable so the camera faces forward. Reelsteady Go will work, but it won’t work with horizon lock. To use horizon lock in this case, you have to patch the raw footage first (How? See section “Lock Horizon” in this article)
Save Recording
If you power down the GoPro without stopping recording, the file will be corrupted and you will lose your footage. Make sure you stop recording before disconnecting your battery.
Light Leakage
Some units has light leakage issue, which is noticeable when flying under the sun or light source. This is caused by the light going through the semi-transparent glue between the sensor board (back PCB) and lens housing.
Easy fix is just to put some electrical tape over it. Credit to Tommy Tibajia for this tip.

SD Card & File Size
If you record in 2.7K, 64GB is generally enough in most cases. A 3-minute flight takes about 1.4GB – 64GB shgould allow 2 hours of recording :) See my SD card recommendations.
Current Consumption
Credit: Witek Ewert
OFF:
- 50mA fully off, 250mA off but CPU running
Stand-by:
- WiFi ON, Screen OFF 351 mA
- WiFi OFF, Screen OFF 306 mA
WiFi ON Screen ON, Brightness with Back Touch Screen attached:
- 100% 433 mA
- 75% 374 mA
- 45% 357 mA
- 10% 338 mA
GoPro app preview (4K | 50 | W):
- screen 10%: 412 mA
- screen off: 370 mA
Recording:
- 4K | 50 | W 809mA
- 2.7K 4:3 | 50 | W 845mA
- 2.7K 4:3 | 50 | L 777mA
- 1080 | 50 | L 662mA
GoPro Hero 6 Spare Parts
- Main board: https://bit.ly/2YkmYHz
- Lens and sensor: https://oscarliang.com/product-as94
- Lens Only: https://bit.ly/2CluNUJ
- USB port: https://bit.ly/2V4Xwng
- Front LCD : https://bit.ly/2Cicpft
- Buttons: https://bit.ly/3eimDdW
- Touch Screen LCD Display (with/without housing): https://bit.ly/2NbPkgK
- Touch Screen LCD Display Only: https://bit.ly/2BnFGF9
- Housing Only: https://bit.ly/3fUny4X
- Front cover: https://bit.ly/3ejs38L
- Side Door for HDMI/USB: https://bit.ly/2YhiVvy
- UV Filter Lens and Side Door: https://bit.ly/2V2tZKS
Prepare for the Worst
If you decided to invest in this project, do prepare for the worst as things don’t always go your way. Decase GoPro is extremely flimsy and fragile, a damaged lens module and motherboard costs $70 to $100 each to replace. I have damaged 1 GoPro board so far which I consider pretty lucky compared to some others :)

Any questions, please let me know in the great forum – IntoFPV. I try to check blog comments regularly, but it’s hard to keep up and so i use the form more frequently.
Edit History
- April 2020 – Article created
- May 2020 – Added info regarding auto power and starting recording
- June 2020 – Added info about WiFi connection, and my Umma85 build, where to buy spare parts; Moved all info for the Hero 8 to a separate post, will focus on Hero 6 solely in this post
39 comments
Hi. Unfortunately I did this before reading your article, and now my Hero7 is stuck in DFU mode as you’re describing it with a solid red LED. How do I get it out of DFU mode?
Does anyone know of a mod/3d print to make the naked gopro 6 fit into the supersuit?
Thanks for all this. Mine works a treat, great footage. Am using the BLE app as WIFI only seems to work with the GoPro battery plugged in…?
This is an incredible guide! Thank you!
Do you think it is possible to show the recording indicator on the OSD by pressing a button from method 1(betaflight buzzer)? Like red REC circle on regular cameras.
Hi. I’m Francesco from italy. Thanks for the article.
Do you know where can I find pins for the microphones on the main board? I would connect 1 or 2 mini microphones to have audio when I use my naked hero 6 not for fpv.
I do not have microphone flat cable
Thanks
Sorry I have no idea, but You can connect the original shutter button, the benefit is you will also get Audio, because the microphone is located on the same part
I had my gp6 connected to my iPhone , I destroyed my display and go naked.
So now I had to reflagged fw on gp6 and now I can’t connect to the phone anymore. Maybe u know how I can read the gp6 WiFi password out of my iPhone?
Thx greets from austria
that’s not a gopro question, but an iPhone question isn’t it? :D
Sorry I am not an iPhone user so not sure if you can get the password from an existing network, maybe google that?
Last resort would be buying the touch screen as a spare part, listed at the bottom of the article.
Hello! What you thing about GPS module? It has a connector on it and also 8 control points (4×2) and I guess its possible to find GND/VCC/TX/RX and use it on our drones as normal one but small GPS module. I can’t find wiring/pcb schematics for GoPRO 7/8 where GPS is available. Can you help?
Hi mate, I did the go pro 6 tear down. I can connect to the go pro via wifi. I can’t seem to connect it to the app though?
Any ideas?
Hi Oscar great article!
After updating the go pro app I cannot see or change the advanced video settings like iso ,shutter etc …
The camera is great and there’s no problem with connection to the app but all the advanced settings disappeared and can only changed with the screen…
The new GoPro App removed those features including shutter speed.
Only way around this is to revert back to the old app, someone commented where to find APK of the old app, maybe it’s useful to you:
https://oscarliang.com/gopro-settings-fpv/#comment-56325
Any ideas what may be causing white horizontal lines to be showing up in my recordings? Running the BetaFPV naked GoPro kit and powering it from the battery with a balance connector.
Maybe electrical noise / voltage spikes from the motors?
Try adding a low ESR capacitor at the power input of the voltage regulator that powers your gopro.
This guide is amazing! I was wandering… I just changed my phone and I can’t connect to the wifi. I’m quite certain I need to reconnect the screen so that I can click on the connect to GoPro button. What do I need to reconnect??
No, you just need the wifi password from GoPro to connect to new phone.
How to get audio recording ? Is there some hack around ? Or a board that has that functions.
It is boring to fly without audio :(
The PDF guide you’re linking to says that the six screws are T4, but they are actually T3. Now I’m missing the right screwdriver and can’t continue. Frustrating…
I did conformal coating by protecting the connectors with masking tape. I get the solid RED light. anything to do ? I tried cleaning the connectors with alcohol but still the RED light. any troubleshooting for that red solid LED ?
I figured not so already ordered a HERO6, but wanted to check.
remove all soldered wires, and check for solder balls?
heyhey, i have stripped a gopro hero 5 black and want to power it. my usb c port broke so i have to find a solution. i thoiught of using the battery 4,2 and battery gound, but on your diagramm is only the ground. do i need to get a 3,8-4,2 bec
greetings
I will explain how I destroyed my hero7 board, in case someone finds it useful.
I used two step down becs in series to power the board from a 6s lipo.
6s Lipo 25V –x-> iFlight Mirco BEC 12V 2A —> Betafpv mod bec 5v —> Gopro board.
I did not consider that when plugging the lipo in, there will be a voltage spice through both becs, and there is not enough time for the voltage to be regulated.
Eventually, I destroyed the power circuit of the hero7 board, and now it turns on only when plugging in both a USB c charger and the gopro battery.
The next try will be, power the becs from two middle cells of the balance cable of the 6s lipo (8.4V), and may also add a small capacitor. Hopefully, the four outer cells of the lipo will absorb any possible voltage spikes, coming back in from the esc.
Most important is to plug already regulated voltage to the Betafpv bec last
6s Lipo balance cable 8.4V—> iFlight Mirco BEC 5V 3A –x-> Betafpv mod bec 5v —> Gopro board.
I hope the above may save anyone from unnecessary trouble.
So how do you fixed hero7 board with destroyed power circuit? i have the same issue now.
My understanding for your next try is, there was another board.
So I have a naked Hero 7 Black that was working just fine with the BetaFPV BEC Board. I cut the record wire to avoid the DFU issue, but despite that I got the dreaded solid red light after a few flights.
Based on your description, it sounds like somehow this got stuck in DFU mode. Any ideas on how to get it out of DFU mode? I’ve returned everything back to stock parts and I still get the red light using the original battery, as well as USB-C to power the Gopro.
Why no one uses naked Session 5? I have three …
Because no stabilization.
Great article Oscar!
Your website is the main source of knowledge for me when building umma85. I am still looking for knowledge how to solve my problem. I need a buzzer on board umma85 but at the same time would like to run gorpo recording from the radio. Is it possible to use the LED pad on the FC to run REC gopro by connecting to the pad rec on the board bec betafpv. Your article states that only the FC Buzzer pad can be used for this purpose. Information about the possibility of using the LED pad on fc can be found in the description of BEC board on the betafpv website. I’d like to be sure and not fry the gopro board.
A lot of people are having problems following instructions on their website by connecting the REC pad to the FC, including myself, the GoPro just gets stuck and have a solid RED LED.
That’s something you should only do at your own risk.
Is it possible to replicate this using the hero 5? The hero 5 board is much more affordable these days.
No because it doesn’t have any way of image stabilization .
is the gopro screen absolutely necessary?
Not necessary if you already have the Wifi password, you can just use the mobile app.
But it’s handy to have for testing and stuff.
Well done. I’m a big fan of this new trend. You mentioned 3inch. Ive had some good success converting this platform onto 3inch:
youtu.be/WhqkDlsi_hY
Ive since made some good durability improvements, will be posting an update soon.
awesome tutorial,
Good Job! Very informative, clear, easy to follow, excellent pictures. Thanks
Wow, I learned a lot in this article of yours. I wanted a small GoPro Whoop for a long time, since I saw Robert Mcintosh’s video cruising along Muscle Beach. But he was using a GoPro 4 then and no real protection for it whatsoever.
Fast forward I just ordered the pre build version from BetaFPV and can’t wait to get into the air.
Super nice overview- took me couple of weeks and quite some reading through fb groups and yt channels to gather the information you have on this blog-awesome work man!!! Also on the gpauto command- didnt get my one back to working but thanks for your work! keep it coming!
Hi,
Thanks for the article.
What do you think about using this FC (4S, 12A) https://betafpv.com/collections/brushless-flight-controller/products/f4-2-4s-aio-brushless-flight-controller-12a-blheli_s instead of the 20A ESC version you recommend, with 1105 5000kv motors ?
What would be the difference flying the drone in your opinion ?
I have not tested this, but on the page recommended combo it listed 1105 5000kv motors is okay on 4S, so i supposed it’s okay?