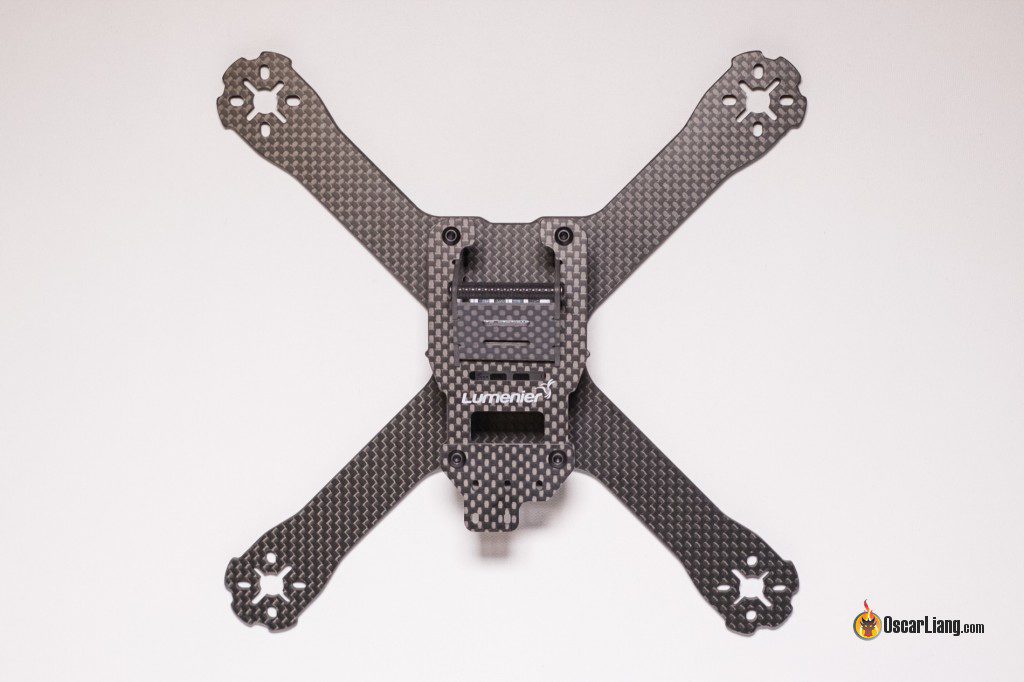
In this review & build log, we have the Lumenier QAV-X racing mini quad frame 4mm version.
This QAV-X frame is provided by GetFPV.com. This review is written by Artur Banach.
Frame Overview
What comes with the frame package:
- 4mm unibody main plate
- 2mm top plate
- 2 x 1.5mm camera sidewall plates
- 1.5mm HD Camera mounting plate
- 1.5mm battery protector plate
- Lumenier 4Power Power Distribution Board
- 4 x 28mm knurled spacers
- XT60 16AWG pigtail
- Neoprene foam tape
- Lumenier Lipo strap
- Hardware
QAV-X is a square unibody, true X racing frame for 5″ props (maximum), where the width and length of the frame are the same. Motor to motor distance is 214mm. Top plate is held in place by 4 standoffs.
The FPV camera is supported by 2 side walls, which also give the HD camera a 35 degree tilt.
There is a cut out at the back of the top plate through which allows you to change video channels. Additional antenna mounting plate can be used to support the VTX antenna.
It’s recommended to use 1300-1500mah size batteries mounted underneath the frame.
Fully assembled frame weights 92g which is pretty good for a frame with 4mm unibody bottom plate.
Table of Contents
Good things about the frame:
- Well-thought-out design, compact and light with attention to detail
- Easy to assemble
- Comes with power distribution board (Lumenier 4Power)
- One mounting solution for FPV camera and HD camera. It reduces the space inside the frame by lifting the camera location up. No need for messy DIY HD camera mounting or 3D printed parts
- Very good quality carbon fibre
- Bottom plate is very stiff, it is really hard to make it bend
- Frame comes with XT60 pigtail (AWG16)
- Frame comes with the single plate lipo protector and foam pads
Disadvantages:
- Very little carbon fibre around the motors locations. Motors could get damaged more easily with less protection
- Price is on the high side
- Cut-outs for the lipo strap in the bottom plate are only for the small velcro strap. Standard lipo velcro straps won’t fit in there
- Arms are a bit wide – which could cause drag and slows down the quad when flying forward. Wide arms are also heavier
- Screws supplied with the reviewed frame were a bit too short to hold the standoffs on 4mm bottom plate. Not sure if it was a mistake or the 4mm version normally comes with such short screws
QAV-X Build Log
Parts list:
- Cobra Champion 2205 2300kv
- DYS XS30A ESC
- Air32 Flight Controller
- 4power Lumenier power distribution board
- HS1177 FPV Camera
- Aomway 200mw Video Transmitter
- FrSky X4R-SB Radio Receiver
(For more component options check out Mini Quad Parts List)
Before I started building I prepared the carbon fibre edges using diamond files under the running water. It’s important to remove the sharp edges and also making them less prone to splitting during crashes.
Bottom plate
Motor wires were shortened and soldered together with ESCs.
Installing motors on the arms. Putting the lipo Velcro strap through the cut-outs and attaching power distribution board. Using electrical duct tape to secure ESCs on arms.
De-pinned X4R radio receiver before sliding it underneath the power distribution board. That saved a lot of space and secured it well between bottom plate and PDB.
Soldered color switchable LED lights directly to ESC pads.
Because of limited space I decided not to use any LC filter but just one single 470uf 25V capacitor. I used this same trick in the Alien Mini Quad build. Capacitor was soldered directly to the AUX2 pad on PDB and video transmitter power wires were soldered onto the same pads as well.
Soldered the ESC signal wires directly to a flight controller. Power to the FC was taken from the AUX1 pad. It also serves as VBAT.
Because I wasn’t running any voltage regulation on the PDB, I had to bridge VIN and VOUT together with a piece of a silicone wire in order to use AUX without regulator.
Installed FC on the standoffs, tidied up the wires and attached LEDs onto arms using zip ties. Radio receiver antenna was wrapped around the frame rear standoffs and attached to the cable ties.
Top plate
Installing the camera in between the sidewalls but I didn’t use camera screws before sliding it into the top plate. My HS1177 has top connector.
Attached video transmitter to the underside of the top plate as far as I could see the dip switches form the top via dedicated cut out. Using zip ties I tied the Spironet antenna to the top plate. Used a piece of foam to adjusted the level to avoid Aomway pushing against the flight controlled after top plate is installed.
FPV camera was connected to video transmitter directly.
Thanks to this configuration, there was only single wire (power to video transmitter) that was connecting bottom plate with the top plate. It helps when dissembling the frame for potential repairs or components replacement.
It took me only about 4 hours to build from scratch. My new personal best :)
Weight
- Fully built QAV-X on its own weights 356g
- With Dinogy Graphene 1300 70C 4S it weights 510g
- With Dinogy Graphene 1300 70C 4S and the GoPro 4 Black it weights 616g
It is certainly not the lightest racing build (with the GoPro) but we need to bear in mind that Cobras and XS30A are pretty heavy components. If I was using Cobra 2204 2300 motors and XS20A ESCs I could have saved about 35g. Using Cobra Champions and XS30A made this quad 5S capable! :)
Photos of Finished QAV-X Build
Conclusion
The QAV-X is a very well-thought-out and minimalist design. Initially I thought that the build was going to be quite complicated, it has proven myself wrong. The best feature was the double functional camera mounting solution. We gain more space insdie the cage by moving the FPV camera up, which makes fitting components inside a lot more straight forward. I have so much room that I could even fit a capacitor in there, which wasn’t that small. Overall QAV-X is great frame and I really enjoyed building it.


19 comments
the tbs antenna for video transmitter keep rotating left and right and hitting the propellers, they dont stay upright like yours, do you know a fix for that?
My build comes in at 553 grams with session and Battery (A tatoo R-line 1300)
I use a Betaflight F3, DYS 30A v2 Esc and TBS mr,steele motors.
Expencive frame, but really good!
One thing I noticed here is that you used 3 blade props in your build. Do you prefer 3 or 2 blade props?
i depends on the situation. If i am just flying on my own doing freestyle i prefer 2 blades, if I am racing with other people i use 3 because it gives me more speed and better response :) but shorter flight time
Nice pos. Btw where do you put the radio transmitter? I don’t see the RTX apply on your quad. Thanks
The RX is under the PDB
Hi Oscar,
Researching for my first build. Thanks for all the fantastic info here- I certainly will make a donation. Looking at your parts list here you list an Air 32 Flight Controller but I can’t find that one online. Is it a Naze?
google Air32 FC :) first result should be it.
alternatively check out the list of FC here: https://oscarliang.com/250-mini-quad-part-list-fpv/#fc
Thanks! I’m in US and couldn’t find it here and wanted faster shipping so ordered the SP Racing Mini FC.
Getting excited to receive everything in the mail. So far I have this coming:
QAV-X Charpu 4mm frame
X-Nova Hyper Racing 2205-2300kv motors
DYS-XS 30A w/BLHeli ESC
SP Racing F3 Mini FC
Foxeer 5.8G 40 Ch. Tm25 Switcher25/200/600 VTX
Foxeer HS1177 NTSC 2.8 FPV Cam
still researching… going to be fun to build.
Neat buildIs the capacitor trick as effective as a LC-filter? Just wondered if it removes the lines or is it just there to protect the vtx from voltage spikes?
Thank you:).
it won’t be as effective as a LC filter, but it would help reducing some voltage spikes.
Thanks Ocar!
So far I must say that used that trick on 3 builds and those builds have the cleanest video out of any quad I had with LC filter. Cannot confirm it with the science though:) Just sayin :)
Hi Óscar , do you have desync problems with dys 30a blheli_s? During flight i have desync issue with dtfc, xs30a and rs2205 2600kv. Thanx
Great post again!
It is a pitty that QAV-* do not fit Oscar’s/ IntoFPV straps…
LOL yea i agree, it’s a lost to the QAV’s side :)
I was waiting for your review to get some ideas to build my QAV-X (also the 4mm version).
Ended up buying the HS1177 camera with a top plug, just like you…
Loved the review!
But let me just tell you, that the first time you refer to the included XT60 connector (I mean, in the kit’s parts list), you say 14AWG. It’s 16AWG. The second time you refer to it, you say 16AWG, which is correct. Just mentioning it because some people might get confused.
Loved the idea of depinning the radio receiver and run it under the PDB. I’m gonna try that.
Curiously enough, just ordered 2 led sets like yours (mine are Matek. Not sure about yours…) but I’ll put them under the arms, because frankly, when we run these things they are angled so high forward that rear facing leds just end up pointing into the sky. XD Cheers!!!
Thanks for the feedback Bruno. Yes, we need to change the AWG information. Possibly just a typo. Regarding the camera connector, it was my bet, I confused the connector location with Helix frame I was looking at and that’s how got that information. In the end it was still better to have the connector at the top because I used a capacitor under the camera.
Regarding LEDs – eventually I’ve put them to the underside of the arms. As you said, angle of those things when they are in the are is pretty big and best visibility for the lights.
I’m glad you like the review!
Keep them coming Artur! ^^