ZMR250 is probably the most popular mini quad frame, because of its affordable price and practical design. However it’s not the most trusted frame due to the variable quality, and the large amount of fake carbon fibre frames on the market.
FPVModel.com very recently released a high quality full carbon ZMR250 frame. They call it the “V2” because they made a few exciting changes to the design, including an awesome PDB.
Let’s have a look! Get your ZMR250 V2 frame from FPVModel.com here. I will refer to the old, original ZMR frame as V1 in this post.
And here is the detail build log.
ZMR250 V2 Unboxing
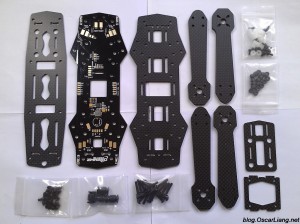
Just from appearance, you can tell right away the quality is better than the V1 frame you can find on ebay or Banggood. It includes top and bottom plates, an integrated PDB, 4 arms, some other bits and pieces. (I forgot to show the 8 stand-offs in the picture)
And here is how it looks after the assembly.
And with the LED on.
Whole frame weights 185g (take away the weight of Power plug). It might seem a bit heavy, But mind you, 190g includes power distribution, LEDs, UBEC and filter, enhanced arms and body plates. You really cannot just simply compare the weight with a naked frame.
Enhancement from Original ZMR250 Frame
So what’s better on the ZMR250 V2 compared to the V1 frame? To Summarize:
- Integrated PDB, with built-in LEDs
- Better Carbon fiber
- Thicker arms and plates
ZMR PDB – Power Distribution Board
PDB can make wiring so much cleaner. There are many PDB that are designed for the ZMR, sold separately. Some of them are so popular they go out of stock within hours.
One of the good example would be the Overcraft PDB, and interestingly, the PDB included in this frame looks like an early version of Overcraft PDB (allegedly revision batch 3 ).
Features includes:
- Can handle 100A current Max (25A per motor)
- ESC Integration: You can solder your ESC power and signal wires directly on the board.
- 3S and 4S compatible.
- Onboard 5V BEC: This board uses a voltage regulator (L13603). You can power your flight controller and radio receiver with that onboard BEC (e.g. if you are using OPTO ESC). Alternatively you can also power the FC/RX with the BEC on ESC, there are solder pads provided.
- Easy option for voltage regulator if you are running 4S, and it requires 12V for video transmitter and FPV camera.
- 3 power options for FPV camera and video transmitter: 5V, Main battery voltage, or regulator voltage (12V on 4S).
- MinimOSD integration, it can be soldered under the FC that saves room, also simplify cabling a lot.
- Optional Buzzer solder holes: Buzzer is not included, but there are holes for easy soldering. Very useful if you lost your quadcopter in tall grass and you want to find it, or you want to setup your profiles without looking at the LEDs of the FC.
And I wanted to make sure the 5V regulator is working correctly with 3S and 4S LiPo batteries. I got 5.08V output on 3S (on the left), and 5.09V on 4S (on the right). Seller told me the 5V regulator can supply max 1A current.
This PDB can really make wiring simple yet clean. However the soldering pads might be confusing to beginners, and there is no documentation at the moment. So I spent hours checking all the pads, and drew a connection diagram. Hopefully that helps you understand how the PDB works, and where to solder your components and wires.
Some have concerns over not having GND with ESC signal wire. I am pretty sure that wouldn’t be a problem as I have been running my quad without ESC signal GND connected to FC successfully for many flights. But of course I think they should provide GND pads as well for ESC signal.
There should be enough room between the FPV board camera and the camera solder pads.
However it could potentially get obstructed by the ESC power solder joints. So make sure when you solder your ESC, make the joint as flat and low as possible.
The LEDs are not super bright, but they are visible even in day light. White at the front and red at tail, it really helps your orientation when flying line of sight.
But I have been wondering how to switch off the LED. Again, lack of documentation! I found two soldering jumping at the bottom of the board, not sure if they are for turning off the LEDs. Need to confirm with seller first.
Update on LED (12/07/2015): Seller told me LED is not possible to turn off.
Arms
Arms thickness have been boosted to 4mm, compared to 3mm in the V1 frame. Each arm weights 13.7g. For other ZMR arms, check out the Thug arms review (enhanced arms for ZMR250).
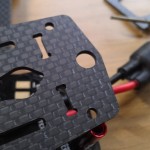
Look at the carbon fibre quality difference as well.
The shape of the arms are identical to V1, as well as the motor mount screw holes. That means we still face the same problem when using 2204 size motors (M3 bolts), we will have to drill the hole bigger.
Top / Bottom Plates and other accessories
Both top and bottom plates are also thicker with 2mm thickness.
The new ZMR frame has a matte finish, while the old version always has the glossy shiny surface.
They have made the hole on the top plate bigger, which is normally used to fix the VTX antenna extension lead. Before that, we had to drill the hole bigger ourselves.
Bolts used for arms are longer, and the vibration damping balls seem to be higher quality.
Possible Improvement
If FPVModel is ever going to make a V3, I think it would be nice to have these improvement.
Wider Arm motor mounts to protect 2204 motors
Bigger motor mount screw holes for M3 botls
Better documentation of PDB and it’s components, such as
- how much current the PDB can handle (answer: 100A)
- what’s the max current draw for the 5V regulator (answer; 1A)
- how to turn off LED (answer: not possible)
Build in 12V voltage regulator, or sell this PDB as an option for those who run 4S. (ideally has built-in power filter as well for FPV gear)
Why not include a buzzer in the package? They are so cheap! And it’s a pain the user has to buy them separately.
Maybe consider selling the PDB alone as well, lots of people who has already got a ZMR250 would love to get the PDB, and not break the bank getting a whole frame.
Ground solder pad for ESC signal.
MinimOSD solder pins misaligned. It will still fit, but you need to tilt the video signal and ground pins by about 10 degrees.
Solder pads need to be cleaned with alcohol before shipping out, they don’t solder very well, maybe oil on the surface from factory.
So, would you choose the V2 frame over V1?
This new mini quad frame is priced at $59. The V1 frame can be found $20-$30 on the internet depends on where you are getting it from, but you have no guarantee whether your frame will be full carbon fibre. Many crap ZMR250 V1 frames are made of Fibre glass.
To be honest, I don’t see anything that i haven’t seen before on this frame. Frame design is exactly the same, they only thickened the arms and frame plates. PDB is extremely similar to the Overcraft PDB if not identical.
Regardless the lack of creativity, I still think it’s worth the extra $30 to get the ZMR250 V2, not only for the reassurance of good quality carbon fibre, but also the PDB.
Update from FPVModel (27/Aug/2015)
We have now made something change to the PDB. It features ESC pads on the top and bottom of the board. Traces and main power distribution have been routed in a manner to avoid running under the arms. Optional 12V regulator w/ built in LC filter is now available.
Besides, the misaligned of MinimOSD solder pins now solved. Also, the arms for fitting 2204/2206 motors are selectable.


36 comments
hey oscar!
recently i bought a eashine racer250 quad! will this thing able to lift 880g with my gopro and 3axis feiyue gimble? using 5030 balanced props!!(expanable to 6030)
HI Oscar,
I’m in the verge of choosing between the Eachine Falcon 250 FPV Drone and the ZMR 250 V2. Which would you recommend is the better choice? I have a DJI Phantom P3 and have enjoyed that a lot and am taking the step into FPV racing so you know where my skill level is at – I.E no skills, but keen to have good gear to learn on :)
Thanks
Luke Rous
If you want to build it from scratch, go for the ZMR250 V2 :)
if you want something that flies out of the box, then the other one…
but i really recommend building your own, it’s fun to learn how to build :)
by the way, I recommend joining this forum, it’s very useful and there are lots of helpful people there. I am a daily user too :) http://intoFPV.com
Hi Oscar,
How do you wire the on board 5V Reg to power the FC? As far as i can tell the only power trace comes from the BEC pad next to the esc pads.
check my build log there are diagrams.
Hi Oscar, thanks again for your informative review. We have now made something change to the PDB. It features ESC pads on the top and bottom of the board. Traces and main power distribution have been routed in a manner to avoid running under the arms. Optional 12V regulator w/ built in LC filter is now available.
Besides, the misaligned of MinimOSD solder pins now solved. Also, the arms for fitting 2204/2206 motors are selectable.
Hi Roy
fantastic news :) thanks for the update, i will put a notice up in the review shortly.
thanks
Oscar
Hi Oscar, thank you very much for putting up the notice.
Hi Oscar,
I’m not convinced that the v2 is genuine carbon. If you take a close look at your pic of the 2 different arms, you can see the v2 arms are made with a single (very thin) layer of wavy woven carbon fibre either side and 4 layers of 3 ply fibreglass in the middle. The pic of the v1 is out of focus so I can’t tell if it’s similar construction. I also fly with ZMR frames and have seen 2 different arms. The first was like your v2 only 3mm. The second was genuine carbon but suffered delamination issues. In conclusion I would stick to the standard 3mm as they are lighter and stronger. The v1 is such good value that it’s hard to beat.
Thanks for taking the time to share your findings.
Hi Sean,
I think what you are referring to are just light reflections, there is no “woven layers” as far as i can tell.
Sean, If you test the resistance of these arms you will find that they are indeed, carbon fibre as fibre glass is an insulator and cf conducts electricity.
Hi Oscar.
I’m rather new to this, but are the arms long enough on the ZMR to fit 6″ props?
I really like your blog, lots of great info about all sorts of stuff, and has really helped me out getting started with this hobby. =)
HI Kristian, yes 6′ propls fits fine!
Hi Oscar !
Thanks so much for ask of your informative blogs. I chose this one as my first quad build and am so relieved to see the connection diagram. Thanks again, and looking forward to your build log of this quad!
Hi Oscar,
Am I right in assuming that if you wanted to fit a MinimOSD, the smartest way to do it would be to buy a MinimOSD that comes without pre-soldered pins? I notice that basically all MinimOSDs that have pre-soldered pins come with right angle pins whereas you’d only want straight pins in this application, wouldn’t you?
Cheers,
Andrew
that’s right Andrew. But it’s not mega difficult to remove the pins. I actually show how to do this in my build log, which I will publish tonight or tomorrow. Check back later :)
Hi Oscar
Just wondering how the Minimosd connects to the pdb? and does the PDB work with the KV mod minimosd that you recommend?
Also does it come with standoffs for the FC? or should I order them separately? I find the documentation on what exactly comes with the basic ZMR v2 package small bit wise.
I’m planning out a mid-grade 250 for a video/booklet series I would like to try and create about creating your own racing 250.
This is what I have so far but i’m probably going to drop down on the engine as they seem really nice but fairly pricy. If you have any comments please let me know!
Please note that some of the amp draws are just placeholder to add a tiny bit as they will be drawing amps but probably nowhere near as much eg. FC using 0.5 amps
Type Parts Weight (g) Amp Draw (Max) Voltage Price (USD) Notes
Frame ZMR250 V2 185 0.5 60 All of the nice things like LED, Great PCB like the really expensive gear.
Motors CM-2204/32 100 52 84 Expensive and maybe a litle too High end for middle range? 21 USD per unit
Props DF 5030/ GF 6030 6
FC Naze32 acro 7.3 0.5 16 25
ESC BL20A 7.6 44 Very good not overkill with 80% rule also not more expensive or much heavier than 16A version
FPV Camera 600TVL SONY SUPER HAD 25 1 12? 30
VTX ImmersionRC 600mW 18 3 6 to 25 70
OSD MinimOSD 10 0.2 Place holder mass? For OSD and RX
RX Orange RX 10 0.5 I have a few lying around
Battery 1300 40C/2200 25C 3s 188 11.1 13 1300 to 2200
Voltage regulators Not really needed as it should be kept simple at 3s. Possible later upgrade to 4s. Also built into frame?
Totals 556.9g 57.7amps 326 USD
Hi Nathaniel,
I have some connection diagrams I will publish in tonight or tomorrow in the build log, come back and check later. Both versions (with KV mod, and the original) will work.
It does come with standoffs for FC.
I like your part list, i think that should work well.
Hi Oscar
Thanks for replying I’ll check back later, I really enjoy your blog keep up the good work.
One more quick question, does it come with fpv camera standoff and if not what would you recommend. I mainly used Board cameras with cases on my scratch builds that just screw on so I have no experience with pre built frames. (tiny bit with pdb)
Again thanks for all the work you put into your blog, it’s a great help to a lot of people.
HI Nathaniel
you can simply use some foam and zip ties to make a tilted FPV camera with the camera mount :)
https://oscarliang.com/quadcopter-building-flying-tips-tricks/
so can i use Opto ESCS on this PDB once it has an onboard UBEC?
yes you can use Opto ESC, and it has onboard UBEC (5V regulator)
Hi Oscar
So I’ve ordered soem DYS bl20A OPTO ESC’s and the do not have BEC. I understand this pdb has a BEC onboard, but how do I wire that to my naze32. I’m a little confused on that portion. Do I need to power the onboard BEC separately?
Thanks a lot! I really enjoy your blog.
Hi Sirenz, sorry, i draw diagrams how to power your FC with the onboard BEC… which part isn’t clear to you?
can i add extra LED strips to this PDB ?…i really love LEDs…… :D
hi oscar, im looking to mount my FIRST fpv mini quad ever, do you think i will be able to figure out where and how to solder everything on this PDB? thanks in advance!!!
yes you should be able to figure it out :) it’s not mega complicated! but I will draw some connection diagrams in a day or two :) stay tuned!
you can solder LED on it, but there isn’t other dedicated places for LED….
Hi Oscar,
many thanks for this review, I just ordered this frame in replacement of my V1 version.
Your connection diagram is really great to understand how is made the internal PDB wiring.
I wish you could detail where you connect: the camera, the miniosd and the TX on this diagram.
I am not quite sure where to solder…
BTW, what are the “reg” pads (blue line) for ?
thanks
Sure! I am building this frame this week, hopefully i can upload some pictures in the build log and make a connection diagram as well!
“reg” means voltage regulator, it’s for people running 4S lipo to connect a regulator to get 12V for the camera and VTX.
What regulator would you use exactly here Oscar?
this one: https://oscarliang.com/3a-voltage-regulator-mobius-quadcopter-rc-model/
Hi Oscar
Nice! Found my next mini quad. Seems to be a durable frame and of good quality.
With the improvements of the zmr v2, any reason to spend $100+ on the so called “highend” frames (lumenier, blackout, etc)?
I am quite happy with the ZMR and I don’t think I will spend so much on a QAV or Blackout frame.
190g that looks really heavy… that’s 100 g more (= a gopro or 1500 extra mAh) than the lightest frames.
Can this frame be really a good choice ?
Mind you, 190g includes power distribution, LEDs, UBEC and filter, enhanced arms and body plates.
The lightest frame you are referring to probably is only a bare plastic body, when you add all these in, the weight will jump right up.