In this article we will review & build the Zuul Racehound V2 frame (Hovership), which is a H mini quad frame with replaceable arms.

The Zuul V2 frame was provided by Hovership. Review is written by Artur Banach.
Frame overview

Frame kit contains:
- 4 x 3mm arms
- 1.5mm bottom plate and base plate
- 1.5mm top plate
- Video transmitter plate
- 2 x FPV camera side plates
- 6 aluminium standoffs and hardware
- 3D printed spacers for base plates (13mm tall)
- Stomp Cussions (landing gear)
- 2 x Hovership battery straps
- Lipo battery grip pads

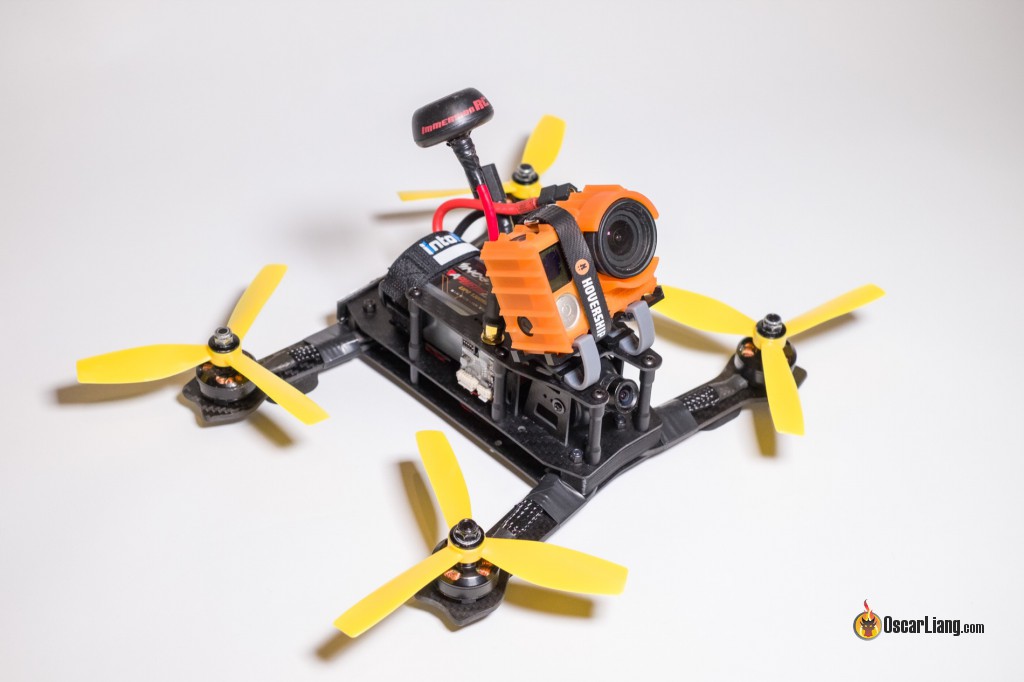
The ZUUL frame is an unique “H” shape design. The frame incorporates 3D printed spacers between the 2 base plates. The base section is only 16mm tall, but it’s designed to fit all the electronics components including ESC, FC, PDB etc in there.
LiPo battery can sit inside the fuselage and is protected by the top plate and standoffs.


Diagonal motor to motor distance is 235mm and it can fit 5′ or smaller propellers.


Video transmitter has a dedicated location and is supposed to be mounted on a small carbon fibre plate. FPV camera can be mounted using supplied camera plates.

Fully assembled frame weights 132g. Zuul can only take Lipos that are the same size as standard 4S 1300mah because of size limitation of the frame body.
![]()
Good things about the frame
- Good quality carbon fibre
- Very good COG (centre of gravity) with battery sitting low and in line with propellers
- Battery is well protected
- Easy access to video transmitter button or dip switches for channel change or replacement, without any headaches
- Better water resistance because components are well protected within the fuselage
- Many useful cut-outs in the sandwich plates for wire management
- Great extras bits and pieces included: stomp cushions, battery pad, battery straps
Disadvantages
- I found the FPV camera side plates are a bit loose, which causing a bit of a movement on the camera
- Video transmitter camera plate sits little bit too far outwards. Some thinner video transmitters may not fit there. Alternatively this additional plate can be removed
- Arms are held by only two screws and they bend a tiny bit (not much of an issue but worth mentioning)
- Battery sizes limited to 1300mah – 1500mah. With bigger batteries they will stick out the back when mounting inside the frame and COG would be shifted to the back.
- I wish they had added additional plate behind the FPV camera for bettery Lipo protection. On larger impact LiPo could move forward and hit the camera
- Lack of manual – it wasn’t easy to put this frame together without it. Even some experienced builder may encounter difficulties. Hovership makes really nice manuals for other frames. None was made for Zuul V2 (yet)
ZUUL Racehound V2 Build Log

Parts list:
- Cobra 2204 2300kv (will be upgraded in the future)
- Racestar 30A BlheliS ESC
- Air32 Flight Controller
- Matek PDB with 5V and 12V regulators (supplied by Hovership)
- HS1177 FPV Camera
- Aomway 220mw Video Transmitter
- FrSky X4R-SB Radio Reciever
- Hovership Camera Sled with Sled Mount
- IntoFPV battery Strap
(For more component options check out Mini Quad Parts List)
Before I started building I filed the carbon fibre edges under the running water. It removes the sharp edges and also makes them less prone to splitting during crashes. This is a standard procedure for mini quad frames that preserves life of carbon fibre.
Table of Contents
Bottom plate
Putting the arms, 3D printed spacers and bottom plate together. I used a piece of double side tape to hold the Power Distribution Board (PDB) in place, as well as separating it from the carbon fibre frame.
I trimmed all the ESC power wires to about 7-8mm and they are all double sided taped, then soldered to the PDB.

Next I Installed the motors on the arms, cut the wires to the correct length and soldered them on my ESC’s. To achieve a neat look, wires were secured inside the mesh.
ESC signal and Ground wires were also trimmed.
I also soldered wires for VTX and FPV camera, as well as the LED bars (bought separately).

In the meantime X4R-SB was de-pined and heatshrinked. I have measured wires length and cut them to suit. X4R-SB was soldered on directly to Flight Controller (FC).

FC was installed on the frame and ESC signal wires were soldered to it directly.

Now we could put on the top base plate with standoffs. FPV gear wires go through the cutouts. Looking from the side we can see how everything fits inside the frame perfectly.


Radio Receiver antennas were fed through the cut outs on the bottom plate and attached to the arms with the stomp cushions (landing gear). This solution was suggested by Conrad Furadi Miller who used to be Hovership pilot for a long time. Back switchable colour LED light power wires went through the gap between arms and the 3D printed spacers. Perfect fit.

Upper Part
This section contains Video Transmitter (VTX), FPV camera and top plate. Before anything else I fitted the GoPro camera sled.

Attached the VTX first and fed antenna via designated cut out. It is possible to install it on left or right side. My wires were on the right side so I decided to stick with that. XT60 wire was strapped to the standoff by few cable ties.


Weight
- Fully built ZUUL Racehound V2 Mini Quad weight (no battery and HD camera) 380g
- With Dinogy Graphene 1300 70C 4S it weights 534g
- With Dinogy Graphene 1300 70C 4S and the GoPro 4 Black it weights 640g
GoPro Accessory
Along with the frame, Hovership sent me a camera sled and ExoPro bumper. These accessories make mounting GoPro camera so much easier. The sled comes with 3 leg tilt options (20/30/40 degrees).
ExoPro gives full access to the GoPro buttons but requires lens protector removal each time you change or charge battery. Also when recording with Superview there is a small piece of the bumper around the lens protector visible in the footage. I simply trimmed it with a cutter.
Finished Build Photo Gallery :)


Conclusion
First version of Zuul Racehound frame was on the market for almost 2 years. The new V2 we have just built looks like a nice step forward, still maintaining most of the original Zuul features. It is not the lightest frame because of the ‘sandwich base design’, but this build was only around 30g heavier than the QAV-X racing frame we reviewed recently.
The old Apple Computers motto – ‘Think Different’, fits here very well. Unusual design compared to what is available on the market, makes it stand out from the crowd. There isn’t many frames that provides battery protection. Also the VTX mounting solution is a great idea. I enjoyed building this frame overall, despite few head scratching moments :)
Author: Artur Banach
2 comments
They aren’t supporting the original Zuul anymore? That’s a shame. They were always a frame I wanted to put on my bench. Recently I thought of building a dedicated 6in two blade (so it can still fold) setup for “Long Range” gopro flying. I have my standard tri blade five inch setups for acro but a nice cruiser would have been great at the superbeast was my target. Guess I’ll need to look elsewhere. The v2 never really did it for me, taking away the folding was my biggest turn off right out of the gates.
This feels like such a step back from the previous Racehound and Superbeast…
The best part about these was the ability to fold it down into a brick and throw it into your bag, now they arnt even supporting the older versions. Really disappointing.
Owner of a Helix, Alien, Blackout, Goby, Atom, Raiju, and countlessed brushed abominations, the Zuul with 2208 2050kv 6″ is still my most used platform.