RotoRacer RR210 is a light weight mini quad frame designed for 5 inch propellers and FPV racing. In this post Artur will show us the frame, how he built it and what he think of this quadcopter frame.

Get your RR210 mini quad frame from RotoRacer.
RR210 Unboxing

Frame comes in a very nice package.

Carbon fibre parts and hardware of the frame:
- 4 x 3mm arms
- 2mm bottom plate
- 2mm top plate
- 2mm middle plate
- Mini PDB (Power Distribution Board) with build in 5V and 12V voltage regulators
- Screws and standoffs
- RotoRacer logo sticker

Quadcopter Frame Review
Total weight of the fully assembled frame is 102g. Diagonal motor to motor distance is 210mm. This is an X frame and the width and length of this frame is exactly the same (the four motors form a square). This is unlike the Speed Addict 210 or DemonRC Nox5 we reviewed recently where width is always longer then the length of the frame, but that is for a good reason relates to weight distribution and flight characteristics, we will see how the RR210 plays out.

Arms have the same mounting holes location as ZMR250 arms and frame is actually fully compatible with those ZMR250 arms, although I haven’t tried it myself to verify that. RR210 arms have some different design and they are narrower towards the motor mounts. I reckon this can be potentially a weak spot for the arm strength.
The design of the bottom and top plates are not symmetrical. They have multiple cutouts for lipo straps, video antenna, power cable and FPV camera . It is a low profile frame with only 30mm between the top and the bottom plates.

There are threaded metal rings incorporated into the carbon fibre middle plate, they are “glued on” and cannot be turned, so you won’t need a pair of pliers to hold them. I find it easier to work with than the traditional nylon nuts. Arms can be easily removed in the field for instance if they need to be changed.


The carbon fibre quality is great and frame parts fit together nicely. The frame feels pretty rigid once assembled, but there is just a little flex on the arms (similar to flex on Alien frame).
Power Distribution Board
Mini Power Distribution Board (optional) that came with the reviewed frame is a very basic and very tiny. It can fit right into the middle plate cut out, and it just stays there by pushing it down without any additional support.
It has two voltage regulators – 5V and 12V. I checked with a multimeter, both regulators output voltages are correct.

On the bottom of the PDB there is a very bright blue LED. With the PDB installed in the frame, the LED light can be seen through the gap from behind if you are flying forward.

Build Log
For this build I used:
- DYS XM20A ESC’s
- Cobra 2204 2300kv motors
- KISS Flight Controller
- FX795-2 Video Transmitter
- HS1177 FPV Camera with 2.5mm lens
- FrSky X4R-SB Radio Reciever (SBUS)
- LEDs: Demon Lights (DemonRC)

It was my first build where I used KISS FC with non-KISS ESC’s.
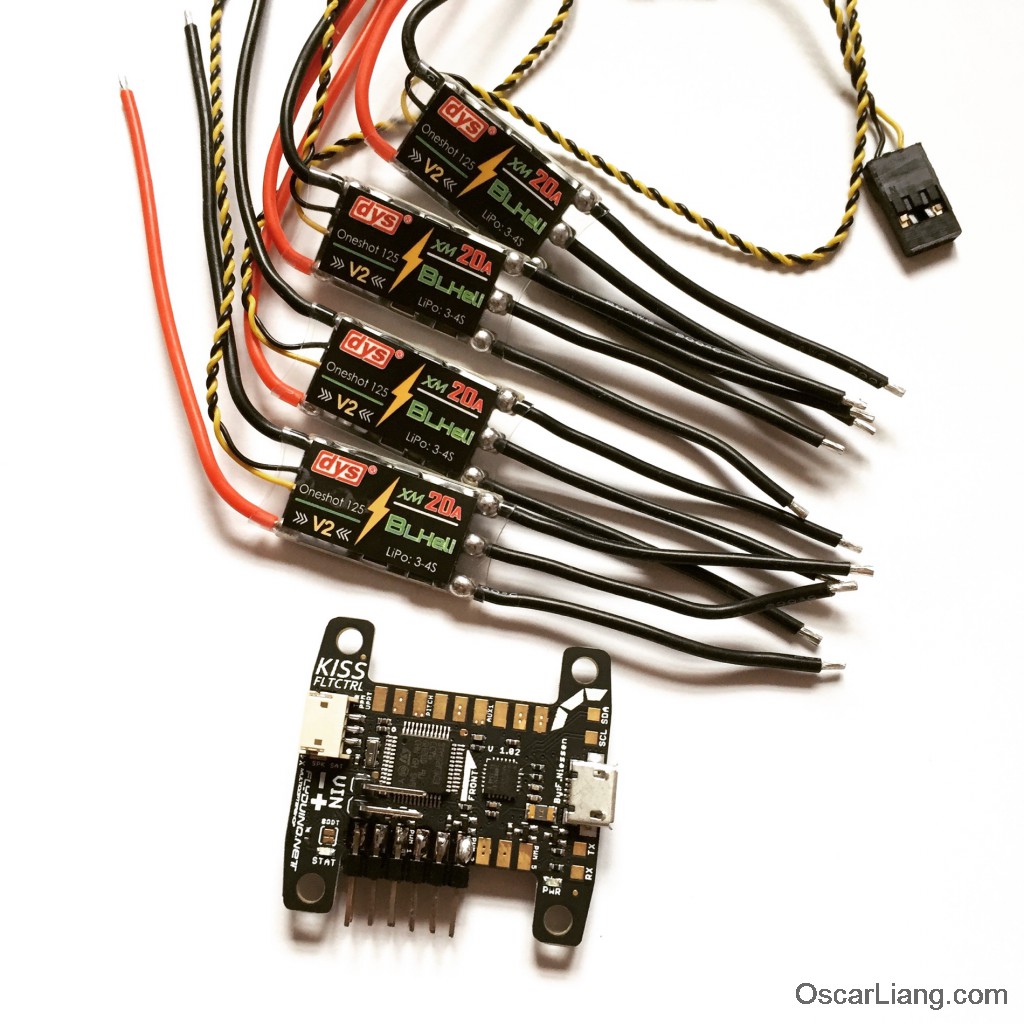
Table of Contents
Motors, ESC and PDB
After trimming motor wires to suit the length of the arms , I soldered the motors to the ESC’s. I then removed the original DYS XM20A ESC heatshrink and replaced with new ones covering all soldered connections:

Motors fitted onto the arms:

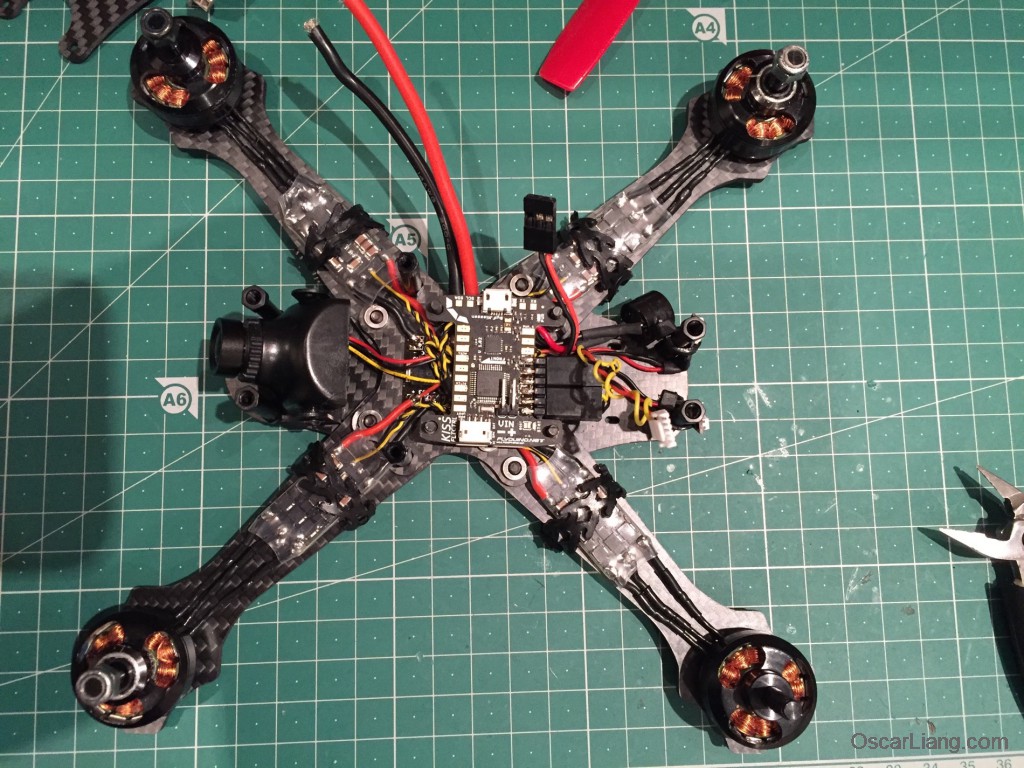
ESC power wires were cut just enough to reach the ESC solder pads, it helps reduce the weight and clutter from unnecessary cables:

I soldered the lipo XT60 power cable, camera and video transmitter cables onto the power distribution board:

Flight controller
I soldered signal pins and buzzer to the KISS Flight Controller. Reason for going with pins and not direct soldering to the pads was simply because of BLHELI. ESC passthrough programming does not work on KISS FC (yet), so changing configuration such as motor rotation directions can only be done using one wire method (connecting to each ESC with the signal wire using an Arduino Nano or other linker programmer)
I also soldered pins to a VIN on the KISS Flight Controller, so it can be disconnected form the power during ESCs flashing. I decided to keep the whole signal and ground cable on the ESC, and just keep them wrapped the and hidden under the flight controller:
Camera, Video Transmitter and Radio Reciever
Fitting Radio Receiver and video gear wasn’t the easiest job on this compact frame. At first I tried to fit the X4R-SB RX under the top plate but it was too big with the pins and there was not much room left for VTX. In the end I had to de-pin the D4R-II RX and leave it on the bottom plate, near Flight Controller.
If you want to run SBUS I strongly recommend using this miniature size XSR RX instead, it’s the same RX as the X4R-SB just smaller.


VTX was attached to the underside of the top plate with just few tie wraps and I left it at an angle to avoid props hitting one of the corners:

Weight
What we would expect from the compact racing frame is the low weight.
My mini quad build without a GoPro and lipo weights 333g
The quadocpter with a GoPro and 4S 1300mah DroneLabs lipo weights around 556g
Pretty light weight I would say. Note that only small 1300-1500 lipos can be used on this frame, any long lipo would stick out at the back.
Few photos of the finished build


Conclusions
It’s a very compact frame and probably more suitable for experienced builders.
Good things about the RR210
- Superb packaging!
- Good quality carbon fibre
- Main frame body is even smaller than some of the 180 frames, yet it can fit 5 inch propellers
- Arms mounting holes compatible with ZMR250 arms
- Middle plate has threaded rings, so no nuts are required to fit the arms onto the frame. Much easier to replace the arm without even opening the main frame body
- Tiny Power Distribution Board with 5V and 12V regulators, it also helps keep the build clean
- Very bright blue LED on the bottom of the PDB, it’s visible by other pilots from behind while racing, very cool feature!
Things to watch out for with the RR210
- Props are very tight towards the main body. Loose antenna, wires, zip ties etc. can easily get sucked in and chopped off.
- I wish they make it 5mm longer diagonally to give it some more room
- Depending on the HD camera angle, props might be visible in the video footage
- The arms have “less meat” towards the motors – a bigger chance breaking the arm in this location
- No dedicated cutouts for zip tie holding the Radio Receiver antenna (zip tie + heatshrink tubes – the most common method of holding radio receiver antennas in place on a mini quads)
- Cutout that is suppose to hold power wires is enclosed. Power wires need to go through the hole first and then XT60 connector needs to be soldered on. It would be a good idea to keep it open with the grommet
Update (26/04/2016)
Mac from RotoRacer responded to the above comments:
Regarding lipos: “It is possible to use even bigger lipos than 1300-1500 if they are attached to underside of the quad or still on the top but without the HD camera”.
Mac also confirmed the strength of the arms: “After months of testing, the only place where arms where cracking after a bad crash was the location near the fuselage and not near the motors”.
He explained the receiver antenna location on the top plate: “Two small cutouts near the second row of standoffs are designed to hold the receiver antenna”. In my review I used a different location, more convenient for me with Gopro attached to the top plate.
Author: Artur Banach Bio: A mini quad pilot based in Scotland, Co-Admin of Multicopter International FB Group. Youtube Channel Join us as a guest writer and help move the hobby forward.