The BetaFPV Cetus FPV kit includes everything you need to start flying: the drone, radio, FPV goggles, battery and charger. In this review we will go over all the components and find out the pros and cons of this RTF kit.

If you are new to FPV, check out my FPV beginner’s guide.
Table of Contents
Where to Buy BetaFPV Cetus FPV Kit?
Update (Nov 2022): There’s a new version – the Cetus X FPV Kit!
- Banggood: https://oscarliang.com/product-aqtz
- BetaFPV: https://oscarliang.com/product-ysko
- GetFPV: https://oscarliang.com/product-7ppk

It includes the following items in the box:
- 1 x Cetus Micro FPV Drone
- 1 x LiteRadio 2 SE Radio Transmitter
- 1 x BETAFPV VR02 FPV Goggle
- 2 x 1S 300mAh Lipo Battery (BT 2.0 connector)
- 1 x USB-C Battery Charger
- 1 x USB-C Cable
- 1 x USB Adapter for FC
- 1 x Prop Removal Tool
- 4 x 31mm 4-Blade Prop (Spare)
All the parts are stored in a carry case which provides protection and is easy to carry around.
The Cetus Micro FPV Drone
The Cetus micro drone is what we call a “tiny whoop” in the hobby. It’s light weight, small and low power, so is very safe to fly indoor around people.
The Cetus is a little heavy at 27.5g (without battery), a typical Tinywhoop of this size usually weighs at around 20 to 22g. This is mainly due to the beefy canopy and prop guard, it’s rigid and durable.


The Cetus is using brushed motors with Gemfan 1220 4-blade propellers, running “props in” configuration, and not “props out” which is preferred on tiny whoops for better performance.

The prop guards and canopy are super tough.

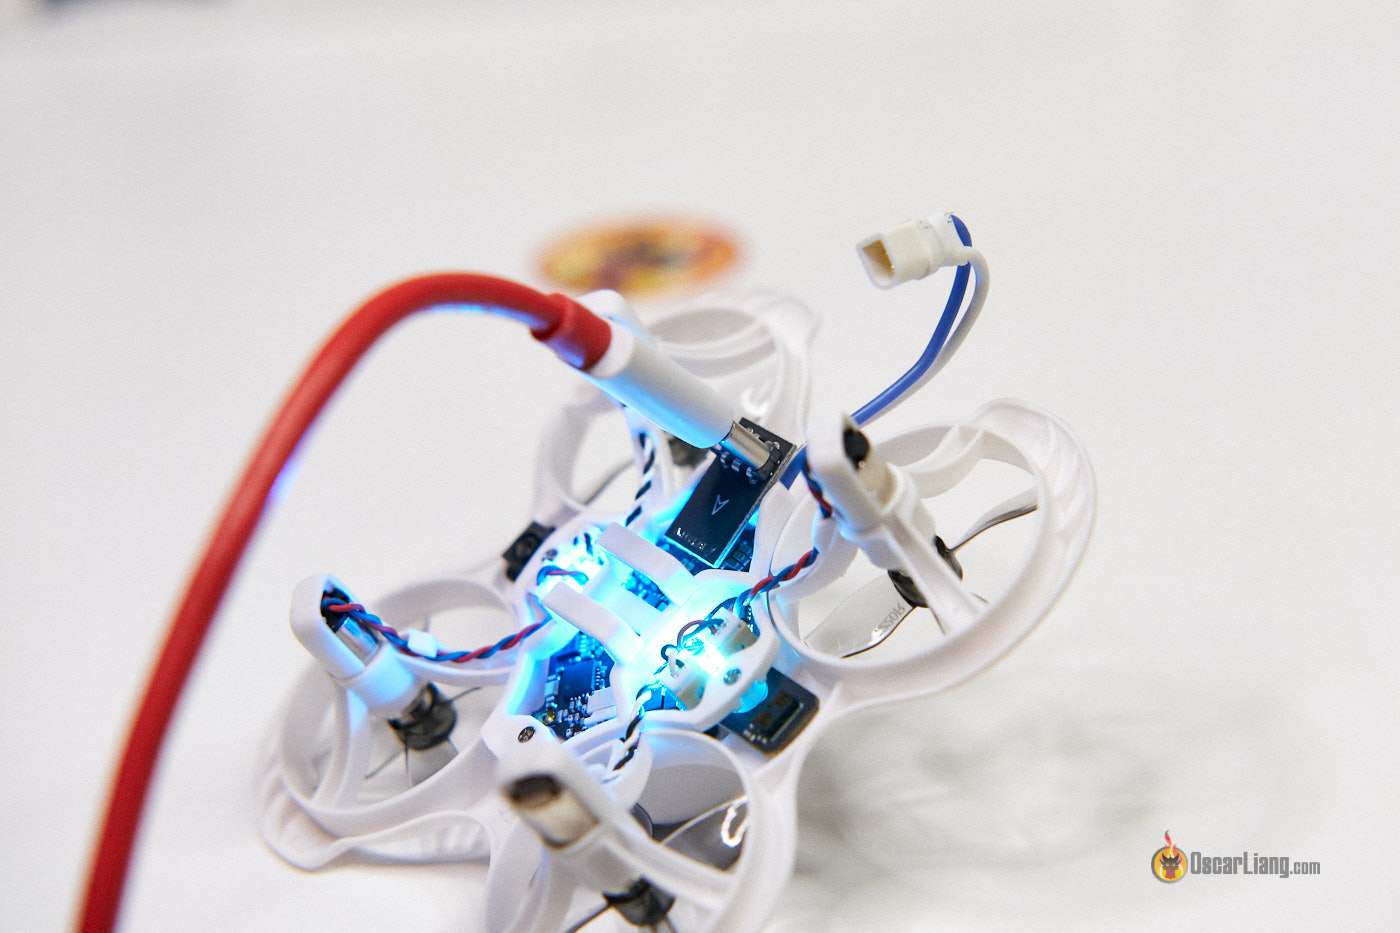
From the bottom you can see it has an optical flow camera sensor (P3901 RSN) for determining the aircraft’s ground velocity, and a LiDAR component for detecting altitude. These sensors are used for the “Normal” flight mode which I will explain later.
This flight mode is perhaps the most interesting feature of the Cetus, and it’s the first time I have ever seen these sensors used in a tiny whoop.

Flight Modes
I believe the Cetus micro drone is heavily inspired by the DJI FPV drone – it has three flight modes just like the DJI FPV drone: Normal mode, Sport mode and Manual mode. The manual explains what each mode does, in a nutshell:
- Manual mode = Acro mode (in Betaflight)
- Sport mode = Angle mode (in Betaflight)
- Normal mode = Angle Mode, but throttle becomes altitude control
The Normal mode is pretty interesting, it’s almost like flying a DJI camera drone. It has sensors to detect the height, and it will stay at the same altitude if you leave your throttle stick at the centre (altitude hold). if you throttle up, it will ascend and if you re-centre throttle stick it will stop. And if you throttle down it will descent.
It basically replaces throttle management with altitude control, making the drone even easier to control.


There are also three speed levels: slow, mid and fast. Essentially what it does is changing the rates – how fast and sensitive the drone reacts to your stick movement.
Flight mode and Speed are displayed at the lower right corner of the screen. At the bottom left, you have battery voltage and Timer.

Safety Features
The Cetus micro drone has some unique safety features that you don’t normally see in other RTF kits.
When battery runs low (at about 3.3V) it just lands itself automatically by slowly descending and disarming. It’s almost like a DJI camera drone.
For an experienced pilot this can be counter-productive as we would prefer to land somewhere near ourselves and not have to walk across the room to pick it up whenever battery is low :) But for beginners this is a great feature as it makes sure your battery is not over-discharged and damaged. Sometimes you can be carried away by the excitement of FPV and forget about it :) That still happens to me sometimes after all these years :) Read about how to handle LiPo batteries here.
The other safety feature is auto-disarm upon crashing.
Flight Performance
The Cetus is not designed for flight performance but around safety and ease of use for beginners. As mentioned it’s quite heavy for a tiny whoop, therefore it’s not super powerful, but still has more than enough speed for a beginner.
On my first flight, the drone was drifting a lot, calibrating the accelerometer on level ground fixed that.
I get about 4 minutes to 4:30 flight time on a fully charged LiPo, which is pretty decent.
Yaw rate was a bit too high for my taste (even at SLOW speed), and there’s no way to lower it. It only gets faster with higher speed, and it’s way too fast in HIGH speed so I am kind of stuck with MID speed :) It’s still flyable after some getting used to.
I was getting some interference in my video feed, which appears to be electrical noise from the motors (only appears after I arm the motors and gets worse after take off). It’s not too bad, just a little bit distracting, still totally flyable.
I also got some latency to the controls when I am flying from the next room, it seems to be radio receiver (RX) signal can be a little unreliable when there’s obstacle in between you and the drone, video is totally clear though. There’s no latency when I am flying near myself.
The drone is using BT2.0 connector, it’s a pretty unique connector and only BetaFPV uses it. It’s supposed to deliver better performance, but for a quad like the Cetus, I don’t think it’s necessary, and perhaps a more common PH2.0 connector would have been better because you have more choices when it comes to battery, and not locked into BetaFPV’s ecosystem.


The drone has an OSD menu for changing a few basic settings, but it’s very limited.
I wish they offer more settings in the OSD, like rates/expo for yaw, pitch and roll. And options to disable some of the safety features like “low voltage landing”, and “auto disarm upon crashing” would be really nice too. As you grow as a pilot you don’t really need these “training wheels” and they increasingly become an inconvenience.
Flight Controller Configurator
Beware that it’s not using Betaflight, but their own FC firmware. This means you have almost zero control on the settings. You can connect the FC to your computer using the provided FC USB adapter. 
Download the configurator here that allows you to change PID, rates etc: https://github.com/BETAFPV/BETAFPV.github.io/releases/
The settings are quite limited, it’s like an simplified version of Betaflight. Here are some screenshots of the configurator:


The FPV Goggles

BETAFPV VR02 goggle:
- 4.3 inches 800*480px LCD display
- Aspect Ratio: 16:9
- FOV: 55°
It’s a very basic box style FPV Goggles, and it supports 5.8GHz, 5 bands and 40 channels in total. It doesn’t have any other settings apart from choosing channel (no brightness/contrast settings etc).
You can buy this goggles separately: https://oscarliang.com/product-k0lu

There’s no focal length adjustment, and no way to use diopter lenses, so if you wear glasses, this goggle might not work for you. However, I am near-sighted (-2.0) and I have no problem seeing the screen without my glasses.

There’s a built-in battery inside, and can be charged through the USB-C connector.
There’s no sign of antenna on the outside, my guess is that the antenna is hidden inside the goggle, which makes it really convenient to use and for transportation. The range of the video link is quite decent, I have no problem flying it in my house in different rooms. It actually outperforms the radio link, so you are going to get a failsafe before losing videos :)
But it defaults back to A1 channel every time I shut it down, so you’d have to change channels again every time you power up the goggles.

As it’s a basic goggle, it has no DVR feature (video recording).

The Radio Controller

The BETAFPV LiteRadio 2 SE remote is a very basic and compact radio. It’s actually loaded with OpenTX firmware – a very powerful firmware used on nearly all the popular radios nowadays. But because it has no screen and menu buttons, you can only change settings by connecting it to your computer and through OpenTX companion software.
You can buy this radio separately: https://oscarliang.com/product-1fs3

It is a tiny radio, and the gimbals are quite small and doesn’t have the control precision as some other bigger radios with full size gimbals. When I was flying the drone with the LiteRadio and my TX16S back to back, I feel so much more confident in my flying with the TX16S as I have a lot more control with the larger gimbals.
With that said, this radio works fine as expected.
The USB-C port on the bottom is for charging, as well as connecting to computer for FPV simulators.

There’s no battery in the battery compartment, I guess they managed to fit the battery inside the radio.

LiPo Battery and Charger

All the gear in the Cetus FPV kit can be charged via USB-C cable, which is super handy.
The included battery charger can charge two 1S 300mAh LiPo batteries simultaneously. charging is quite fast, takes about 20 mins to fully charge a LiPo.

Charger can be used as a LiPo voltage checker too.

Conclusion
Here’s the thing, this hobby is expensive. My FPV Goggles costs $500, my radio setup costs $250, my own custom built drone costs about $300. And what if you realize this hobby is not for you after getting everything?
If you are new to FPV and don’t want to commit to a full purchase, at only $160, the BetaFPV Cetus FPV kit is an affordable way to get started.
If you want something that’s more powerful and suited for outdoor flying, BetaFPV also released the Cetus Pro version.

This kit can be used for training, but really it’s designed purely for beginners and won’t give you the full FPV experience. It’s probably not the most exciting RTF kit for experienced pilots to be honest. If you want the highest performance tiny whoop check out this post.
You will grow out of those goggles and radios as you make progress, but the good news is that you can still fly the BetaFPV Cetus micro drone when you upgrade your radio, as long as the radio supports Frsky D8 protocol. You can also use it with any other FPV goggles that support the B band.

Check prices of the Cetus FPV Kit here:
- Banggood: https://oscarliang.com/product-aqtz
- BetaFPV: https://oscarliang.com/product-ysko
- GetFPV: https://oscarliang.com/product-7ppk
16 comments
Witch Is the vtx Channel ? Because with auto-research i lose signal After 10 meters
Thanks
It’s on the B band, set your goggles on the same band and scroll through the channel to find it, you can’t get it wrong.
Hi, are you sure about ACRO mode?
i think that the cetus run only in angle mode.
No ACRO function is mentioned in official site
They call it manual mode which is just acro mode.
Hi,
does the manual mode works the same as ACRO mode on other drones?
Merry Christmas!
Hi, Yes Acro mode is just manual mode. Merry Xmas.
Dear Oscar,
Thank you for this detailed review. However looks like the The BETAFPV LiteRadio 2 SE is not running on Open TX but on a specific BetaFPV software. Furthermore, can we connect the Cetus to betaflight ?
Thank you,
No, the Cetus is not running Betaflight afaik.
hey bro what are the values that you configure for the pid for normal mode
What are the setting being done for the drifting ?
calibrating the accelerometer on level ground fixed that
Hi! Yes, there is indeed a configurator for the Cetus drone. It runs on Windows only and connects via the USB-C adapter. The user interface is not great, but it can flash the firmware and tweak some settings like PIDs and rates. BetaFPV has not posted anything about it, but I see that it is now available on github:
https://github.com/BETAFPV/BETAFPV.github.io/releases/tag/v1.0
Excellent! I will add the link to the review.
What did you choose on the “Setup” tab. I was unable to connect with the latest configure_V1 from “github”. Thanks.
Do you know if DJI FPV Goggles will work with this drone?
Yes but you will need a adapter like the BDI one, and an analog receiver module.
They do but honestly, the beta goggles have better picture than my dji analog setup!