
Tiny Whoop became very popular in recent months, so we jumped onto the hype train, and looked into how to build a Tiny Whoop Inductrix micro quad :)

Update (Sep 2018): You no longer have to build your own Tiny Whoop, there are a lot of BNF (pre-built) models available which perform great out of the box.
Update (Nov 2024): Here’s an up to date tiny whoop build guide with the latest parts: https://oscarliang.com/how-to-build-tiny-whoop/
What is Tiny Whoop?
Tiny Whoop is a tiny micro brushed quadcopter with added FPV gear. Propellers are protected by EDF ducts that also makes it a very efficient little machine.

It allows some insane indoor FPV flying: chasing people, annoying your pets, cruise around the house without hurting anyone or damage anything :) Compared to mini quads, the tiny size opens the horizon for new possibilities in FPV hobby.
Further Reading
- Also check out BigglesFPV’s review on the Inductrix micron drone.
- I also made a similar 3D printed frame for 8.5mm motors and Cleanflight FC, check out the Whoopee micro frame.
- There is now a much cheaper alternative to Inductrix – the Eachine E010.
The Tiny whoop is much tinier than it looks: Motor to motor distance is only 64mm, total weight with FPV setup is 20g (without lipo) and 24g (with 175mAh battery).
So, let’s show you how to build it :)
Parts to build Tiny Whoop
- Blade Inductrix – Available from many places such HorizonHobby or Sussex. There are BNF (Bind and Fly) or RTF (Ready to Fly) versions available, BNF doesn’t come with TX, RTF does.
- FX797 FPV camera and Video Transmitter combo
- Many 1S 150-205mAh LiPo batteries
- Spektrum transmitter or OrangeRX module for Taranis
The Blade Inductix micro quad has a built-in receiver that only support Spektrum radio. Many people already have the Taranis transmitter, so it might be easier to just get an OrangeRX module and plug it into the Taranis. Alternatively you can maybe get a second hand Spektrum TX cheaply online, or buy the RTF version which comes with a TX.
Optional:
- Upgrade motors – they supposedly provide more power than the stock ones, with the additional power the quad can handle extra weight of the FPV setup better (0615 motors)

Build log
Table of Contents
Step 1
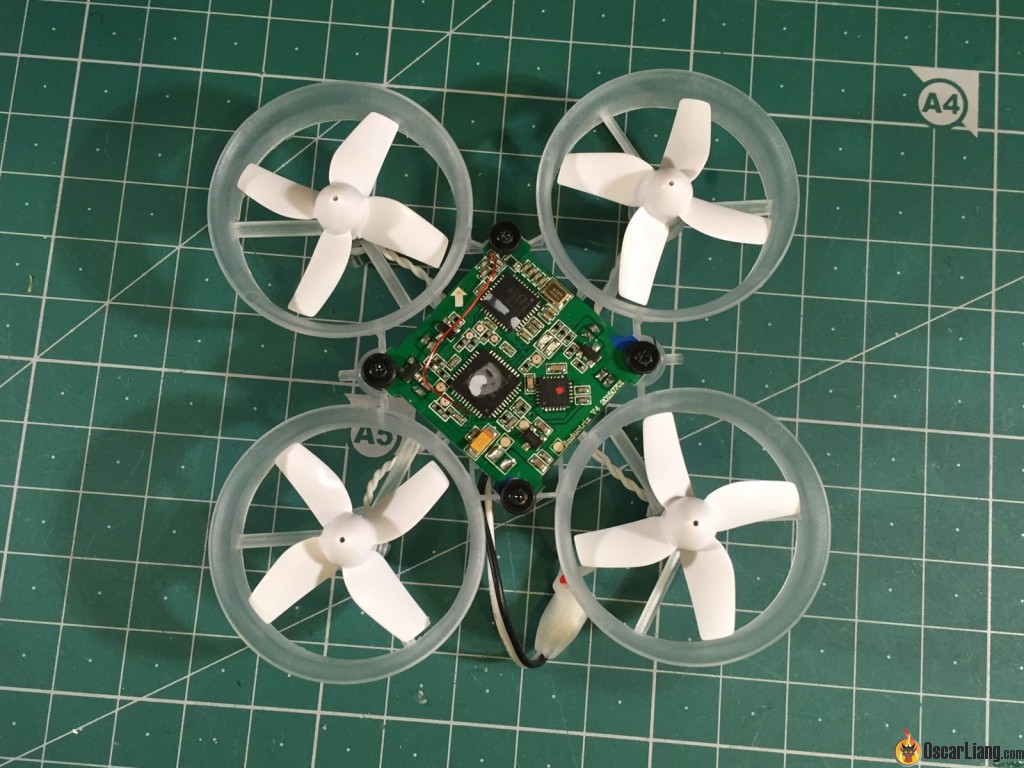
Strip the plastic cover that comes with the Inductrix to reveal the main board. The red tiny thin wire is the radio antenna and it’s best to leave it alone to avoid damaging it.
Step 2
I used FX797 Camera and Video Transmitter combo in this build.
To save weight I removed the plastic case covering the unit. It doesn’t come off easily, so be careful when doing so.
Once removed, it also creates a great mounting point for the rubber band to hold it down on top of the Inductrix main board.

Step 3
The most difficult part I found was the upgrade motors installation.
Stock motors come in black & white colour coding but upgrade motors have a slightly different wire colours: Blue & Red for clockwise and Black & White for anti-clockwise.
Front Right and Rear Left are Clockwise motors. I have placed upgrade motors on the cutting mat in the right order during the entire process. There is an arrow on the Inductrix main board showing the front direction, otherwise you wouldn’t be able to tell what’s the quad direction.

To remove motor I used small pliers. First disconnect the plug and push motor gently up. It’s best to do it slowly to avoid damaging the motor.

Once in place, I rolled the remaining wire onto the motors and wrapped the motors with insulating tape to hold them securely in place. There is a rubber band that came with the Inductrix stock motors but it is quite rubbish with longer wire. Sockets for the motors are on the adjacent side of the main board, so it’s easy to plug the motor into the correct connector sockets.

The micro quad isn’t a Tiny Whoop yet but rather just an Inductrix on steroids with upgraded motors :)
Step 4
This is the final step of the conversion when our Inductrix finally becomes a Tiny Whoop – FPV gear installation!
There are several ways of doing so. Some even use 3D printed holders that screw onto the Inductrix main board. In my case I simply used double sided tape and a rubber band.
FPV gear will be powered off from the same pads that Inductrix is getting battery power from, but we will solder the wires to the top side of the main board (LiPo wires are soldered to the underside).

Take a measurement to make sure that the power wires are long enough to reach the pads, and solders them on. Red wire from FPV combo goes to the pad where white wire is connected from underneath. Black wire goes to the pad where black wire is soldered on from underneath.

Voila! Another Tiny Whoop was just born!
Taranis setup and binding
For those who use Taranis radios the only way to “talk” to Tiny Whoop is via OrangeRX module attached to the radio transmitter. There is also a Spektrum module but I will only cover OrangeRX here.
Creating model on Taranis
Firstly, setup a new model in the Taranis for Tiny Whoop, turn off internal RF and switch External RF to PPM, CH1-12 AND 30.5ms. Actually, when you switch to 12 channels, PPM frame is changed to 30.5ms automatically. There are reports that Tiny Whoop is also working with 1-8 channels but I tested it with 1-12.
Next we set up channels. There are only two modes on Inductrix: Self-level and Acro.
They can be triggered by a momentary switch (SH on Taranis). This switch needs to be on CH6.
I have added some expo to Pitch Rolls and Yaw but you have to play with this to have an optimal result.
Channel 2 and 4 need to be reversed so the quad can react to sticks correctly.
I have reduced Throttle inputs from CH1 to eliminate a dead zone on the low throttle. Again, play with these settings and changed adjust them to your liking.
Binding
In order to bind the Tiny Whoop to Taranis with OrangeRX module, you have to switch OrangeRX module to binding mode (status light double blink) by pressing the bind button 3 times very quickly. (Refer to manual for more info).
Once it’s done, switch off Taranis and turn on the quad. Now power on the Taranis while press down the BIND button on the OrangeRX module. There should be a series of beeps and LED status light on Tiny Whoop should become blue confirming that binding was successful.
OrangeRX issues
Sometimes when swapping LiPo with radio already switched on, the Tiny whoop could lose connection to the radio (Tiny Whoop lights start flashing or status light becomes blue, but no radio inputs are received). This happens randomly and not always.
The only solution I found is to simply restart the radio (turn on and off), and also unplug the battery from the quad and start again. This is a known issue and no fixed yet. It’s a bit annoying during the Whooping session and we can’t start the quad after changing the battery.
Batteries
Tiny Whoop use 1S 150-205mah LiPo batteries and flight time is about 1-2 minutes. Between different brands and discharge rates there might be a difference in flight time. It’s best to get loads of them. I think 10 to 15 of them is a good number to for a living room FPV racing session.
I haven’t tried bigger batteries because the Tiny Whoop uses Pico connectors (smaller than those on the usual 1S batteries). Anyway I think the weight of a 200mah is pretty close to the efficiency limit.
Eachine also sells these 1S 200mah batteries for the Inductrix blade quadcopter.

Those tiny batteries come with Pico JST male plug. They can be charged via supplied USB charger (1 at the time) or by parallel board and regular LiPo charger.
Search “Pico JST charge board” in eBay.

Upgrade motors
There are two types of upgrade 0615 motors sold by micro-motor-warehouse: medium & fast.
I used medium motors for Tiny Whoop. Type of upgrade motors has an impact on performance and battery life. Because stock PIDs on the Inductrix main board are not adjusted to fly with neither medium nor fast so when flying in acro mode motors sound like they struggle and also there are some oscillations. I didn’t have a chance to test the stock motors with FPV gear on so can’t confirm how they perform in acro.
Let’s get “Whoopin”
The Inductrix micro drone isn’t expensive, but all the accessories and upgrade parts add up quickly: it costed me around £150.
But the possibility of Racing in your living room is priceless. Flying inside the house, under the chairs, through tiny mini air gates is a crazy fun. What’s better than flying indoor on rainy days or winter evenings, when FPV outside is not an option? With Tiny Whoop you can do it from the comfort of your armchair. How cool is that? :)
Author : Artur B.
22 comments
People here in 2025… long live tinywhoop.
Had to come back in 2024 to say thanks for all your great write ups! Here’s my Inductrix in action from a couple weeks ago! youtu.be/YulZVoR7ogY
Great flying!
Hey Oscar
I want to change my flying mode in the taranis to Acro. You told briefly about how to change. I changed my goggle to CH 6, and triggered the SH button. However, it didn’t change.
Can you tell me how to change the modes?
Make sure the switch is setup correctly as an AUX switch, and can be activated in the receiver tab:
https://oscarliang.com/betaflight-firmware-setup/#receiver
Assign the AUX switch to the a flight mode, when allt he flight modes are off, the quad will be in Acro mode when you arm it:
https://oscarliang.com/betaflight-firmware-setup/#modes
Is it possible with Hubsan x4 h107p?
how do i use my 4 IB6 charger to charge these batteries in parallel? im stumped and my charger only goes to 2s i believe.
Did anyone ever figure out how to solve the OrangeRX issue described in this article? I was in a race yesterday and blew two heats just because I had to keep re-powering my tiny whoop with the stock iductrix fc trying to get it to bind correctly/receive radio inputs. I need that to work reliably but I haven’t seen any great solutions.
Hello,
What flytime do you have with the banggood 200mah batteries?
I bought 4 of them and I get less than 1 min flytime which is disapointting :/
Hi, here is the report where i tested the eachine 200mah lipos:
http://intofpv.com/t-using-tiny-whoop-batteries-on-eachine-e010
Hey Oscar , long time follower, first time commenting ;)
How does the tiny whoop compare to the whoopee? I’m on the fence of what I want to build. Wanted to know your thoughts having built both.
I have never flown a Tiny Whoop so I can’t comment on that :) This tutorial is written by a guest writer.
But I really like the Whoopee. Although the Tiny whoop is a lot smaller than whoopee, the latter provides double the flight time and cheaper to build. But if you don’t like building, maybe easier to get a tiny whoop :)
Hi Oscar, would the Spekrum dx7 works with tiny whoop?
Yes – confirmed.
What’s the difference of buy a ready nano qx fpv?
this one probably more powerful as it can carry FPV seutp.
it uses spektrum DSMX which mean you can control it from a Spektrum TX or Taranis which a lot of people already use.
I thought the inductrix uses 6mm motors?
Yes it does :) you are right
Where can I get the parallel charge board?
i would be interested in that too
Hi Shawn, search for “pico jst charge board” on ebay there are a lot on there.
Also amazon.com/dp/B00DCFFK2S