If you’re new to EdgeTX, one of the first things you’ll need to learn is how to create a new model for your FPV drone. While many brand-new radios come with a preconfigured profile for quadcopters, learning how to set up a new model from scratch is incredibly useful. In this guide, I’ll walk you through the process step by step.


The interface and steps may vary slightly between radios with monochrome displays and those with color screens, so I’ve provided instructions and screenshots for both types.
Looking for a new EdgeTX radio? Check out our recommendations: https://oscarliang.com/radio-transmitter/
Table of Contents
Why You Need to Create a Model
A model profile in your radio stores all of the key settings: channel mapping, switch assignments, timers, telemetry, and more. Setting it up correctly ensures your quad will respond as expected.
Checking Default Channel Order
Before creating a new model, it’s important to ensure your radio’s channel order is set up correctly.
| B&W Radios | Color Screen Radios |
|
|
 |  |
By default, the default channel order should be AETR, you shouldn’t change it unless you know what you are doing. AETR stands for Aileron, Elevator, Throttle and Rudder, it basically means:
- CH1 is Aileron (Roll)
- CH2 is Elevator (Pitch)
- CH3 is Throttle
- CH4 is Rudder (Yaw)
Accessing the Model Selection Screen
| B&W Radios | Color Screen Radios |
| Press the “Model” (or MDL) button to enter the model selection screen. | Press and hold the MDL button for 1 second. |
 |  |
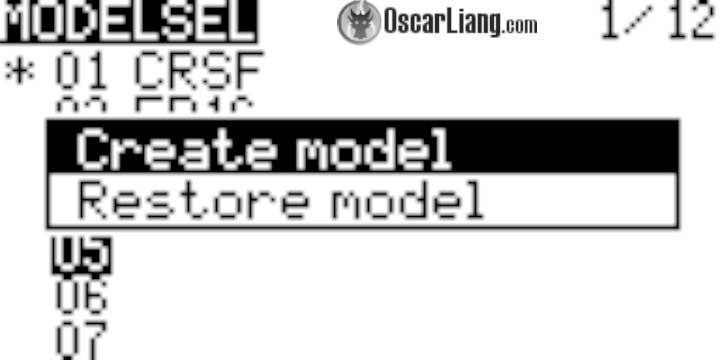
Creating a New Model
| B&W Radios | Color Screen Radios |
|
|
 |  |
| x |  |
If your radio doesn’t offer a model setup wizard, it’s not a problem, the radio will create a generic model profile. You can set it up from scratch following the instructions below.
Set Model Name
| B&W Radios | Color Screen Radios |
|
|
 |  |
Pro Tip: you may create separate profiles for all of your FPV drones. However, if you have many drones like I do, that’s a lot of work and can be difficult to keep track. As FPV drone pilots, we don’t normally need to change model settings, therefore I tend to just create model profiles for the different radio links I use. For example, I have one profile for ExpressLRS, one for Crossfire and another for Frsky. Each of these profile is bound to multiple models that are using the same radio link.
This is just my recommendation, it’s totally up to you how you manage your model profiles, there is no wrong or right way.
I will just call this model “ELRS” which stands for ExpressLRS.
Want to use your own custom model images? Check out this guide: https://oscarliang.com/custom-splash-background-model-images/
Checking Inputs
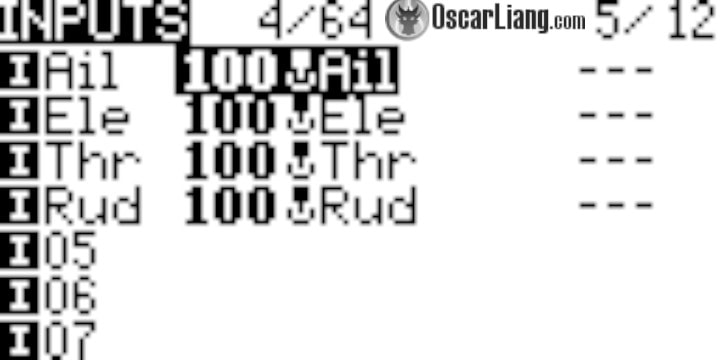
There are two pages you need to configure for channels: Inputs and Mixes.
The Inputs page is automatically set up by the system, but it’s a good idea to double-check. This page can be used to modify raw control inputs before being mapped to different channels in the Mixes page – such as adding expo or adjusting weight on the raw input values, but this is typically used by fixed-wing pilots who don’t use a flight controller. You can learn more about the purpose of the Inputs screen here: https://oscarliang.com/inputs-mixes-outputs/#Inputs-Where-Control-Begins.
If you only fly multirotors, you can usually skip this screen, as there’s no need to change anything.
| B&W Radios | Color Screen Radios |
|
|
 |  |
Configuring Mixes
In the Mixes page, you can map inputs to channels. Radio systems generally have 8 to 16 channels available, for example, ExpressLRS supports up to 16 channels. The first four channels (CH1 to CH4) are always used for the stick controls, and the remaining channels are for switches, known as Auxiliary channels (AUX).
| B&W Radios | Color Screen Radios |
|
|
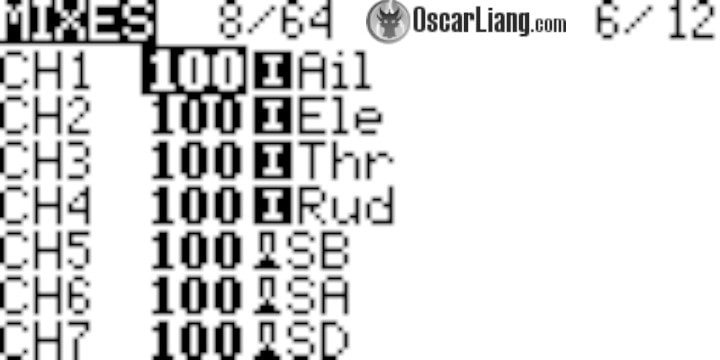 |  |
The channels are setup automatically by the radio based on the default channel order (as we confirmed earlier in step 1), so normally you don’t need to change anything here. However, it’s a good idea to double-check to avoid any surprises. If your default channel order is AETR, the Mixes should show:
- CH1 Aileron (Roll)
- CH2 Elevator (Pitch)
- CH3 Throttle
- CH4 Rudder (Yaw)
To learn more about channel order, what it is, and how to change it manually, you can follow this guide: https://oscarliang.com/channel-map/
Switch Configuration
You will need to configure switches for arming the drone, flight modes, and beeper.
| B&W Radios | Color Screen Radios |
|
|
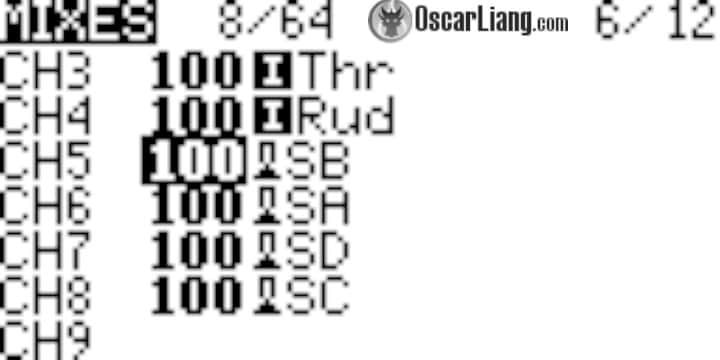 |  |
This is how I normally use my switches:
- For Arming: Any 2-position switch
- For Angle/Horizon Mode: Any 3-position switch
- For Beeper: Any 2-position switch
- For additional features, such as turtle mode or return to home: Any 3-position switch
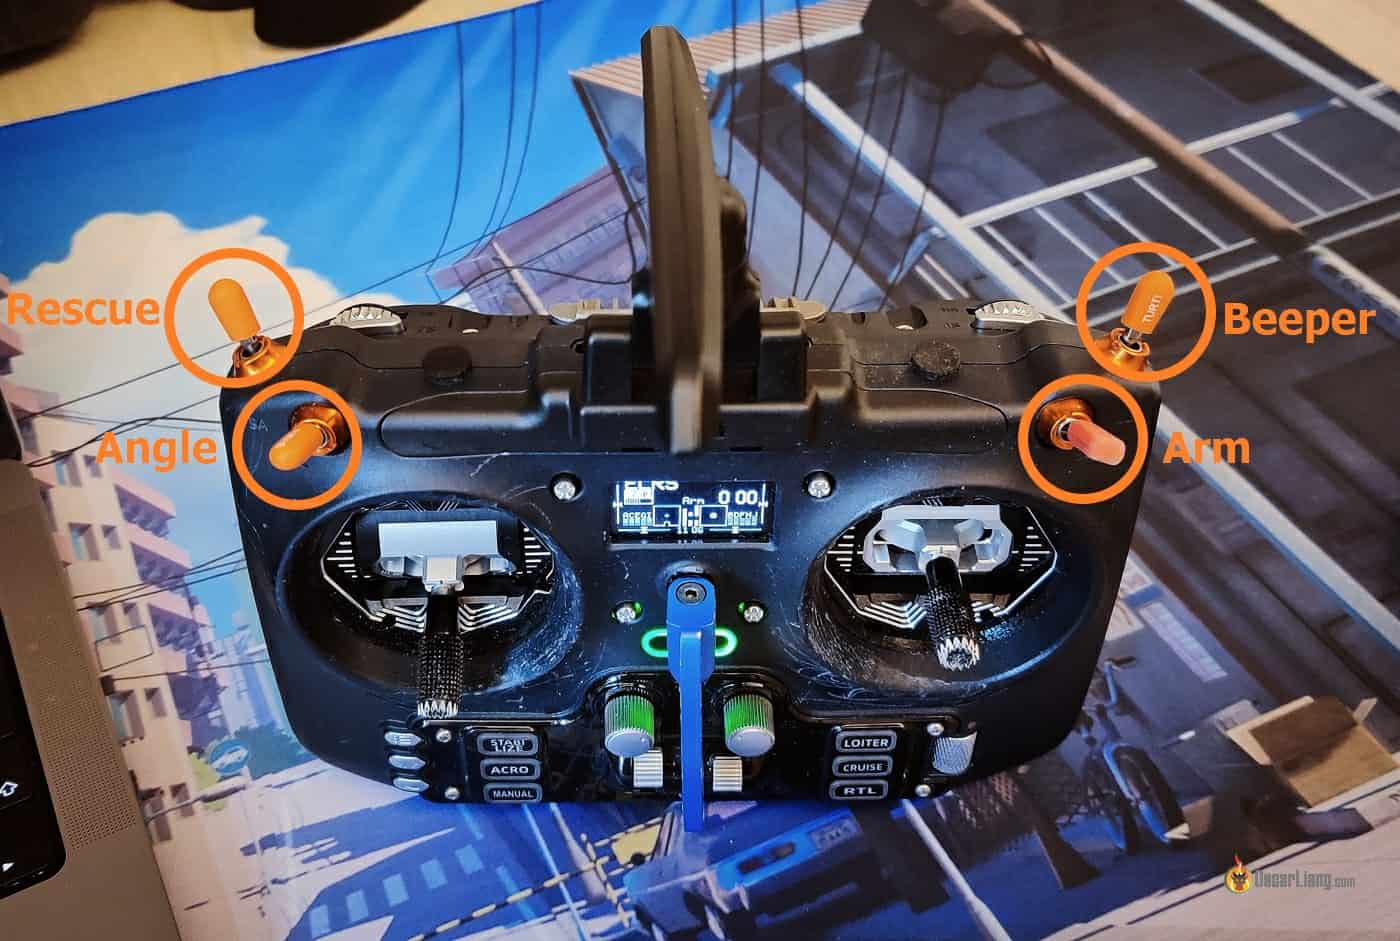
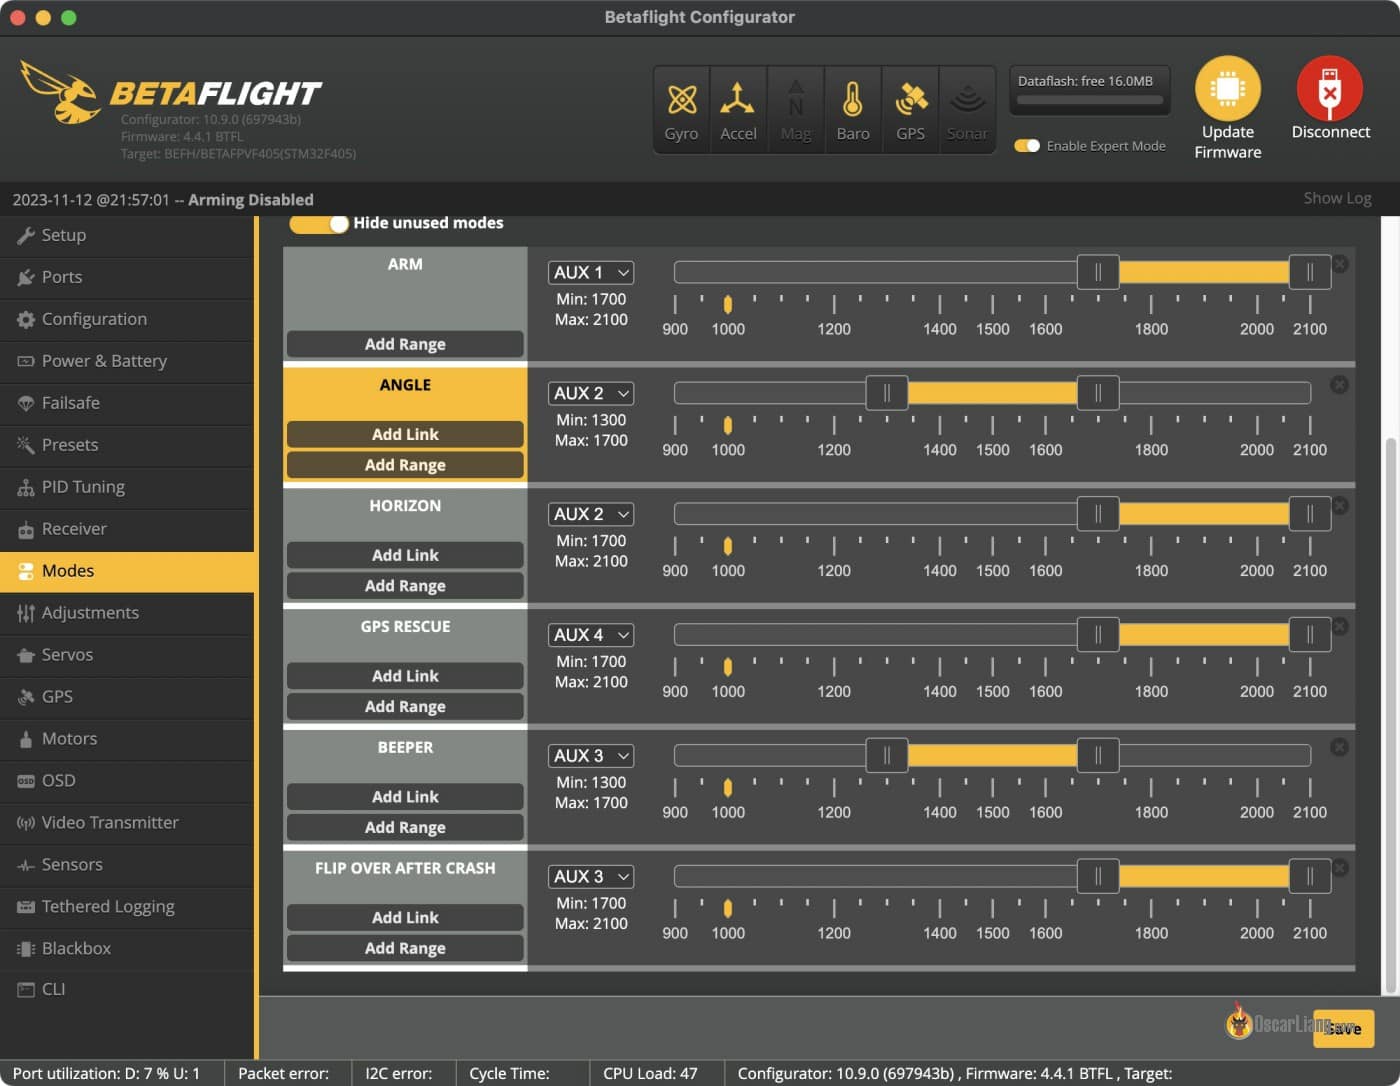
Now, go to the Modes tab in Betaflight Configurator, and assign the AUX channels to the functions you want to use. Note that:
- AUX 1 is CH5
- AUX 2 is CH6
- AUX 3 is CH7
- AUX 4 is CH8
- and so on…
You can learn more about Betaflight Modes and how to set it up here: https://oscarliang.com/betaflight-modes/
Binding to ExpressLRS Receiver
| B&W Radios | Color Screen Radios |
|
|
 |  |
Now you can bind the drone to your radio following this guide: https://oscarliang.com/bind-expresslrs-receivers/
Telemetry Setup
Telemetry is useful for monitoring vital flight data, such as battery voltage and GPS coordinate (if you have a GPS module installed).
Modern radio links such as Crossfire or ExpressLRS they both support Telemetry.
To set it up, go to Betaflight Configurator, Receiver tab, and enable the Telemetry output option.

| B&W Radios | Color Screen Radios |
|
|
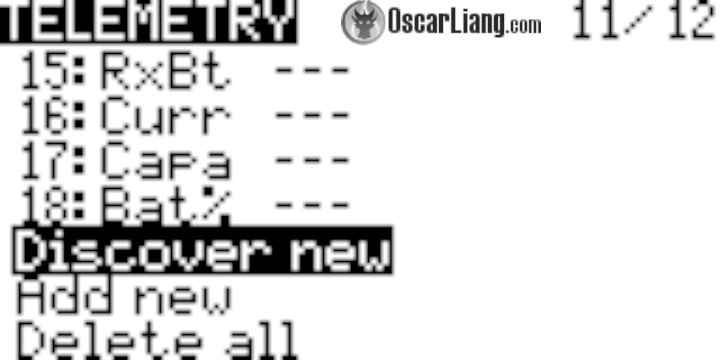 |  |
| When telemetry is working, the sensors should be updating rapidly, with an Asterisk at the end flashing. | When telemetry is working, the sensors should populate, with an black dot flashing, indicating the value being updated. |
 |  |
Finalizing Model Setup
| B&W Radios | Color Screen Radios |
| In Model Setup, turn ADC Filter to OFF to reduce latency and avoid interference with PID tuning. | In Model Setup, go to Others, turn ADC Filter to OFF to reduce latency and avoid interference with PID tuning. |
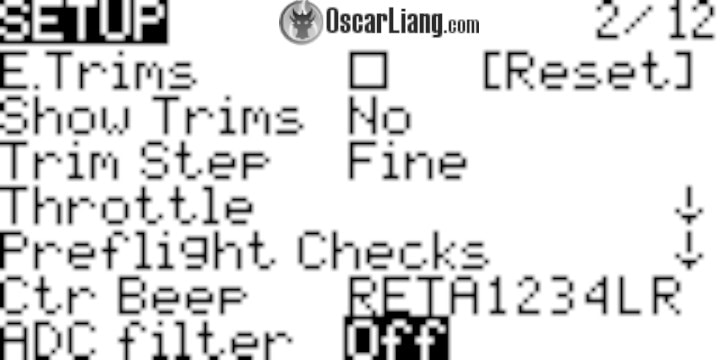 |  |
ADC filter is only needed for fixed wings without a flight controller, it can smooth out RC commands and reduce jitter movements in servos. However, it can introduce additional latency to your controls, which is not ideal for multirotors, Betaflight has its own built-in RC smoothing anyway, so ADC filtering isn’t needed and should be turned off. You could also leave the option at Global (default value) and manage it from Hardware page in Radio settings.
Here are some other optional features that I normally configure in my model.
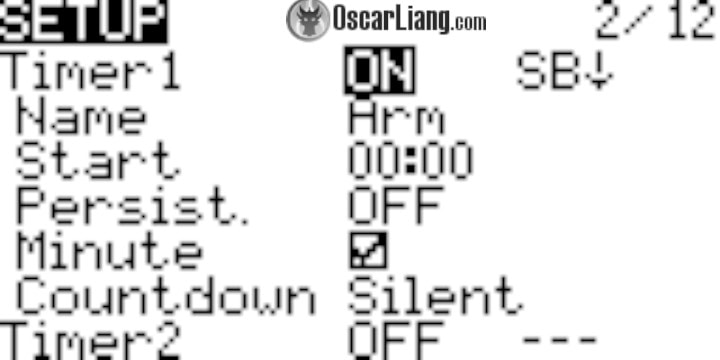
Arm Timer – the radio says the time every minute. Timer 1 starts when the arm switch is activated. It helps me keep track how long I have been flying for.
 |  |
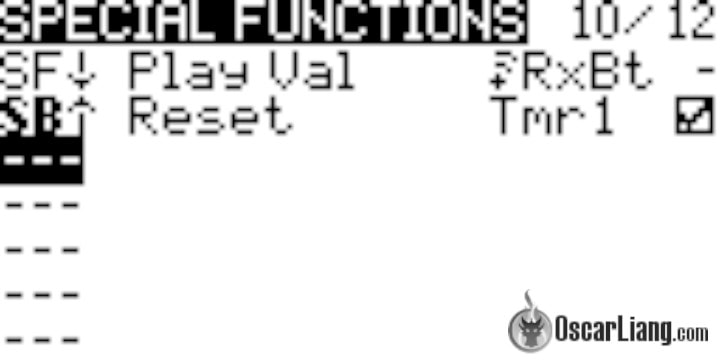
Here are the special functions I have. One function is for reading battery voltage out loud using a momentary switch. The other function is for resetting timer 1 when the arm switch is deactivated.
 |  |
Before your first flight, thoroughly test all controls in Betaflight Receiver tab, without plugging in the LiPo battery. Verify that the control direction, arming switch and other auxiliary functions work as intended.

It’s important to ensure yaw, roll and pitch sticks at center position are exactly 1500, and all these channels, as well as throttle, can reach at least 1000 and 2000 at their end points. A little lower than 1000, and higher than 2000 is fine (e.g. for the lowest, 988, and for the highest, 1012, are both acceptable. Otherwise, you are not using the full range of your controls, and you should fix it in the Outputs page on the radio by following this guide: https://oscarliang.com/adjust-tx-channel-mid-end-point/
Backup Model Profiles
Once you are happy with how your new model profile is setup, you should back it up.
Following instructions here to backup and restore models and radio settings: https://oscarliang.com/backup-restore-models-radio-settings-edgetx/
Conclusion
Congratulations! You’ve successfully set up a new multirotor profile on your EdgeTX radio. The setup is probably not the most intuitive for beginners, but it’s a powerful radio system, the deeper you learn about this system the more you can achieve. Always ensure your configurations align with your specific equipment and needs. Safe flying!
Edit History
- Nov 2023 – Guide created
- Apr 2026 – Updated instructions, added screenshots for color screen radios
2 comments
Thank you soooo much for this! i havent used my drones for years now, i went over to planes and forgot all about the Betaflight setups.I managed to install edgetx over opentx.Love the touch monitor! Pictures in this guide helped me setting up my mobula 6 again within seconds on my T16 with edgetx.My stick inputs was wrong :)
Have a great summer!
This is great. I’m used to duplicate previous model (I still have one profile for each quad) that I forgot about this process