The Jumper T20 / T20S is a radio that brings together a full-size radio’s functionality in the most compact form factor one can imagine. Every radio has its strengths and weaknesses. Some shine in specific areas but have flaws in others. But Jumper cherry-picked the best from their previous models and blend them together and made the T20S. Not only is it compact and lightweight, but it also retains the full-size gimbals and exceptional ergonomics. What’s more, it’s armed with the latest tech in FPV remote controllers, at a budget-friendly price tag.

Let’s dive in. By the end of this review, you might just agree that the Jumper T20S is one of the best radios of 2023.
New to FPV? You can learn more about FPV drone radio transmitters in this buyer’s guide: https://oscarliang.com/radio-transmitter/
Table of Contents
Where to Buy?
Update (18 Dec 2023): The T20S Gemini is released, see my review here: https://oscarliang.com/jumper-t20s-gemini/
The Original version is the same as the Gemini Edition, but the Original has a standard internal ELRS transmitter module – it’s not compatible with Gemini Mode.
The Jumper T20S original edition is available from these vendors:
- Banggood: https://oscarliang.com/product-enpo
- AliExpress: https://s.click.aliexpress.com/e/_DC2s3bZ
- NewBeeDrone: https://oscarliang.com/product-obg7
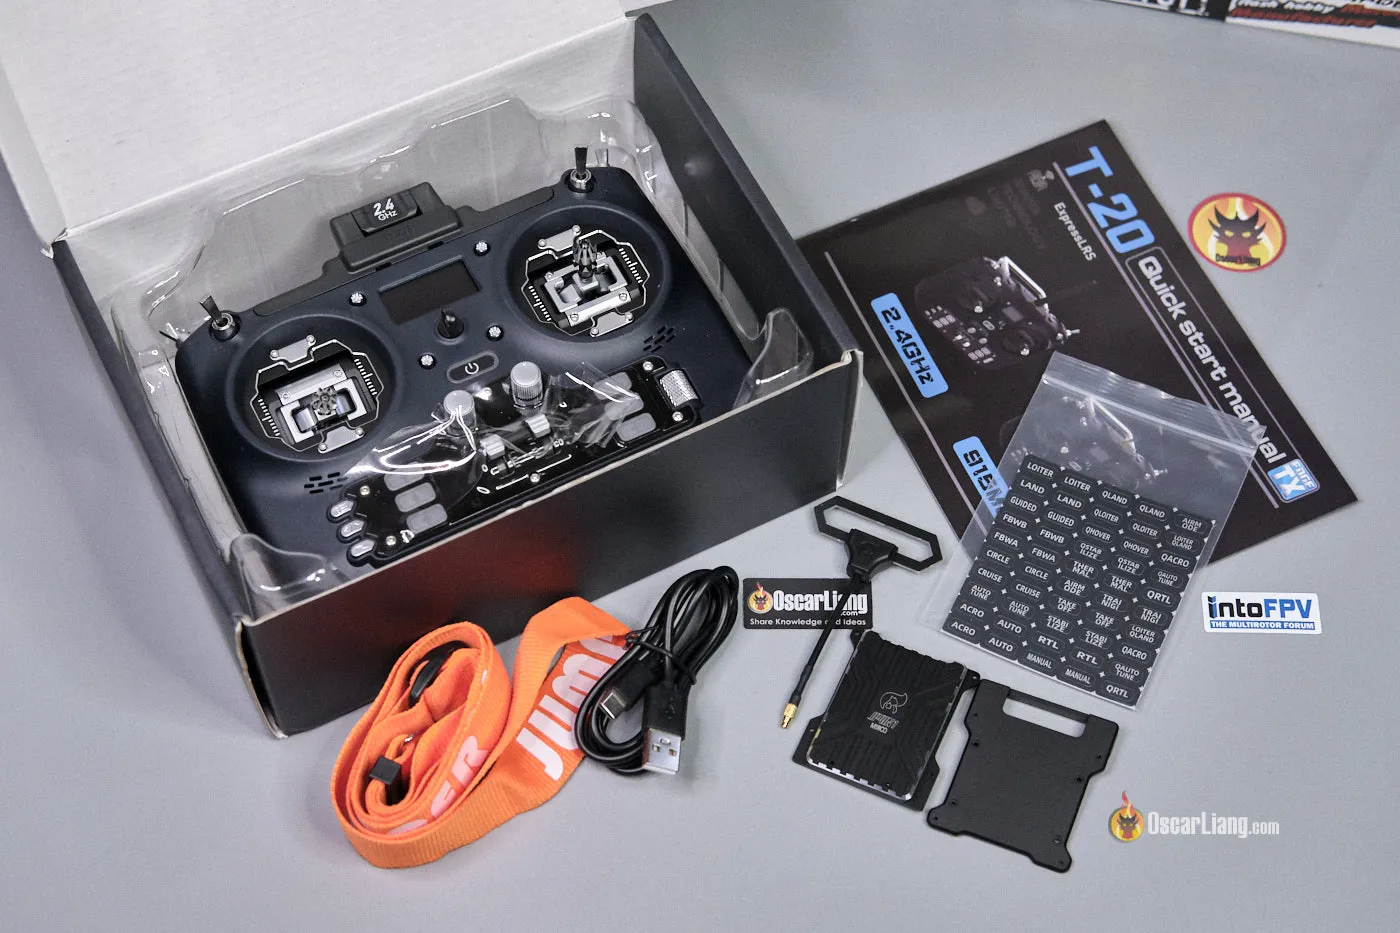
In the box, you can find the following accessories:
- Neck strap
- Quick start user manual
- Flight mode button stickers
- USB-C data and charging cable
- JP4in1 Multiprotocol micro module
- External module adapter
Note that batteries are not included.
21700 Li-ion cells:
- RDQ: https://oscarliang.com/product-njo4
- GetFPV: https://oscarliang.com/product-nnl6
- Amazon: https://amzn.to/3YJl15c
- AliExpress: https://s.click.aliexpress.com/e/_DCxHS4X
18650 Li-ion cells:
- Radiomaster: https://oscarliang.com/product-0239
- Amazon: https://amzn.to/2W93Uwp
- GetFPV: https://oscarliang.com/product-h1sg
- RDQ: https://oscarliang.com/product-1np7
Frequency Options
The T20S comes equipped with an ExpressLRS internal module, offering three frequency choices: 2.4GHz, 868MHz, and 915MHz. Personally, my choice is the 2.4GHz — that’s the one I’m focusing on in this review. Why? It offers exceptional range that suits my needs (up to tens of kilometers) and comes with notably smaller antennas compared to the lower frequency 900Mhz options.
T20 vs T20S: What’s the Difference?
There are two versions to consider: the Jumper T20 and the T20S.
The main difference is the gimbals. The T20 is fitted with hall sensor gimbals, while the T20S boasts RDC90 gimbals. RDC90 is a potentiometer gimbal which can be found in premium radios like the Futaba T18MZ. I tried RDC90 gimbals before – they made an appearance in the previous T18 radio. But to be honest, I didn’t find them to be noticeably different from regular hall sensor gimbals when it comes to smoothness or control feel. Some people claim they have more linear outputs than hall gimbals but that will require some further testing to confirm.
Now, RDC90 gimbals come at a $30 premium compared to the Hall gimbals. If you’re one of those people who believe in “more expensive is always better” then by all means get the RDC90. However, I think the Hall gimbals are perfectly fine for more people, especially given their more affordable price tag.
Specifications & Key Features
Highlights:
- Compact Design
- Full-Size Gimbals
- Powerful 1W Output
- Travel-friendly Foldable Antenna
- Support for External Modules (including Crossfire and Multiprotocol modules)
- Long Battery Life with two 21700 Li-ion cells
- Traditional Metal Switches
- A Variety of Controls: rotary switches, sliders, and flight mode buttons
- Decent Build Quality
- Budget-friendly
Technical Specs for T20:
- External Module Supported, Interface: 1.25mm-SP, 2S Power via XT30
- Display: 1.3″ OLED with 128*64 resolution
- Onboard Memory (replacing the need for SD Card)
- Full size gimbals
- Gimbal Options: Choose between Hall Sensor or RDC90
- Voltage Range: 6.0V – 8.4V
- Power Source: Either two 18650 or two 21700 Li-ion cells
- Maximum Power Output: 1W
- Weight:
443g447g (batteries excluded)
Design and Build
The Jumper T-20 has a solid construction and innovative design. It’s similar size to a gamepad style radio, but surprisingly it packs all the features you would normally only see in a full-sized radio.
The T20’s plastic housing has a matte dark blue finish, all markings are moulded, giving it a build quality that feels superior for its $110 price range.

When you stack it up against the Radiomaster Boxer, which is known for its compact design, the Jumper T20 occupies merely 2/3 of the Boxer’s space. But the new Radiomaster Pocket is still smaller.

The T20 is significantly more compact than the Radiomaster TX16S. In fact, when you compare them side by side, the T20 is nearly half the size of the TX16S.

Unlike most full-sized radios, the T20 lacks a handlebar on the back, which contributes to its compact design, but I do feel the addition of a flexible fabric handlebar like the Boxer, or perhaps an optional foldable handle would have been a welcome touch.

In terms of thickness, the T20 is about the same as the Radiomaster Boxer and TX16S. This ensures that it provides a solid and comfortable grip.


The foldable antenna is a bonus for frequent travellers. However, you probably still want to use a gimbals and switches protector during transportation. It’s a shame that no such protector comes with the radio.

Weight-wise, the Jumper T20 tips the scale at 447g without batteries. When equipped with two 18650 batteries, it weighs 542g, and 580g with two 21700 batteries. Including the batteries, the T20 surpasses the Pocket’s 390g, Zorro’s 350g, and the T-Lite V2’s 250g. However, it remains significantly lighter than the Boxer, which weighs in at 720g (with two 18650 batteries).
Gimbals
I did ask specifcially for the hall gimbal version, but it seems I’ve been sent the RDC90 gimbals (based on the appearance).
The Jumper T20 comes with either full size hall effect gimbals or potentiometer RDC90. Hall gimbals offer several advantages over traditional potentiometer gimbals. Hall effect gimbals are renowned for their exceptional smoothness and increased durability, ensuring a more precise and reliable control experience. Although hall effect gimbals traditionally came at a higher cost, nowadays they have become standard in both high-end and lower-end radios due to their superior performance and popularity.

In terms of stick travel, the T20’s gimbals are almost identical to both the Boxer and the TX16S (including original hall gimbals and AG01 gimbals). While they do get the job done, I think Radiomaster’s gimbals are slightly better in terms of build quality.
You can upgrade to the AG01 gimbals, here’s my step by step tutorial: https://oscarliang.com/install-ag01-t20s/
The stick ends are upgradable, allowing pilots to replace them for better control feel. Do note, the gimbal stick thread is M3 size, smaller than what you’d find on Radiomaster’s full-size gimbals (M4).

Adjusting stick length is a breeze by rotating the screw inside the stick end using a 1mm hex screwdriver. That said, I felt the T20’s stock stick ends lack grip, I’d probably change them out to better ones such as the Sticky360.

Moreover, the T20 is equipped with trim buttons (5-way joystick buttons) next to the gimbals. These might seem redundant for multirotors, but they come in handy for channel trimming for fixed-wing models. Furthermore, you have the flexibility to configure these trim buttons as additional switches in EdgeTX, offering enhanced customization possibilities. If there is enough interest, I’d be more than happy to write a how-to tutorial on configuring these trim buttons.

To customize your control experience, the T20 allows you to adjust gimbal tension, which involves removing the back housing. I will show you how in my setup guide. Note that the T20 doesn’t come with any spare gimbal springs for different tension, which I think is a slight oversight.
Switches
Despite its compact size, the T20 doesn’t skimp on controls. It’s impressively loaded with 10 switches, 6 sliders, and 6 flight mode buttons. Now, if you’re an FPV drone pilots, chances are you will never use most of these controls. However, they’re there for a reason. Should you ever fly planes, you’ll find these controls invaluable. This makes the T20 a more versatile radio.

If you like traditional switches, the T20 has you covered. There are two 3-position switches on the front, and two 2-position switches on top.

Behind them, you’ll find two sturdy metal latching switches, and two sliders with center indent.

Admittedly the layout feels a tad cramped together, especially for FPV pilots who might not often reach for these controls. Also the latching switches are a bit stiff, requiring a harder press than I’d prefer. And I wish one of the latching switches were momentary switch which would offer more versatility – you can use it for pre-arm or playing telemetry value etc.

Diving into the control panel at the bottom, we find the remaining controls.
The two rotary knobs (S1 and S2) are made of plastic and lack a center indent, the two extra sliders in the center (S3 and S4) are metal and have no center indent either.

There are 6 flight mode buttons, which are quite common in full size radios. These buttons are made of translucent plastic with white LED backlights, which double up as battery level indicators while charging. Jumper went the extra mile by including stickers with function names, enabling users to customize each button to their liking.

The four trim buttons also serve as momentary switches when pressing down.
A curious addition is the two holes on top, hinting at possible spots for additional switches through DIY modification. For now, these remain sealed with rubber plugs.

Screen, Menu Buttons, Controls and Speaker
The small OLED screen is located in the top center of the T20. It appears to be the same display used in the TBS Tango 2 and BetaFPV LiteRadio 3 Pro. I’ve got to say, it’s a huge improvement over backlit LCD screen like the one in the T-Lite or Pocket. Not only does the OLED screen look way cooler and offer superior clarity under sunlight, but its reduced power consumption also translates to extended battery life.

The buttons for operating the menu are located at the bottom of the radio: the three menu buttons on the left and the scroll wheel on the right are all CNC metal. You may notice the fewer menu buttons. That’s because each buttons has multiple functions:
- Model Setup (short press), Radio Setup (long press)
- Next Page (short press), Last Page (long press)
- Cancel
It will take Radiomaster users some time to get used to, but it really cleans up the layout of the radio.
On the top, you have the USB-C port for FPV simulator, data transfer and firmware updates. Also there’s the trainer port (3.5mm audio jack).
Last but not least, there’s a speaker under the left gimbal. Its maximum volume level is similar to the Boxer and TX16S, ensuring audible alerts and feedback during your flights.
Ergonomics
The Jumper T20 manages to be more compact without compromising on ergonomics and gimbal size, or overall functionality. It’s simply impressive.
The radio’s shorter body is a win for frequent travellers as it snugly fits in your bag, but its thickness remains similar to a full-size radio, ensuring a solid and comfortable grip.

On the back of the radio you can find removable anti-slip rubber inserts. Although these might feel slightly cheaper than the ones in the Zorro or Boxer, and lack that same tackiness, they get the job done. Considering the T20’s affordable price point of only $110, this is a reasonable trade-off for the overall value it provides.

Whether you’re a thumber, or a hybrid pincher, the T20 has you covered. Holding it feels natural, and accessing the switches doesn’t involve any uncomfortable finger gymnastics. The gimbals are smooth and soft out of the box without the need for any adjustment.

Let’s talk weight. The T20, ranging between 540-580g depends on what batteries you use, is heavier than compact radios like the T-Lite and Pocket (390g). But it’s considerably lighter when stacked against the Boxer and TX16S (880g). Those transitioning from a full-size radio will likely find the T20’s weight a refreshing change.
However, a few quirks do exist. For one, the radio’s base isn’t flat, so standing it upright on a table isn’t an option; you’ll have to lay it down.

Secondly, the neck strap’s balance feels off. The culprit? The battery bay’s low placement, making the radio bottom-heavy. A minor design shuffle, like swapping the locations of the power button and the neck strap hook could have potentially addressed this. But don’t fret, a neckstrap balancer (be it 3D printed or CNC-machined) can easily rectify this oversight.
ExpressLRS
The T20 features an internal ExpressLRS module that comes with ELRS 2.5.1 firmware. Although the LUA script initially identified the module as “AION T-Pro TX”, the good news is that starting from the ELRS 3.3.0, “AION T20” is now correctly listed under “Device” in ExpressLRS Configurator. Updating the firmware was a breeze for me using the passthrough method.
A quick tip for those updating: always ensure you’re working with the latest LUA script. Grab the newest version, replace the outdated script in your SD card’s SCRIPT > TOOLS Folder, and then remove the old files, i.e. elrsV3.luac and elrsV3.lua.
If you are new to ExpressLRS, check out my detailed setup guide: https://oscarliang.com/setup-expresslrs-2-4ghz/

While the antenna on the T20 is not removable, it has a foldable design, making it travel-friendly and easy to store. It can be unfolded and rotated up to 180 degrees for optimal angle. It’s worth noting that for optimum performance, it’s crucial to align your TX antenna with your RX antenna – ensuring a consistent, strong signal. You can refer to my tutorial on antenna placement for more insights: https://oscarliang.com/antenna-positioning/

Internally, the antenna is connected to the RF module via a UFL connector. Interestingly, the antenna’s plastic housing seems oversized for 2.4Ghz. I guess they are using the same mould for both 2.4GHz and 900MHz in order to save costs, but they could have clearly made it smaller for 2.4GHz.


Another design element that caught my attention is the massive heatsink on the back. This is to cool down the 1W internal ExpressLRS module, especially since there isn’t a built-in cooling fan. It does get a bit hot (which is a good sign that it’s getting the heat out), not enough to burn your fingers, but I’d still advise against touching it while flying.
External Module Bay
The T20 might not come with a built-in module bay, but it does support external modules. If you inspect the heatsink closely, you’ll notice screw holes specifically designed for installing a removable module bay adapter. However, keep in mind that this adapter isn’t included in the package and will need to be purchased separately.
Peeling back the rubber cover below the heatsink reveals the XT30 power output (7.4V 1.5A) and data connection for an external module.

Radio Firmware
The Jumper T20 comes preinstalled with EdgeTX firmware, which is currently the most widely used radio firmware in the FPV community.
Although the exact version of EdgeTX isn’t specified—merely being labeled as the “Factory” version—the build date (July 03 2023) gives us a clue, likely to be EdgeTX 2.8 or newer. The firmware target is T20.
A notable feature about the T20 is its elimination of the SD card slot. And no, it’s not an oversight. In fact, the T20 doesn’t even require an SD card. Instead, it boasts an onboard 512MB flash memory. This serves as a storage for what’s typically termed as “SD Content” where model images, audio files and radio backups are stored. That means you won’t need to purchase an SD card separately.
You can access the storage via the USB-C port: connect the cable while the radio is active, when prompted, select the USB Storage (SD) option.
While you likely won’t need to mess with firmware when the radio arrives, it’s certainly possible to flash EdgeTX firmware using one of the two methods described in my tutorial: https://oscarliang.com/flash-edgetx/
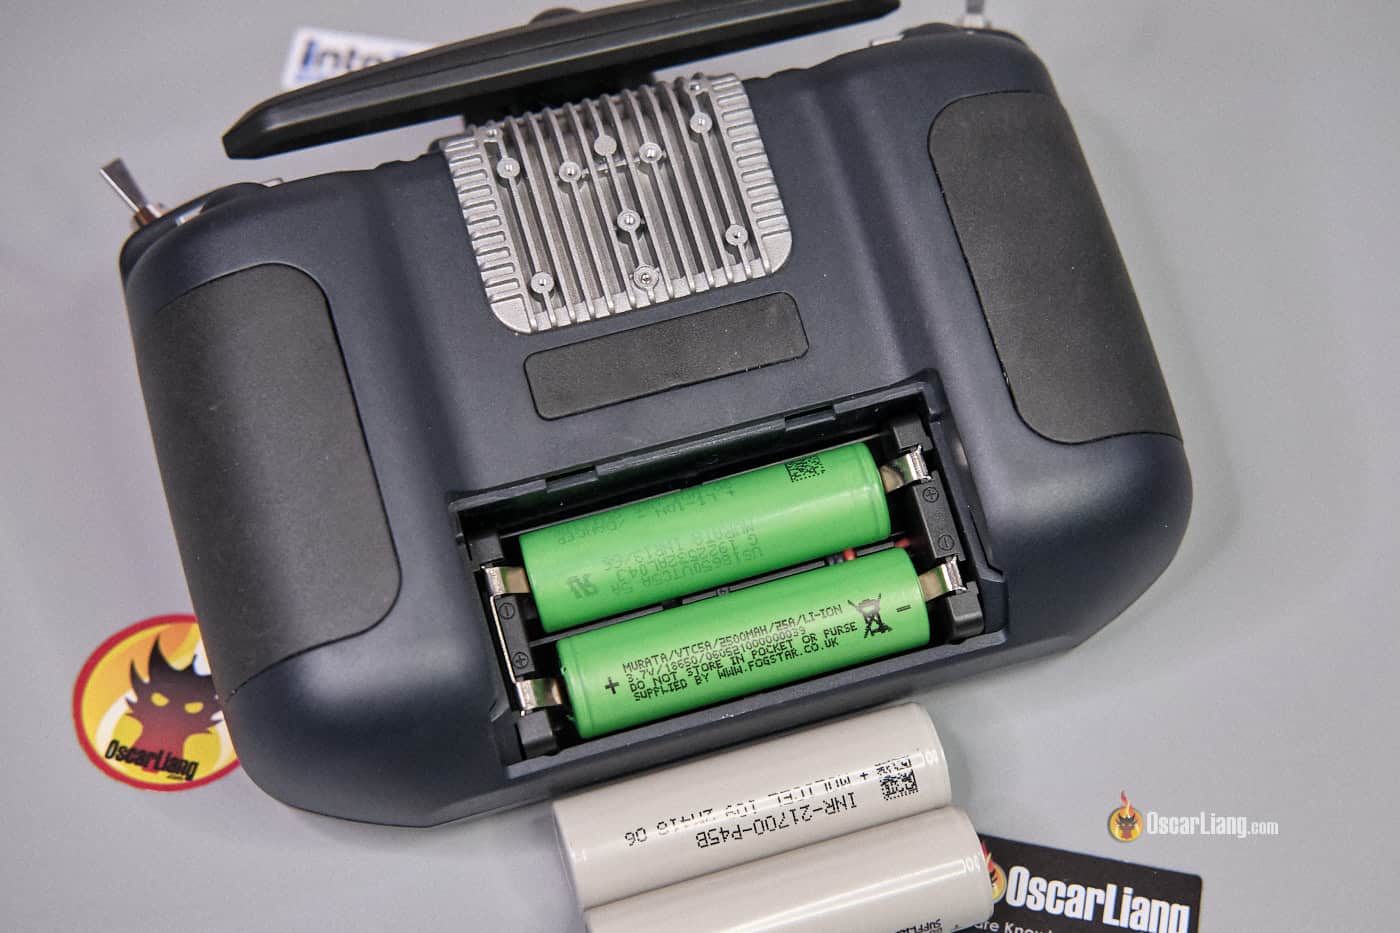
Battery
Choosing Batteries
The Jumper T20 is compatible with a 2S LiPo or two Li-ion 18650 or 21700 cells. Batteries are not included, and need to be purchased separately. Get them here:
21700 Li-ion cells:
- RDQ: https://oscarliang.com/product-njo4
- GetFPV: https://oscarliang.com/product-nnl6
- Amazon: https://amzn.to/3YJl15c
- AliExpress: https://s.click.aliexpress.com/e/_DCxHS4X
18650 Li-ion cells:
- Radiomaster: https://oscarliang.com/product-0239
- Amazon: https://amzn.to/2W93Uwp
- GetFPV: https://oscarliang.com/product-h1sg
- RDQ: https://oscarliang.com/product-1np7

For those using 21700, brace for a tight fit. It takes a firm push to close the battery bay lid.

You can use 18650 with this holder too, just pull the contacts outwards so they can hold the smaller 18650 cells securely. I personally prefer 18650 for its lightweight and weight balance, even if it trades off some battery longevity.
Power Consumption and Battery Life
Current draw varies depending on the RF power setting, here’s the measurements from my testing:
- 0.30A at 25mW
- 0.38A at 250mW
- 0.45A at 500mW
- 0.60A at 1W
Using 21700 4500mAh cells, you can expect around 14 hours of run time at 10mW, or approximately 7 hours at 1W. With the 18650 3000mAh cells, this drops to roughly 9 hours at 10mW or about 4.5 hours at 1W. Note: this is only a rough estimation.
To optimize battery life, you can utilize the Dynamic Power option available in the ExpressLRS LUA script. With Dynamic Power, the mW output adapts to the model’s range, signal strength and link quality, minimizing power consumption. This feature allows for as little as 10-25mW usage during unobstructed line-of-sight flights.
Charging
Apart from data connection, the USB-C port located on top is also used for battery charging.
One of the downsides of the T20 is its slow charging. PD chargers don’t seem to work properly, and it only support normal 5V chargers. Consequently, its charge rate is a modest 4W, dropping even lower as the battery nears full charge.
Estimated charging times are as follows:
- 21700 4500mah batteries: Approximately 9 hours
- 18650 3000mah batteries: Just under 6 hours
Playing Simulators
The Jumper T20 is plug and play with popular FPV simulators such as Tryp and Liftoff. When connected, it’s automatically recognized in the simulator and shows up as Radiomaster TX16S. While it’s the wrong name, it doesn’t affect usage, and the setup remains the same as all other mainstream remotes.
Tear Down
Disassembling the Jumper T-20 can be somewhat challenging, especially when compared to other remote controllers I recently reviewed. This could make self-repairs slightly daunting, but with a little patience, it’s entirely doable.
To start, gently pry out the rubber inserts on the back. Then, unscrew the 10 screws which hold the front and back housing together. Don’t forget to loosen the two top switches during this process.

Be cautious of the 3 ribbon cables connecting the front and back housing, which needs to be unplugged first before pulling the radio apart.


All the switches are connected to the mainboard using ribbon cables. This design choice simplifies any repair or replacements you might need to do down the road.

Output Power Testing
Here are the power measurements of the Jumper T-20’s internal module at different output power levels.
| Power Levels | 25mW | 50mW | 100mW | 250mW | 500mW | 1W |
| T20 Internal Module | 21mW | 67mW | 111mW | 300mW | 566mW | 1050mW |
These measurements were taken using the ImmersionRC Power meter V2 and demonstrate the accuracy of the factory calibration and whether the maximum output power meets expectations. It’s important to note that these measurements do not reflect the hardware quality, but rather the consistency and performance of the internal module
After running the T20 at its maximum 1W output power for 20 minutes, it settled around 880mW, slightly lower than the rated power. Nonetheless, this level of consistency is not bad for an internal module without active cooling.

The back heatsink does get hot after running for a while at high output power, so be careful.
How to Setup
I have a full guide explaining how I setup this radio, and hardware mods I did to make it better for me: https://oscarliang.com/setup-jumper-t20s-radio/
Conclusion
Overall design of the T20 is so far the best coming from Jumper. For a radio priced at a mere $110, the feature set and construction quality are truly remarkable. The Boxer, with its condensed full-size radio footprint, impressed many, but the T20 ups the ante by being even more compact, without any compromises on features or user comfort.
The T20 is by no mean the perfect radio, but it’s certainly moving in the right direction. It ticks many boxes for me: a compact form factor, full-size gimbals, a 1W ExpressLRS module, and a compelling price tag. It’s hits the perfect balance between cost, portability and features.
Get the T20 radio from these vendors:
- Banggood: https://oscarliang.com/product-enpo
- AliExpress: https://s.click.aliexpress.com/e/_DC2s3bZ
- NewBeeDrone: https://oscarliang.com/product-obg7
There are a few small drawbacks as mentioned throughout the review. Like the stiff latching switches, inability to stand upright, inconvenient gimbal adjustment, non-balanced neck strap, slower battery charging, lack of gimbal/switches protector, unnecessarily big antenna, and a few other quirks that could use some refinement. But, these minor inconveniences aren’t deal breakers.
T20 vs Pocket
Facing the choice between the T20 and Radiomaster’s newly unveiled Pocket?
In my opinion, they cater to different demographics. The T20, being a larger, heavier, pricier but feature-rich, contrasts starkly with the Pocket—a budget-friendly, basic radio with one of the most portable and light weight design. Personal preference weighs heavily here, but if one had to pick where weight and size aren’t the main consideration, the T20’s versatility tips the scale in its favor.
34 comments
from my email to the manufacturer: JumperRC,[email protected] ……..
Hello, ,what frequency does the Jumper T20 V2 915/868 MHZ transmit on? ,Are there versions for 915 MHz and 868 MHz? ,Or can the model be used on both frequencies without modifications?
Dear Jozef,,Wish you have a nice day.,915 version is available. No,only have single frequency.
Hello,
Is it possible to make both gimbals self-centered on this radio?
Yes.
I just get this radio, but there is not posibility to have both gimbals self centered. This plastic centering lever can be placed on the left or right gimbal, but I would need two of them to make both gimbals self centering.
…need to look for some parts on the internet
would like to relocate the top switches on the front, similar to the radiomaster boxer.
are there any available sockets on the mb so i can add new 2 position traditional switches ?
AFAIK, there’s no spare connectors for additional switches.
Hello Oscar!
Thank you for your job!
What about T20 V2?
From Russia with love!
Hey, thanks for a good a review. I’m really on the edge of buying this now.. Already have all my drones using crossfire. Is it possible to install the crossfire module into this rc or would you swap all the receivers with 2.4 or 915 elrs?
Not sure if you can install Crossfire in this radio, if possible it would require some clever DIY. I think it might be easier to replace the receivers, it’s a direct replacement anyway (ExpressLRS receiver connection and config are the same as crossfire)
On Banggood, they added a mod to allows you to add a crossfire nano as internal module with a change of the antenna housing both 2.4GHz and 900MHz
Really? that would be great!
Hi Oscar
Jumper sells a modified T-20 front panel.
The following three main improvements have been made
1. The rim around the gimbal is now out of the way, even for hybrid pincher users.
2. The hook position moves down and a 18650 battery can balance it.
3. The two 3-position switches on the front are now tilted further upward, out of the way even when wearing gloves.
An additional feature is a translucent ring around the gimbal that can be illuminated with LEDs from within.
See below for more detailed photos, etc. 052.jp/gpvp
thank you for providing this comparison and the linked japanese article. It was surprisingly difficult to find anybody comparing the T20 V1 vs T20 V2.
Hi Oscar, thank you for the great review. I’m considering choosing between 2.4GHz and 900MHz. If I go with 2.4GHz, I’m concerned about the lack of penetration. Do you think it would be possible to replace it with a spare 900MHz TX module and antenna from Jumper? They do sell them on AliExpress. This way, I could eventually have a 900MHz version without the extra module on the back. Thank you in advance.
They do offer the 868/915MHz version of the T20S, but the Gemini version only available in 2.4GHz at the moment. If you want the best penetration might as well just go straight to 900MHz.
Would you recommend the T20 over the Boxer? (I am going to get the AG01 gimballs no matter what, it will just take a bit more work to make it work in the T20.)
I am getting my first controller and drone (a Mobula 8), I want portability so both the T20 and the Boxer seem like a really good option.
I like the T20 for its form factor and features, but the Boxer has overall better quality control. It’s up to you and your priority. Can’t really go wrong with both.
Hello Folks
What case are you guys using for your Jumper T20s?
Placed an order for the Pocket for $65 but currenly OOS and not yet shipped. And I found the T20S for $85 at AliExpress. For just $20, I really should get the T20S..grrr
Interesting, why Jumper T20 with RDC90 sensor gimbals costs more than with hall sensors? What is so special about RDC90?
There made by Alps not some backsteet manufacturer.
Oscar,
Please take this comment as an individual that would love to see a tutorial on configuring at least one set of the 5-way trim switches to alternative uses.
Thanks a lot for such a deep review. Many many thanks. God bless you <3
Now it's time to set up :)
https://oscarliang.com/setup-jumper-t20s-radio/
Hello, Thanks for the review. Just FYI my controller came with a set of spare springs.
Nice review Oscar! I would like to know if it is possible to add two momentary switches at the top, where the black circles are located. Thanks.
I am not sure at this point. There are two unused connectors on the PCB and I wonder if they can be used for additional switches. Will have to check with Jumper to get more details on that. Maybe they will sell DIY kits for extra switches in the future, who knows.
Hello,
Many thanks for this article.
Still debating whether to buy it. Still have a QX7S, haha.
Have you seen Bruce’s (rcmodelreviews) speaker issue? How well is soldered the connector on yours?
Also you mentioned that yours is RDC90 version. Do the Hall version has adjustable gimbals (stick ends / height) ? Doesn’t seem so ? Initially I wanted the Hall gimbals but these adjustments could be useful.
No I haven’t seen his review, but I will check it out.
From the pictures, the Hall gimbals have the same brackets in the RDC90, so you should be able to move them to adjust stick travel. You can take a look at my guide to see how stick travel can be adjusted in a few more pictures: How to Setup Jumper T20S Radio | Upgrades, Tips and Tricks
It looks like all the pictures you show are the Jumper T20S with the RDC90 gimbals. Not the Hall gimbals.
Just curious. Thanks Donny
The version of Edge-TX is 2.10.0-selfbuild
It is displayed by pressing and holding the Enter key on the main screen and selecting About from the menu.
How do you find the trim buttons? I fly both multicoopters and planes and it seems a little messy yo use a 5 way joystick button for triming when flying planes
it does require a bit more attention at the beginning, so you are not trimming the wrong channel, but I got used to it now and it works just fine.
Ooh, this is the first transmitter in a hot sec that’s really intrigued me with its features at its price point. Really like how the heatsink has threaded holes where 3D printed parts or an external fan can be slapped on pretty easily. Might be the transmitter that’ll make me actually upgrade my hardware after years with ol’ reliable
Just what i was also thinking. Since theres a power port at the back 2s output. Putting in a small fan with a switch esp if using 1w power.