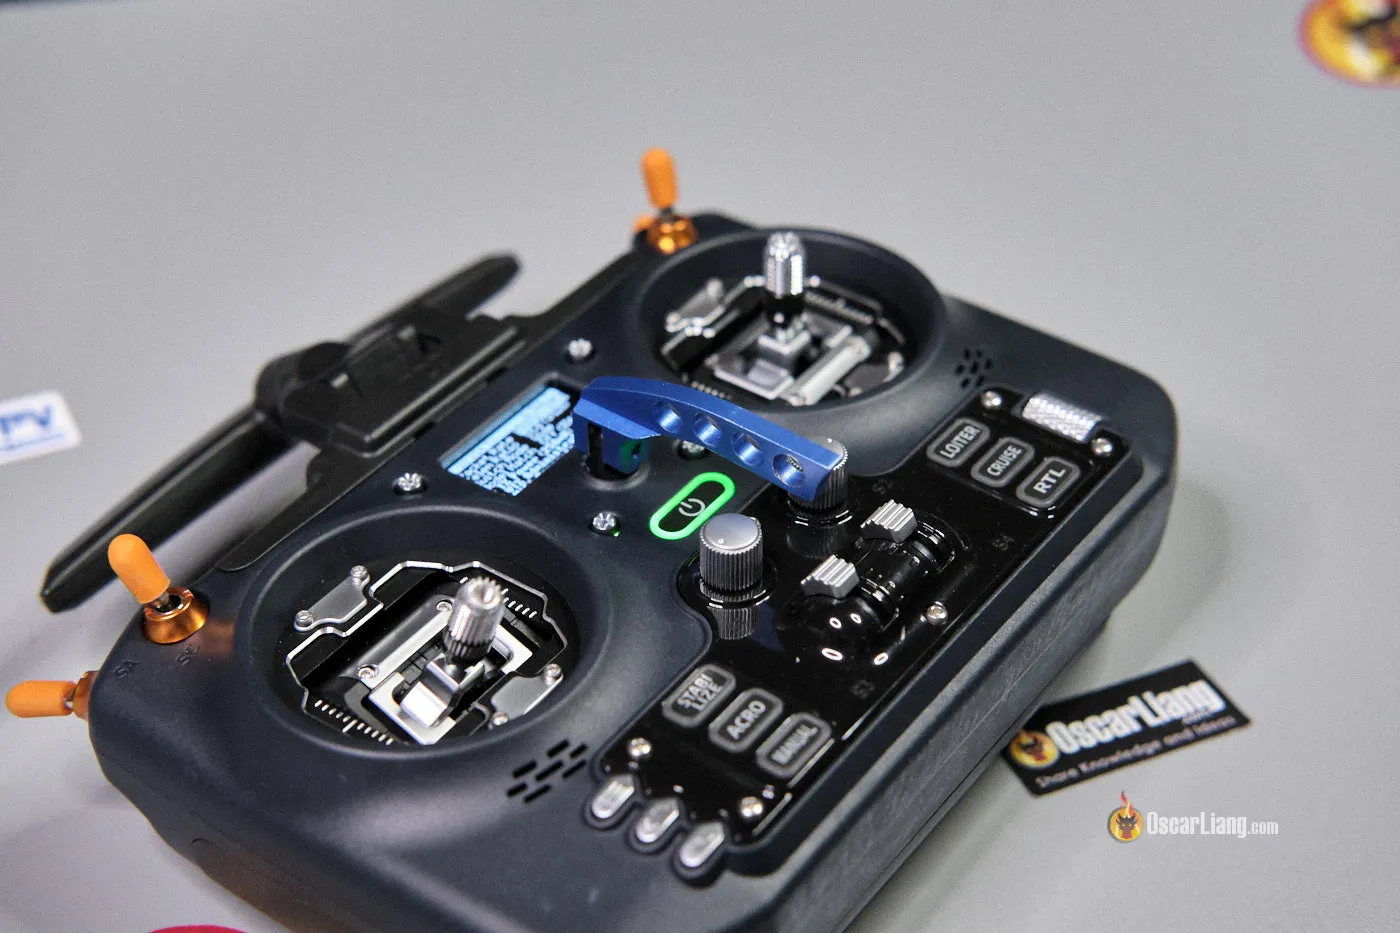
I will show you how to setup Jumper T20 / T20S radio transmitter for the first time, and get the most out of it. I’ll guide you step-by-step through setting up the EdgeTX radio and also show you some tips and tricks, and potential hardware upgrades to elevate your user experience.

Still wondering if the T20S is the ideal radio for you? Check out my in-depth review of the Jumper T20/T20S here: https://oscarliang.com/jumper-t20-radio/
Table of Contents
Installing Antenna
Ensure that the included antenna is attached before powering on the radio. Powering on the radio without the antenna can cause the RF chip to overheat quickly or even become damaged.
Remember, NEVER turn on the radio without antenna!
Battery Installation
The battery compartment is located on the back. To power up your Jumper T20S, you’ll need either two 18650 or 21700 Li-ion cells. Batteries are not included, but you can purchase them here:
21700 Li-ion cells:
- RDQ: https://oscarliang.com/product-njo4
- GetFPV: https://oscarliang.com/product-nnl6
- Amazon: https://amzn.to/3YJl15c
- AliExpress: https://s.click.aliexpress.com/e/_DCxHS4X
18650 Li-ion cells:
- Radiomaster: https://oscarliang.com/product-0239
- Amazon: https://amzn.to/2W93Uwp
- GetFPV: https://oscarliang.com/product-h1sg
- RDQ: https://oscarliang.com/product-1np7
With 21700, it’s a pretty tight fit and it takes a firm push to close the battery bay lid. 21700 cells have considerably larger capacity than 18650, so you should get longer battery life, however they are also heavier which can affect how the radio feels in your hands.

This battery holder is compatible with 18650 cells too, just pull the contacts outwards so they can hold the smaller 18650 batteries securely. I personally prefer 18650 for its lightweight and weight balance, even though run time is shorter.
Powering On Your Radio
To power on, press and hold the radio’s power button for a couple of seconds. You will be greeted by the EdgeTX splash screen.

Potential Start-up Warnings
Ideally, a brand new radio should turn on without any issues. However, if you are prompted by a warning, don’t panic. Here’s a breakdown of potential warnings and their quick fixes:
- Throttle Warning: This pops up if your throttle stick (the left one for Mode 2 radios) isn’t at its lowest position when powered on. Pushing it all the way down will get rid of this warning.
- Switch Warning (also known as Control Warning): This signals that some switches aren’t in their default positions. To clear this, ensure all switches are in their HIGH position
- Alarms Warning: This appears if the Sound mode is set to mute. If you configure this on purpose, you can press the Enter button (scroll wheel) to safely skip this warning, otherwise enable Sound again in Radio settings.
- SD Card Warning: This indicates a version mismatch between the SD card content and firmware. If you get this warning, follow this guide to fix it
Some of these warnings are just safety features that prevents accidental activation of functions like arming motors or retracting landing gear. It’s especially useful if you’re flying a fixed-wing aircraft or a multirotor where you want to ensure the radio powers on with the switches in safe positions.
If everything goes well, you should land on the radio’s default home page.

Home Screen Overview
On the main screen of your EdgeTX radio, you’ll see basic information like the model name, battery voltage, and trim positions.

For fixed-wing pilots, the trim switches are particularly important, and you can easily see how your trims are adjusted on the main screen. For multirotor pilots, trims are less critical, but it’s still good to know where to find this information.
Navigating the Menus
For radio settings, long press the top left button.
For model settings, short press the top left button.
Your radio will have page forward and page back buttons – on the T20S they are combined into one single button, short press to go to next page and long press to go back to the last page.
Radio Settings
The Radio Settings are where you’ll adjust your display, audio, system related parameters, and so forth.
Kick things off by holding down the menu button for a couple of seconds (the first button on the left of the control panel), this will take you to the TOOLS page. From there, short press the PAGE button twice (the second button on the left of the control panel) to scroll to the Radio Setup page.

I’ll walk you through the initial changes you might want to consider. Anything I skip over can be left default.
1. Set Date & Time. While setting the date and time is optional, it can be useful if you rely on your radio for logging flights. Unfortunately, the time tends to drift on most radios, and there’s no simple way to have it auto-sync. You can configure the time via GPS if your drone is equipped with telemetry, but it’s not always reliable. For the most part, manually setting the time works just fine for most users.
2. Battery Range:
- For Li-ion battery: 6.2V – 8.2V
- For Lipo battery: 7.4V – 8.2V
Why these ranges? This setting defines the battery indicator on-screen, specifically when it displays as full or empty. You might wonder about the minimum 6.2V for a 2S Li-ion, which can indeed be discharged even more. Yes, you can set it to 6.0V. However, having it a tad higher offers an earlier visual cue. As for the 8.2V max (instead of 8.4V), it’s due to voltage sag. The moment you power up, the battery’s voltage drops slightly. You will never see 8.4V on screen, so think of 8.2V as “fully charged.”
3. Sound:
- Mode: Opt for “All” to hear “beeps” when navigating the menu. Alternatively, if you find constant beeping annoying, setting it to “no key” will mute the beeps for navigation while still allowing critical alarms to sound.
4. Alarms:
-
- Battery low (threshold for audio and haptic warning, if you fly long range you might want to set this higher so you have enough battery to make your way home.)
- For Li-ion: 6.4V
- For Lipo: 7.4V
- Inactivity: 10 minutes (if the radio is left untouched for this duration, you will hear the “inactivity alarm” audio reminder). This reminds you if the radio has been left on without use.
- Shutdown Warning: Prevents you from turning off the radio if a receiver is still connected, helping avoid accidental shutdowns mid-flight.
- Battery low (threshold for audio and haptic warning, if you fly long range you might want to set this higher so you have enough battery to make your way home.)
5. Pwr On delay: 1s
This is the time it takes to hold down the power button to turn on the radio. Some users prefer to disable both Pwr On/Off delay for faster power-up times. Additionally, the power-on delay setting lets you control how long you need to press the power button before the radio turns on. This prevents accidental activation in your bag or during transport.
6. Pwr Off delay: 1s
This is the time it takes to hold down the power button to switch off the radio, this is a safety feature to avoid accidentally turning off the radio. I personally set it to 1s for faster shut down, but if you want to play safe you can set it longer.
7. USB mode: “Ask”. The USB mode setting controls how your radio behaves when connected to a computer. The Ask option is more flexible as it allows you to select what mode to use when plug in the USB cable.
8. Channel Order – the default channel order configures the order of the main controls for new models (throttle, yaw, pitch, roll). It’s best to set this to match your flight controller’s default settings (like Betaflight’s order).
9. Variometer and Haptic Feedback – If you’re flying gliders or need altitude feedback, you can configure the variometer options. This feature tells you how fast your model is climbing or descending. If you don’t need this feature, you can ignore it. The haptic feedback option allows the radio to vibrate in response to actions. You can enable this for alerts or button presses. While useful in noisy environments, some users might find it annoying, and it can easily be turned off.
10. Backlight and Contrast Settings (not available on the T20S). The backlight settings allow you to control when and how long the screen stays illuminated. This is particularly important for color touchscreen radios, as the screen can drain the battery faster.
- Mode: Choose whether the backlight responds to button presses, stick movements, or stays on permanently.
- Duration: Set the duration the backlight stays on after activation.
- Brightness and Contrast: Adjust these settings to make the screen comfortable to read in different lighting conditions.
11. Lastly, press the PAGE button a few times to go to the Hardware page, ensure the ADC Filter option is turned off (unticked). Why? See this section.
Understanding Channels
On your home screen, press the page button a few times should land you in the page that shows all the channel values. So what do channels mean?
When you move a stick on your radio, you’re sending a signal through what’s called a channel. Each channel can have a value from -100% to +100%, when it’s at center it’s 0%, and these values correspond to how far you’ve moved the stick or turned a knob. The EdgeTX system translates these values into signals that control your model.
For example, on a fixed-wing aircraft, one channel might control the ailerons, while another controls the throttle. By viewing the channel values on your radio’s screen, you can verify that your controls are working correctly. If something seems off, such as a stick not reaching its full range of motion, you might need to calibrate your gimbals or check your channel assignments.
Adjusting Stick Travel
One unique feature of the T20 is the ability to increase or decrease gimbal stick travel. More stick travel means more range of motion which leads to more precise control. But if you require quicker and more responsive control, a shorter stick travel might be preferred. Note that once you have changed your stick travel, you should re-calibrate your gimbals.
To adjust horizontal gimbal stick travel, simply remove the two screws circled in the following image, and push the metal bracket which limits how much you are allowed to have.

To adjust the vertical stick travel, remove the metal covers on the top and bottom of the gimbal, which reveals the screws that limit how far the stick can travel.

You should always re-calibrate your gimbals after adjusting stick travel.
Adjusting Stick Length
Adjusting stick length is a breeze by rotating the screw inside the stick end using a 1mm hex screwdriver.

Adjusting Gimbal Tension
To customize your control experience, the T20 allows you to adjust gimbal spring tension, but it requires tearing down the radio first. There are 10 screws to remove, and you also need to loosen the two top switches.

Carefully disconnect the ribbon cables before fully lifting the back housing.


Here’s a diagram showing where the gimbal tension screws are for roll, pitch, yaw and throttle.

Gimbal Calibration
Before flying with a new radio, you should always calibrate the gimbals.
Navigate to the Radio Setup page, then hit the PAGE button a few times till you land on the “HARDWARE” page. From there, select the “Calibration” option. This will initiate the calibration process for both the sticks and sliders. The on-screen instructions are clear, so just follow along.

Make sure you only move the sticks as shown in the following image. For best result, avoid moving the sticks in circle. Be as gentle as possible when pushing the sticks, so the radio reads the end points correctly.

Make sure you also move the sliders and rotary switches, set them to their middle position before calibration. You also need to calibrate the 6 flight mode buttons, they are actually treated as a slider in the radio. If your flight mode buttons are not working, chances are you haven’t calibrated them correctly yet.
Battery Voltage Calibration
To ensure you’re getting the most precise battery reading possible, take a moment to calibrate your radio’s battery voltage.
With a digital multimeter in hand, measure the voltage of the batteries inside your radio (while the radio is powered on). Given that the cells are connected in series, you should expect a reading between 6V to 8.4V. The goal is to make sure the measurement on your multimeter matches the one displayed on your radio.
Navigate to the “HARDWARE” page, scroll down until you find the “Batt. calib” (Battery Calibration) option. Using the scroll wheel, get the voltage as close to your earlier measurement as possible.

Flight Mode Button Setup
If you set up the S3 as a ‘multipos’ switch in hardware settings and calibrate it correctly (set ‘4’ as the center, then press 1, 2, 3, 4, 5, 6, 5, 4, 3, 2, 1 when moving the sticks/pots), new switches labeled S31, S32, S33, S34, S35 and S36 will appear. You can now use these as normal individual switches.
Flight Mode Buttons Labelling
The T20 comes with stickers for the flight mode buttons. If you fly iNav or ArduPilot, it’s a good idea to label all the buttons to help you remember what they do. This is optional.

Here’s mine.

Switch Covers and Custom Switch Nuts

Silicone Switch Covers:
- AliExpress: https://s.click.aliexpress.com/e/_DEeR767
- BG: https://oscarliang.com/product-7vcb
- RM: https://oscarliang.com/product-6tjc
Custom Switch Nuts:
- AliExpress: https://s.click.aliexpress.com/e/_DeSVnF9
- GetFPV: https://oscarliang.com/product-esfp
Stick End Upgrades

I felt the T20’s stock stick ends lack grip, so I upgraded mine to the Sticky360, you can get the M3 version for the T20 gimbals here:
- Radiomaster: https://oscarliang.com/product-xo4g
- GetFPV: https://oscarliang.com/product-kk4b
- RDQ: https://oscarliang.com/product-ih0l
- AliExpress: https://s.click.aliexpress.com/e/_DegTW2Z
Swapping Switches

I swapped the 2-position and 3-position switches, because I normally use the 2-position switches to arm and disarm, having them closer to the gimbal makes them easier to reach while flying.
Neck Strap Balancer
Due to the location of the battery bay, the T20S is bottom heavy and it won’t balance on the neck strap out of the box. An easy solution is to use a neck strap balancer.
I bought this one a few years back for the Taranis X9D, and it works perfectly on the T20 as well. Get it here:
- AliExpress: https://s.click.aliexpress.com/e/_DBBbrqb
- Amazon: https://amzn.to/2URPg8s
Model Profile
The T20 comes with a model profile pre-created for you, it’s just called “Model01”. To see the model selection, short press the menu button (top button on the left of the control panel).
While this model has some basic configurations, you need to assign switches in MIXES before you can fly.
To go to MIXES, short press the menu button, then press the PAGE button a few times until you are in MIXES. Go down to CH5, select Edit, and assign whichever switch you want to use for arming. Repeat for CH6, CH7 and CH8 if you wish to use more switches for other things like flight modes, turtle mode and beeper.
If you need help on how to assign switches, here’s my tutorial: https://oscarliang.com/betaflight-modes/#How-to-Setup-Arm-Switch
Here’s the end result of my radio MIXES setup:

More tutorials on ExpressLRS:
- For ExpressLRS receiver binding, follow this guider: https://oscarliang.com/bind-expresslrs-receivers/.
- If you’re using the multiprotocol CC2500 version, find setup details here: https://oscarliang.com/setup-tx16s-t16-radio/#model-settings
Creating a Profile for FPV Sims
Planning on practising in an FPV simulator? Consider creating a dedicated model profile for this purpose.
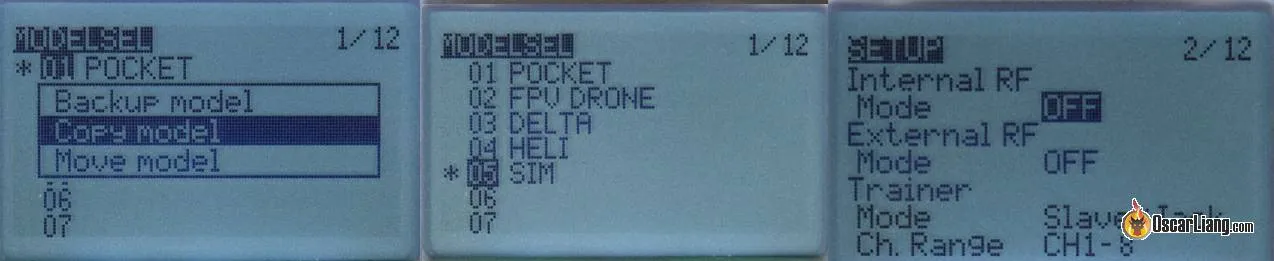
To do this, start with making a duplicate of your existing model profile for your drone. Then change its name to something else such as “FPV Sim” or just “Sim”.
In Model Setup, scroll down and switch both “Internal RF” and “External RF” to OFF. This will save battery life when you are playing FPV sim and prevents the internal RF modules from getting hot.
Customize Screen Widgets
If you’re using a radio with a color touchscreen, like the Radiomaster TX16S, you get more flexibility in how you display information. The main screen is fully configurable, allowing you to add widgets for things like battery voltage, RSSI, and even a graphical model of your drone or airplane.
Monochrome radios, like the Jumper T20S, still provide all the necessary information in a simpler format. You’ll see the same pages for stick positions, channel values, and other telemetry data, just in a text-based display instead of a graphical one.
Backup and Restore Radio
I recommend backing up your radio settings regularly (e.g. before firmware updates and whenever you make big changes). Fortunately, with EdgeTX, backing up and restoring your radio’s settings is simple and hassle-free.
Normally, EdgeTX radios use a micro SD card to store everything (aka SD card content), but the T20 has a onboard memory chip for this.
Follow instructions here to backup and restore your radio SD Card Content: https://oscarliang.com/backup-restore-models-radio-settings-edgetx/
Easy Volume Control
Your Jumper T20S is equipped with two rotary controls in the control panel (S1 and S2). They might not be useful for people flying multi-rotors, and we can turn them into a volume control. The trick is to create a function in the radio. You can either do this in “Special Functions” in the Model Setup, or “Global Functions” in the Radio Setup. I prefer to do this in Global functions because it applies to all model profiles, saving you the need to set them up individually for each profile.

- Navigating to Global Function: Hold down the Menu button, then a few taps of the “PAGE” button will take you to the “Global function” page.
- Creating Function: Find a empty slot and select “ON”.
- Setting Up Volume Control: In the 2nd parameter, select Volume, in the 3rd parameter, select the rotary control by moving it with your fingers, and finally enable it by ticking the box.
Updating EdgeTX
Backup your SD card first before updating EdgeTX.
1. Checking Firmware Version: Navigate to the system menu by heading to Radio settings => Versions. This step helps identify the version currently running on your radio and whether you need to update.
2. Using EdgeTX Buddy: This online tool is the most user-friendly method for updating the EdgeTX firmware. For a detailed step-by-step guide on using it, refer to: https://oscarliang.com/flash-edgetx/.
Updating Internal ExpressLRS Module
If you have the ExpressLRS (ELRS) version, updating the internal module is easy. The procedure is identical to the Zorro: https://oscarliang.com/update-zorro-elrs-firmware/. Here’s a summary of the steps:
- Connect the T20 to your computer using the top USB-C port. Opt for the “USB Serials (VCP)” mode.
- Download, install and run ExpressLRS Configurator program, choose “Jumper 2.4GHz” as the device category and select “Jumper AION T-20 2.4GHz TX” as the device.
- Build Options:
- Go with EdgeTXPassthrough as your flashing method.
- Set your regulatory domain. For instance, use ISM_2400 for FCC users.
- Enter your unique binding phrase
- If flashing via USB, click “Build & Flash”.

Tips and Tricks
Custom Sound Pack
Bored of the default voice prompts? Try custom sound packs. Amber Sound Pack, for instance, stands out with its superior sound quality.
Download: http://open-txu.org/home/version-2/v2-2-resources-2/
After downloading, extract the files and replace the originals in the SOUND/en folder on your SD card.
Playing Custom Sounds
Did you know you can play custom sound files, even your favorite tunes, on any EdgeTX radios? If you’re new to this, here’s a tutorial to create custom sound files for OpenTX radios, the same steps apply for EdgeTX: https://oscarliang.com/taranis-play-sound-track-mp3-files/
Filename limits: Ensure the filename is no more than 6 characters, with the file extension capped at 3 characters. Also, dodge any special symbols in the name. The ideal file format: 32000kHz Mono Wav.
Exploring the Tools Page
The Tools page on your EdgeTX radio is a collection of useful LUA scripts. One frequently used LUA script is ExpressLRS, which allows you to configure your ExpressLRS module.

Button Cell Battery Replacement

If your radio is constantly forgetting the date and time settings, it’s likely the button cell battery is dying. Look for a Lithium 3V CR1220 battery. Conveniently, you can get them online, for instance on Amazon (affiliate link): https://amzn.to/3yDyDBe
Upgrading to AG01 Gimbals
You can upgrade to the AG01 gimbals, here’s my step by step tutorial: https://oscarliang.com/install-ag01-t20s/
Switch Rockers and Knobs Upgrade


Purely aesthetic upgrades, but do look nice.
- AliExpress: https://s.click.aliexpress.com/e/_DlJZXBJ
- Banggood: https://oscarliang.com/product-7pbv
V2 Shell Upgrade
Here’s the V2 housing upgrade.

It features a slightly different design, particularly around the gimbals, with no more “recess.” It also includes a translucent plastic ring that adds a bit more depth, which is great for the LED ring mod. The housing is available in transparent and grey color options. I love the transparent version because you can see the LED lights through the housing.
Get the V2 Shell here:
- AliExpress: https://s.click.aliexpress.com/e/_DnpJk8z
- Banggood: https://oscarliang.com/product-r8sa

The same AG01 gimbal upgrade also works with this housing, but it requires an additional 2mm spacer: https://makerworld.com/en/models/520373#profileId-436766

I also added a couple of feet to the T20S so it can stand upright on the table: https://makerworld.com/en/models/156330#profileId-171256

Additionally, I installed a flexible handle on the back: https://www.thingiverse.com/thing:6229830
Finally, I added folding antenna supports. They’re kind of unnecessary but why not: https://www.thingiverse.com/thing:6286666/files
I printed all these parts in TPU, and they work great.

Not sure if you noticed, but I also moved the switches around, using only the top holes. The hole closest to the gimbal is a bit too close to the hand when pinching, and I sometimes hit the switch by mistake. So, I decided to move that switch further away. It took about a week to get used to this new switch location but it’s worth it.
Conclusion
We hope this guide has been helpful in setting up your Jumper T20/T20S radio. By mastering these settings, you’ll get the most out of your radio, ensuring better control, safety, and enjoyment while flying your RC models. I will be updating this guide if there are other useful mods and upgrades.
43 comments
Hi Oskar, thanks for this awesome page!!
But here’s my question since I swap from my Taranis to the jumper ts20 all my quads flip over to the front after I hit the throttle stick to the max and then put it back to zero. Even quotes which worked perfectly fine with my old radio have this issue now?…. Do you know if this could be an issue with this radio?
Thank you very much and keep being awesome..
Have you checked in the receiver tab in Betaflight that the channels are correct when you move the sticks ? Maybe the new radio has a different channel order? See this tutorial for detail: https://oscarliang.com/channel-map/
Is there any aux connector inside ? I need it to transmit telemetry by bluetooth.
I have occasionally bought external nano module adapter for Jumper T-Lite External nano module adapter for Jumper T-Lite which seems to be incompatible with Jumper T20. How can I rewire it to work on Jumper T20? Thanks!
Super page thanks Oscar. Just got one of these (T20 V2) so lots of tricks to try.
A couple of additional things that would be handy
– a diagram of the switches and the corresponding Open/EdgeTX codes that they show up as. Not rocket science to figure out but would be handy
– link to the LED mod where you mention it. Looks like fun.
Completely unrelated question for you or anyone else who would be up for answering it. If you have more than one radio and you want to be able to swap radios when flying quads, is there any particularly easy way to do so? As I’d understand you just have to go through and set up the model on each, and bind one after the other, to make sure they are configured and ready to go, then each time you want to swap radios you need to re-bind, which in the field on ELRS drones is probably most conveniently done by the plug-battery-in-3-times routine.
Am I missing anything? Cheers
LED mod – something like this: https://oscarliang.com/uruav-rocker-gimbal-backlight/. There’s no official LED mod yet, mostly just DIY.
When you say “swap radio” do you mean during flight, or between flights?
For ELRS, as long as you use the same bind phrase on the quad and radio, you don’t need to go through binding. You can change radio between flights as long as all your radios have the same bind phrase.
Thanks Oscar!
LED mod looks fun. I still have to do my “external module power cutout switch to stop battery drain” mod on the T-Lite first so that will have to wait :-)
For swapping radios, I meant for different flights, not during a flight (what new madness would that be :-) )
Good to hear if that works, will give it a try.
Oh and I’ve since realised my first suggestion was incredibly dense… Many of the switch names are actually lightly embossed (?) on the case.
Time to get some more lighting in the garage!
Though I noticed also that my T20 V2 case doesn’t have the SA – SD labels that are pictured on your T20 above.
Neck Strap Balancer
Hey Oscar, nice article as always. How to change the direction of the mount for the Neck Strap Balancer? Do I have to disassamble the circuit board?
Greetings
Initially I just turned it with a pair of pliers. It put so much stress on the plastic it actually turned a little white, like it was going to break :) While this was doable and saved me from taking the radio apart and removing the main PCB, it’s clearly not great for the housing plastic.
Does this radio support crossfire?
Yes it does.
Hi, how do you rotate hook in radio to mount this model of neck strap balancer?
There’s a nut inside the housing that you can loosen.
Thank you :D
Can you add the details of the wiring of the external module socket. I have the irx4 lite muti protocol that i would like to wired it to..
Hi oscar, I have not used this radio for two months, now the screen just blank no activity or light.. any ideas? it boot fine, theres edgetx booting sound and switch warning.
Do you know if EdgeTX is planning on updating the Jumper T20s to 2.9 anytime soon?
I am having issues with “Loading..” stuck with the expresslrs script.
You don’t happen to have a backup of the stock SD card contents? I accidentally deleted my backup.
Mine arrived this week and I have the same problem, did you find a solution?
Same here. Just flashed edgetx 2.10.1 on it with no change to the problem. Starting Lua-Script “ExpressLRS” starts loading. Flashes the question marks, erases them and stays at the loading screen.
Maybe someone can provide a whole SD-Card Image from the untouched factory fresh, working version?!
YES! Please! I’m having the same issue.
Can happen when there is no ELRS radio transmitter active. Go to page 2 in the model setup (upper left button, then middle left button) and see that Internal RF is not set to OFF.
Thank you for a great review! :) I just bought one. However, I wonder if the two (silver) “latching” buttons on the top can be modified to to be momentary switches instead? Do you know if it’s possible to just remove the latching function on those switches?
I am not entirely sure, but i don’t think it’s possible. Might need to replace them with real momentary switches.
I fixed it already, it’s not an “easy” thing, but doable… :) You have to dismantle the actual switch behind the physical button you press and remove the small “latch-wire” inside the actual switch…
Does it support ELRS backpack?
uP!
I have been very interested in the extra switch holes under the rubber bungs but I have yet to see any sign of anyone attempting to add any extra switches to the radio in those.
I was thinking it would probably be easier to effectively replace a couple of the pots with switches in those holes. I mean 6 pots is a little overkill!
How easy do you think this would be to do?
I want add more switches to I seen 2 connectors inside but they are on different board. Also mine RSlider its faulty and can’t calibrate. Radio looks solid and i like the form factor. 2 extra switches will make big difference to me. Its weird originally there are 8 switches unlocked in menu but only 4 are physical available.
Hi, i cant seem to find T20 in the edgetx dropdown list of radio, so does it mean i cant update the edgetx for now? thanks Oscar
EdgeTX Support for the T20/T20S isn’t in 2.9 yet, it’s coming in the next release 2.10.
For now you can just leave it on the stock firmware.
Great content – super useful, thank you for sharing. What size are the nuts you used for the switches?
I’m not 100% sure about the size, but they are the same one used on the TX16S/Taranis/T16/Boxer. They all use the same switch sizes.
Tried to update the elrs module to 3.3.0 via wifi and got this error: Targets Mismatch
Current target: JUMPER_AION_2400_T-PRO_TX.
Uploaded image: UNIFIED_ESP32_2400_TX.
Rechecked and rebuilt the firmware but the error persists. Is it ok to proceed or there’s something wrong?
And how did you get drivers for USB Serials (VCP) mod? Thanks
I flashed via USB so didn’t get that error, but I think it should be ok to proceed because the target is different in the new version. The old target was T-Pro but the new target is T20.
Regarding driver, You might need to install CP210x Driver (Download: https://www.silabs.com/developers/usb-to-uart-bridge-vcp-drivers). I tried standard windows driver as it comes with an installer, version 6.7.6 seems to work fine.
Hey Oscar,
I installed the drivers but still get only the COM5 Microsoft. Do you have any idea why would it be?
I have the same issue in Windows 11. Worked perfectly on Mac pro M1
Same, here only com 4 microsoft
Same for me, only COM4 available and fails to open it when i try to flash. Anyone got a solution?
Seems like drivers won’t install properly.
Hi Oscar… Always seem to find your reviews when researching new toys before purchase, thanks for the information. Just a thought, some of your readers (like me) are looking to confirm how hard it will be to convert from mode 2 to mode 1… Info on swapping ratchet and springs on the gimbals along with if the option is in the menus would be a fantastic addition to your reviews… Thank you
I haven’t tried changing it from mode 2 to mode 1 myself, and I have no plan of doing it as I don’t fly Mode 1. But just based on observation it should be possible. I think you just need to move the throttle friction bar over to the other gimbal, as well as moving the screw that disables the vertical gimbal spring.
Bagaimana cara upgrade Jumper T20 ke ELRS versi 3.3