
In this review we will check out the latest product from Fatshark – the Fatshark 101 Drone Training System. It’s basically a starter kit that comes with the quadcopter, FPV Goggles and radio transmitter, and it’s ready to fly out of the box.


The Fatshark 101 Starter Kit is available at GetFPV.com.
What’s Special about the Fatshark 101 Drone Training System?
To get into drone racing, you normally have to spend minimum $500-$1000 on parts and accessories even before you have a drone that can actually take off. Not to mention hours and hours of researching and studying trying to acquire all the required skills to build your first drone.
The “Fatshark 101 Drone Training System” is the solution from Fatshark! It’s developed specifically to address this problem and allow beginners to get into the hobby much more easily and cheaply.
Further Reading: How to get started in Racing Drones (parts, building, and flying)?

The whole kit only costs $250 and it includes everything you’ll need. There is no building or soldering required, the software even comes pre-configured so you can just take it out of the box and start flying.
In this review we will take a close look at the kit and see if it’s any good!
Unboxing and Specification
What’s included in the package:
- a micro drone (quadcopter)
- 2 LiPo batteries
- a radio transmitter
- a Fatshark Recon FPV Goggle
- 2 foldable racing gates for setting up a simple race track
- 2 spare propellers and motors

Apart from the hardware, each kit also comes with the following benefits:
- free access to the DRL (Drone Racing League) simulator (worth $20)
- three months of free Academy of Model Aeronautics membership + insurance (I think it’s only useful if you are living in the US?)
Close Look at the Parts
Table of Contents
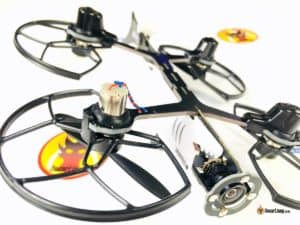
The Quadocpter – Shark Quad!
First of all, I love the humour from Fatshark! This quadcopter really made me laugh, it’s a darn Shark! LOL Perhaps a little too skinny but still it reflects the brand perfectly. I will call it “Shark Quad” in the rest of this review :)

The Shark Quad uses 8.5mm brushed motors (8520) powered by a 2S LiPo battery, therefore It’s bigger and more powerful than the popular Tiny Whoop. And the prop guards are effective protecting the propellers in crashes and they are also removable.

The FPV antenna and radio receiver antenna are both integrated in the “shark’s fins”, so they won’t get damaged in a crash, or by the spinning propellers. This is truly a clever design!

The FPV camera is a small CMOS camera and it’s well protected by the frame, Unfortunately it’s not possible to adjust the tilt angle, but for a beginner this isn’t necessary a bad thing.
However as your flying skill improves, you might begin to find this to be a limitation, because you need a higher tilt angle to see the horizon when going faster.
Update (Feb 05 2018) – Fatshark came back to me and told me although the camera cannot be tilted, you can tilt the motors up to 20 degree, that will give you the same effect as tilting your camera. (however you will have to trim your ACC for the hover position)

I find the electronics design really interesting in the Shark Quad, because they are built on a PCB that sits vertically rather than horizontally like in all other drones.

The shark canopy is sticked to the quad with double-sided tapes. Removing the canopy reveals the electronics: on the left, we have the VTX (video transmitter) and RX (radio receiver); on the right, we have the FC (flight controller).
The VTX on the quad only supports 16 channels across two bands: Fatshark and Raceband. But really, that’s more than enough for a beginner, it will also have the capacity to allow multiple people to fly together.


You might wonder how well this quad handles windy conditions.
It’s not going to be as powerful as a 5″ racing drone using 4S battery, but I got to say it’s pretty impressive given the small size and light weight.
I think Fatshark made a good choice of pairing 8.5mm brushed motors and 2S battery which provide just enough power to handle outdoor flights, yet it isn’t too powerful to cause serious damages when it crashes.

You can connect the Shark Quad to a computer using a micro USB cable, so you can change flight controller settings such as PID’s and rates using Betaflight Configurator.
FPV Goggles – Fatshark Recon
The FatShark Recon is a new box style FPV goggles with a LCD screen, and a built-in 5.8Ghz single video receiver that supports 32 channels with auto-search feature. It uses an SMA connector by the way.

The Goggle is powered by an 1S 18650 2500mAh Li-ion battery, rechargeable via USB port.


The Fatshark Recon Goggles weighs about 350g, and it’s comfortable to wear. The fit is nearly perfect for me, except the tiny bit of light leak around the nose support, but that’s no biggie at all.
The FOV on this thing feels similar to my Dominator V2 of 32 degree FOV, but it has 16:9 aspect ratio instead of 4:3. I didn’t need any eyesight correction lenses to see the screen clearly, although on my DomV2 I have to use -2 Diopters.
The Recon goggles accepts eyesight correction lenses if you wear glasses. The unit I reviewed actually came with a -6 diopter lens (which I don’t need), so please check with the reseller if there are other lens option available.

There is information displayed on the top of the screen showing you the channel you are using, RSSI (signal strength of your video), and your Goggle’s battery level.

The Recon goggle is not great, but okay. Screen brightness is a bit on the low side even being on 100%, the colour looks a bit blue-ish and cold. Resolution is acceptable.
The biggest downside for me is the lack of support for diversity and external module.
Fatshark, if you are listening, please at least support AV input so we can hook up an external video receiver to it with diversity capability! Of course, support for external module would be the best solution :) The built-in battery and convenient charging is also a great bonus on this goggle.
Further Reading: How to choose FPV Goggles?
There are only 3 buttons on the goggle, for changing channels, activate “Auto Search” feature, and adjusting brightness and contrast.

In case you are curious, this is how the goggle looks like when taken apart :)

Transmitter
This is a very simple radio transmitter (TX), no screen or telemetry feature, but it’s equipped with some nice full-sized gimbals and two 3-position switches.
![]()
It’s considerably smaller than other popular options on the market, such as the Taranis QX7S, yet it doesn’t feel bad at all in my hands.
![]()
The switch on the left is for selecting the flight mode, while the switch on the right is for arming the quad.
You don’t need to worry about binding, the TX is bound with the quad out of the box.
When I first saw the TX, I worried about the range of this thing because the antenna is hidden inside the plastic housing. According to Fatshark the range of the radio is only about 30 meters, so don’t try to push your luck and fly too far out with the Shark Quad. :)
Apparently, the TX uses Flysky protocol, so you can probably bind the quad to a more advanced Flysky transmitter such as the Flysky i6X or the Turnigy Evolution. However I don’t have one to test it out so I hope someone can confirm this.
The Transmitter uses 4x AA batteries.
![]()
I really think they should provide support for Frsky or Spketrum radios, because these are the most popular options in the drone racing hobby. This will allow us to upgrade the TX and still fly this quad.
Further Reading: How to choose a radio transmitter?
Batteries and Charging
The Shark Quad uses a 2S 260mAh 35C LiPo battery, and it can be changed using the USB charger that comes with the kit.

The battery is well protected in a removable holder. I get about 4 mins of flight time with the stock battery.
I wish Fatshark can either provide more batteries in the kit, or sell them separately. It’s annoying that you have to wait half an hour for the batteries to charge for only 8 mins of flying.
Update (Feb 05 2018) – Fatshark came back to me and told me they will start selling the batteries separately soon. Each battery kit will come with 2 batteries and 1 USB charger so you can charge multiple batteries at a time.


Beware that you can’t charge these LiPo batteries directly with a LiPo charger without some modifications. The battery connector is not the standard connectors we normally use on our quadcopters, it’s some weird 5mm pitch connector and there is no balance lead (it possibly has a built-in cell balancing circuit inside). Anyway it’s recommended to only use the charger provided.
Further Reading: Learn about the basics of LiPo batteries
Other Features
Here are the interesting features that I haven’t mentioned yet.
Low Battery Warning
You must be wondering, how do we monitor the voltage of the battery during flight if there is no OSD, or telemetry?
Well, when the battery on the quadcopter is low, the image from the camera will turn black and white. When this happens you are supposed to come back, land and replace the battery.
2-Year Warranty!
One thing I really like about Fatshark is their repair service. The kit comes with a 2-Year warranty, so if you break something, Fatshark might be able to fix it for you.
Free DRL Sim
The kit comes with a free copy of the DRL simulator. You can connect the TX directly to your computer and use it to control the drone in the sim for practice.
Flying Experience
The quad works as expected and it’s very intuitive to setup and operate, the manual explains how to get started in great detail so make sure to check it out.
Fatshark is also making a series of tutorials how you can get started with drone flying using the kit.
The quad gives you 3 flight modes: beginner, intermediate and advance. The stick sensitivity (rate) is very low in the beginner’s mode, and your quad is auto-leveled when you are not moving the sticks so it’s relatively easy to control.
Further Reading: Differences between auto-level and manual modes.
As you are getting more confident about flying, you can start to increase your rates to fly faster and more aggressively. Later on you can try intermediate and advance modes which will allow you do to flips and rolls with higher stick sensitivity.
I found the rates to be too slow for me personally even in the expert’s mode, so I had to adjust it in the Betaflight software. (Yes I am that good! :) hehe)
This is the Betaflight Configurator, where you can change all the settings in the quad. You can also find information about the flight controller, including:
- FC Board firmware target: FSFC
- Firmware version: 3.3.0 (Nov 30 2017)
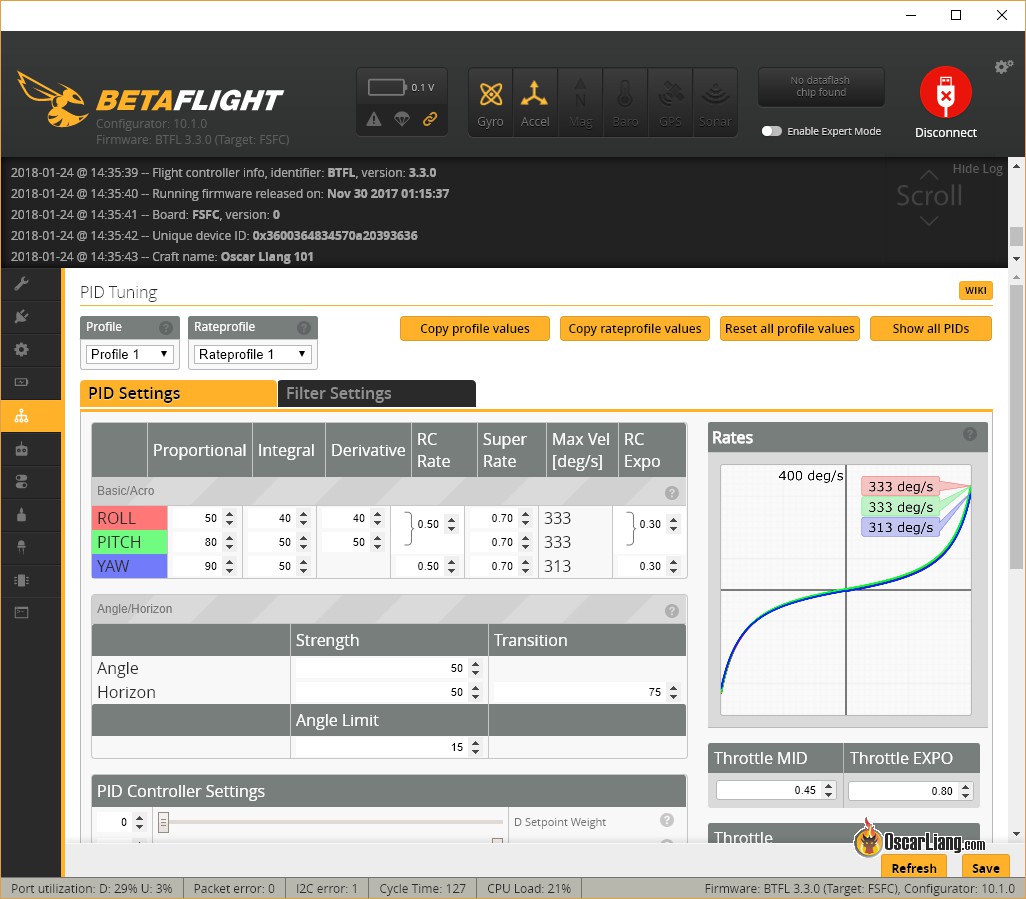
The first thing I recommend you to do is to enable “Motor Stop” in the configurator, so that the motors stops spinning when your throttle is all the way down. By default “Motor Stop” is disabled, and the motors spin even when your throttle is zero as long as the quad is armed. It’s natural to panic when you crash and forget where the Arm switch is, you can damage the motors if they keep spinning on the ground.
Pro’s and Con’s
I think a complete beginner can benefit from the Fatshark 101 Drone Training System, it allows you to get started with flying in no time, this is especially helpful for those who isn’t very good with technical stuff.
Anyway, there are upsides as well downsides with this product.
The good things:
- You can get started with flying cheaply at only $250 and it includes nearly everything you need
- It’s beginner friendly, it’s completely ready-to-fly out of the box: No soldering, assembling or configuration required
- Great quality hardware, and you get a warranty as well!
- The micro quad performs great indoor as well as outdoor given the small form factor
Things Fatshark should improve on:
- You can quickly grow out of this system – the goggles and radio transmitter can become redundant (because of the lack of features)
- The Recon FPV Goggle doesn’t support diversity, AV input or external receiver modules like the True-D or Laforge
The quad’s camera angle is not adjustable?The Motors can be tiltedFatshark should make spare batteries available for purchase, the only two packs from the kit is not enough (for me personally). Battery can only be charged via USB charger and it can take timeSeparate batteries will be onsale soon- Support for Frsky or Spektrum radios would be awesome!
6 comments
How do you tilt the motor? I have been looking everywhere for instructions on how you would do it but can’t find anything.
Love Reading ALL Your Material !!! Ive Learned A lot From Your Pages, When I Cant Find Drone Information, I Quickly Turn To Your Pages, Please Keep Up The FABULOUS WORK ! I For One GREATLY Appreciate It !!!
wow that was great , can you add more pic of the goggles main board?
Proprietary battery means…no go. Good effort, bad implementation. Regardless whether it uses common 8.5mm motors or a open flysky protocol.
Hey Oscar, great review!!
How would you mount that diopter lens that came with the Recon Goggles? Does it slot in like on other FS products, or so you have to take the goggles apart to put it in?
Thanks!
It’s a single piece of hard plastic optics that you insert into the goggle, no need to take it apart.
No, it’s not like the diopter slots in the other slimline FS goggles.